| |
| |||||||
 |
| | LinkBack | Thread Tools | Display Modes |
 12-16-2008, 03:50 PM
| #1 |
| Powered by Awesome   Join Date: Sep 2004 Location: Parker, Colorado
Posts: 3,622
|
I picked this up about a month ago. I have always liked this chassis since they first came out a LOOOONG time ago. All 3 TA-02, XC and CC-01 are awsome chassis that crawl amazingly well! So, here is what i started with: Tamiya Pajero Wide body metal top kit Full Bearings Integy 55 turn Lathe Motor Stock Pinion Tamiya 1.9 Hummer Rims RC4wd Rock Crushers - Turned out to be wayyyy too big - Now running BFG's JB - Weld to lock the diffs Traxxas Waterproof XL5 Traxxas Waterproof High Torque Servo Traxxas Slash water proof Reciever box Hitech 5645 converted into a servo Proline Roof Rack Proline Light Kit - Moddified to hold LED's Proline scale accesories Kit with the Jerry can, Cooler, Recovery kit and Winch a Bunch of spare Dark Drifter Led Kits Spectrum DX3 with reciver Interior modified from the Dale Ernheardt SS Silverado _ which turned out to be too small. Junfac front skid plate Junfac rear tire carrier I started by clearencing for the rock crushers - mistake 1 but i decided to wait for the Traxxas Summit to come out and am going to buy / convert the bolt on fender flares to finish her up! Im still playing with tire ideas. want a little bigger, but nothing crazy. I just installed the proline scale stuff and am working on the leds. i need to shorten the junfac tire mount - sticks out too far and am looking at custom metal winch bumpers front and rear. i am also installing a led for the license plate (gotta keep it legal). Hope to have the winch mounted and such by friday cause our comp is on Saturday for event 2 of the crawlerado scale series. Onto the pics. i know, some of them are crappy - followed by some really good wheelin pics! Last edited by TwistedXT; 12-16-2008 at 03:56 PM. |

|  |
| Sponsored Links | |
| | |
|
12-16-2008, 03:53 PM
| #2 |
| Powered by Awesome Join Date: Sep 2004 Location: Parker, Colorado
Posts: 3,622
|
Playin at Daniels Park in Castle Rock Colorado
|
|
| |
|
12-16-2008, 04:04 PM
| #3 |
| Rock Crawler Join Date: Aug 2007 Location: Dela-where?
Posts: 502
|
nice! that is a great lookin 'jero.
|
|
| |
|
12-16-2008, 04:23 PM
| #4 |
| Powered by Awesome Join Date: Sep 2004 Location: Parker, Colorado
Posts: 3,622
|
for the long ranging arguement on how to say Pajero: http://en.wikipedia.org/wiki/Pajero Pajero : Pa - hair - o` Last edited by TwistedXT; 12-16-2008 at 04:28 PM. |
|
| |
|
12-16-2008, 04:54 PM
| #5 |
| I wanna be Dave Join Date: Aug 2007 Location: santa monica
Posts: 3,687
|
that looks really good. I'm really starting to dig this body. I agree on ditching the flares though. It doesnt look bad imo but better with. I was going to do the same thing for the montero actually but chickened out at the last minute. I would consider using a smaller wheel and reducing some tires to keep at or under the 3.5" of the bfg's and still get good performance. I suggest the kawada cooper wheels. I have a set (about $20) and they're 1.5's. I have a tall tire on it now but if you reduced a standard tire, like a trail doc standard height or one of the new rc4wd tires that are 3.7-3.8" tall you'd end up with a tire that was 3.4"-ish tall. good performance and correct scale for that body. the kawada wheels look like this: (with XLs on it so its taller than it would be for you) 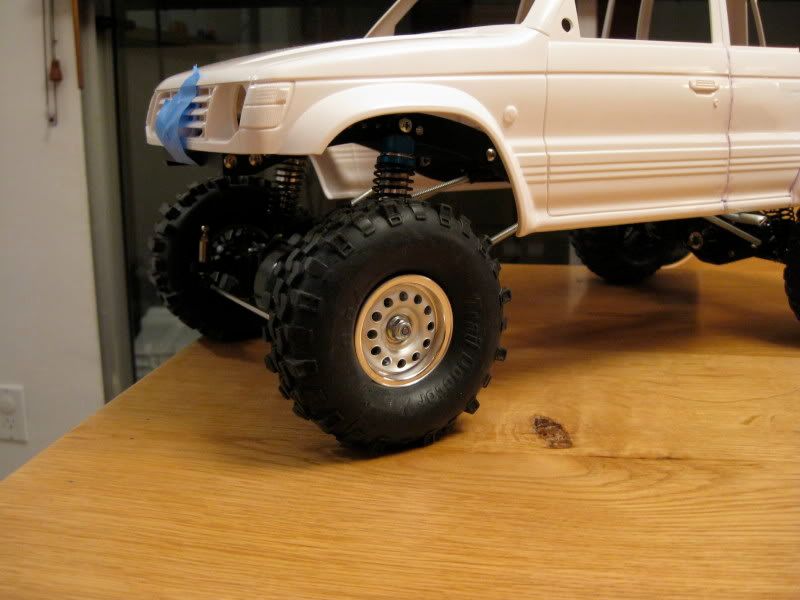 also you should consider cutting the bumpers off. I dig how aggressive it makes them look. Here's where I bought them http://us.rcmart.com/rc-mchassis-rim...l?cPath=35_898 and on ebay currently you can find them item # 350140827331 looking forward to seeing more!  |
|
| |
|
12-16-2008, 06:26 PM
| #6 |
| RCC Addict  Join Date: Dec 2007 Location: Chuck Chuck Chuckin Rocks.
Posts: 1,224
|
Nice lookin rig there buddy. Thank you for doing the editing. Sorry for posting wrong. JC Last edited by skid plate; 12-16-2008 at 06:31 PM. |
|
| |
|
12-17-2008, 09:17 AM
| #7 |
| Powered by Awesome Join Date: Sep 2004 Location: Parker, Colorado
Posts: 3,622
|
Ok, so, i dug into my personal stash of my left over leds for this project... Um yeah... there are currently 20 Led's on her.... 2 Front head lights 2 Front Fog lights 5 roof mounted offroad lights 2 rear roof mounted lights 4 rear led brake lights 4 undercarrage rock lights 1 license plate light im going to have to re-wire this to get my interior in here! i need ALOT more shrink wrap... this is just for this weekend.. then out come the wire cutters and the hot glue gun, heat gun, soldering iron and shrink wrap. I also added a flat black hood strip - aka.. a sole patch. i kinda like it! has a mopar / vehicross look to it. |
|
| |
|
12-17-2008, 09:32 AM
| #8 |
| RCC Addict Join Date: Jun 2008 Location: Monroe, NC
Posts: 1,547
|
Looks great. I liked it with the claws on it. Justin |
|
| |
|
12-17-2008, 01:31 PM
| #9 |
| Rock Stacker Join Date: Mar 2008 Location: Its a language (not mine) and a utensil all rolled into one messed up city.
Posts: 80
|
I dig CC-01 trucks, especially the "hard body" versions. Looks good. Makes me jelous |
|
| |
|
12-17-2008, 01:53 PM
| #10 |
| Pebble Pounder Join Date: Jul 2007 Location: SinCity
Posts: 126
| |
|
| |
|
12-23-2008, 12:34 PM
| #11 |
| Powered by Awesome Join Date: Sep 2004 Location: Parker, Colorado
Posts: 3,622
|
so, due to the holidays its kinda dead at work "knock on wood" so ive been getting busy on the Pajero body... I cut off the rear bumper just below where the factory mount is.. then i trimmed the front bumper down small enought where there is just a mount... here is where she stands soo far. |
|
| |
|
12-23-2008, 12:36 PM
| #12 |
| Powered by Awesome Join Date: Sep 2004 Location: Parker, Colorado
Posts: 3,622
|
this will raise the rear bumper up about 1/2 inch... which will help out alot! and the underside of the bumper will end up extending under the chassis and is 2 sheets of styrene thick.. making it twice as thick as the pajero body itself. i was going to use metal, but that last thing this needs is to be heavier.
|
|
| |
|
12-23-2008, 12:47 PM
| #13 |
| Newbie Join Date: Dec 2008 Location: Hastings
Posts: 12
|
I think you have done a very nice job on this truck so far! I really have always like the Pajero, A very capable little truck that is sometimes overlooked!
|
|
| |
|
12-23-2008, 03:59 PM
| #14 |
| Powered by Awesome Join Date: Sep 2004 Location: Parker, Colorado
Posts: 3,622
|
on a side note, on the Junfac spare tire carrier.. i had to shorten it by about 1/4-1/2 inch to suck the tire in closer. It stuck out WAY to far for crawling!
|
|
| |
|
12-23-2008, 04:57 PM
| #15 |
| Powered by Awesome Join Date: Sep 2004 Location: Parker, Colorado
Posts: 3,622
|
so i have been working on this all friggin day at work i am taking her home for some filler and to clean up the edges.. PICS! |
|
| |
|
12-24-2008, 09:00 AM
| #16 |
| Powered by Awesome Join Date: Sep 2004 Location: Parker, Colorado
Posts: 3,622
|
took the dremel to her last night! looks friggin killer in my opinion! |
|
| |
|
12-24-2008, 11:50 AM
| #17 |
| Oppan Gangnam Style  Join Date: Jun 2005 Location: Shingle Springs
Posts: 5,164
|
Great job on the styrene bumper! .... And holy s#!t!!!!  |
|
| |
|
12-24-2008, 02:41 PM
| #18 |
| RCC Addict  Join Date: Jan 2004 Location: Gunbarrel
Posts: 1,167
|
Looks good, I'm still up in the air if I want to get one of these. Ehh.. Who am I kidding, I want one just have to convince the wife that I need to get one. I was amazed at how well it performed last weekend. Good job on the bumper looks good. |
|
| |
|
12-24-2008, 11:40 PM
| #19 |
| Pebble Pounder Join Date: Jul 2007 Location: SinCity
Posts: 126
|
dam!!! don't forget the caution high voltage scale sticker!
|
|
| |
|
12-25-2008, 02:04 PM
| #20 |
| Newbie Join Date: Dec 2008 Location: Orlando
Posts: 3
|
Nice rig!! Love the LEDs!! I like the way you mounted the Proline lights... I was wondering where to put them. I'm still waiting on my Junfac stuff... been about a week.  |
|
| |
|
| |


 Linear Mode


