| |
 09-03-2010, 12:00 PM
| #1 |
| Pebble Pounder Join Date: Dec 2006 Location: Colorado Springs
Posts: 113
|
Ok so I have mad torque twist and my front upper 3 link mount keep pulling out so I decided to do some research on here. After some digging I figured I would just 4 link the rear with equal length uppers (because that's what I have) and just put the rear 3 link mount to the front. Well after making a new plate and all the back barely moves and has almost zero flex! Tell me what I did wrong! Here's pics....  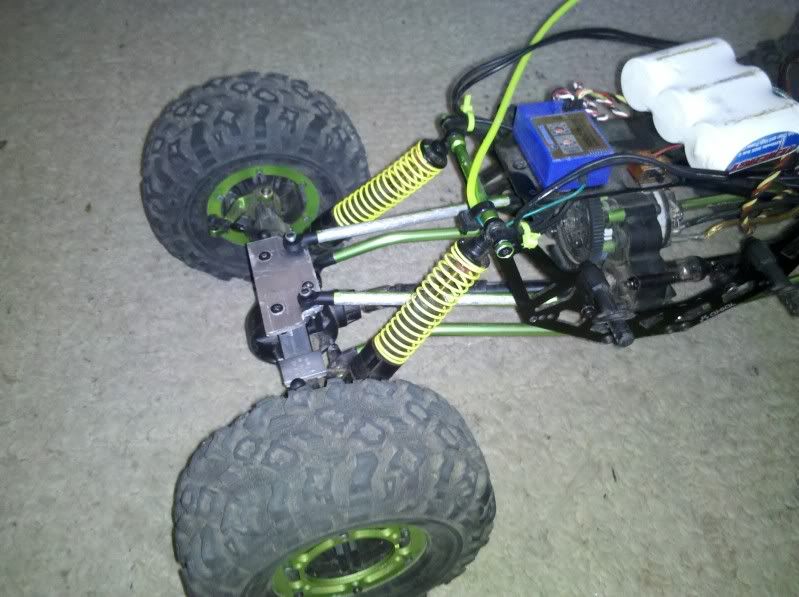  Nick |

|  |
| Sponsored Links | |
| | |
|
09-03-2010, 12:09 PM
| #2 |
| RCC Addict Join Date: Oct 2009 Location: San Francisco
Posts: 1,927
|
Check your rod ends aren't to tight up against the chassis or your plate, that will cause heinous binding issues  |
|
| |
|
09-03-2010, 12:12 PM
| #3 |
| Rock Crawler Join Date: Jan 2010 Location: Pacifica, CA.
Posts: 919
|
X2 the links need to be free to move and need to be under the plate. You can also do one side over and the other under. The best wat to reduce torque twist is to put a stiffer spring/spacer/pre-load or the left rear shock. |
|
| |
|
09-03-2010, 12:51 PM
| #4 |
| Pebble Pounder Join Date: Dec 2009 Location: Earth
Posts: 121
|
It looks like in your setup as one of the rear wheels rise the link end will bind on the 4 link plate on the side the wheel is going up. you can trim the plate or put a spacer in there to raise it up. This will give you the space you need. If you just cycle the suspension with your hands you should be able to see the spot it's binding in. Or you could do this... duuuuuuuude's F4 |
|
| |
|
09-03-2010, 02:44 PM
| #5 | |||
| Pebble Pounder Join Date: Dec 2006 Location: Colorado Springs
Posts: 113
| Quote:
Quote:
Quote:
see..... 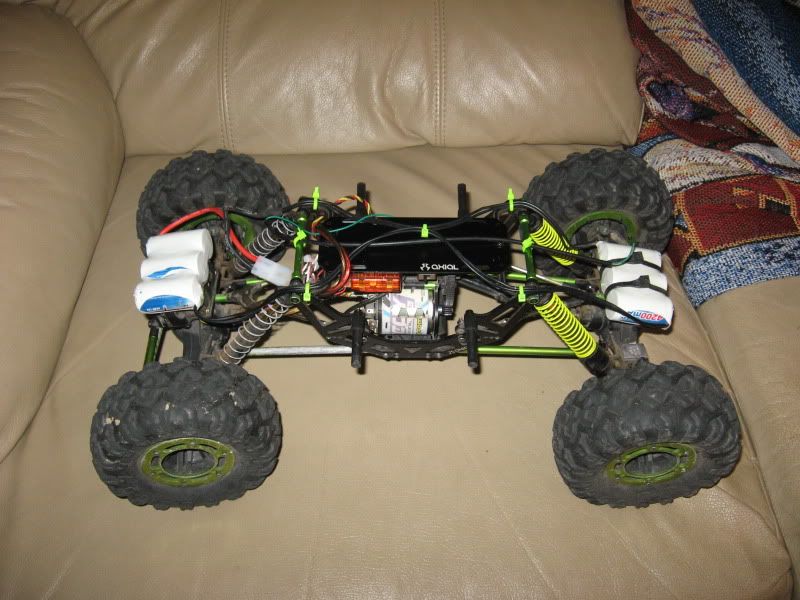 So I'll try moving the one side to the bottom but I don't think it's going to make much of a difference. Are my links too long? they are the stock (I assume) lowers..... Nick | |||
|
| |
|
09-03-2010, 02:48 PM
| #6 | |
| Pebble Pounder Join Date: Jan 2009 Location: Colorado Springs
Posts: 112
| Quote:
| |
|
| |
|
09-03-2010, 03:56 PM
| #7 |
| RCC Addict Join Date: May 2010 Location: So. Charleston. Wv
Posts: 1,221
|
my 3 link bar has popped out since i got the thing. i just put a washer on the axle side of the 3link and hasnt happend anymore since
|
|
| |
|
09-03-2010, 03:59 PM
| #8 |
| Rock Crawler  Join Date: Mar 2008 Location: ...in your meter box...
Posts: 616
| In this pic it looks as though you have little to no triangulation of your links. The first thing I would try is moving the axle end of your lower links to where your shocks are installed now, Then move the shock to the outside(closest to wheel) of the link mount. - |
|
| |
|
09-03-2010, 04:09 PM
| #9 | |
| RCC Addict Join Date: Jul 2009 Location: Ontherocks
Posts: 1,980
|
This is rmdesignworks diagram of the actual science...yes science of torque twist and fighting it properly. From his T&T thread in the Creeper section For thoes that say its as simple as adding a spacer and thicker oil in the left rear shock, its not. It is obtaining proper link geometry Quote:
| |
|
| |
|
09-03-2010, 05:10 PM
| #10 | |
| Suck it up!   Join Date: Mar 2008 Location: Arkansas
Posts: 11,652
| Quote:
| |
|
| |
|
09-03-2010, 09:33 PM
| #11 | |
| Pebble Pounder Join Date: Dec 2006 Location: Colorado Springs
Posts: 113
| Quote:
Ok I'll pull it all back apart tomorrow and try that. If that works I just have to figure out where to mount the other half of my battery.... Nick | |
|
| |
|
09-04-2010, 08:51 AM
| #12 | ||
| Quarry Creeper Join Date: Sep 2008 Location: Kuala Lumpur, Malaysia
Posts: 372
| Quote:
Quote:
Once you have done both of these changes, disconnect the shocks at the top so you can play with the axle in your hands and look for any binding in the links. Fix that and you should be good to go. Cheers. | ||
|
| |
|
09-04-2010, 06:34 PM
| #13 | |
| Pebble Pounder Join Date: Jan 2009 Location: Colorado Springs
Posts: 112
| Quote:
| |
|
| |
|
09-04-2010, 06:56 PM
| #14 | ||
| Suck it up! Join Date: Mar 2008 Location: Arkansas
Posts: 11,652
| Quote:
Quote:
The upper links are fine. The lowers need to be moved closer together at the skid to provide triangulation. Looking at the pics, the only other real issue I can see is that the upper links are possibly running out of room to move and contacting the plate. Try shimming them up a bit. Last edited by Duuuuuuuude; 09-04-2010 at 07:00 PM. | ||
|
| |
|
09-04-2010, 07:02 PM
| #15 | |
| I wanna be Dave Join Date: Dec 2009 Location: Lady Lake, Fl
Posts: 2,128
| Quote:
| |
|
| |
|
09-04-2010, 10:08 PM
| #16 |
| Shelf queen  Join Date: Aug 2008 Location: Internet
Posts: 5,857
|
It's definitely a combo of the equal length uppers and poor link geometry. You need to triangulate your links more. With the equal length uppers, and the near parallel link geometry you have, It simply cannot let the suspension articulate properly. The easiest way I can explain is liek this. Grab a shoe box from end to end and try and twist it. The eight fixed point resist the twist or in this case the articulation. |
|
| |
|
09-04-2010, 10:32 PM
| #17 | |
| Suck it up! Join Date: Mar 2008 Location: Arkansas
Posts: 11,652
| Quote:
There are some of us that run equal length uppers that are nearly parallel with the chassis. It DOES NOT hinder articulation.  | |
|
| |
|
09-05-2010, 12:53 AM
| #18 | |
| Shelf queen Join Date: Aug 2008 Location: Internet
Posts: 5,857
| Quote:
I used to run a CDW with straight uppers. In trhis case it's not the fact that he is running equal length uppers that are near parallel with the chassis. My concern is that nothing is triangulated. His lowers are near parallel to each other, as well as his upper's. Sure there are vball ends, but that type of link lengths combined with there placement, limits the amount of aritculation possible (in my head anyways.) when viewed from the eend, having all his links in a box shaped, just doesn't geometrically allow flex. Having links triangulated, gives the links a trapezoidal shape when viewed from the end, and this allows the links to pivot around a fulcrum, allowiing more possible articulation. When you cycle a double triangulated suspension, the axle pivots around the lowers at the chassis end, and around the uppers at the axle end. Having equal length links, parallel each other (upper and lower) will result in a pivot point near dead center of upper and lower links at both the chassis and axle end, and geometrically, it limits the amount of possible articulation. Did that rant make any sense He should just unbolt his shocks, and see how much it can flex by hand. | |
|
| |
|
09-05-2010, 06:04 AM
| #19 |
| RCC Addict Join Date: Jul 2009 Location: Ontherocks
Posts: 1,980
|
Heres how my truck is set up now. Notice how the uppers are just about parallel and slope upward from the chassis to my rear link plate. My lowers are as triangulated as they can be, without binding. I have near zero noticeable torque twist   |
|
| |
|
09-05-2010, 02:23 PM
| #20 |
| Rock Stacker Join Date: Aug 2010 Location: outside
Posts: 54
|
check the thread "squat anti squat" tons of susp geometry to make your head hurt. And heavier oil or stiffer spings to fix torque twist is for people for dont understand how their crawler works.
|
|
| |
 |
| |


 Linear Mode


