| |
 12-13-2007, 03:30 PM
| #1 |
| Rock Stacker Join Date: May 2007 Location: SoCal
Posts: 78
|
After recently installing a set of MSD RockSolid Top Gun beadlocks (which widen the truck as much as possible), I realized it was time to narrow the WK and make it more crawl-able. I removed about 5/8" from each side, for a total width reduction of about 1 1/4". First time around I used only CA glue and some strips of plastic to hold the rear case together together, and would have used epoxy had I not assembled the axle (for test-fitting purposes). Then on the front, I used the same method, but used epoxy that time since I knew everything would fit together. A coworker at the LHS was droppin my fully assembled truck when I wasn't there, and I hadn't yet told him that the rear axle was only being held together by CA... it broke. When I got home I removed all of the CA, and then this morning I picked up some fiberglass fabric. Here's the result, my 3rd attempt:  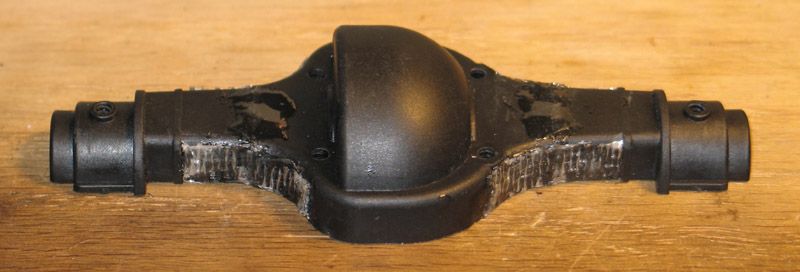 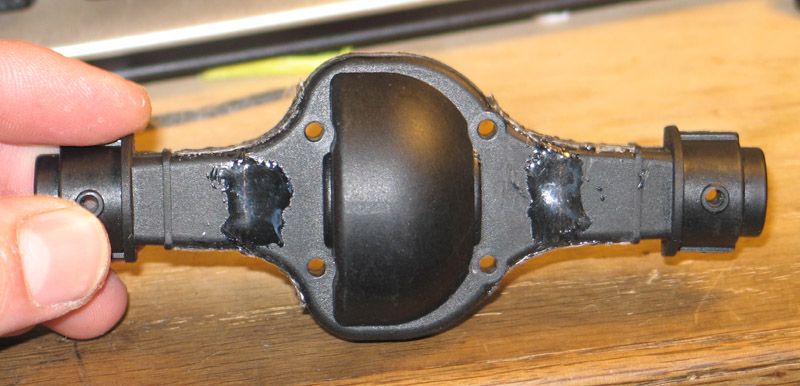 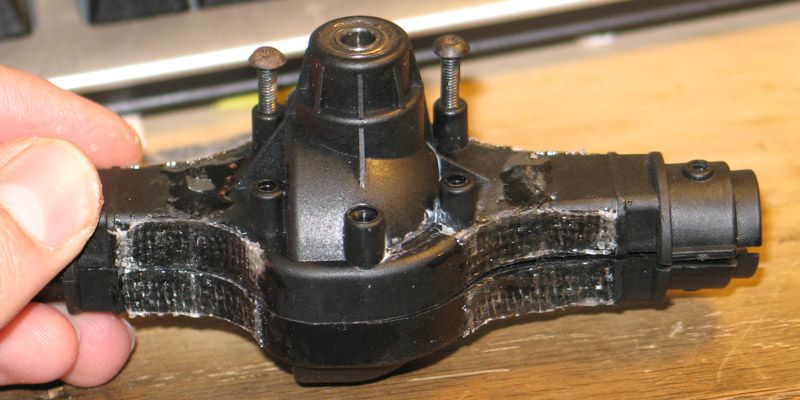 Please forgive the messiness, this was my first attempt at applying fiberglass, and I didn't vacuum bag it. That gap in the case is fine, it is very minor and goes away when the two halves are pushed together Also, since the axles are now narrower, I had to rework my lower links and shocks (the shocks are mounted on the lower links) as the lower links were pushed toward the center. My axle-mounted servo mount also had to be reworked. And that resulted in a BTA steering setup. More on that later in another thread. Last edited by MetalMan; 12-13-2007 at 05:20 PM. |

|  |
| Sponsored Links | |
| | |
|
12-13-2007, 03:37 PM
| #2 |
| Rock Crawler Join Date: Oct 2007 Location: richmond, va
Posts: 766
|
looks good, but you could have done it this way to, found it on this site: An idea I came up with to narrow the WK axles.... some may have seen me mention it in slobin3d's thread, I finally got some pics of it. On the left, stock Wheely King steering knuckle and parts. On the right is Nitro MT 1 parts. You can see how much difference there is in the length of the axle stubs. What's not as clear in the pic is that the NMT drive cup is quite a bit larger diameter (beefier). The Wheely King wheel stubs are the same as the REAR of the NMT1. The NMT front stubs are much narrower, and have a larger bearing to get the drive cup inward more. Here is the stubs with bearings on them: Part numbers: HPI A460 - NMT1 steering knuckle/C-hub parts tree HPI A548 - axle stub Bearings, one 5x11 and one 10x15 each per knuckle, I use Avid's NMT2 parts are similar to NMT1 parts, but not sure exactly the difference. I believe the NMT2 comes with CVD axles. The dogbone style drive cups are needed to work with the stock WK axle shafts (86813). The only pdf manual I have for a NMT2 is from the 18SS and it uses CVD's. In case anyone is interested: HPI 85076 - NMT2 steering knuckle/C-hub parts tree NMT hub on the left, WK on the right, you can see the width difference, and height difference: WK on the left again, NMT on the right, with hex installed: I'd guess about 3/8" difference in width for each side. The screws are completely different. WK on the left, NMT on the right, with the shoulder installed on the screw: The NMT screws are definitely too short, and the diameter of the collar is too small. The WK screws are much bigger where they screw into the knuckle. Drilling the NMT knuckle and threading in the WK screws should work perfect, but I didn't do so as the NMT parts are going back on the NMT!! The NMT hubs have plenty of material around the hole, they should hold up just fine after drilling. |
|
| |
|
12-13-2007, 04:42 PM
| #3 |
| SCALE PERFORMANCE PARTS   Join Date: Oct 2007 Location: Cedar Park
Posts: 5,453
|
I'm new to this and all but why narrow it? Anyway, I think you could have trimmed differently and had the outer housing slip into the center section (at least the top & bottom, the back side would need to be trimmed like you did). Looks like you could have made them slip into the center all the way to the screw posts and I think that would have given you more surface to glue, thus adding some strength. Don;t worry about the 'glass. Looks better than my jobs  |
|
| |
|
12-13-2007, 05:07 PM
| #4 | |
| Quarry Creeper Join Date: May 2007 Location: Tunin' Tires
Posts: 239
| Quote:
Not seeing any pics. | |
|
| |
|
12-13-2007, 05:19 PM
| #5 | ||
| Rock Stacker Join Date: May 2007 Location: SoCal
Posts: 78
| Quote:
Wheely King CXT In all honesty, I don't think that method is the one to go with. At most it will only narrow the width by 3/4", and my truck is now 1.25" narrower than stock, with total width (including M2K tire bulge) at 10.2". Quote:
.I'm not sure I understand what you mean by trimming the housing differently. | ||
|
| |
|
12-13-2007, 05:24 PM
| #6 |
| Rock Crawler Join Date: Oct 2007 Location: richmond, va
Posts: 766
|
both ways are good. your way would look better with some cleaning up of the seams, but being 13 option #2 is the easiyest way for me.
|
|
| |
|
12-13-2007, 05:26 PM
| #7 |
| Rock Crawler Join Date: Oct 2007 Location: richmond, va
Posts: 766
|
o yeah metalman, do you have any pics comparing the stock versus modifyed and what axle shafts are you going to use?
|
|
| |
|
12-13-2007, 05:31 PM
| #8 |
| Rock Stacker Join Date: May 2007 Location: SoCal
Posts: 78
|
My way could definitely look better if it were cleaned up (I only scraped away fiberglass/epoxy so it wouldn't interfere with anything else), but in all honesty, if I wanted it to look good I wouldn't have done it to a crawler :thumbsup:. I don't currently have any pics comparing the two (camera battery is charging), but I can get some. I cut down stock shafts and ground the ends to fit into the diffs for the rear, and cut down the CVDs for the front and ground those ends. |
|
| |
|
12-13-2007, 05:55 PM
| #9 |
| Rock Crawler Join Date: Oct 2007 Location: richmond, va
Posts: 766
|
cool, looking forward for the pics. |
|
| |
|
12-13-2007, 07:10 PM
| #10 |
| Picky Fab'r/Acetal Junky  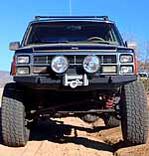 Join Date: Jul 2006 Location: Arizona Desert/AJ
Posts: 3,073
|
Yeah, hurry up man....I want to see pics of the finished axles under the truck |
|
| |
|
12-13-2007, 09:16 PM
| #11 |
| Rock Crawler  Join Date: Jan 2007 Location: Midway
Posts: 836
|
These are the best way to narrow the axle width for most people wanting to narrow a WK axle. See post 147 here http://www.rccrawler.com/forum/showt...440#post929440 Most guys are not going to cut the axles and housings. So they can get similar results using narrowing wheels. No need to cut anything and no mess. |
|
| |
|
12-13-2007, 10:24 PM
| #12 | |
| Rock Stacker Join Date: May 2007 Location: SoCal
Posts: 78
| Quote:
| |
|
| |
|
12-14-2007, 12:28 AM
| #13 |
| SCALE PERFORMANCE PARTS Join Date: Oct 2007 Location: Cedar Park
Posts: 5,453
|
So what I mean is that in looking at each housing half, there are 3 sides (for my demonstration)... top, back & bottom. So you leave more material than what you cut off the outer housing top & bottom and trim the center a little more on the top and bottom (looking down into it). I exaggerated the proportions to make the point but sorta like this:  The red parts (the back side) would still be flush, but the dark gray form the outer would slide into the inner light gray, giving you some more to glue to or maybe even slip a bolt into. Anyway, just my thoughts. I like it wide and that fiberglass will probably be fine. Last edited by Locked Up; 12-14-2007 at 12:30 AM. |
|
| |
|
12-14-2007, 06:40 AM
| #14 | |
| Picky Fab'r/Acetal Junky Join Date: Jul 2006 Location: Arizona Desert/AJ
Posts: 3,073
|
Well, if you'd done some research into what kind of offset the Rock Solids had before you went and bought them, you wouldn't have that problem now would ya....:-P Quote:
| |
|
| |
|
12-14-2007, 09:21 AM
| #15 | ||
| Rock Stacker Join Date: May 2007 Location: SoCal
Posts: 78
| Quote:
Quote:
| ||
|
| |
|
12-14-2007, 09:22 AM
| #16 |
| Newbie Join Date: Nov 2007 Location: Springfield MA
Posts: 42
|
Pretty neat way of narrowing these up. Sure beats buying a TLT axle set and blowing another hundred or so into it to beef it up for a scale build.
|
|
| |
|
12-14-2007, 07:25 PM
| #17 |
| I wanna be Dave  Join Date: Jan 2006 Location: Corruptifornia
Posts: 12,107
|
MetalMan, cool idea and keep us updated. |
|
| |
|
02-07-2008, 01:08 AM
| #18 |
| Rock Stacker Join Date: May 2007 Location: SoCal
Posts: 78
|
Here are the narrowed axles mounted up: King 4x4 (56K BEWARE) |
|
| |
 |
| |


 Linear Mode


