Go Back   RCCrawler Forums > RCCrawler Brand Specific Tech > Heritage Crawlers > Losi Micro-Rock Crawler
Loading

Notices

Thread: Anyone change the servo horn and linkage?

Reply
 
LinkBack Thread Tools Display Modes
Old 12-14-2010, 03:47 PM   #1
Rock Crawler
 
Join Date: Jun 2007
Location: Working in my dream RC workshop and remodeling my entire home.
Posts: 850
Default Anyone change the servo horn and linkage?

Just wondering how many of you have gotten rid of the stock set-up. I know maybe the stock servo won't hold up without the saver on there, but I'd like to get rid of the slop and get the thing to turn a little better when under load. I'm considering using the traxxas 2065 or a Hitec HS-65HB servo and making my own links. Just curious as to how this is working out for some of you and wouldn't mind some pics of your set-ups. Also what servo horn will fit the stock servo? I'm not sure what the teeth style are on the servo. Thanks in advance.....
MAXXMASHER is offline   Reply With Quote
Sponsored Links
Old 12-14-2010, 04:52 PM   #2
Pebble Pounder
 
Join Date: Nov 2008
Location: Littleton
Posts: 142
Default

Quote:
Originally Posted by MAXXMASHER View Post
Just wondering how many of you have gotten rid of the stock set-up. I know maybe the stock servo won't hold up without the saver on there, but I'd like to get rid of the slop and get the thing to turn a little better when under load. I'm considering using the traxxas 2065 or a Hitec HS-65HB servo and making my own links. Just curious as to how this is working out for some of you and wouldn't mind some pics of your set-ups. Also what servo horn will fit the stock servo? I'm not sure what the teeth style are on the servo. Thanks in advance.....
I can't get a good picture of mine to save my life. I use a Hitec HS65 with the servo horn that comes with it. I used some 2-56 threaded rod and the tiny ball ends that come in a package of mini-t plastic ball ends. then I used black heat shrink to cover the exposed rod. I did also end up drilling out the heads of the ball caps so I could get @ the hex screws for the ball studs.

Here's a link to my pics thread.

My first LMRC build. TMC.

The set up has yet to do anything it shouldn't. I have shaved some spots with a dremel to get maximum steering throw as well.
DSchulten88 is offline   Reply With Quote
Old 12-14-2010, 05:33 PM   #3
Quarry Creeper
 
Join Date: Oct 2010
Location: TX Coast
Posts: 196
Default

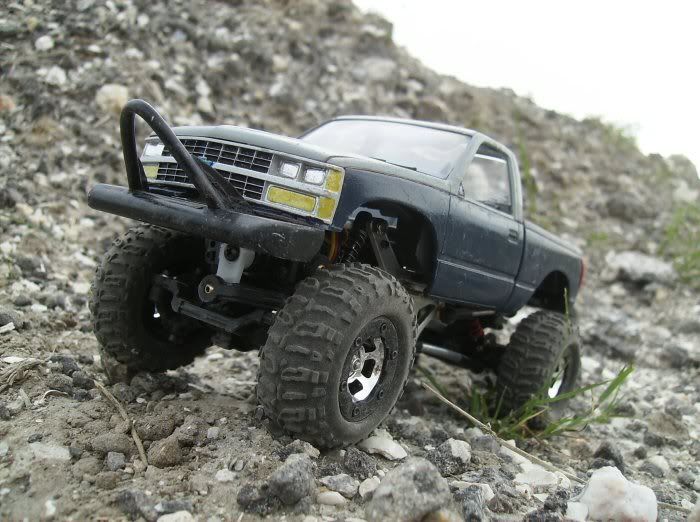
I replaced mine w/ a HiTech & just cut down one of the horns that came w/ it. I drilled it out a little, then threaded the stock ball into the horn. I've seen an aluminum replacement linkage on eBay for pretty cheap- thats my next step, I think.
Not the best pic, but its one I have handy:

Last edited by TexasJeff; 12-14-2010 at 05:35 PM.
TexasJeff is offline   Reply With Quote
Old 12-14-2010, 05:47 PM   #4
I wanna be Dave
 
Join Date: May 2007
Location: Taylors Falls just hanging with the MNRCRC crew.
Posts: 7,843
Default

Quote:
Originally Posted by DSchulten88 View Post
I can't get a good picture of mine to save my life. I use a Hitec HS65 with the servo horn that comes with it. I used some 2-56 threaded rod and the tiny ball ends that come in a package of mini-t plastic ball ends. then I used black heat shrink to cover the exposed rod. I did also end up drilling out the heads of the ball caps so I could get @ the hex screws for the ball studs.

Here's a link to my pics thread.

My first LMRC build. TMC.

The set up has yet to do anything it shouldn't. I have shaved some spots with a dremel to get maximum steering throw as well.
Wow this is a great responce, love your steering linkage, the entire rig looks great. Nice work DS
Stormin2u is offline   Reply With Quote
Old 12-14-2010, 07:44 PM   #5
Rock Crawler
 
Join Date: Jun 2007
Location: Working in my dream RC workshop and remodeling my entire home.
Posts: 850
Default

Quote:
Originally Posted by DSchulten88 View Post
I can't get a good picture of mine to save my life. I use a Hitec HS65 with the servo horn that comes with it. I used some 2-56 threaded rod and the tiny ball ends that come in a package of mini-t plastic ball ends. then I used black heat shrink to cover the exposed rod. I did also end up drilling out the heads of the ball caps so I could get @ the hex screws for the ball studs.

Here's a link to my pics thread.

My first LMRC build. TMC.

The set up has yet to do anything it shouldn't. I have shaved some spots with a dremel to get maximum steering throw as well.
Thanks a lot man! I'm half afraid to ever ask a question on this forum about anything, 'cause it seems like everytime someone does, they get chewed to pieces and told DO A SEARCH!! I couldn't find exactly what I wanted, but you answered me perfectly. Thanks. Nice rig!!
MAXXMASHER is offline   Reply With Quote
Old 12-15-2010, 08:38 AM   #6
RCC Addict
 
Join Date: Jun 2007
Location: MESA
Posts: 1,389
Default

You can get really custom on these. I tried a BTA and didn't like it. This one is just a piece of aluminum clearanced on the inside to miss the diff and a link with ball ends and all-thread.


DANALLY is offline   Reply With Quote
Old 12-15-2010, 12:42 PM   #7
Rock Crawler
 
Join Date: Feb 2009
Location: Milwaukee
Posts: 609
Default

Quote:
Originally Posted by DANALLY View Post
This one is just a piece of aluminum clearanced on the inside to miss the diff and a link with ball ends and all-thread.
I really like the looks of your design. Might have to "use it" in the future.
T-buck is offline   Reply With Quote
Old 12-15-2010, 01:37 PM   #8
Quarry Creeper
 
Join Date: Jul 2007
Location: Sierra Foothills
Posts: 201
Default Question

Since this is an interesting post going, does anybody know the size (or spline number) for the stock servo? I can't seem to find any aluminum horns that will fit the stock servo. Thanks Mick
stomper4x4.com is offline   Reply With Quote
Old 12-15-2010, 05:33 PM   #9
I wanna be Dave
 
Join Date: May 2007
Location: Taylors Falls just hanging with the MNRCRC crew.
Posts: 7,843
Default

Quote:
Originally Posted by DANALLY View Post
You can get really custom on these. I tried a BTA and didn't like it. This one is just a piece of aluminum clearanced on the inside to miss the diff and a link with ball ends and all-thread.

Nice set up I'm with T-Buck might have to try it.
Stormin2u is offline   Reply With Quote
Old 12-15-2010, 07:56 PM   #10
I wanna be Dave
 
Join Date: Feb 2007
Location: South FL
Posts: 3,349
Default

Quote:
Originally Posted by MAXXMASHER View Post
Thanks a lot man! I'm half afraid to ever ask a question on this forum about anything, 'cause it seems like everytime someone does, they get chewed to pieces and told DO A SEARCH!! I couldn't find exactly what I wanted, but you answered me perfectly. Thanks. Nice rig!!
Thats usually only when the question is common with an answer known to be in multiple threads.
most of the time it has to do with the same things over and over, for example Batteries/Lipos/chargers and brushless/outrunner motors
I always try to search using multiple keywords before i Post. if i cant find it Ill say "i tried searching with these keywords with no luck"
spoo76 is offline   Reply With Quote
Old 12-16-2010, 09:23 AM   #11
Rock Crawler
 
Join Date: Jun 2007
Location: Working in my dream RC workshop and remodeling my entire home.
Posts: 850
Default

I was going to get another servo arm but decided to just modify the stock set-up a bit. I had to keep the three pieces to be able to use them. What I came up with was to trim them up to get everything to fit tight without slipping as it was designed to do. I also added just a bit of CA glue to the pieces just to be sure. I got the peices on there tight on the servo (minus the spring) and had to use a different screw because with the trimmed material gone the stock screw was too long. Instead of using the normal piece of threaded rod and sleeve, I decided to get a little custom and put a "hydraulic assist" on there. I used a spare shock I had and extended the shaft all the way out. I then inserted the 2-56 threaded rod into the shock body with a nice coat of thick CA. The end of the rod is bent a little bit so it will clear the pumpkin when fully turned. I gave it a little paint for a more realistic look. If this holds up well on the truck, I will be doing the same thing to my other micro. Check it out....

I used the ball end on the bottom to allow clearance so the shaft doesn't hit the arm.


All rigged up


And the finishing touch.....

MAXXMASHER is offline   Reply With Quote
Reply


Posting Rules
You may not post new threads
You may not post replies
You may not post attachments
You may not edit your posts

BB code is On
Smilies are On
[IMG] code is On
HTML code is On
Trackbacks are On
Pingbacks are On
Refbacks are On


All times are GMT -6. The time now is 08:27 AM.


Powered by vBulletin® Version 3.8.7
Copyright ©2000 - 2024, vBulletin Solutions, Inc.
Content Relevant URLs by vBSEO ©2011, Crawlability, Inc.
Copyright 2004-2014 RCCrawler.com