| |
 01-13-2008, 09:16 PM
| #1 |
| RCC Addict Join Date: May 2006 Location: California
Posts: 1,361
|
I need help on how to repair and paint my hard body. I think i am supposed to wet sand it and fill in the scratches, then paint it. But what exactly is wet sanding? I searched for it but didnt find anything on how to do it. I guess i will need some sandable type filler to fill in the scratches. And what grit sand paper will i need? I read that i should go up in grits like start with about 200, then 400, then 600, etc.. Also on stripping paint from the body, easy off oven cleaner in the yellow container is the best right? I dont know lots on body work so if this needs to be moved to the newbie section then thats ok. Thanks. edit: I also found that some people use purple power to take the paint off the bodys. What do you like better, the easy off or purple power? Last edited by Norcal crawler; 01-13-2008 at 10:11 PM. |

|  |
| Sponsored Links | |
| | |
|
01-14-2008, 06:51 AM
| #2 |
| Rock Stacker Join Date: Jan 2008 Location: Roanoke, VA
Posts: 53
|
When you wet sand, you use very fine sand paper that is made to use wet. You can get it at most automotive paint stores, or you can use those Testor's wet/dry sanding films. The water keeps the dust down. Even though they are fine grit, you can still sand through the paint pretty easily. You want to use a light touch. |
|
| |
|
01-14-2008, 07:10 AM
| #3 | |
| Sinking with the ship   Join Date: Mar 2005 Location: El Capitan...sole survivor and sinking fast
Posts: 8,864
| Quote:
I personally use castrol super clean or purple power (same stuff), it works great on enamel paints, however, some other paints (I am thinking they are acrylic maybe?) it doesnt touch them and thats where the oven cleaner may work better. If all else fails, youll have to wet sand with some 1000 or 1200, using it went allows you to get the paint dust out of the paper as you sand. You basically dip it in, start sanding, and when the paint starts to build up on the paper dip it again to clean it off. Youll be able to sand with ease that way. Good luck -Mike | |
|
| |
|
01-14-2008, 09:26 AM
| #4 | |
| RCC Addict Join Date: May 2006 Location: California
Posts: 1,361
| Quote:
| |
|
| |
|
01-14-2008, 12:27 PM
| #5 | |
| Sinking with the ship Join Date: Mar 2005 Location: El Capitan...sole survivor and sinking fast
Posts: 8,864
| Quote:
Yeup, I like using the Tamiya putty, I have been using it for years. I tired regular car Bondo but it doesnt sand nearly as easily and nicely as the Tamiya stuff does. | |
|
| |
|
01-14-2008, 01:40 PM
| #6 |
| RCC Addict Join Date: Mar 2005 Location: Saginaw
Posts: 1,721
|
Squadron putty works great, too.
|
|
| |
|
01-14-2008, 01:56 PM
| #7 |
| Quarry Creeper Join Date: Jan 2008 Location: san jose
Posts: 293
|
I find that squadron and tamiya putty both love to shrink. I used some automotive putty I bought from Kragens. Its in a red/white tube. It fills in nicely and does not shrink as much as the tamiya or squadron.
|
|
| |
|
01-14-2008, 02:39 PM
| #8 |
| I joined the Band! Join Date: Oct 2006 Location: RcFanatics.net
Posts: 380
|
Id start with 1200 grit sand paper and work my way up to 2000. Just get a bucket of water, cut the sand paper up into 3x3 pieces (Thats what I do anyway) and let them soak in the water. Then start sanding away. Start with the hbeavy and work your way to the lighter stuff.
|
|
| |
|
01-14-2008, 04:27 PM
| #9 |
| I had the hottest girlfriend at the MSD Nats Join Date: Dec 2006 Location: Hecho en Tejas
Posts: 2,399
|
how deep scratches are we talking? filler primer can take care of smaller stuff. also have a small rag in the bucket and use it to have a constant flow of water while your sanding. squeeze the towel a little bit to let some water out above where youre sanding. if you can make a small "block" of styrene or something you wont dig little dips in the shape of fingers. |
|
| |
|
01-14-2008, 07:26 PM
| #10 | |
| RCC Addict Join Date: May 2006 Location: California
Posts: 1,361
| Quote:
| |
|
| |
|
01-14-2008, 10:02 PM
| #11 |
| Quarry Creeper Join Date: Jun 2004 Location: aurora, CO
Posts: 472
|
strip with what ever you want so you arnt sanding out details (just test a spot to make absalute sure it works no sense in ruining a good body if it dont work or you buy the wrong stuff) for the scratches if they get cought on a finger nail but it comes off easy then use a high build primer just a couple medium coats should do, sand off with wet 600 if your nail gets stuck in the scratch use a red air dry putty from a body shop or a glaze type filler the red stuff is hard to spread but is workable sand that down with a 320-400 dry or wet then prime the spot sand with 600 wet after your body is nice and primered and smooth with 600 you can lay down your base coat/clear coat or single stage if you do a single stage you may be able to get away with a wet 400 and a couple good amount of medium heavy coats to buff it out and get a nice shine use a 1000-1500-2000 in that order than get a hand glaze and work the surface for a good while for all your wet sanding needs make sure to listen to the paper it will sound smooth if it is clean, a nice cutting noise, if it squeks clean it out its got dirt in it that will scratch your paint make sure to wipe off all the water when you are wet sanding and check your progress, when you dont have any shiny spots left your surface should be flat and ready for the next step if you get a sponger with a hard back that should work well as a block, or you can go to the autobody shop and get a small block but most of the time i jsut use my fingers and try to keep even pressure any more questions? |
|
| |
|
01-14-2008, 10:46 PM
| #12 |
| RCC Addict Join Date: May 2006 Location: California
Posts: 1,361
|
Thanks, that is a lot of help. I do have another question though. the color of the body will be primer. Here is what i am trying to get it to look like. It has some dark spots, so how would i get that effect? I was thinking making a black base coat, and cover that with primer. then sand some of the primer to get the black so show through, or just leave it and let the rock rash do that. I am not too concerned with it being the best paint job ever because it is going to be run, not a shelf queen. I dont want to spend lots of time on it because it will just get scrathced up again. So what i was thinking was this. Take the paint off it, fill in most of the scratches with tamiya putty, and wet sand it a few times till the majority of them are gone, then paint. Any help on how i could paint it to match this effect? 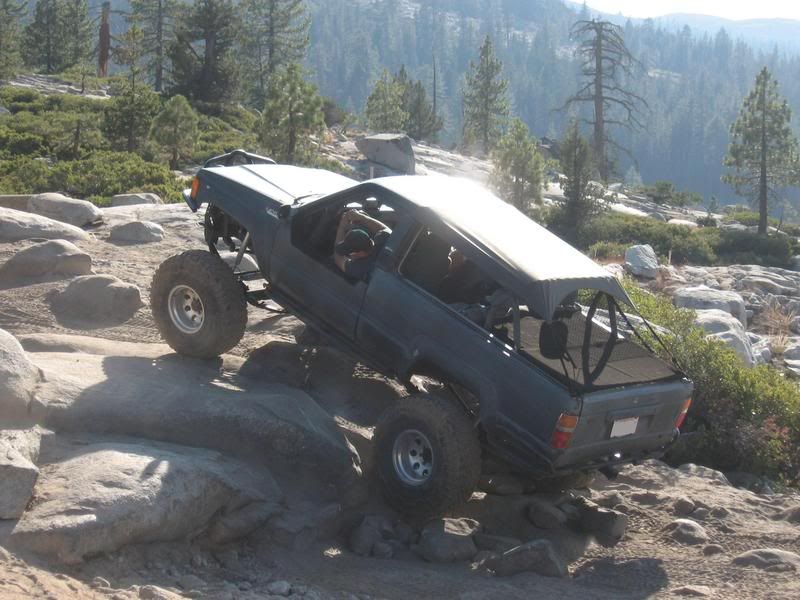 |
|
| |
|
01-16-2008, 04:42 PM
| #13 |
| Quarry Creeper Join Date: Jun 2004 Location: aurora, CO
Posts: 472
|
you couldput two diffrent layers and sand down some spots, what i would do is airbrush the spots in with a darker color... many ways to go about it sanding it down will give it an incomplete rat rod look, airbrushing will give it that "spray can" look |
|
| |
 |
| |


 Linear Mode


