| |
 06-14-2009, 01:33 PM
| #1 |
| RCC Addict Join Date: Jul 2008 Location: Sin City
Posts: 1,332
| LH2.0 Bully Axles install. Like so many things in RC, especially crawling, we make our own parts. Unlike every other version of RC, in crawling, most of the time its someone who see's something that can be improved and just goes for it on their own. I would venture to say 80% of the people on RCCrawler with vendor stars design and/or fabricate their own parts to sell. This is just one of those things that i love about crawling because the parts from the independent guys are almost always the most brutal overkill designed parts you can imagine. So everyone knows the problems the Bully's had with the first few versions of the stubs and shafts on the bully's. Most people who jumped on the Bully 1.0 (machined) have already been through a V1, V2, and V3 set. Aside from the stubs the Bully's are THE ultimate crawler axle. This isn't even up for debate. So Letshandleit put these two things together and came up with his own stub axles. Luckily i live across town from him so i got the first set, and yes, they are brutal and yes, you will be jealous. I took my rig over to his house today and we walked through the install so here goes. Three quick notes, 1) you will have to drill out your stock rc4wd hexes to accept the huge 5mm threads and 2) some of you will need a hammer and punch to get the stock pins out, some of them will come right out once you get the pink retainer off, it just depends on how worn in your axles are and 3) the kit comes with 2 new pins for the front but you can use the stock ones if yours arent to badly worn, if they are a dremel or file will be needed. Tools Needed: 3mm Hex to take your axles apart. 2mm Hex to take your knuckles off the front axle Pliers to pull the E-clips off the rear axle shafts and reinstall them onto the new ones Drill with 13/64 (or .201) size bit. (Drill press optional, hand drill is fine if you have even a halfway steady hand) 2mm Punch (or a nail or anything that you have handy really, the 2mm hex driver can do this also) Small hammer (or some other blunt hitting object) First off, here is what comes in the kit. 2 new stubs, 2 straight axle shafts, 2 new pins, 4 new 5mm wheel nuts. 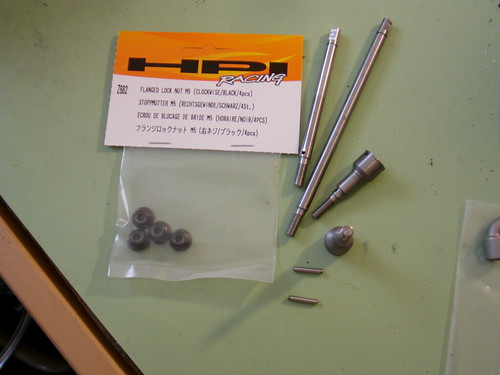 BEEFCAKE! Check this out, huge threads and 4340 Chromoly?! I'm tempted to throw my rig off a roof onto the wheels just to see if the knuckle will break before these do. (if i do i will video it and post it) 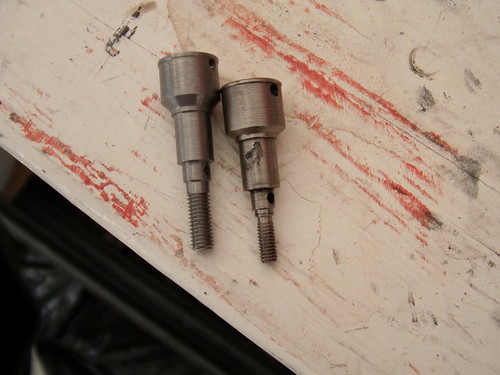 Go ahead and drill out all 4 hexes. We had a little benchtop press but a hand drill would work just as well. The drill bit size is 13/64 or (.201).  Continued... Last edited by Culetto; 06-14-2009 at 01:43 PM. |

|  |
| Sponsored Links | |
| | |
|
06-14-2009, 01:34 PM
| #2 |
| RCC Addict Join Date: Jul 2008 Location: Sin City
Posts: 1,332
|
The rear axles are very straightforward. Just take out the old ones and put in the new ones with the drilled out hex. Nothing fancy, just remember to put your e-clips back on the inside of the axle shaft before you bolt it all back together (you would be amazed how many times i have forgotten this and the whole axles slides out New LH2.0 axles installed. Old V3 on the left. Beefy! 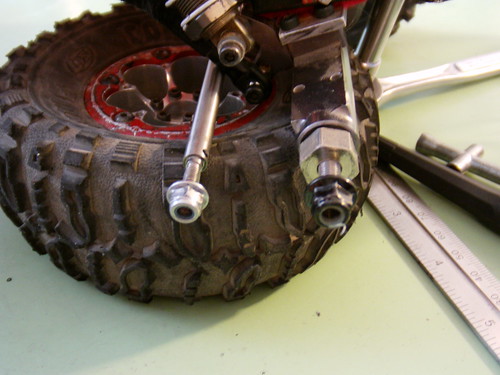 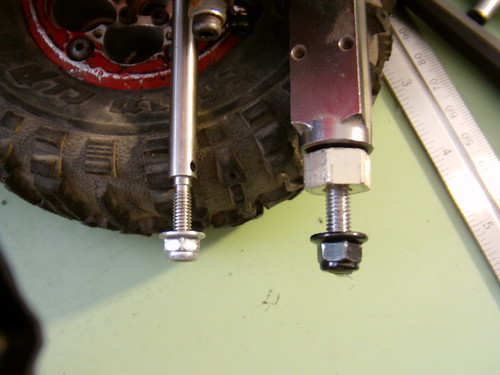 Bonus shot so you can see how nice the new m5 locknuts fit. 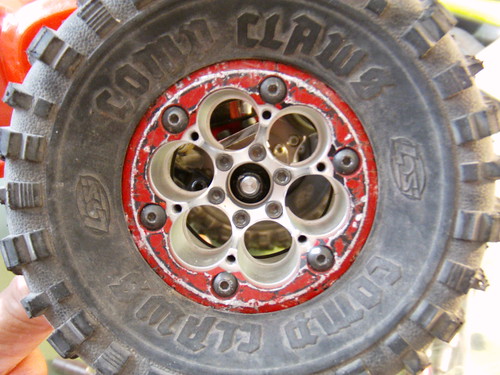 |
|
| |
|
06-14-2009, 01:34 PM
| #3 |
| RCC Addict Join Date: Jul 2008 Location: Sin City
Posts: 1,332
|
Ok now to the fronts. These are a little more involved because you have to put the new stub on the original inner axle. The RC4WD guys did an amazing job designing this axle with huge inner shafts. But for all that beef we will add the stubs to match them. Remove both knuckles and take the axles out. If your axles are used the pink retaining ring should slide right off. Fresh from RC4WD they are pressed in and could be tough to get off. You can put them in the freezer for an hour or so if yours are totally stuck on there. Once you have the retainer off you will need to push the pin out. This may or may not require a hammer with a punch or you might be able to push them out with a small allen wrench. It will depend on how worn in your axles are and what version you have.  Once you have the pin out you can remove the old stub and put the new one in place. Make sure you line up the holes with the pivot in the middle before you tap the pin back into place. We used the punch for this and then set the pin in tapping lightly with a hammer. 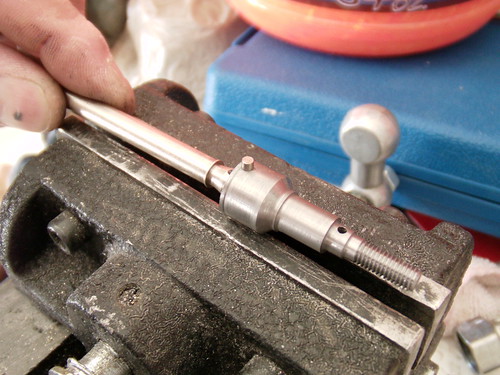 This is the main step so let me add some notes here. 1)If you reuse your stock pins that's fine (I did). The new ones are included in case yours are worn and too loose. The ones that are included have a small rounding at one end to make them easier to get started, once you have the flat end flush with the stub the rounded end will have to be ground off smooth with the stub (only 1mm), a dremel would be fastest but a file will make sure you dont over do it. 2)Also the new LH2.0 stubs are machined to very tight tolerances and can feel like a very snug fit, this is normal and they wear in after 10 minutes or so of running. Some silicone lubricant can assist this process. Again this will all depend more on how much you love your bully's (read: drive your rig). The before and after shot! 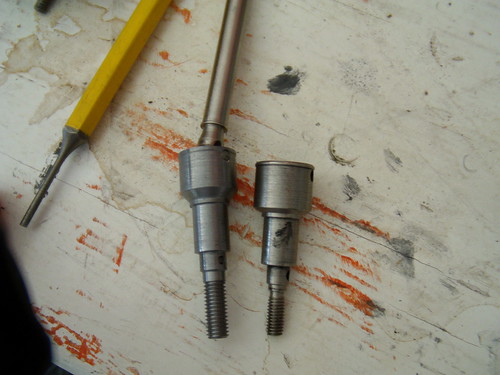 This is my favorite comparison shot i took today. Notice the BEEF. The threading is also 3mm longer to make sure that you can use any wheel you like and still get plenty of bite on the nut. 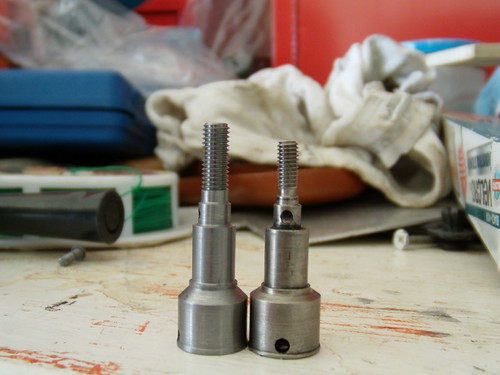 So thats all there is to it. If you have any questions please post up and i will do my best to answer them. And if this just seems to much (not everyone has the tools or time, its understandable) you can contact Letshandleit via PM and if you ship the axles he will install them for you for no additional charge (You will have to pay the shipping both ways though). Last edited by Culetto; 06-14-2009 at 01:41 PM. |
|
| |
|
06-14-2009, 01:38 PM
| #4 |
| I wanna be Dave Join Date: Sep 2008 Location: behind the wheel of a monster truck...
Posts: 2,878
|
Awesome tech thread Culetto!!!  Very informative and in definate need of a sticky!! Very informative and in definate need of a sticky!!
|
|
| |
|
06-14-2009, 02:34 PM
| #5 |
| Quarry Creeper Join Date: Dec 2008 Location: Aurora Colorado
Posts: 346
|
So where do I pick up the parts to do the conversion?
|
|
| |
|
06-14-2009, 03:10 PM
| #6 | |
| RC Axle Master   Join Date: Mar 2008 Location: Las Vegas
Posts: 517
| Quote:
Thank you Culetto for the very nice install post and the support. | |
|
| |
|
06-14-2009, 05:54 PM
| #8 |
| I wanna be Dave Join Date: Jan 2009 Location: laying low
Posts: 2,508
|
4340 and that 5mm thread=drooooooool!!!! I'm getting some of these babies! Great work gents Nice shafts and nice tech.... |
|
| |
|
06-14-2009, 09:11 PM
| #9 |
| I wanna be Dave Join Date: Jan 2006 Location: Henderson/Las Vegas, NV
Posts: 5,032
|
awesome tech thread guys, ive seen the things in person and they are disgusting, you'll break a tube off the case before breaking a stub now. can't wait til we get the berg ones done, hehehe...
|
|
| |
|
06-14-2009, 10:08 PM
| #10 |
| Pebble Pounder Join Date: Feb 2005 Location: The Aloha State....Aurite!
Posts: 123
|
SWEET!!!!...........saving up my pennies for a set Awesome tech thread |
|
| |
|
06-16-2009, 04:48 PM
| #11 |
| Quarry Creeper Join Date: Jan 2007 Location: L.I.
Posts: 317
|
So let me get this straight, for $110 I only get front stubs not complete front axles ? After the last comp I noticed 1 front wheel spinning and the other one not, plus there's clown wheel affect on front and rear axles. I need to replace axles and was thinking of replacing them LH2.0, but if I need to purchase from RC4WD front axles because the LH2.0 only include stubs that comes out to $150. In that case I can just purchase complete new axles from RC4WD and have spare parts. But if there included then I'll purchase the LH2.0 and be set. |
|
| |
|
06-16-2009, 05:37 PM
| #12 | |
| RCC Addict Join Date: Jul 2008 Location: Sin City
Posts: 1,332
| Quote:
| |
|
| |
|
06-16-2009, 06:37 PM
| #13 |
| Quarry Creeper Join Date: Dec 2008 Location: Aurora Colorado
Posts: 346
|
So being new to the bully. I havent even received all my parts yet but they are in the mail. Are these a big upgrade for the brand new axles I purchased from them last week or only the older stuff. It looks like by the posts on here that the new bully is progressively better than the older ones. Has anyone experienced breakage with the newest ones? |
|
| |
|
06-16-2009, 10:00 PM
| #14 | |
| Rock Crawler Join Date: Aug 2008 Location: Alamogordo
Posts: 774
| Quote:
Ive Broken 2 different inners. I still plan on getting a set of these axles though. | |
|
| |
|
06-16-2009, 10:17 PM
| #15 | |
| RC Axle Master Join Date: Mar 2008 Location: Las Vegas
Posts: 517
| Quote:
| |
|
| |
|
06-16-2009, 10:47 PM
| #16 | |
| RC Axle Master Join Date: Mar 2008 Location: Las Vegas
Posts: 517
| Quote:
| |
|
| |
|
06-17-2009, 08:46 AM
| #17 | |
| Rock Crawler Join Date: Aug 2008 Location: Alamogordo
Posts: 774
| Quote:
In regards to RC4WD V4 vs. V5 vs. LH1V2 Axles, The V4's are very strong and will eliminate many of the problems that early Bully owners saw when the axles were being machined out of Stainless. Not only have they listened to the customers and the Team Drivers and made design changes, they have also made a material change and they are now being hardened as well. As for the V5mm sets from RC4WD they will as far as i know be available in the FUTURE as an UPGRADE, for those same people (CULETTO) rolling their trucks down thirty foot cliffs. No Doubt in my mind that these are some amazingly strong axles and the Maker and I have been in contact since he first started throwing the idea around, if you need them get them you wont be disappointed and i would be shocked to see anyone bust one. Nathan | |
|
| |
|
06-17-2009, 04:04 PM
| #18 |
| Quarry Creeper Join Date: Dec 2008 Location: Aurora Colorado
Posts: 346
|
Just sent the money. Thanks, TL |
|
| |
|
06-17-2009, 05:01 PM
| #19 | |
| RCC Addict Join Date: Jul 2008 Location: Sin City
Posts: 1,332
| Quote:
LOL I told everyone all day to let the rig fall if i tipped it to see if i could bust a wheel off. Finally i went way up the side of this smooth red sandstone mountain and tried to dig and throttle down it forward, hit a steep part i didnt see and it was off to the races. It looked like a Cirque-du-Solei acrobat in a brazilian farm porn rodeo comming down. I broke the hell out of everything else but the stubs. The one fall was a 5995tg (stripped and shorted), a Kamikaze lower link (cracked and twisted all the way over in the ball ends), a stainless lower link (shattered the allthread that ran all the way through it a half inch into the 1/4 stainless sleeve), and a Sidewinder (cracked both halves of the case but it still works, sorta). I would imagine you would break a knuckle off before the stub broke. They wont be indestructable, nothing is in this hobby, but these actually match the rest of the sick overkill that RC4WD put into the rest of the axle. They are a little more pricey than normal but they are much stronger than normal but a set of v4's is $65 bucks so its a good deal for what you get. | |
|
| |
 |
| |


 Linear Mode


