| |
| |||||||
 |
| | LinkBack | Thread Tools | Display Modes |
 07-14-2006, 04:30 AM
| #1 |
| Quarry Creeper Join Date: Jan 2005 Location: Milan, Italy
Posts: 323
|
I'm sure it has already done, but since I took some pics while we (me and a friend) were narrowing those rims I thought it could be interesting for someone to write a "how to" thread. We are talking about the narrow proline rims, but this is obviously doable to any rim. You'll need the epoxy and the fiberglass tape. We choose a tape with the width the rims will have after the narrowing action. In this case it's 4 cm (1,57") wide and 240 g/mt of weight. You'll need a brush. Consider that you'll trash the brush with the epoxy dryed, so don't us a good or expensive one. You can find fiberglass tape and dedicated epoxy in various shops. The one we used is tha same often used by Plane RC modelers. 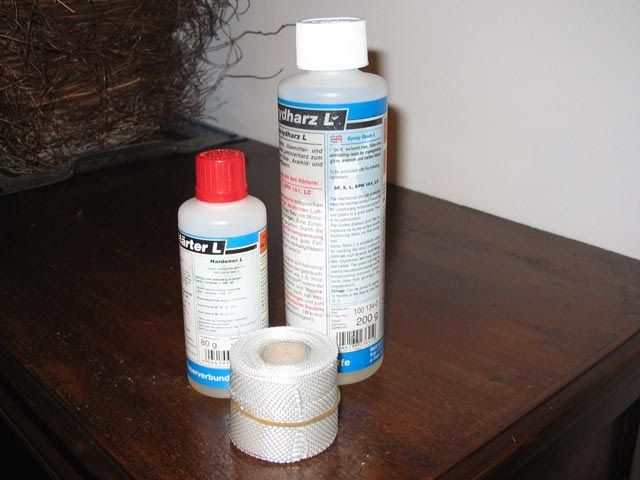 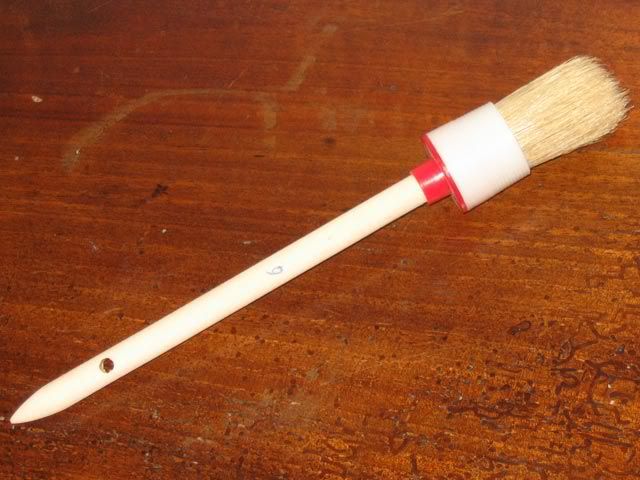 These are a couple of rims already cut and glued togheter with 3/4 drops of CA. That's only to keep the halves togheter while the fiberglass procedure. Note that the rims have been sandpapered a bit to give the surface more "grip" for the fiberglass. The thich white line is the junction line. 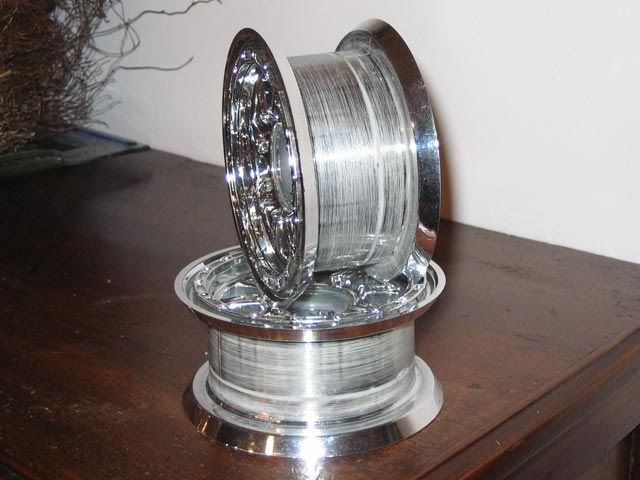 At this point you have to prepare the mix between the epoxy and the catalyzator. You don't need a TON of fluid. To narrow 4 Proline Beadlock we used 10g of epoxy and 2,5g of catalyzator (more or less). The proportion are written on the product you'll use. You'll have 100 min before the epoxy become too stiff to work with. 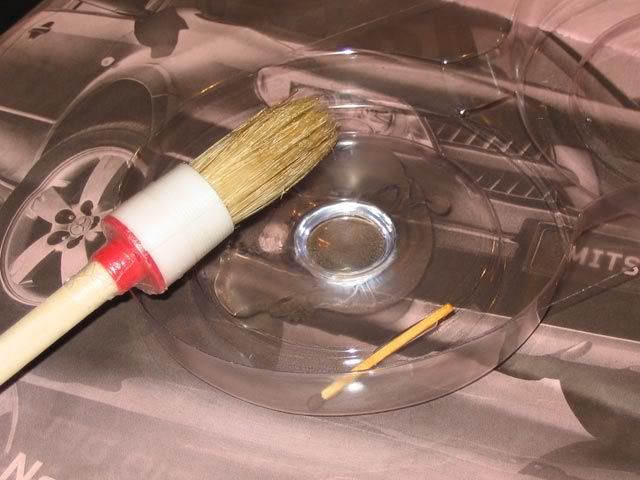 Prepare 4 strip of tape. One roll is enough. This tape weight 240 g/mt. you'll need more or less 25 cm (10") for each rim. This means 60g of tape each rim.  Close up of the fiberglass. 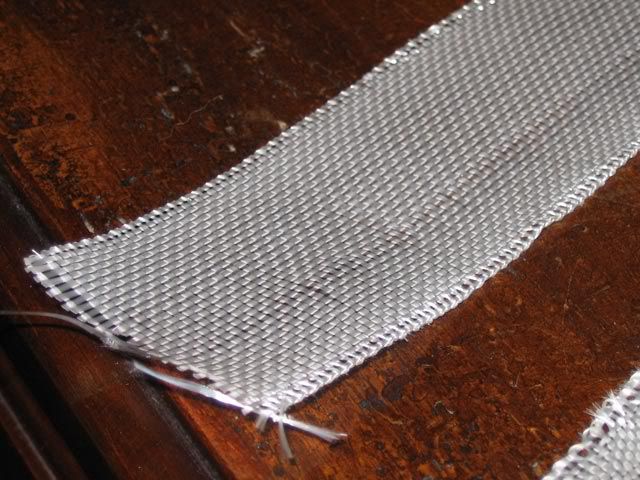 Place the tape on the rim. 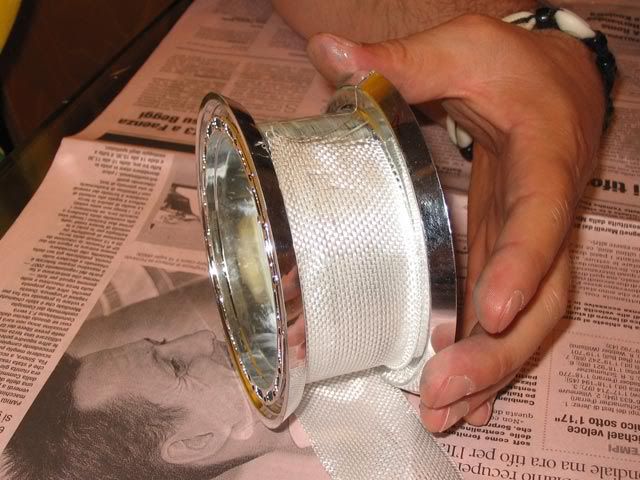 And start to brush the fluid on the tape. Don't be scared to touch this thing with your fingers. You'll have plenty of time to wash your hand. That's not CA. Remember you don't need a lot of fluid on the tape. You'll see the tape will become clear while you brush the epoxy on it. If you use too much epoxy you'll increase the probability air bubbles could happen between the tape and the rims. If the do just stretch more the tape and the epoxy with the brush. 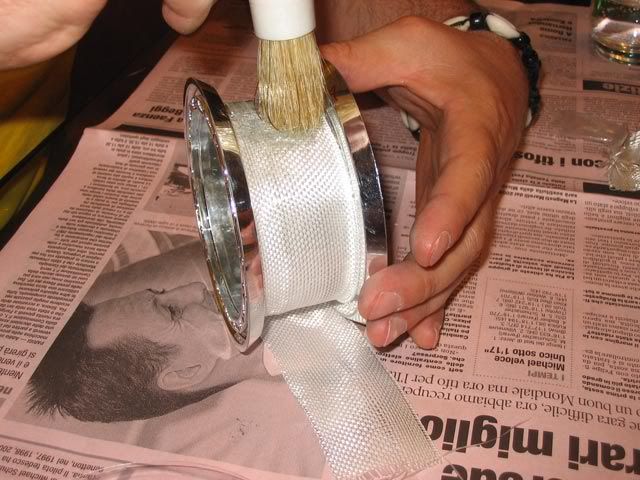 Brush all the tape surface. 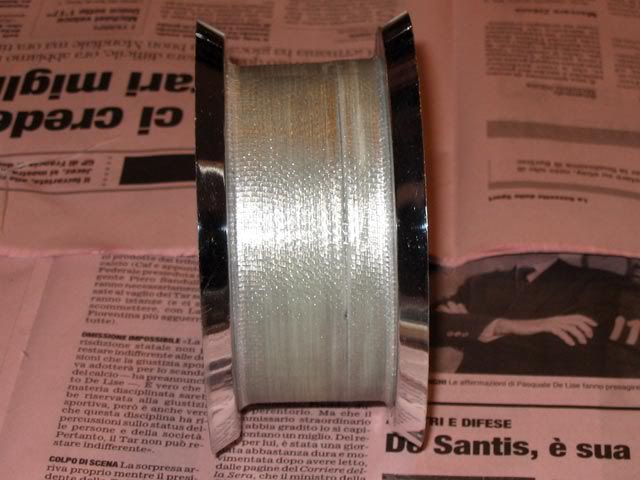 Note the transparency of the tape with the epoxy. The horizontal line you can see is in the mold of the rim. The vertical lines are the sandpaper action lines. You'll almost can't see tha tape. Do that 4 times. 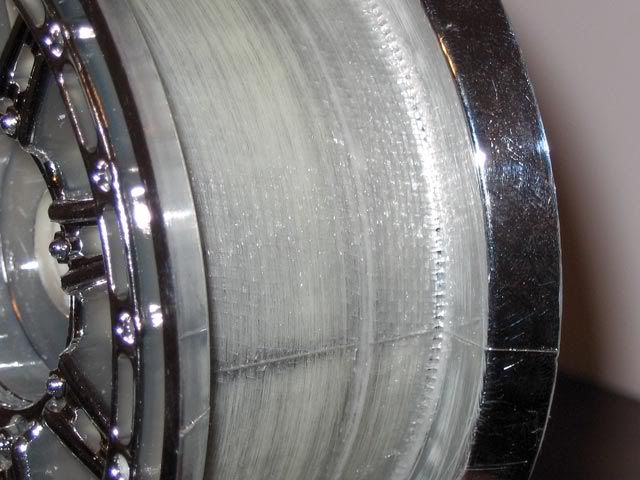 Go to bed and let your new narrowed rims rest while the epoxy dry. A couple of rims completed. My beadlocks are now 5 cm (2") wide. 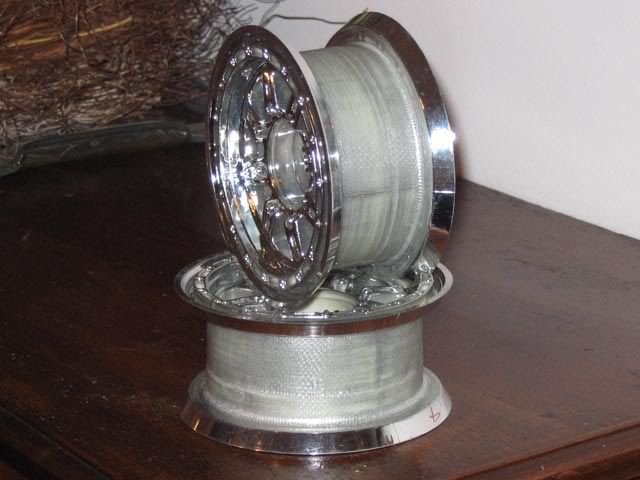 It's really easier than you could think. The harder part is to make good straight cuts in the rims. Hope this could help someone ;) |

|  |
| Sponsored Links | |
| | |
|
07-14-2006, 06:44 AM
| #2 |
| Quarry Creeper Join Date: Jan 2006 Location: Winston-Salem
Posts: 328
|
Nice work and "How to".
|
|
| |
|
07-14-2006, 10:59 AM
| #3 |
| Rock Crawler  Join Date: May 2006 Location: Surrey, BC, Canada
Posts: 870
|
I work with fiberglass, carbon fiber and kevlar... I just want to add something here... When placing the glass on and brushing, take a squeegie of sorts, be it flat rubber or even a piece of cardboard or a roller... Squeeze or roll the area as well to get ALL The air out.. Brushing alone isn't quite enuff... Good idea, mate... I'll hafta try it should I decide to get gutsy and chop a set of rims... Just thought I'd add some glassing knowledge to the mix... I have thought about similar for bodies to keep them from folding and crushing under rolls and drops... Some ppl use drywall tape and shoegoo, I figgered glass'd be lighter and far stronger... |
|
| |
|
07-14-2006, 12:20 PM
| #4 | |
| RCC Addict Join Date: Mar 2005 Location: Saginaw
Posts: 1,721
| Quote:
But seriously, nice write-up. Good pics - it looks like those rims came out very well. One thing I have heard is to brush on a very light coating of the epoxy on the surface before you lay down the fabric. Then when you lay the fabric down, it will soak up from underneath and help the strip lay properly. Not too much, though, or else you'll have a ton that oozes out when you squeegee. | |
|
| |
|
07-17-2006, 08:03 PM
| #5 |
| Rock Crawler Join Date: Feb 2006 Location: jacksonville beach
Posts: 848
|
are you reading a spanish newspaper ?
|
|
| |
|
07-17-2006, 08:10 PM
| #6 |
| I lost my vendor privileges Join Date: May 2006 Location: TOP OF THE HILL
Posts: 3,014
|
good job and idea. |
|
| |
|
07-17-2006, 08:17 PM
| #7 |
| Rock Crawler Join Date: Mar 2006 Location: Benson,NC
Posts: 761
|
you likr that dont you clodstall |
|
| |
|
07-17-2006, 08:20 PM
| #8 | |
| RCC Addict Join Date: Jan 2006 Location: The Amish Ghetto
Posts: 1,932
| Quote:
| |
|
| |
|
07-17-2006, 08:54 PM
| #9 | |
| Quarry Creeper Join Date: Jul 2004 Location: Arkie-Saw
Posts: 284
| Quote:
But his location says Italy, which is a much better indicator of where he is from. | |
|
| |
|
07-17-2006, 09:16 PM
| #10 | |
| RCC Addict Join Date: Jan 2006 Location: The Amish Ghetto
Posts: 1,932
| Quote:
sorry i must have missed the mitsu marketing campaign with euro front bumpers, here in the US.. | |
|
| |
|
07-18-2006, 03:32 AM
| #11 |
| Quarry Creeper Join Date: Jan 2005 Location: Milan, Italy
Posts: 323
|
I'm reading an Italian newspaper cause there are plenty of them here ;) My sig could be a hint also That's explaining Why I did a bad translation of the italian word for "catalyst" and wrote "catalyzator" ;) |
|
| |
|
07-18-2006, 07:16 PM
| #12 |
| RCC Addict Join Date: Mar 2005 Location: Saginaw
Posts: 1,721
|
It's all good - half the Americans here can't type in good English either :-P
|
|
| |
|
03-14-2007, 12:26 AM
| #13 |
| I wanna be Dave  Join Date: Feb 2006 Location: Campbell, CA 4 hrs 2Rubicon !
Posts: 2,044
|
Great write up that was a big process I just bought Epoxy plastic welder glue for $4. and glued mine |
|
| |
|
03-15-2007, 03:10 PM
| #14 |
| I wanna be Dave  Join Date: Oct 2006 Location: Martinsburg WV
Posts: 2,781
|
Oh, yea - those will NEVER come apart again. Well written how-to... |
|
| |
|
03-15-2007, 03:30 PM
| #15 |
| Quarry Creeper Join Date: Jan 2007 Location: New York
Posts: 260
|
wow, nice write up, thanks!
|
|
| |
|
03-15-2007, 05:23 PM
| #16 |
| Rock Crawler Join Date: Feb 2006 Location: Easthampton
Posts: 747
|
that almost how i did mine but i used automotive resin.and the woven glass mat
Last edited by '83 chevy; 03-15-2007 at 05:29 PM. |
|
| |
|
| |


 Linear Mode


