I thought that I would post some pictures to a little experiment that I had.
I wanted to get the look of " RAW " chrome-molly tube on my rock racers. I have been building custom rifles for some years now and I have used gun blue quite allot, so I thought that I might try a little on my MRC chassis that I got from ECOLI. I wanted to see how it would look there before I committed to doing this on my 1/6 racer project.
I will go step by step through what I did to get this finish.
1. I began by filing and feathering out all of the joints so they would flow together nicely. Then I sanded the chassis with 200 wet/ dry paper and then again with 500 wet/dry. I followed this with 0000 steel wool and wiped it all down with some alcohol pads.
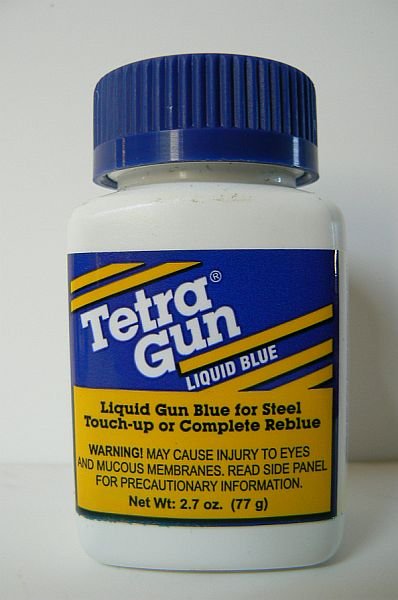
2. Using a Q-tip I began to apply the first layer of Tetra Gun Liquid Blue to the chassis. ( this product can be found at most gun shops and there are a few brands out there. I would suggest staying away from the gel version as it is much harder to work with. ) Only dip the Q-tip in the container once so as not to contaminate the bottle with any residue that might be left on the chassis. Q-tip's are cheap so don't skimp on them. The tubes will begin to turn as soon as the product is applied. I noticed that the brazed joints turned a dark copper color but this will change as more coats are applied.
3. After allowing the first coat to set for around 5 min. I rinsed the chassis in cold watter and toweled it dry.
4. I then used the 0000 steel wool again on the entire chassis. Do not rub to hard over the brazed joints as this will remove to much of the bluing.
5. Apply the next coat in the same manner as the first and this coat should begin to even out the color throughout. Rinse when complete and dry.
6. This is where the creativity comes in. I figured out where I wanted the wear areas to be and using the 0000 steel wool again removed the bluing down to the bare metal. Again try to stay away from the joints as the brazed areas will remove alto faster.
7. I then applied one more coat to the entire chassis so the bare spots would still have a slight tint of color but the rest of the frame would be nice and uniform and rinse as I did before.
8. Once you are happy with the look apply 2 light coats of gun oil to the entire chassis. The gun oil will protect the chassis from rusting and enhance the blue color. I would suggest using gun oil as it is less prone to attract dirt as other oils might. I would suggest that when you clean your rig rub a coat of the oil on to keep the metal rust free.
The nice thing about this finish is that it is easy to maintain and repair. If areas become to worn from use all you have to do is sand the area down with the 0000 steel wool and apply some more of the blue to the area and re-oil the chassis.
I hope this helps give some an idea to an alternative to paint.
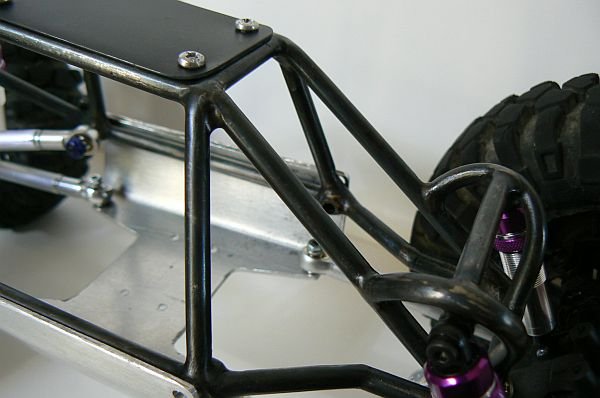
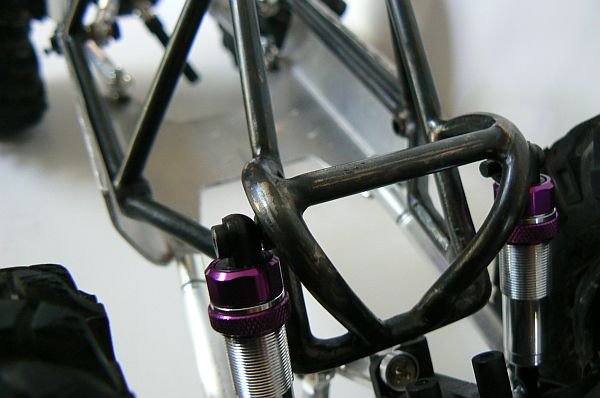
Here are a few pics of the finish on the MRC. I will post more detailed ones as I get the 1/6 closer to this stage.
Thanks for the time!
I wanted to get the look of " RAW " chrome-molly tube on my rock racers. I have been building custom rifles for some years now and I have used gun blue quite allot, so I thought that I might try a little on my MRC chassis that I got from ECOLI. I wanted to see how it would look there before I committed to doing this on my 1/6 racer project.
I will go step by step through what I did to get this finish.
1. I began by filing and feathering out all of the joints so they would flow together nicely. Then I sanded the chassis with 200 wet/ dry paper and then again with 500 wet/dry. I followed this with 0000 steel wool and wiped it all down with some alcohol pads.
2. Using a Q-tip I began to apply the first layer of Tetra Gun Liquid Blue to the chassis. ( this product can be found at most gun shops and there are a few brands out there. I would suggest staying away from the gel version as it is much harder to work with. ) Only dip the Q-tip in the container once so as not to contaminate the bottle with any residue that might be left on the chassis. Q-tip's are cheap so don't skimp on them. The tubes will begin to turn as soon as the product is applied. I noticed that the brazed joints turned a dark copper color but this will change as more coats are applied.
3. After allowing the first coat to set for around 5 min. I rinsed the chassis in cold watter and toweled it dry.
4. I then used the 0000 steel wool again on the entire chassis. Do not rub to hard over the brazed joints as this will remove to much of the bluing.
5. Apply the next coat in the same manner as the first and this coat should begin to even out the color throughout. Rinse when complete and dry.
6. This is where the creativity comes in. I figured out where I wanted the wear areas to be and using the 0000 steel wool again removed the bluing down to the bare metal. Again try to stay away from the joints as the brazed areas will remove alto faster.
7. I then applied one more coat to the entire chassis so the bare spots would still have a slight tint of color but the rest of the frame would be nice and uniform and rinse as I did before.
8. Once you are happy with the look apply 2 light coats of gun oil to the entire chassis. The gun oil will protect the chassis from rusting and enhance the blue color. I would suggest using gun oil as it is less prone to attract dirt as other oils might. I would suggest that when you clean your rig rub a coat of the oil on to keep the metal rust free.
The nice thing about this finish is that it is easy to maintain and repair. If areas become to worn from use all you have to do is sand the area down with the 0000 steel wool and apply some more of the blue to the area and re-oil the chassis.
I hope this helps give some an idea to an alternative to paint.
Here are a few pics of the finish on the MRC. I will post more detailed ones as I get the 1/6 closer to this stage.
Thanks for the time!


 !
!