new2rocks
I wanna be Dave
I’m definitely not the first to do this mod, but I thought it may be helpful to put together step-by-step instructions for those who have been thinking about it but perhaps a bit unsure of how to go about it. My starting point was a Gelande 2 Cruiser that was fully assembled save for the body, and I wanted to stick with the following goals/guidelines for this mod:
•Fixed leaf hanger would be placed ahead of both axles as one the 1:1
•No mods to the chassis other than drilling mounting holes for the leaf hangers and shackles
•Use stock RC4WD leaf hangers and shooter shackles unmodified except trimming hangers if necessary to locate them properly on the chassis
•No special tools other than a drill and a dremel
•No supplies other than RC4WD leaf hangers, shooter shackles, and leafs (red full-length, black full-length with eyes cut off, and short/medium helpers if needed)
If you haven’t yet assembled your suspension, I’ll point out places where you might want to make some adjustments to the sequence. So…with that out of the way, here goes:
FRONT AXLE
Step 1: Locate the front axle and leaf
Start by locating the front axle on the chassis for proper alignment with the body. If you haven’t yet installed your axles with links, start by attaching your leaf springs and helpers to the axles and then sit the axle under the chassis with the body on to find the proper axle and leaf location. If you have already installed the axles with links as I had (note that I had lengthened the front links to position the front axle farther forward in the wheel wells like the 1:1 FJ40), hold one leaf alongside the chassis rail with the leaf's mounting holes lined up with the mounting holes in the axle.

From here, you'll see where the front eye of the leaf will need to go. In this case, I could see that the front eye of the leaf would need to be centered right at the end of the front bumper winch plate.
Step 2: Locate the front hanger bracket and mark one of the two mounting holes on the chassis
Once you know the alignment of the front leaf eye, place the z-shaped half of the leaf hanger bracket on the chassis with the shoulder screw hole lined up where the leaf eye needs to go (in this case, lined up with the end of the bumper winch plate). At this stage, it's better to use the z-shaped half of the bracket rather than the flat half of the bracket so that you can get a nice, snug fit between the z-shaped bracket half and the chassis. Once you've found the right spot for the bracket, mark the location of the forward screw hole in the hanger bracket on the chassis so that you can drill out the hole.

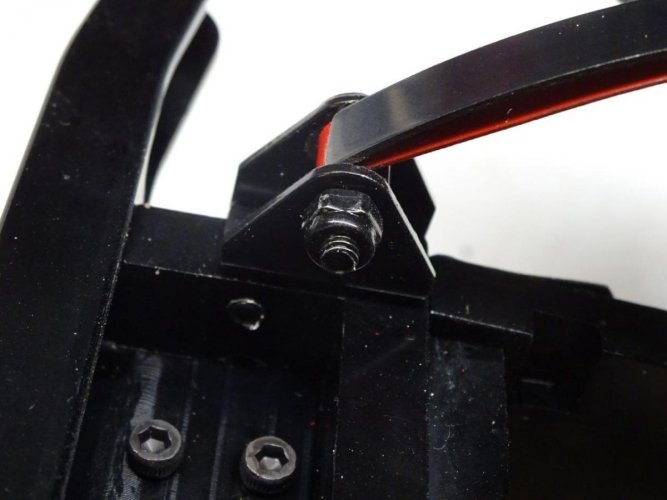
Note that you don’t need to use both mounting holes, as the hanger bracket will stay nice and secure with just screw. I chose the front hole because it lined up with a narrower section of the front bumper bracket, making it a bit easier to drill (and also allowing the possibility of adding a lock nut on the inside of the bracket if I need later on). Here's a view of the front mounting location after installation from underneath:
Step 3: Drill and tap the hole for the front leaf hanger bracket and install both sides of the leaf hanger bracket
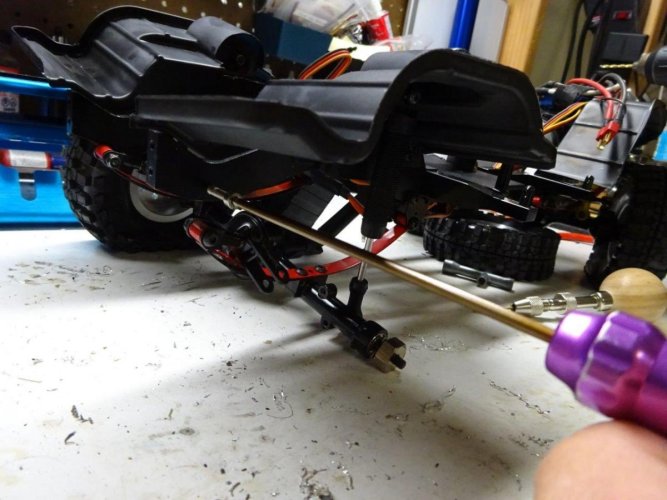
Start with a pilot hole (I used a 5/16” bit for the pilot hole) and then re-drill with a larger bit. I used 7/16”, which turns out to be the perfect size to allow for easy tapping of the hole to fit a 3mm screw using...a 3mm screw. Yes, you read that correctly. The 7/16” hole turns out to be so close in size that you can tap the hole using a normal 3mm screw, which is much faster and easier than using an old fashioned tap. Set aside 2 sacrificial screws for tapping duty, as the first one is likely to get worn down after tapping about 5-6 holes. (See pictures in rear axle section below.)
Step 4: Install the front leaf hanger bracket and mount the axle
Once you've tapped the hole for the leaf hanger bracket, install both halves of the bracket. If you had already installed your axles with links, this is where you'll want to remove the links from front axle, mount leafs to both sides of the front axle, and then mount the leaf to the hanger bracket using a shoulder screw.

Step 5: Install the leaf hanger bracket on the other side of the front axle
Since you have now installed the hanger bracket on one side of the front axle, the other side is much easier. You can mark the mounting hole on the chassis using measurements carried over from the other side, or you can locate the mounting hole by lining up the axle, holding the z-shaped hanger bracket half in place, and marking the mounting hole. Since I had a very easy alignment point (centering the bracket at the back edge of the front bumper winch plate), I used that on the other side to line up the mounting point for the hanger bracket.

Step 6: Install the shackles at the back of the front leafs
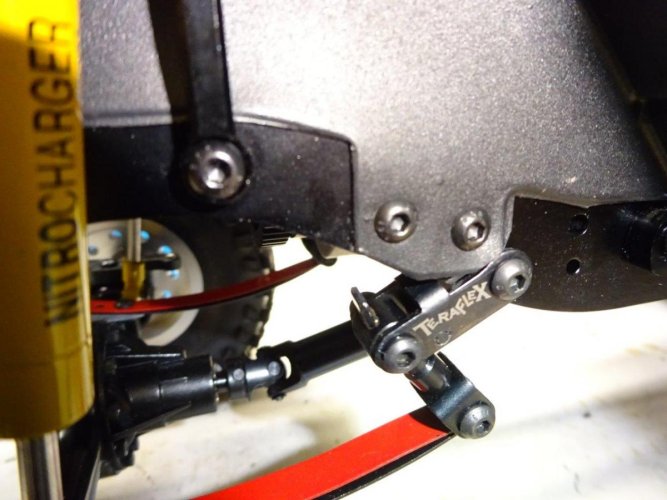
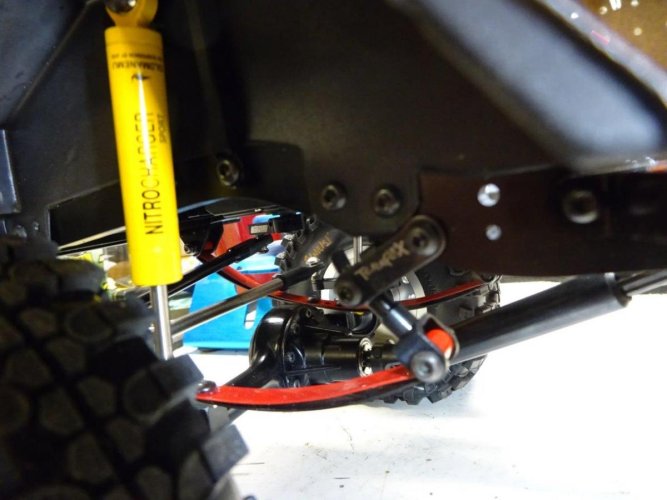
Once you have the leaf hangers installed on both sides of the front axle, the shackles are simple. If you plan to use the stock shackles, remember that the shackles should attach to the chassis (or to a bracket below the chassis) at a point that is closer to the axle than the end of the leaf, creating an angle in the shackle while the leaf is at rest. If you are installing revolver/shooter shackles as I did, the revolvers/shooters should attach to the chassis directly above the leaf eye with the hinge facing toward the axle. Once you've found your mounting location on the chassis, mark it and follow the same process for drilling and attaching the shackle. Here's mine:

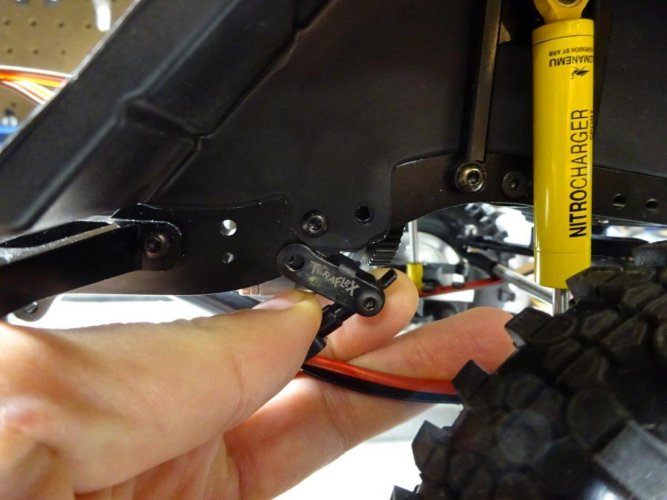
When locating the mounting hole for the shackle, make sure that you leave enough material between the screw and lower edge of the rail for strength but that you're close enough to the rail to give the shackle and leaf sufficient freedom of movement (particularly if you're running shooters):
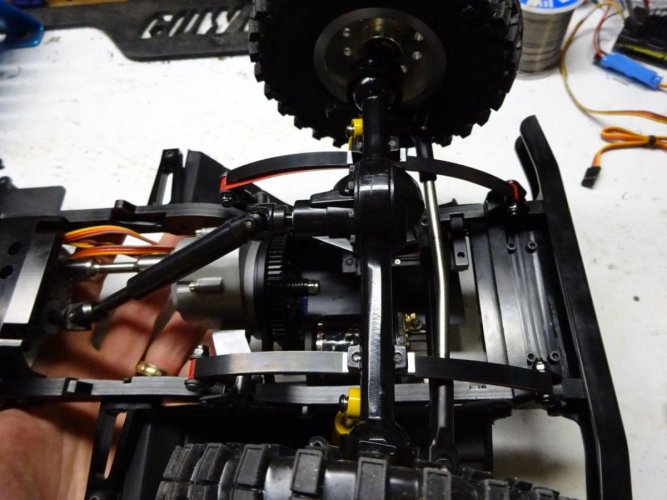
After you attach your shocks, you're halfway there. Next up is the rear axle.
7. Locate the hanger bracket ahead of the rear axles
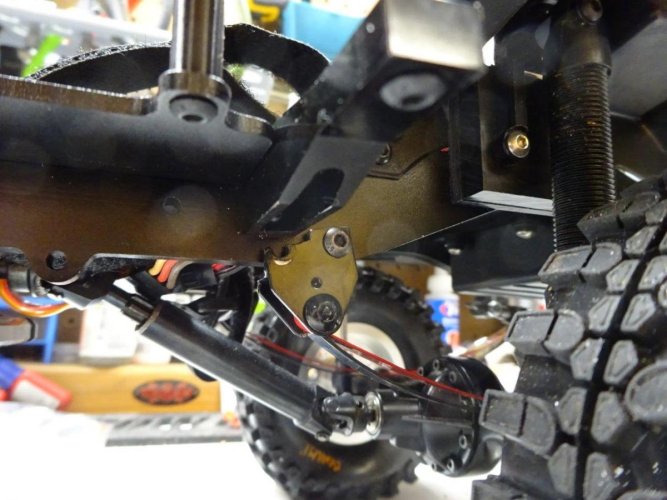
The process is the same as locating the hanger bracket on the front axle. Start by locating the rear axle on the chassis for proper alignment with the body. If you haven’t yet installed your axles with links, start by attaching your leaf springs and helpers to the axles and then sit the axle under the chassis with the body on to find the proper axle and leaf location. If you have already installed the axles with links, before removing the links, hold one leaf alongside the chassis rail with the leaf's mounting holes lined up with the mounting holes in the axle. The hanger brackets will end up sitting at a bend in the chassis rails, so it's important to mark the screw holes with the back edge of the bracket pressed up agains the underside of the rail as much as possible to keep the shackle nice and secure. I found it necessary to notch the back half of the hangar bracket to clear the body mounting post.

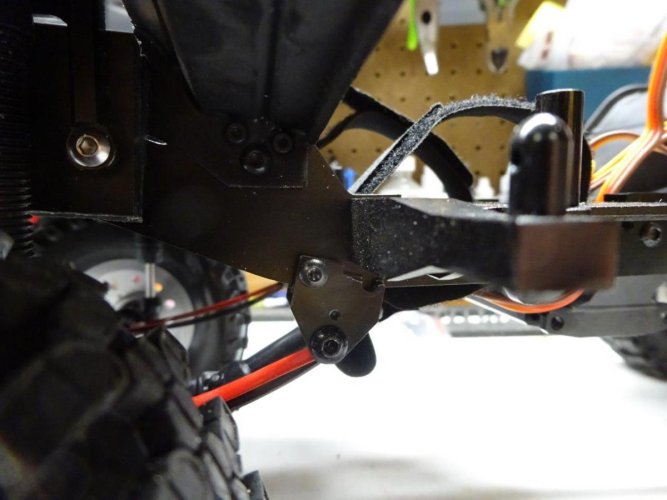

And the other side:
8. Mount the shackles at the back of the rear leafs
Same process again as the fronts. Starting with one side, locate the shackle:
Mark the mounting hole location:

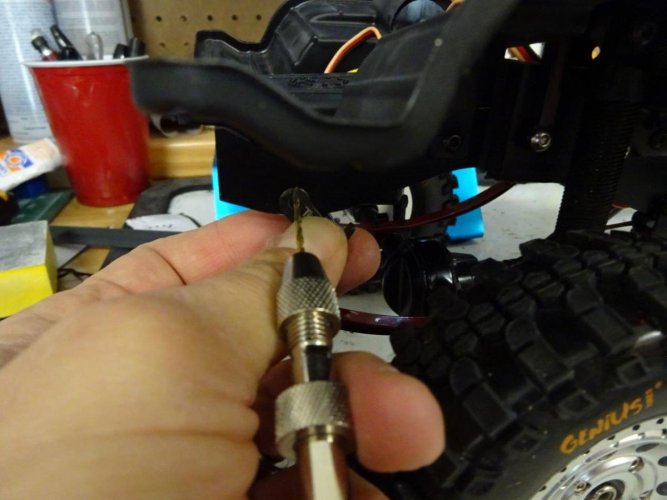
After drilling out, tap with a sacrificial M3 cap head screw:
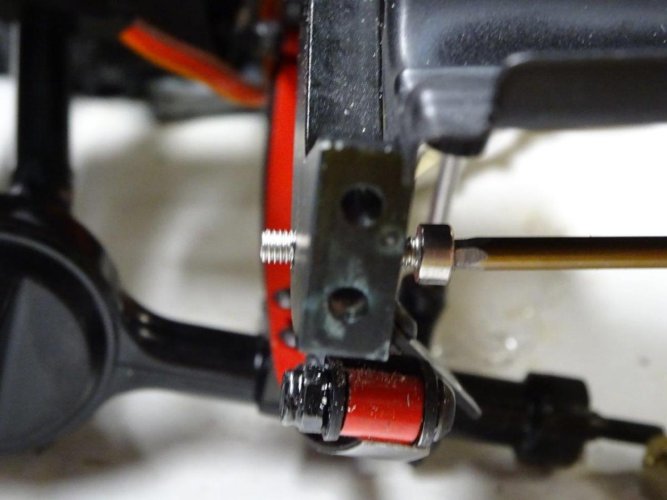
And then the mounting screw with lock nut on the inside of the rail:

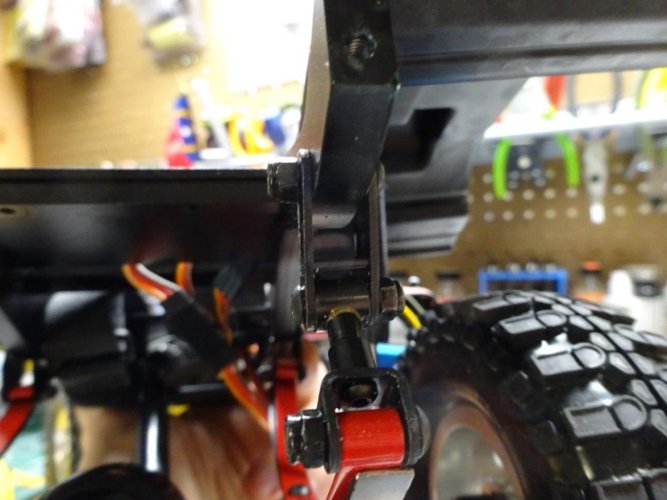
Carry over measurements to locate the mounting hole on the other side, drill & tap, then mount:
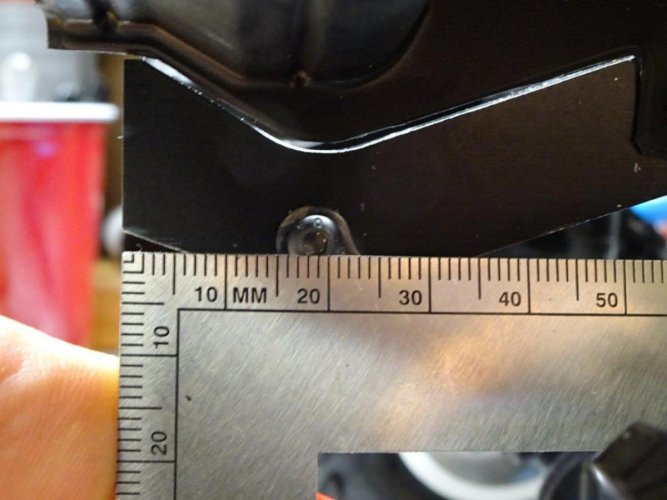

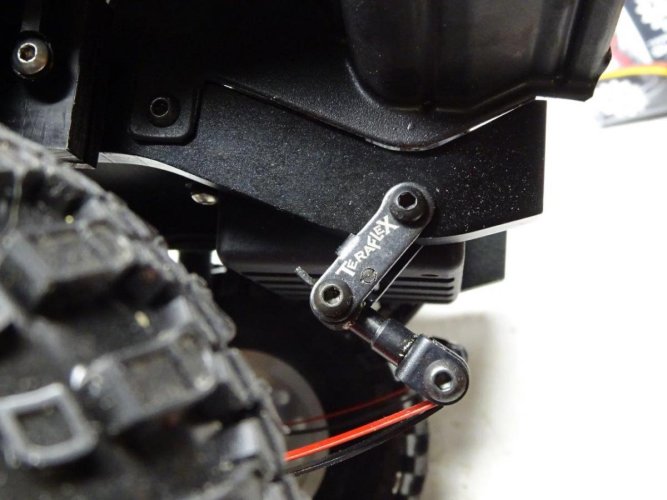
When you're done, you'll have this:


Here is how she sits with body on:
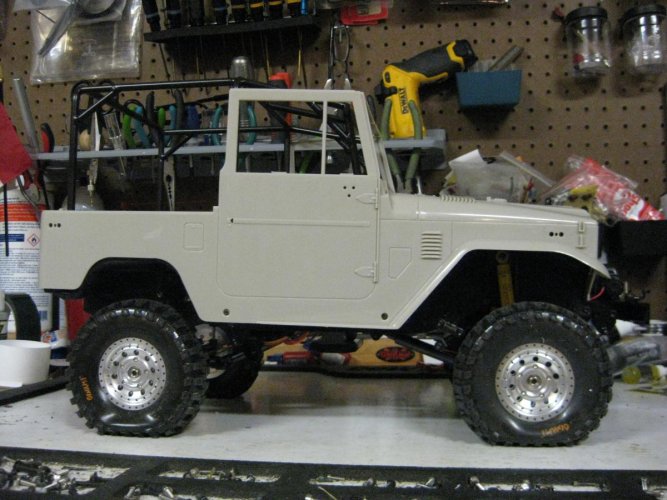
A couple of notes to point out thanks to input from n00b:
1. Stock FJ40s had the shackles ahead of the front axle, not behind, but reversing them is a fairly common mod in the 1:1 world.
2. Mounting the axles over the leafs instead of under brings the ride height down to stock levels. As mine sits in the picture above, it's a bit on the high side, but I think okay for a more aggressive, lifted look. Either way works.
It's a great little project and well worth the effort to bring that additional scale element to your build. I hope this helps!
•Fixed leaf hanger would be placed ahead of both axles as one the 1:1
•No mods to the chassis other than drilling mounting holes for the leaf hangers and shackles
•Use stock RC4WD leaf hangers and shooter shackles unmodified except trimming hangers if necessary to locate them properly on the chassis
•No special tools other than a drill and a dremel
•No supplies other than RC4WD leaf hangers, shooter shackles, and leafs (red full-length, black full-length with eyes cut off, and short/medium helpers if needed)
If you haven’t yet assembled your suspension, I’ll point out places where you might want to make some adjustments to the sequence. So…with that out of the way, here goes:
FRONT AXLE
Step 1: Locate the front axle and leaf
Start by locating the front axle on the chassis for proper alignment with the body. If you haven’t yet installed your axles with links, start by attaching your leaf springs and helpers to the axles and then sit the axle under the chassis with the body on to find the proper axle and leaf location. If you have already installed the axles with links as I had (note that I had lengthened the front links to position the front axle farther forward in the wheel wells like the 1:1 FJ40), hold one leaf alongside the chassis rail with the leaf's mounting holes lined up with the mounting holes in the axle.

From here, you'll see where the front eye of the leaf will need to go. In this case, I could see that the front eye of the leaf would need to be centered right at the end of the front bumper winch plate.
Step 2: Locate the front hanger bracket and mark one of the two mounting holes on the chassis
Once you know the alignment of the front leaf eye, place the z-shaped half of the leaf hanger bracket on the chassis with the shoulder screw hole lined up where the leaf eye needs to go (in this case, lined up with the end of the bumper winch plate). At this stage, it's better to use the z-shaped half of the bracket rather than the flat half of the bracket so that you can get a nice, snug fit between the z-shaped bracket half and the chassis. Once you've found the right spot for the bracket, mark the location of the forward screw hole in the hanger bracket on the chassis so that you can drill out the hole.

Note that you don’t need to use both mounting holes, as the hanger bracket will stay nice and secure with just screw. I chose the front hole because it lined up with a narrower section of the front bumper bracket, making it a bit easier to drill (and also allowing the possibility of adding a lock nut on the inside of the bracket if I need later on). Here's a view of the front mounting location after installation from underneath:

Step 3: Drill and tap the hole for the front leaf hanger bracket and install both sides of the leaf hanger bracket
Start with a pilot hole (I used a 5/16” bit for the pilot hole) and then re-drill with a larger bit. I used 7/16”, which turns out to be the perfect size to allow for easy tapping of the hole to fit a 3mm screw using...a 3mm screw. Yes, you read that correctly. The 7/16” hole turns out to be so close in size that you can tap the hole using a normal 3mm screw, which is much faster and easier than using an old fashioned tap. Set aside 2 sacrificial screws for tapping duty, as the first one is likely to get worn down after tapping about 5-6 holes. (See pictures in rear axle section below.)
Step 4: Install the front leaf hanger bracket and mount the axle
Once you've tapped the hole for the leaf hanger bracket, install both halves of the bracket. If you had already installed your axles with links, this is where you'll want to remove the links from front axle, mount leafs to both sides of the front axle, and then mount the leaf to the hanger bracket using a shoulder screw.

Step 5: Install the leaf hanger bracket on the other side of the front axle
Since you have now installed the hanger bracket on one side of the front axle, the other side is much easier. You can mark the mounting hole on the chassis using measurements carried over from the other side, or you can locate the mounting hole by lining up the axle, holding the z-shaped hanger bracket half in place, and marking the mounting hole. Since I had a very easy alignment point (centering the bracket at the back edge of the front bumper winch plate), I used that on the other side to line up the mounting point for the hanger bracket.

Step 6: Install the shackles at the back of the front leafs
Once you have the leaf hangers installed on both sides of the front axle, the shackles are simple. If you plan to use the stock shackles, remember that the shackles should attach to the chassis (or to a bracket below the chassis) at a point that is closer to the axle than the end of the leaf, creating an angle in the shackle while the leaf is at rest. If you are installing revolver/shooter shackles as I did, the revolvers/shooters should attach to the chassis directly above the leaf eye with the hinge facing toward the axle. Once you've found your mounting location on the chassis, mark it and follow the same process for drilling and attaching the shackle. Here's mine:


When locating the mounting hole for the shackle, make sure that you leave enough material between the screw and lower edge of the rail for strength but that you're close enough to the rail to give the shackle and leaf sufficient freedom of movement (particularly if you're running shooters):


After you attach your shocks, you're halfway there. Next up is the rear axle.
7. Locate the hanger bracket ahead of the rear axles
The process is the same as locating the hanger bracket on the front axle. Start by locating the rear axle on the chassis for proper alignment with the body. If you haven’t yet installed your axles with links, start by attaching your leaf springs and helpers to the axles and then sit the axle under the chassis with the body on to find the proper axle and leaf location. If you have already installed the axles with links, before removing the links, hold one leaf alongside the chassis rail with the leaf's mounting holes lined up with the mounting holes in the axle. The hanger brackets will end up sitting at a bend in the chassis rails, so it's important to mark the screw holes with the back edge of the bracket pressed up agains the underside of the rail as much as possible to keep the shackle nice and secure. I found it necessary to notch the back half of the hangar bracket to clear the body mounting post.


And the other side:

8. Mount the shackles at the back of the rear leafs
Same process again as the fronts. Starting with one side, locate the shackle:
Mark the mounting hole location:


After drilling out, tap with a sacrificial M3 cap head screw:


And then the mounting screw with lock nut on the inside of the rail:


Carry over measurements to locate the mounting hole on the other side, drill & tap, then mount:


When you're done, you'll have this:


Here is how she sits with body on:

A couple of notes to point out thanks to input from n00b:
1. Stock FJ40s had the shackles ahead of the front axle, not behind, but reversing them is a fairly common mod in the 1:1 world.
2. Mounting the axles over the leafs instead of under brings the ride height down to stock levels. As mine sits in the picture above, it's a bit on the high side, but I think okay for a more aggressive, lifted look. Either way works.
It's a great little project and well worth the effort to bring that additional scale element to your build. I hope this helps!
Last edited:
