• Welcome to RCCrawler Forums.

    It looks like you're enjoying RCCrawler's Forums but haven't created an account yet. Why not take a minute to register for your own free account now? As a member you get free access to all of our forums and posts plus the ability to post your own messages, communicate directly with other members, and much more. Register now!

    Already a member? Login at the top of this page to stop seeing this message.

How to make a windshield/windows?

jeff22

Pebble Pounder
Joined
Jan 26, 2015
Messages
171
Location
South Central PA
I ordered this Tamiya Bullhead body over the weekend:
TAM0335103-2.jpg


I have seen some other's use this same body on an scx10 frame and they look nice. I'm going to try to build one of these up on my scx10 honcho frame. I have never fabbed anything before so building this with a bed is going to have a huge learning curve.

The body doesn't come with any accessories, but I can buy the grille, lights, exhaust, and air cleaners seperately which is nice.

What I can't find anywhere is the windshield and window glass. No one seems to have it in stock.

My biggest concern is the bend in the center of the windshield. I will be filling in the sunroof. Everything else seems flat which should be easy right?

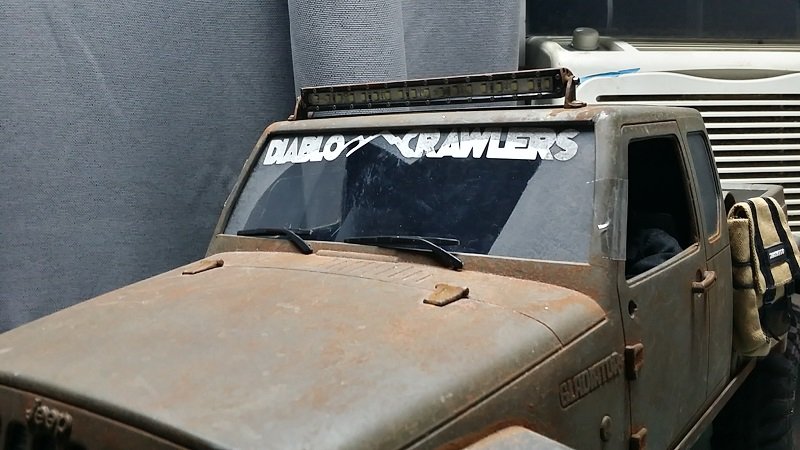
Here is how the stock windows look.

TAM0335104-2.jpg


Any advice on what material is best for building individual windows and how to get them to fit right would be great.
 
Last edited:
When I make the windows for a hard body I use a sheet of clear lexan from parma. I had cut the windows slightly larger than the holes and either hot glue or clear epoxy them into place. For bends, like you have in the windshield, I use a hair dryer to lightly heat teh lexan enough to bend into shape and hold it there till it cools. So far has worked every time for me.
 
Alright thanks, I didn't realize you could re-shape lexan with some heat and it would holds it's shape. I always imagined it would just warp uncontrollably.
 
Alright thanks, I didn't realize you could re-shape lexan with some heat and it would holds it's shape. I always imagined it would just warp uncontrollably.

I have had good luck with low steady heat at a slow pace. Sorry for the bad pic, best one I have access to while here at work, but here is my wife's 110. The back glass and the quarter windows are from lexan. The quarter windows are wrap around 90* jobbies. Each piece is separate and are clear epoxied into place.

 
Last edited:
Bob smith gold adhesive makes a glue for clear that won't give you the superglue fog. I used clear plastic from package that my Harbor freight hobby knife came in for the windows in my thiokol sprite.
 
Do you have kids, neice, nephew, cousins? by them a toy, keep the packaging! BAM! you get windows and they get a toy! it's a win win."thumbsup"

Honestly I look for toys that have large flat windows on the packaging when I buy stuff for my kids and keep it to use on all my trucks

as for adhesive, I use Goop, Shoo-Goo, E-6000 all the same stuff. it sticks to everything, flexible, dries clear and doesn't fog the plastic. the only down side is you need to find a way to secure the plastic while it sets.

 
Thanks for the advice, I never thought about using clear plastic from packaging that seems like a good, free idea.

I found some lexan at my hobby shop over the weekend and some Testors clear parts cement that comes in a funny looking bottle, it's supposed to be completely safe for gluing windows and clear parts with no fogging. I got two different thicknesses of lexan I think it was .04 and .02 thick. One is very flexible the other is more rigid.

I have a lot of body holes to fill and body work to complete before building the windows which is probably going to be the last part of the project

keep posting all the good ideas.
 
Last edited:
Thanks for the advice everyone. I managed to make the windows out of the .02 thick Lexan sheet. The clear testors glue took a really long time to dry and made things difficult so I ended up using plain CA glue.

The thin lexan formed nicely around the curve of the windshield and the flat windows were very easy to do. Unfortunately the filling of the holes didn't turn out super nice but I'm happy with it overall.

here's the finished truck.

IMG_1516_zpsu4oycbxl.jpg
 
Last edited:
Both done with packaging plastic and shoe goo.
 

Attachments

  • 20150627_215716_Richtone(HDR).jpg
    20150627_215716_Richtone(HDR).jpg
    128.2 KB · Views: 2,697
  • 20151125_114523.jpg
    20151125_114523.jpg
    155.2 KB · Views: 2,813

Attachments

  • 20151124_173921.jpg
    20151124_173921.jpg
    160.4 KB · Views: 2,729
  • 20151125_114608.jpg
    20151125_114608.jpg
    157.4 KB · Views: 2,656
  • 20151128_141027.jpg
    20151128_141027.jpg
    67.8 KB · Views: 2,722
  • 20151128_141204.jpg
    20151128_141204.jpg
    69.5 KB · Views: 2,791
Back
Top