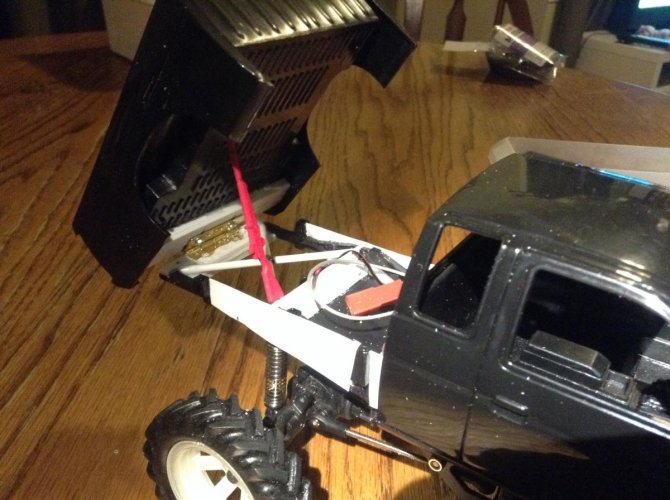
• Welcome to RCCrawler Forums.

    It looks like you're enjoying RCCrawler's Forums but haven't created an account yet. Why not take a minute to register for your own free account now? As a member you get free access to all of our forums and posts plus the ability to post your own messages, communicate directly with other members, and much more. Register now!

    Already a member? Login at the top of this page to stop seeing this message.

The mud season is coming, time to get ready! (Nissan 1/20)

hey that looks sweet :) especially with the spare tire under the back there, did you mount one of the model kit tires under there or is it just a false plastic one? i ask because i had a Lindbergh gmc that had a false one but yours seems to have tread on it. and how about the motor and trans does that actually penetrate through the cab floor or is it seperate, if it is are you planning on doing a full interior? Keep up the good work :)
 
hey that looks sweet :) especially with the spare tire under the back there, did you mount one of the model kit tires under there or is it just a false plastic one? i ask because i had a Lindbergh gmc that had a false one but yours seems to have tread on it. and how about the motor and trans does that actually penetrate through the cab floor or is it seperate, if it is are you planning on doing a full interior? Keep up the good work :)

With the frame mounted so low, the motor hangs free of the interior. So yeah, full interior for this one. "thumbsup" As for the spare, it's part of the kit, and will most likely be removed. It doesn't look right with the truck rollin' on tractor tires! :mrgreen:
 
Tonight I was able to get the links made for the rear, and get the rear shocks in. "thumbsup" Now it's time to move to the front! This thing is going together rather quickly. So quickly in fact, I might have to start another when I'm done! I do have another set of tractor tires already. "thumbsup"
 

Attachments

  • image.jpg
    image.jpg
    139.2 KB · Views: 933
Last night I sat down and finished up the front end. Now that I got it in, I have a roller! "thumbsup" Now it shouldn't be too long before this one is ready for paint! I'm pretty happy about being able to put a full interior in this one! :) I can even put the motor in, however a stock V-6 would never push these tires through the mud. :roll: Maybe I can find a V-8 for this thing. :ror: I figure now that she's a roller, I should give you an obligatory flex shot. "thumbsup" I'm going to have to make sway bars, at least one for the rear, because there is a little too much flex for a fast rig. :roll:
 

Attachments

  • image.jpg
    image.jpg
    162.3 KB · Views: 881
I've been wanting to run an engine under the hood of this thing, but in reality the stock V-6 would would never power this thing. :cry: 
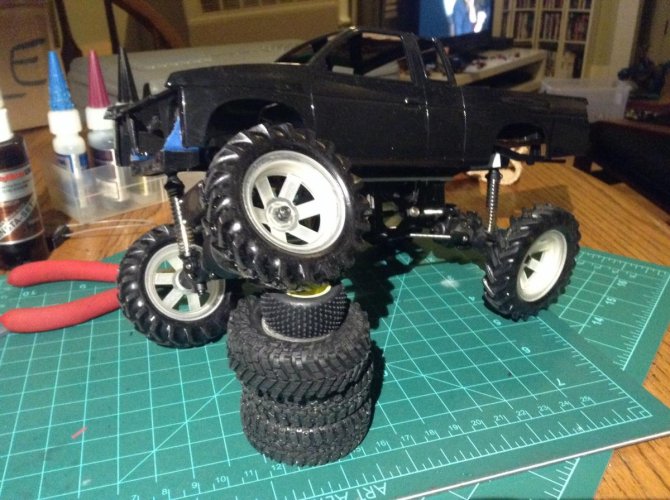
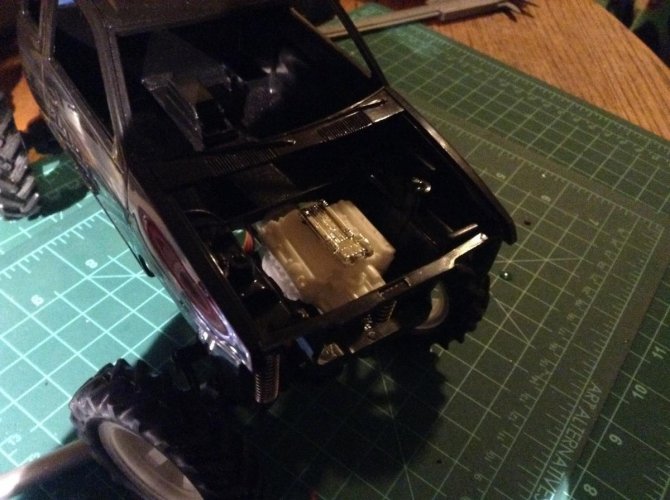
So I've been wanting to find a V-8 for her, but I didn't want to buy a whole kit just for the motor, and then it dawned on me. I've got a chevy LS motor! "thumbsup" I stole it out of a highway patrol car! ;-)
 

Attachments

  • image.jpg
    image.jpg
    134.9 KB · Views: 856
I was able to finish up the electronics box for this thing. "thumbsup" it should be big enough for the ESC, the RX, and the battery.now I just have to find a way to make the bed easily removeable. I've thought about nano-mags, or maybe a hinge in the back, and some hidden body posts under the front of the bed, but I'm not sure. I'll just have to see what works. "thumbsup"
 

Attachments

  • image.jpg
    image.jpg
    140.9 KB · Views: 804
I was playing around with some Miclaws tonight, and I thought I'd post a pic! "thumbsup"
 

Attachments

  • image.jpg
    image.jpg
    158.9 KB · Views: 757
Tonight I just worked on putting together some of the pieces for the model. Like the seats, dash, firewall, and such. I also removed the spare tire, and prepped the rear of the frame for mounting the bed. The bed secures itself to the kit so well, that I feel I real don't need much to hold the bed in place. Maybe just a set screw or two. "thumbsup"
 

Attachments

  • image.jpg
    image.jpg
    112.1 KB · Views: 738
This thing is looking really good, I like the idea of these mud truck's in scale. Your work bench look's like mine, green cutting mat, BSI glue, little white dabber from hobby lobby and team integy hex driver.
 
I knocked out an anti-sway bar for the rear today! "thumbsup" I used 1mm music wire for the torsion bar inside. I feel it turned out pretty good! :ror:
 

Attachments

  • image.jpg
    image.jpg
    110.2 KB · Views: 734
Awesome Rob, looks like it should be fast enough LOL! I really like all the styrene work under that body.

On those tractor tires, try wiping them off with alcohol or wash em in dish soap and warm water. There is mold release agent on them which may make them spin like you mentioned.
 
Awesome Rob, looks like it should be fast enough LOL! I really like all the styrene work under that body.

On those tractor tires, try wiping them off with alcohol or wash em in dish soap and warm water. There is mold release agent on them which may make them spin like you mentioned.

I will definitely wash those tires before mounting them. To be honest they're not glued or nothin' yet, and that's why I threw the Miclaws on. I knew they'd hook up good! "thumbsup" It will do a wheelie with the tractor tires too! 8)
Last night I did get the rear hinged up. This should make it easy to access the battery under the bed. "thumbsup" Now I just have to figure out a good way to latch it down. "thumbsup"
I did end up removing the anti-sway bar for now, it needs a little work. I'll put it back on though, she wants to lean and twist a little when I'm on the throttle.
 

Attachments

  • image.jpg
    image.jpg
    140.2 KB · Views: 655
I got the bed all secured with Neo Mags. A have also been working on a better solution for an anti-sway bar. I finally got something that works well. It's ugly as all hell, but it works. "thumbsup" I used a couple of Servo savers, and small links attached at the axle. I need to do a little work on the axle mounts still, but it's pretty much there. It keeps the axle straight, but will allow side to side travel if it needs. Now I just have to mount up the engine, and a few more little things, and it's ready for some paint. "thumbsup" Still not sure if I should put lights in it or not.
 

Attachments

  • image.jpg
    image.jpg
    124.9 KB · Views: 614
I'm just about done with this one! :ror: I should have all the fab work done tonight. I've just got a couple of things left to finish up, and I will be ready for paint. "thumbsup" I did get the motor in. I had to custom make headers and a K&N air filter. I know on a mud truck the air filter would be in the cab, but I feel it looks good."thumbsup"
 

Attachments

  • image.jpg
    image.jpg
    126.3 KB · Views: 532
Well, I thought I was done until I threw everything together for a final mock-up. Seems I forgot to put in some neo-mags under the hood to hold it down! :roll: Oh well, I guess I'll just finish her up tomorrow. "thumbsup" Here's a final mock-up shot for you.
 

Attachments

  • image.jpg
    image.jpg
    148.7 KB · Views: 531
Back
Top