• Welcome to RCCrawler Forums.

    It looks like you're enjoying RCCrawler's Forums but haven't created an account yet. Why not take a minute to register for your own free account now? As a member you get free access to all of our forums and posts plus the ability to post your own messages, communicate directly with other members, and much more. Register now!

    Already a member? Login at the top of this page to stop seeing this message.

TT Kaiser XS

Thanks actually that helps quite a bit. The major thing it seems to me is definitely the servo as mine stripped after 4 packs. Otherwise this thing is built quite nicely, and is definitely fun.
 
First round of upgrades done. Will take body on shots when there is more light outside.
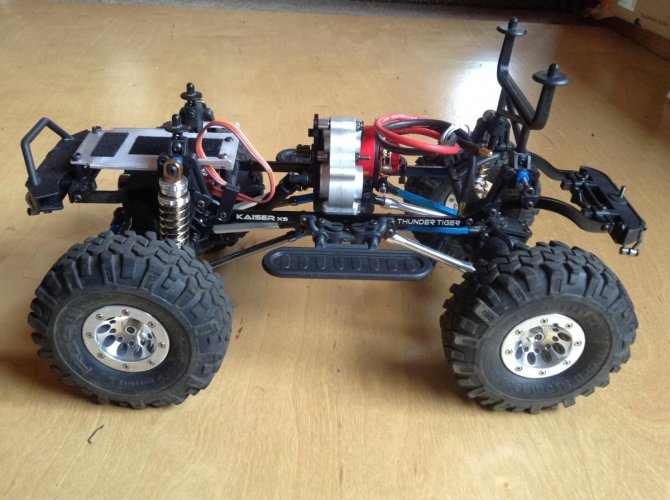
Servo:
Power HD 1501MG (TQ @ 6v-236.1oz-in (17kg), Speed @ 6v-.14sec)
Integy 25T Clamping Servo Horn
Steering Bump Stops shaved for max Steering Angle
** The Stock shocks had a 15mm piece of fuel tubing to limit full compression due to the Standard Size Servo tabs hitting the frame. In order to fix this, you can see I trimmed off the top mounting tabs. 100% unconventional and in a normal 1/10 scaler or crawler I would not recommend to do it at all and there would be no need because there are no clearance issues at that scale. The PHD servo has 81% more TQ than the Stock servo (3.5kg = 48.06oz-in) and in this light weight of a rig swinging these small tires the Servo won’t be taxed at the mounts like in a normal 1/10 scaler or crawler. That’s my thought anyway and the PHD is cheap enough to try it. Right now, the only way around it is to get a “Micro-Mini” Servo with Micro-Mini TQ and Speed. With this mod I gained 9mm of compression. Doesn’t sound like a whole lot but it is Huge at this scale.

Links:
Front Upper Link - Stock 75mm - New 80mm
Front Lower Link - Stock 85mm - New 90mm
Rear Upper Link - Stock 75mm - New 75mm
Rear Lower Link - Stock 85mm - New 85mm
Steering Tie Rod Link – Stock 90mm New 90mm using an old Traxxas turnbuckle and Jato Rod Ends
Steering Drag Link – Stock 35mm - New 45mm
** All Upper and Lower links were made from HQ Prop, Avant, Axial Alum Standoffs and RC4WD Short Rod Ends. I had all the links and rod ends in my parts bin but the HQ Prop standoffs and they are like $4.50 for Qty 4 so not much $$
** All hardware changed from 2.5mm to 3mm with a little Dremel work here and there.

Shocks:
Integy “Scale” Aluminum - Stock 80mm - New 80mm. Got these for $14 on Fleabay.
** At full lock the tires may rub a bit on the springs using the standard hexes. These rims don’t have a bunch of offset and are hex hubs so I’ll have to look for extenders if the rubbing is bad.

Next will be to test for any clearance issues and save some $$ for a ESC.

F54970CC-74EB-4522-96EA-E7758C976F0A_zpsufv1hwsv.jpg

AE9118E5-7F14-415D-9974-F5AE50CEA79B_zpsfc1div4t.jpg

1C1EBF9F-A97A-47AD-AF6F-CE687148AA5F_zpslnkfwno9.jpg

78211BB9-9382-4144-87A4-C446423CABE9_zpsaf7dwtjo.jpg

852B0757-398E-4CAE-9FD1-B23BACF50C62_zps5xngvygh.jpg

71606960-E73A-4B6B-BB69-47841F85D04D_zpsndbueb1o.jpg


Forgot to measure stock steering angle but took off 3mm from the stops so has to be worth at least 5 more degrees.

5FE124A0-02E5-4B7C-B233-993FFEF15838_zpshyibmy72.jpg


Lowered the body a little. Could go more with some body trimming but I'll do that on the next body.

56CECB8A-5F9C-4157-8562-E5799F046783_zpsxxevwvjg.jpg

9B420AA1-8DCD-4ACB-9859-EFFEB7F02162_zpswtk3dlit.jpg


I did a quick run using the Stock 2S battery and the ESC no likey the Servo and bigger tires. Only got 6min before LVC kicked in and motor was just about untouchable. The tiny motor didn't help either. I'll try it with the stock tires tomorrow and see how it does until i can get a better ESC with bigger BEC.
 
Kind of wishing I picked up one of these back when it was on massdrop now.

What is massdrop?

I have a HobbyWing 1080 on its way for a new heart thanks to Screamer recommending it. This rig is fun enough that I'll spend a few $$ on it.
 
I have one of these.

I modded the upper servo ears and trimmed the top of the servo mount off leaving only the bottom. Servo tape and the bottom holes have been enough to secure the stock servo.

I then went and trimmed off some of the Y at the plastic chassis braces to help clear the back of the servo and free'd up another ticks of front articulation.

2S 2,000 mAh LIPO provides about 30 minutes of crawling.

My issue is the terribly tall gearing which greatly hampers low speed throttle control and torque. I ordered and installed a REDCAT racing 380 motor which required shortening the motor shaft with a dremel but provided no noticeable difference n low speed response or throttle control.

I am in desperate need of a better motor for this thing, the pinion is already pretty small so not much room to gear down with smaller pinions enough to make a difference. Any suggestions are welcome.

Oh and last note - TT really screwed up by using a speedo with no drag brake. Having to manually work the brakes on the rocks sucks.

Other than those details its not a bad little crawler.
 
with its dimensions this would be nearly ideal for a Midnight Pumpkin hard body from Tamiya! needs the wheelbase shortened about 4mm's overall and some slightly lower offset wheels to be ideal. mmmm too many thoughts now!
 
Been messing around with mine - put on bigger tires (SCX10 G6 Falken Edition stock tires) and wired up some lights. I fried the original motor by overheating it and creating a ton of smoke when we had some snow. It has a Horizon Hobby 380 series motor in it now.

The bigger tires does make the motor get quite hot but its mostly for the kids to play with.

Anyone else notice their motor mount isn't sticking up straight / motor is kind of angled after a while? Seems like the mount is the weakest point of the platform. A metal motor mount is really needed.

It also looks like there's enough room for a 540-size motor, if someone were to create a mount that could accommodate it. I have a spare Holmes Torquemaster that would be perfect for it.

SdaoTZLhTlia6je-mjrsQYuT900q7jloO6QjdknRFJplzfK5khbARcYe-BeAL05qgAijTkqLbuAFEsnSKyP8EVl9ko7SV1jhwdYp35lXzR4XtwucQKJZPfP6XtR8kxwV1YmCE-cV2G2JPFLL-cv7t3GhzpieMQJYvT8UqqL4yhmFDWM5T_Shvz4g6S0Aj0xjhYQ1rrwcilPt6wkclV5b2JQ_uSoLbsxRrC8wkzahKz-puTmOMkGaKsWPy6GsQYD5QiSdEXKFkKij91IOu-el8tuMAKGrW5r8Gpb_DN7UHekKknD4ctbVF0vsj6MvU_PfZ768i2qoQ4mjoEJ_9nv_sLL5L05PNnm63aqKWHcqOU2RNWGuk3b1nEyu313LyPDO9cYFiYSStbZ6Nq1T5W3pfyjWdOhpuaROXF7Yj5ugPM_JS36tSP5pTWHh9MwOO3N1tpXT5a9MP1BKvYu1lfa8gVW0hZxabQQAPnh1WAiQZ0X-j1YVBf_plOF-0CubBbKBfP0MapKuGUGZp8JdjkEgh55C45Y9pwFvGqsRyVI25oubocZtLtje5imjPpZWJ0tKdD3J03C71YBYJwhljF_K0gSWE5r5PlsHvY4Jo7Hu0KcpvpaSSQXaog=w1280-h960-no


JBEsGEHNYSkg-uXoXiRQ4oSIqCFNqzZaju898zAvpRnttQviL0Ma-ZzoEg3rVHpXzYfhmIKmOOF6luyG5Ai4BDvNFIagJj2Y8FYOi5AMRNn5BpPkfWqrDgX3f28sY9Z3wKxoUUkOCeH5a7brZ0GJPP_tv3kLXYx0rY-c17h_ohiIwmQcE3YJ2X4AJvC0pwGwIjqrxqh5ObDy9K_KaPALondt1A_D3IYQGd0-yAtCh8w9rL3oCQubE0BhHyxNqXNa8szVWAIczm2zwSjIx64v15OgXCcCof978hj4DDQfAv5wof6U6OBK3cTMwS1pMVFOu7HXj_Dh_5TCeOQ_PPXu6JUESBI_t8mWe-N9Durelq3TrTAB35QRIa6aIyMxWPV43Fa_VX_9uA41zXRW8Y7CVVZjbZvNf7TkLD5OexijXNZWbhfjtwsCKE0-S_zxyKCZPGxfZYCa1y0GsUyFyvHmc8ja2-SW30YuHuVJMg6xmEhyWeyf-IcDuesgcIGmH4YoTHGCCCDGuUDpYTyoFTDAvGlpfA1QkG3AI6DzoqMv0jI2Ive5b9dKah9B_wBiVEQY9H2z2yPQQXvfVsAogaw0Leo4jh92m02r1xV2LOALrkHo7lCntQ=w1280-h960-no
 
Looks good. Look like some 1:1 Jeeps around here.

Can you measure the shocks eye to eye for me? Just curious if they'll work for my 1/18 Yeti.
 
Tuanies,
Smoked my stock motor running 1.5's as well. My solution? Take the Tim Allen and Holmes approach, volt up and then gear down. Need to make a adapter plate and cut some driveshafts.
 

Attachments

  • image.jpg
    image.jpg
    138.6 KB · Views: 808
Tuanies,
Smoked my stock motor running 1.5's as well. My solution? Take the Tim Allen and Holmes approach, volt up and then gear down. Need to make a adapter plate and cut some driveshafts.

I'm running 1.9"s lol. What transmission is that? I was thinking about finding a different transmission that'd fit as well.
 
I'm running 1.9"s lol. What transmission is that? I was thinking about finding a different transmission that'd fit as well.

OH man I forgot they are 1.9's in the SCX. Big gearing difference.

SCX Trans, VP case, HR gears, Super Shafty Top shaft Avid Bearings, the basic faux SS bombproof trans. Used the stock motor plate cause I needed to notch it at the frame and didn't want to do that to my SS plate. The Stock pinions are 5mm so any DS will work cut down of course.

I looked at the Losi MRC trans and RC3WD R2 but they are too wide and I had the SCX waiting for transplant into something anyway.
 

Attachments

  • image.jpg
    image.jpg
    134.2 KB · Views: 558
Is there enough room for the RC4WD divorced t-case?

Yes and no. Yes it will fit on the stock mount but nowhere to put the motor like up front normally. The WB is too short and the Standard size servo at full stuff is taller than the frame rails. Not sure if you can see it but my battery tray up front has 1mm clearance from the servo at full compression. There are some bad things about a SWB mini/micro with limited options for modding.

** Edit if your weight bias is good with battery choice you might be able to run the motor out back but that means a custom mount as it is only 70mm between frame rails.
 
Last edited:
Been a while since I did some updates. It is a when I have 5min here 5min there project anyhow. Plus, the 1.55 Pit Bull Rock Beasts aren’t released yet so no rush on my part.

Changed my mind on using the Stock skid plate. The trans mock up with stand offs bolted to the stock skid was not very rigid and thought even on 2S it would twist a little. Kinda like a stock Jeep frame. Hmmm…so stepped back and had to rethink it.

Not having the smarts to be a machinist, have or run a 3D printer I found a 3/8” block of Delrin I had from some other crazy idea project. I had a well-used Wraith skid plate so I cut that up and used that as a template for the holes.

Drilled, tapped and counter sunk the 3mm holes for the screws.

I have the trans as low as it can go in the chassis with 1.5mm clearance from the motor to the top of the chassis rails. The skid plate area is 5/8” and my Delrin block is only 3/8”. Didn’t want to spend another $25 on a 5/8” Delrin block so drilled, tapped and counter sunk the 3mm holes for the screws and used a piece of a 1/5 scale roll cage I broke for a nylon rod skid plate. The goofy stock skid plate that had the spur gear cover as part of it never hot so may not be needed. When I test, I will see if I even need it but can’t hurt.

Moved the F/R upper links from where they attached to the skid plate and bolted them to the frame instead (Need spacers).

The stock skid like all stock skids has molded in locating pins and of course holes to mount it to the frame to keep it from twisting out. I used one of the 3mm holes in the frame to mount the skid and drilled two additional holes in the frame for 2.5mm screws. All holes on the frame and Delrin block were drilled and tapped for the 2.5 and 3mm screws. I doubt it is going anywhere now.

Still to do:
I need to get spacers for the upper links
One longer bolt (Ran out of 35mm ones) for the trans motor plate so I can put a lock nut on the other side
Cut and shorten the stock electronics tray and make new mounts
Measure and cut Traxxas driveshafts since the trans outputs are about 3/8” higher up from stock.


60A3CF27-B76F-4BEC-86D0-12F58931728E_zpsvnveew9l.jpg

50C871B8-7DDF-482B-8DF7-9C38CB100DBC_zpsoynsaech.jpg

61153678-CCCD-495C-B621-DD3A6D8179C3_zpslvrfyuj5.jpg

DF2E0A0F-C60E-4639-8146-2091CE4FA398_zpsku5zsxbx.jpg


BA5D3F87-2B0D-487F-8C04-ED640AD845EC_zps95efbkwk.jpg
 
Back
Top