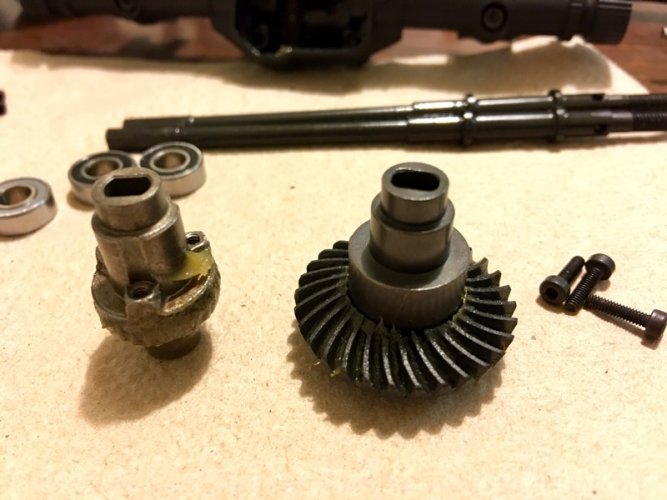
• Welcome to RCCrawler Forums.

    It looks like you're enjoying RCCrawler's Forums but haven't created an account yet. Why not take a minute to register for your own free account now? As a member you get free access to all of our forums and posts plus the ability to post your own messages, communicate directly with other members, and much more. Register now!

    Already a member? Login at the top of this page to stop seeing this message.

Vanquish currie rockjock axels

What did you use to tighten the screws? They are all scored round the head.
I'd bet a penny to the pound that it's over tightening combined with low grade screws that is responsible.
I took it straight out of the stock axles and put them in the curries didn't think of touching the screws

chicken nut bread
 
I took it straight out of the stock axles and put them in the curries didn't think of touching the screws

chicken nut bread

Even if the screws were monkey metal, they would stand up to way more load than that little slope. I think we can be sure the screws were cracked before the slope, and i'd say were likely cracked when tightened. If its an rtr, it could be an issue on their assy line.
 
Even if the screws were monkey metal, they would stand up to way more load than that little slope. I think we can be sure the screws were cracked before the slope, and i'd say were likely cracked when tightened. If its an rtr, it could be an issue on their assy line.
It was out of a rtr... I never touched the bolts at all.the rear axle is out of the same rtr truck.

chicken nut bread
 
Finally got the rest of my parts in to build my Curries and get them mounted. I wanted to give my final thoughts after assembly now that these are ready to run axles. I decided to go with an Incision spool in the rear for strength and reduced slop and some high strength 12.9 hardware on the ring gear. The reduction in slop was immediately noticeable. The shafts are still a slip fit, no hammer required, but the tighter tolerances are nice, big difference over stock. These comparisons are with brand new donor axles that haven't been ran. The bearings fit nice and snug in the pinion area as well as the lockout caps, no complaints here. I love VP's use of bearing carriers for the spool and they make for a very free spinning ring and pinion. The shafts slid right in without issue, bearings top those then caps to finish. One small issue I found after installing the 12mm hexes was that the drivers side axle shaft inserts farther into the housing than the passenger side. You can see the comparison from right side to left in the photos. There is no perceivable grinding but it is very close. I tried swapping axle shafts, each to the other side and it gave the same results. Everything does spin smoothly and freely at this time so I will just keep an eye on the driver's side.

Needless to say, they look amazing on the truck. I can't wait to get them scratched up but my build has quite a ways to go still. I will get the front assembled tonight and mounted and report back. Let me know if you guys have any questions. Here's the pics.
 

Attachments

  • IMG_4531.JPG
    IMG_4531.JPG
    119.3 KB · Views: 2,016
  • IMG_4532.JPG
    IMG_4532.JPG
    113.6 KB · Views: 2,891
  • IMG_4534.JPG
    IMG_4534.JPG
    120.7 KB · Views: 1,994
  • IMG_4535.JPG
    IMG_4535.JPG
    145.1 KB · Views: 2,974
I ran out of hours last night so I didn't get to the front axle until this morning. I have it completed now and wanted to share a couple points of interest. First off, I'm using Vanquish's new SCX10 II scale knuckles with their Curries. The knuckles themselves look incredible especially with the two piece design and bolt on upper steering arm. The kingpin/shoulder screws needed to be clearanced on the edge of the button head in order to clear the inside of the aluminum upper steering arm. Not a huge deal but worth mentioning. The inner bearings were a nice press fit while the outer bearings are a bit looser to the point of falling out of the knuckle just by gravity. The knuckles slide onto the inner C of the axle with just the slightest friction that disappears as soon as you install the screws and turn the knuckle back and forth a few times. This is also where I noticed another issue. The passenger side knuckle does not clear the track bar mount to steer full right. I will have to take a file and clearance the back of the right side knuckle. Again, not a huge deal but something that should be addressed on $45 knuckles.

The rest of the axle went together without issue and once fully assembled, look very nice. I did keep the stock front spool but swapped the stock hardware for 12.9 screws while I was in there. The tubes are the exact same outer diameter as the stock housing but they maintain that diameter all the way from the diff to the inner C in front and the bearing caps in the rear. There's no big step up like there is on the ends of the stockers and no hardware to hang up on rocks. The link and shock mounts are also much nicer looking and stronger because of double shear on the shock mount. The bottoms of the diffs are also much smoother than stock and because of the laid back diff cover, there's no flat wall hitting rocks on approach and departure the way the stock diff covers do. These VP Curries for the SCX10 II have a great design and with just a couple more tweaks in manufacturing, will be a great upgrade to the stockers for sure.

The argument of what slides better on rocks, plastic or aluminum, is an argument for another thread but I can say this, with these Curries, there is much less surface area and hard edges that can make contact with rocks or ledges. I've ran plastic and aluminum axles side by side and have never noticed any significant difference in performance or ability.

I will get this right side knuckle clearanced, get everything mounted and installed on my build and post more pics.
 

Attachments

  • IMG_4542.JPG
    IMG_4542.JPG
    151.8 KB · Views: 4,353
  • IMG_4541.JPG
    IMG_4541.JPG
    112.8 KB · Views: 1,908
  • IMG_4540.JPG
    IMG_4540.JPG
    145.7 KB · Views: 3,114
Here's a pic of how much I had to clearance on the backside of the knuckle to clear the track bar mount and achieve full steering throw. Unfortunately my hands weren't steady enough and I nicked the back of the knuckle a couple times. At least it's the back of the knuckle and won't be easily seen but it's disappointing that I had to do this at all.
 

Attachments

  • IMG_4545.JPG
    IMG_4545.JPG
    112.5 KB · Views: 1,921
Bummer. You'd think that would have been checked.

I didnt have to do anything to my SSD knuckles. I think I'll stick with them for my other builds too. I really dont care for the look of that spacer on the driver side.
 
Bummer. You'd think that would have been checked.

I didnt have to do anything to my SSD knuckles. I think I'll stick with them for my other builds too. I really dont care for the look of that spacer on the driver side.

In retrospect, I should've gone with the SSD knuckles. I would've saved money, had less issues, and the option to run knuckle weights. For some reason I thought the VP knuckles would look much nicer or at least work with VP's axle better than a different knuckle from another company. Sadly, I was wrong. I may still move these knuckles to my other 10.2 and order the SSD knuckles for this axle. Then again, I'm tired of messing with them and will probably just run them as is.
 
Here's the front mounted to the truck. Nothing had to be adjusted as far as link lengths go. Steering links, track bar, and upper and lower suspension links all stayed dialed in, that was a nice surprise not having to readjust 5 links. Also due to the diff cover design and position, I did gain some valuable suspension uptravel. With the stock axle in place, I could not get full compression on both sides because the track bar would contact the stock pumpkin but now I get real damn close to full compression. With a bent track bar like the one LURC offers, I could easily achieve full compression with no contact.

Everything rolls smoothly and suspension and steering cycle fully without issue, except for the minor track bar contact mentioned above. Visually, these housings are a huge improvement over stock and the stock floppy knuckle syndrome is completely cured; no more drift car negative camber on the front of your rock crawler. If/when all of my previous observations are addressed, I would have no problems recommending these housings as a scale and performance upgrade. I've heard that the diff cover gaps no longer exist on newer production housings. The knuckles are a separate conversation. Although they are no doubt an improvement over the stock plastic knuckles, they may not be the best option when price and the ability to run knuckle weights are considered.

I very much look forward to getting these things on some rocks as soon as possible and will report back after the first run.
 

Attachments

  • IMG_4550.JPG
    IMG_4550.JPG
    104.1 KB · Views: 2,142
  • IMG_4554.JPG
    IMG_4554.JPG
    168 KB · Views: 3,175
My front upper link needed to be lengthened a bit.

Hmm, maybe I should check my pinion angle again. It may need some adjustment. Because of caster, it seems like we can never get a perfectly straight pinion like we can in the rear.
 
My pleasure, I figured $250 housings and $45 knuckles are a significant investment and I should share my experience so others would be better informed. I only wish the actual "testers" had been more forthcoming with the info when talking to Vanquish about their product. I understand it's a bit of a catch 22 and you don't want to tell the hand that feeds you their product is less than perfect but you can't tell me that months of pre production testing let this many issues fall through the cracks. This is why I enjoyed working with Erik at DLux so much. He told me upfront, "be honest and try to break it". Lying about issues helps no one and only makes you look bad in the long run. This is the other reason I chose to use Vanquish's knuckles with their axle housings. I didn't want any excuses like parts compatibility or "there's no way we can test every possible combination" BS.

Sharpie, engage!
 
I have my black Currie axles installed. I finally got a chance to do a little light crawling. My buddy drove my other SCX10 ii with the plastic stock axles. The contact area and sliding over rocks and obstacles mentioned above. I felt that the Currie axles had an advantage. I was using stock knuckles. My SSD knuckles and weights will be installed this weekend. But with snow on the ground, football on TV and currently only 1 degree temps. I won't be testing until later.
Thanks for your detailed upfront and brutality honest reviews Screamer. And hopfully some warmer weather will be here soon and we can all get more time on the Currie axles.
 
How do the black axles look after a few scratches? I like the black look but was concerned they would look worse after being scratched up
 
Bil, is right. Black aluminum housings get more "distinguished" with age and use. I have black and gray VP Curries on other builds so I wanted to try silver this time. Honestly all three look great to me but the character that black Curries earn looks really cool.
 
29abfe86d9005377337477a96f7e4413.jpg
It adds character!!

Donner Party Crawlers D.P.C.
 
Back
Top