| |
 01-29-2008, 04:49 AM
| #1 |
| Rock Crawler Join Date: Jan 2007 Location: Lehigh Valley
Posts: 956
|
Well I finally decided to post pics of my PW in progress... This is not a show truck by any means, it actually started out as a "dump the parts box out and see what happens" build. It originally had 2.2 Swamp Dawgs (good thing I didn't want to trim the fenders out). This rig is going to get used.... Nothing fancy, SW2 chassis, TLT's, Pede, CS-70 servo, HPI wheels, Tazer esc, stock Maxx shocks..... So here is my work in progress.. I had an extra set of Rock Lizards that looked like they needed to go on a diet, and I was willing to gamble... Looks like they fit???  First day on the rocks... Just to see how it does & looks. It needed dirt and scratches on it also... Show trucks stay in a garage all but maybe four days a year, work trucks are lucky if they get washed four times a year....    I have to adjust the WB a little but she rolls.... But it's missing something (besides glue for the front tire)??? Bumpers and a winch... Winches on these trucks were BIG and primarily PTO driven... So I set out to try. I wanted all that and to be able to free spool to cable out. Just modding a servo was not an option... This is still a work in progress and has undergone and will endure many changes, so bear with the progress. Initial spool - Bakelite blocks drilled for bearings, cut down the middle and then drilled for pinch bolts. (wooden spool may change, but it is the perfect width)  I found a jar full of these "do-dads" my Dad had, they looked promising   PTO drive??? Well I found a stainless rod with threads on the end that are the perfect pitch for the spindle gear... HMMM... Worm drive!!! The only problem being???? How do I free spool with this?? Never fear... T-Maxx's are good for something... "PARTS"... Like most people with Maxx's I have a whole drawer full of "Parts" mostly broken ones though... Back to the build!!!! I could use a Maxx knuckle to stablize the shaft, hey the bearings will work also (Just minor mods to the shaft)... Problem solved, onto the next. How to free spool? Well a Maxx bulkhead and A-Arm pivot!!! So if I mount the spool to a bulkhead, and the knuckle to the A-arm I can pivot the PTO shaft away from the spool gear and free spool. Now I can mod a servo (again use Maxx yokes & d'shafts) The shaft drops off the gear as the A-arm is raised   Now what?? The rig needs a bumper for this contraption....    It's just a bit to big, it looks like I would need to weight the rear (no pun intended) This is pretty much where it sits now, I did refine the winch a little to get rid of the top blocks in favor of straps for the bearings... Next will be a new smaller bumper and then mount all this under the body. It will fit... I have to work out a way to lock it in free or engaged, but that shouldn't be too tough:-( I could always get a 4 ch TX/RX and use a servo??? Nah... Too easy!!! I only bought a handful of bolts, the wheels, a wooden spool, and some alu for the bumpers, everything else is recycled. I am going for the recycled theme.... Revised spool  It ain't pretty, but it is strong..... |

|  |
| Sponsored Links | |
| | |
|
01-29-2008, 05:08 AM
| #2 |
| Rock Crawler Join Date: Jan 2007 Location: monson
Posts: 651
|
jmz6, Looks great. Those axials chopped up actually look like some sort of mutant NDT tires. great job. I cut up a pair of dirt hawgs for my power wagon build (love those PWs). very clever use of the threads on that shaft/bolt? as a worm gear, wouldn't have thought of that myself, although now that I see yours I might just have to steal that idea (along with the lizard cut and shuts)  |

| |
|
01-29-2008, 08:57 AM
| #3 |
| Rock Crawler Join Date: May 2005 Location: Fort Wayne
Posts: 728
|
Great work on the tires there and that winch looks awesome! Keep up the great work!
|
|
| |
|
02-01-2008, 10:54 PM
| #4 |
| Rock Crawler Join Date: Jan 2007 Location: Lehigh Valley
Posts: 956
|
I had to get out into the shop and get something done on this tonight... I mounted the winch setup with the revised winch, surprisingly it doesn't mess with the articulation when everything is in place... I still need to trim some off the mounting plate in front of the winch and think of some type or fairlead, then add some bumper "ears" like on the 1:1's. Not quite like the real thing, but I think it looks better than before. I connected everything up for a test and it works!!! I have some fine tuning to do, but it's close...     Something kinda like this....  |
|
| |
|
02-02-2008, 07:46 PM
| #5 |
| RCC Addict Join Date: Nov 2005 Location: Kansas
Posts: 1,280
|
those tires are sweet! the winch looks good too... even on the sw2 the truck looks pretty sweet!
|
|
| |
|
02-28-2008, 04:12 PM
| #6 |
| Newbie Join Date: Feb 2008 Location: klamath falls
Posts: 32
|
Looks great ! I love to see the Dodges on here. Keep it up! |
|
| |
|
02-28-2008, 05:50 PM
| #7 |
| RCC Addict Join Date: Dec 2007 Location: Moncton, NB, Canada
Posts: 1,962
|
awesome, reminds of the one that was on Trucks! a season or 2 ago
|
|
| |
|
02-28-2008, 06:13 PM
| #8 |
| I wanna be Dave Join Date: May 2007 Location: Taylors Falls just hanging with the MNRCRC crew.
Posts: 7,843
|
Your winch design is out of control, nice work man |
|
| |
|
02-28-2008, 08:06 PM
| #9 |
| Rock Crawler Join Date: Jan 2007 Location: Lehigh Valley
Posts: 956
|
Thanks..... My PW is getting a new chassis at this moment, actually it has a "new" one and it looks kinda rusty... There have been a few updates since my last post The chassis is 100% alu and was completely "welded" with Alu-Weld rod. Last pic is the chassis during build.Rust, primer, huge PTO winch..... Kinda like the real deal!!!! |
|
| |
|
03-02-2008, 03:24 PM
| #10 |
| Rock Crawler Join Date: Jan 2007 Location: Lehigh Valley
Posts: 956
|
I was having a little trouble trying to figure out how to make the front bumper, but here it is. I used a couple pieces of Bakelite, some ferrules for rollers, and some fabbed "D" rings..... It is hanging loose right now, because I need some longer bolts to hold it on.... I just have to do a little "body-work" and mount it to the chassis and my "dump the parts box out and see what happens build" is almost done.
|
|
| |
|
03-03-2008, 01:56 AM
| #11 |
| Pebble Pounder Join Date: Feb 2008 Location: .
Posts: 99
|
This is totally awesome, I simply love it Everything is perfect: the tires, the chassis, the winch and its a DODGE Keep up the very good work |
|
| |
|
03-03-2008, 07:21 AM
| #12 |
| Quarry Creeper Join Date: Jan 2007 Location: I live in my own world,they know me here
Posts: 402
|
Awesome truck,and I like the sticker on the bedside,I've seen it somewhere before
|
|
| |
|
03-03-2008, 07:33 AM
| #13 |
| RCC Addict Join Date: Sep 2007 Location: Westland, MI
Posts: 1,508
|
Great job. |
|
| |
|
03-04-2008, 02:09 PM
| #14 |
| Quarry Creeper Join Date: Sep 2007 Location: detroit
Posts: 383
|
Man I love this thing! I can imagine a wrecker winch on the rear though, with the crane arm and all! |
|
| |
|
03-09-2008, 06:56 PM
| #15 |
| Rock Crawler Join Date: Jan 2007 Location: Lehigh Valley
Posts: 956
|
The sun finally came out, so I snapped a few pics. Just yard shots but at least it got there under its own power. I found some winch cable that looks real... Yes it is steel, this winch has plenty of power to wind it up with about 12' of cable... My next dilemna is paint.... Should I leave the distressed look, or clean it up a little? (I can't go too shiny, the chassis is is all "rusty") I like the way this one turned out..... Looks like I have to find another PW body (maybe the Bolink if I can find one)... I want to try a wrecker with a B** A** PTO winch in front and another for the boom.... Just a few more scale details to do yet.... |
|
| |
|
03-10-2008, 03:04 PM
| #16 |
| Rock Crawler Join Date: Feb 2007 Location: Bridgeport
Posts: 589
|
I think the paint looks awesome just the way it is. Some lights would finish it off nicely. Last edited by karlos; 03-10-2008 at 03:05 PM. Reason: sp |
|
| |
|
06-20-2008, 10:34 PM
| #17 |
| Rock Crawler Join Date: Jan 2007 Location: Lehigh Valley
Posts: 956
|
My daughter pestered me to take her to the Dollar Store the other day and this is what I found (for me)  I am always on the lookout for whatever might be usefull.... Then I remembered my poor, neglected, dusty, dirty, shelf decoration. I couldn't neglect my PW any longer..... Poor guy got shelfed for another build.. I wanted to put lights in this during the build but nothing seemed to fit the way I wanted; High Lift buckets stuck down too far. So after cutting some extra plastic away, I was left with a bucket that fit the PW body light pocket perfect. 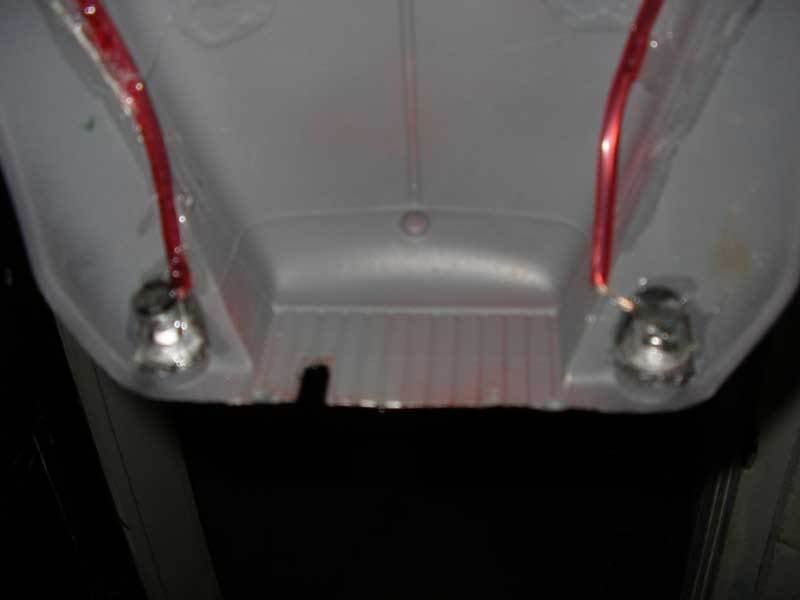 In keeping with the redneck theme, I had to add some headlight guards. Black fiberglass screening looked like it would work. 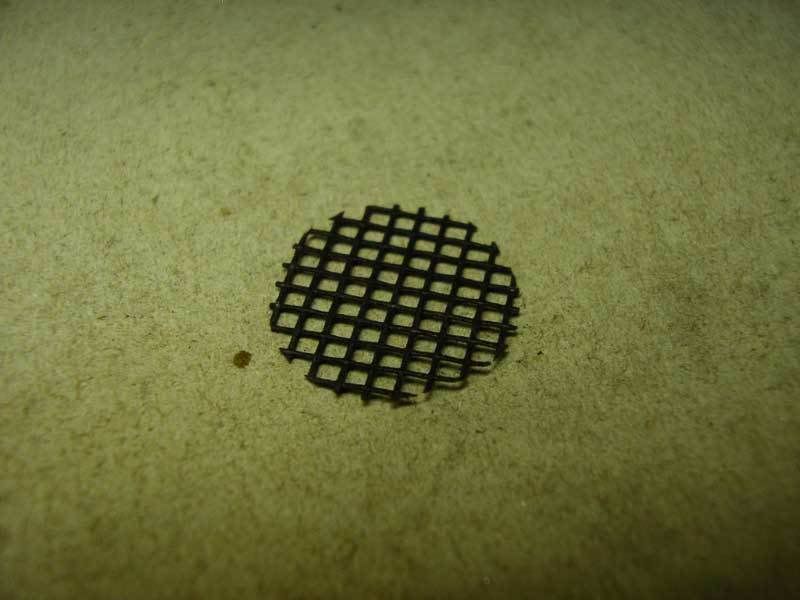 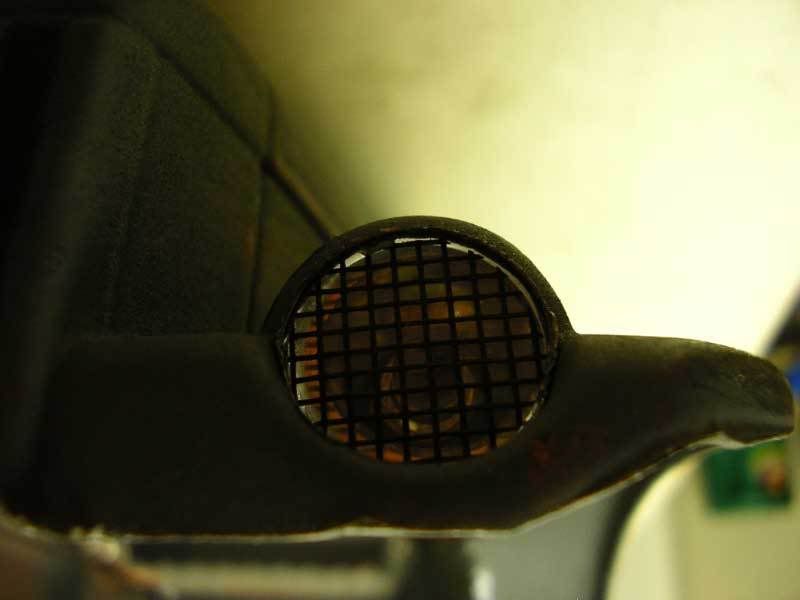 Making decent looking holes in the body was fun:-(. I sharpened the edge of a piece of 1/2" copper pipe to form a punch, but it was way to soft once I got an edge on it. HMMM!!!! Why not heat the end of my copper punch and just melt a perfect hole, just don't melt anything else.... It was sharp enough to cut some screening though.... Next was to Shoe Goo all this in....... The end result... 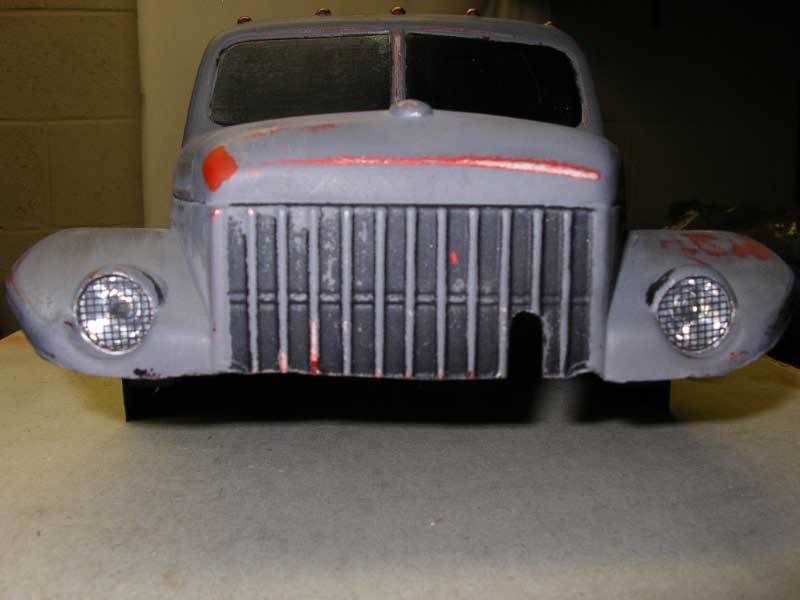 Now toss the body on the chassis. 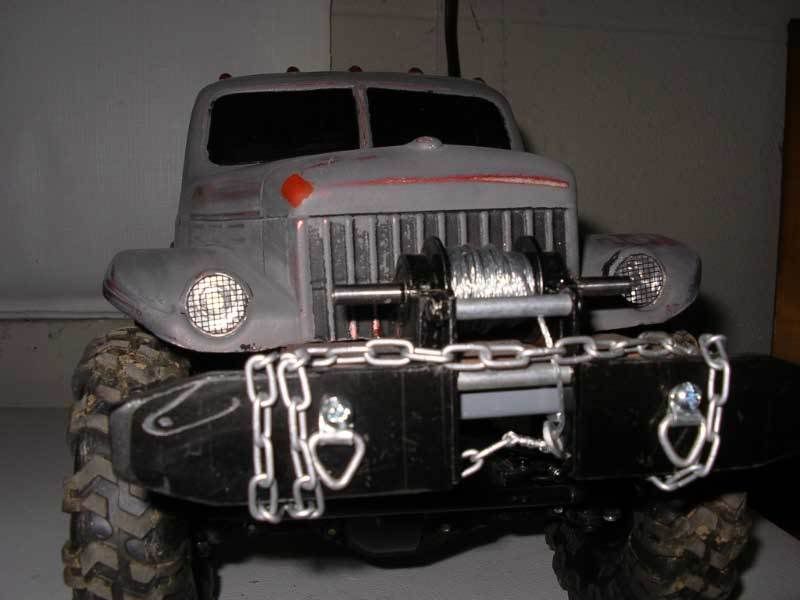 Lights on 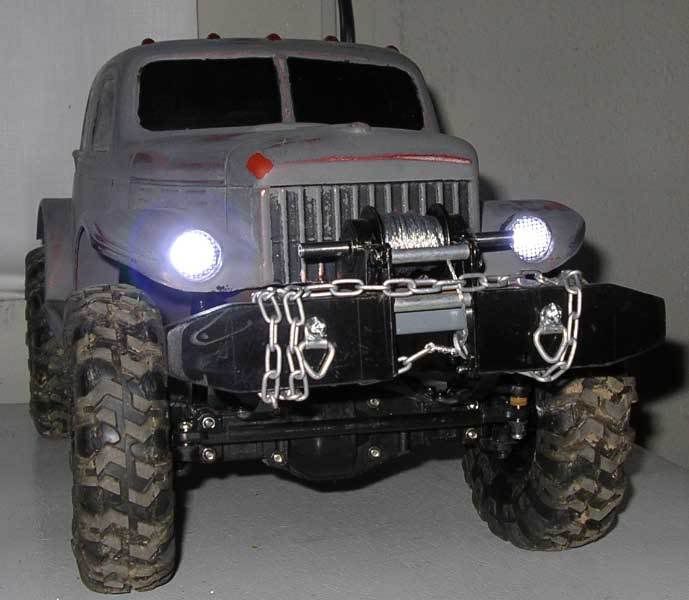 Light the way  I guess I need to add a few more scale items and finish this one finally.... It isn't a pretty truck, but it gets looks..... Last edited by jmz6; 06-20-2008 at 10:48 PM. |
|
| |
|
06-21-2008, 01:08 PM
| #18 |
| Rock Crawler Join Date: Feb 2007 Location: Bridgeport
Posts: 589
|
Nice job on the lights. Looks better now. |
|
| |
|
06-30-2008, 10:25 PM
| #19 |
| Rock Crawler Join Date: Jan 2007 Location: Lehigh Valley
Posts: 956
|
Found some better chain and made a decent winch hook, next will be a couple hooks for the tow chain.    |
|
| |
 |
| |


 Linear Mode


