| |
| |||||||
 |
| | LinkBack | Thread Tools | Display Modes |
 08-10-2008, 09:54 PM
| #1 |
| RCC Addict Join Date: Mar 2007 Location: St. Louis (High Ridge)
Posts: 1,279
|
I figured I'd do an official build thread for this little guy, seeing as he is more fun to drive than I though possible given the width and height This also is part of a Newb's guide to chassis making TVP edition, so the chassis will get lots of pics in the process. So here we go: I started with a lunchbox hardbody that I purchased new for a 1.9 spec class we were starting in St Louis. Then i got the thing and decided it was way too small to use for that purpose. So I decided after narrowing some axles for fun, that they would fit nicely under the LB body. Starting with the basics,  layout the body on graph paper. for something larger than this tape together multiple sheets.  be sure to leave enough room for running gear to be sketched in. I am using Mini LST shacks, traxxas tmaxx tie rods, and narrowed Wheely King axles I did a writeup of here  the page should look roughly like this (for a TVP chassis)  next add the drive train you plan on using. I have a Wheely King transmission with a clocked motor plate, a 2.5:1 metal airplane GRU for 380 size motors, and a stock Mini Quake motor. the gearing on the transmission is I think 19/90, but i'm not sure.  finish sketching your chassis based on shock mounting and link clearances  I had to allow for a cutout for the clocked motor plate which you can see in the chassis sketch here  next i cut out the graph paper chassis sketch and attached it to some cardboard. like the side of a beverage box so it can still be cut easily with scissors.  I traced around the graph paper, then transfered it to the other side.  two identical chassis halves   looks like it will fit OK in the LB  Next i poked holes in the cardboard, and mounted up the trans  as I lined up the other side I had to cut away portions to fit the clocked motor and GRU   next I cut out crossmembers for the chassis  I used packing tape to assemble the chassis   and added the axles  wheelbase and track width checks    Everything looks good, so I cut the cardboard chassis apart, and traced the pieces onto a scrap of plexiglass I had laying around.  This is the only measuring devise I used the whole time  after marking out where the cuts needed to go, I drilled half inch holes in the corners of the cutout. This allows the hacksaw blade to make a 90* corner  The hacksaw i was using allowed the blade to be mounted at 0*, 45*, and 90*. Very handy for cutting this part out  Now is the part I hate. Filing. evening up all the edges to make them symetrical if not identical takes time and patients, somethings I have little of.   Now with all the pieces filed smooth and ready to put together, it was time for some pre drilling checks  I used a #30 drill for the large thru holes, and a #37 drill for the M3 tapped holes getting the trans mounted up  axles / shocks / lower links  Upper links were done last because they were going to be the biggest pain. I used Traxxas 4mm links all the way around. For the front of the truck, I had to run a 4mm die about 3/8" further up the right hand thread side of the links, and cut off about 3/8 of an inch to make the links short enough. The die I put in a 3/4" socket on the impact gun and zip, zap, done. the cutting was done with the dremmel.  |

|  |
| Sponsored Links | |
| | |
|
08-10-2008, 10:13 PM
| #2 |
| RCC Addict Join Date: Mar 2007 Location: St. Louis (High Ridge)
Posts: 1,279
|
Steering was the next pain I had to get sorted out. the suspension travel, and the narrowness of the axle made a traditional draglink across the front impossible. same with servo on axle, no room. I went to one of my friends for help, and he suggested a front to back short drag link like Mack used on their trucks in the 60's. This is what i came up with.    The servo sits transverse on end, the lower servo mount slots right in between the upper links at full compression, the upper mount is tied into the front and opposite side of the chassis with a cut leftover. servo tape secures the rear of the servo, screws the upper mount. It has a little bit of flex to it, and only a little bumpsteer. So far so good.  the servo brace got in the way of my body mounts for the front which is the bridge across the servo you can see in the above pic. here are pics of the rear cross brace and the stock LB body mounting posts.   the rear body mount cross member also serves to strap in the battery, a 4000mAh 2s lipo, good for about 2:30 of run time |
|
| |
|
08-10-2008, 10:19 PM
| #3 |
| RCC Addict Join Date: Mar 2007 Location: St. Louis (High Ridge)
Posts: 1,279
|
Here it is from running around today.    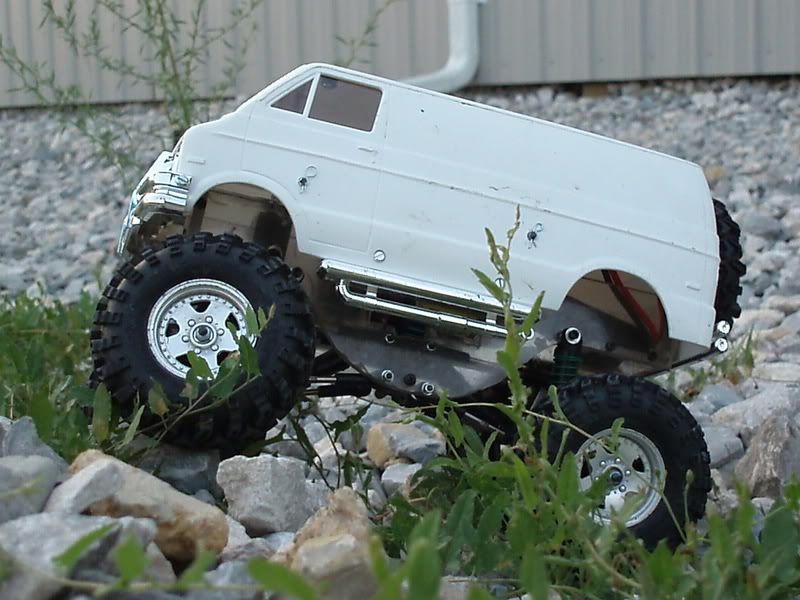   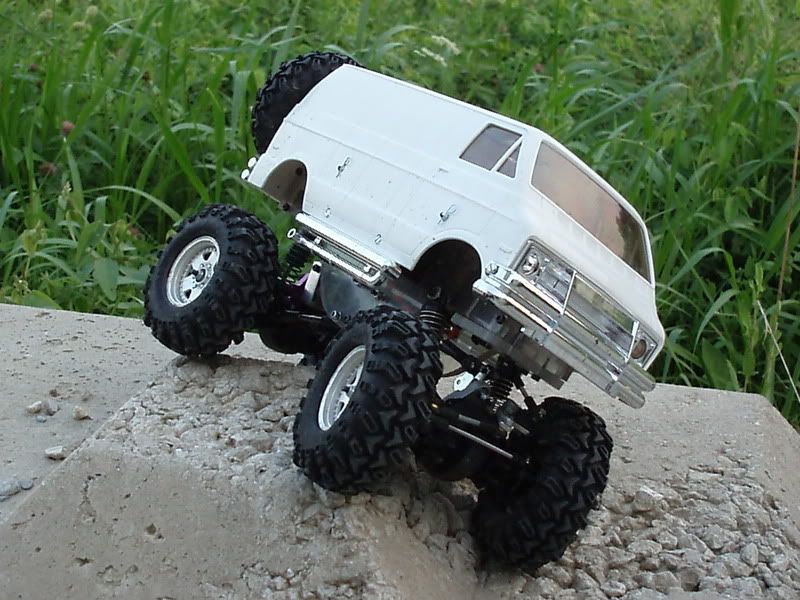   |
|
| |
|
08-10-2008, 10:20 PM
| #4 |
| RCC Addict Join Date: Mar 2007 Location: St. Louis (High Ridge)
Posts: 1,279
|
Videos soon 45% up 11:27 54% up 11:56 Last edited by hairba11; 08-10-2008 at 10:58 PM. |
|
| |
|
08-10-2008, 10:34 PM
| #5 |
| Rock Stacker Join Date: Mar 2008 Location: socal rock garden
Posts: 80
|
awesome lunchbox build  i like it . Now get that video out cant wait to see it in action . i like it . Now get that video out cant wait to see it in action .
|
|
| |
|
08-10-2008, 11:10 PM
| #6 |
| RCC Addict Join Date: Mar 2007 Location: St. Louis (High Ridge)
Posts: 1,279
|
video driveway  side yard  waiting on youtube for the larger vid. youtube vid http://www.youtube.com/watch?v=_zvMIe4zdfc hope you enjoy Last edited by hairba11; 08-11-2008 at 05:06 AM. |
|
| |
|
08-11-2008, 02:56 PM
| #7 |
| I wanna be Dave Join Date: Aug 2007 Location: santa monica
Posts: 3,687
|
hey, that turned out nice. would look better with mini cooper 1.5 wheels with reduced tires on it... pablo- the 3.7" tires will be about 3" when reduced to 1.5  |
|
| |
|
08-12-2008, 09:30 AM
| #8 |
| RCC Addict Join Date: Feb 2008 Location: Hiatus..sutiaH
Posts: 1,620
|
I can't believe more people haven't responded?! That was a cool build you did. At first I was a bit leery about the process but it turned out really cool. I love tho old lunchbox. Those old Tamiya's were the bomb. Great job on the innovative approach. Paint that beotch up. I would suggest the original paint/stickers if you can find them. That would look soo cool with what you have done.
|
|
| |
|
08-12-2008, 12:15 PM
| #9 |
| Nope..   Join Date: Aug 2005 Location: Whiteland, Indiana
Posts: 1,849
|
Pimpin. Paint it all 70's crazy with metal flake and murals.
|
|
| |
|
08-12-2008, 08:21 PM
| #10 | |
| RCC Addict Join Date: Mar 2007 Location: St. Louis (High Ridge)
Posts: 1,279
| Quote:
I dunno, you better send those to me so I can check them pumpkin clearance would drop from an inch to about 5/8 though. Now maybe i could do the 1.5 sidewalls on the 1.9 tires.... I have a stack of sample van photos. maybe I should have a poll | |
|
| |
|
08-12-2008, 08:36 PM
| #11 |
| I wanna be Dave Join Date: Aug 2007 Location: santa monica
Posts: 3,687
|
I ran them and ground clearance loss is noticable but with careful placement of tires you can overcome that. I currently run the 1.7's and have the same issues with clearance...
|
|
| |
|
08-12-2008, 09:08 PM
| #12 |
| RCC Addict Join Date: Mar 2007 Location: St. Louis (High Ridge)
Posts: 1,279
|
yeah, i read through your build. the 1.5s looked good, but it is hard to beat the brat wagons. I think I have some floating around. It might be worth looking for them.
|
|
| |
|
08-13-2008, 04:54 AM
| #13 |
| Rock Stacker Join Date: Aug 2008 Location: USA
Posts: 81
|
I love it, HB! The picture of it with the cardboard chassis really made me smile. |
|
| |
|
08-13-2008, 10:15 AM
| #14 | |
| I wanna be Dave Join Date: Aug 2007 Location: santa monica
Posts: 3,687
| Quote:
| |
|
| |
|
08-13-2008, 10:40 AM
| #15 |
| Rock Crawler Join Date: Feb 2007 Location: Bridgeport
Posts: 589
|
Here ya go! 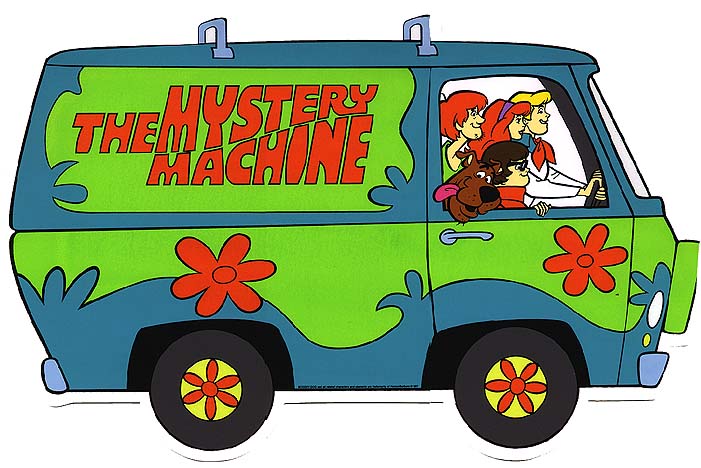 Scooby Dooby Doooo! |
|
| |
|
08-13-2008, 11:07 AM
| #16 |
| I wanna be Dave Join Date: May 2006 Location: akron
Posts: 4,054
|
I love the lunch box wheely in the vid the truck looks great lots of home brew monster trucks have huge wheels from tractors. saw this at jeep fest 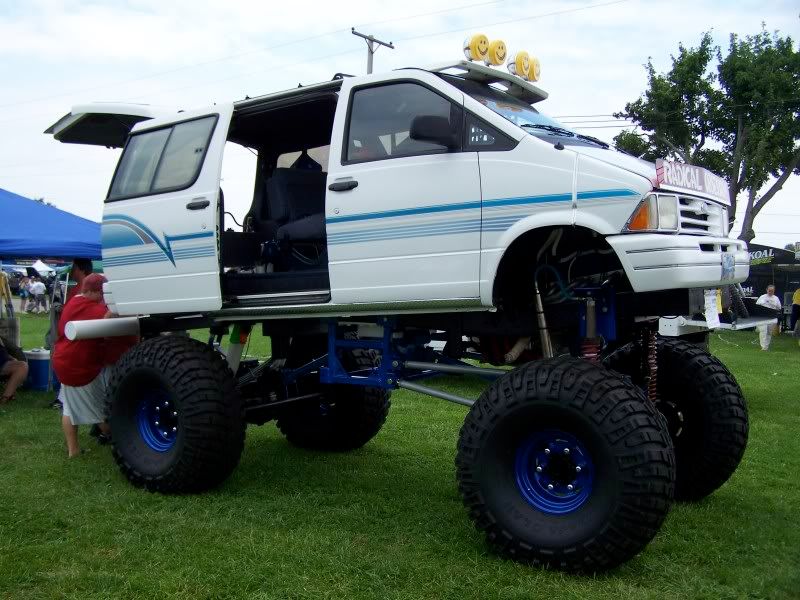 it was running 15's but this wasnt  I wouldnt change a thing it looks good. |
|
| |
|
08-13-2008, 09:55 PM
| #17 |
| RCC Addict Join Date: Mar 2007 Location: St. Louis (High Ridge)
Posts: 1,279
|
I've almost been thinking about putting a yellow light on the roof with a ladder rack and some pipe strapped to it, painting the trim and lights and calling it good. or it does look like it could use a fulle exo treatment..... |
|
| |
|
08-13-2008, 10:24 PM
| #18 |
| Quarry Creeper Join Date: Apr 2007 Location: St. Louis
Posts: 267
|
I like the Mystery Machine Idea.
|
|
| |
|
08-13-2008, 10:52 PM
| #19 | |
| RCC Addict Join Date: Mar 2007 Location: St. Louis (High Ridge)
Posts: 1,279
| Quote:
sorry, it won't work. as you can see from the low belt line, low headlights, rounded nose, and doors in front of the front wheels, the mystery machine is obviously a dodge a 100 tradesman van the lunchbox is obviously a chevy/gmc vandura from the mid 70's  what is most mysterious about the mystery machine is the fact they never had to tow the damn thing to the dodge dealership. Last edited by hairba11; 08-13-2008 at 11:00 PM. | |
|
| |
|
08-13-2008, 11:45 PM
| #20 | |
| I wanna be Dave Join Date: Aug 2007 Location: santa monica
Posts: 3,687
| Quote:
go search and rescue!  or do the pipes on ladder rack but make sure you make a good logo, lol...  | |
|
| |
|
| |


 Linear Mode


