| |
| |||||||
 |
| | LinkBack | Thread Tools | Display Modes |
 02-14-2017, 08:20 AM
| #1 |
| Quarry Creeper Join Date: Aug 2014 Location: holland
Posts: 253
|
First, a few steps back as this built progressed a bit already. Plans were to built a Land Cruiser 79 as trail/scale rig with adequate capabilities. For this reason I bought a SCX10 kit. The kit ran so well my son wouldn't let me take it apart again. Which left me with an old AX10 as a donor... Needless to say that doesn’t come close to the plans I have. Axles, links and other bits might proof useful nonetheless. So started from scratch; I digitalized An SCX10 chassis rail. Upgraded it somewhat with shock hoops, up and under. (Cantilever might be an option). Then I had it punched out of 2mm aluminium.  Skidplate: Then, as the AX10 skid failed the test of compatibility, I went on drew up my own (mock up) skid in 3D.   And let the 3D-printer have his way with it.   Wraith axle cracked: Also the AR60 axle were way to wide for my plans. So I hacked them up.  Top to bottom: SCX10, shortened Wraith axle and the original Wraith axle.  Same width as a SCX. I hope it’ll do the trick under the body.  In order to get as narrow as possible I increased the offset of each wheel by 5mm (1/4”)   Link setup. For now a mock up with AX10 link will have to do   4-link in the rear. CMS setup in the front. Prototyped the braces   Now I enter the area that’s very ‘body’-dependable. One of my requirements is that a full interior can be fitted. ( as full as practically feasible, that is) This means that the Axial transmission cannot stay on the skid plate. Let’s shove it to the front. Along with the steering servo an servo winch. I found a spot just behind the shock hoops, low enough that it fits under the body and dashboard. For now I assume it’ll leave room for the servos. Have to wait for the body though  In complete compression it barely raises above the hoops  …somebody told me the body (ordered in September) is due to arrive januari 20th… |

|  |
| Sponsored Links | |
| | |
|
02-14-2017, 08:22 AM
| #2 |
| Quarry Creeper Join Date: Aug 2014 Location: holland
Posts: 253
|
Fiddled around with the steering link to get it as aligned as possible to the panhard bar. Updated the printed axle brace in the process.   The mounting of the remaining upper link is been altered aswell. By bending it upwards at both ends I created a lot more space atop the suspension to house the motor and transmission.  I think the position of motor/transmission and servo is more or less set by now. Physically mounting the body should resolve that.   Heres the chassis completely bottomed out. (no shocks). Aiming for a low COG. .  Alternatively I could go for splitting the transmission and motor-spur combination. Mounting motor and spur upfront and the transmission flat on the skid. That will require a new motor and topshaft mount. A bit like this:  (Installing a "ToyZuki's fabrication Motor Mount") [youtube]http://www.youtube.com/watch?v=y2VIccNdFOo&feature=youtu.be[/youtube] |
|
| |
|
02-14-2017, 08:23 AM
| #3 |
| Quarry Creeper Join Date: Aug 2014 Location: holland
Posts: 253
|
It’s alive!! (More or less) Started fitting and shifting parts again. Now that the body is here I can see where to fit the parts exactly. I screwed the main body parts together to see the space underneath.  The (again altered) motor position seems okay. Neatly under de bonnet. Placed on a scrap piece of aluminium and bent to hold it in position.  I did, as it turns out, underestimated the space needed for a good placement of both servos. Servo arm for steering requires a lot of room.  Eventually I had to lay down the steering servo. In any other position the arm hit either the chassis or panhard. The winch will fit between the rails. (White brace is temporary). I plan on making the winch drum visible from the topside of the bumper. The 2 (black) screws are there to keep the body leveled during fitting.   Elk nadeel heb ze voordeel! (Famous exclamation of Johan Cruijf, Dutch soccer layer, -trainer, and -annalist) meaning: every disadvantage has its benefits. Benefits of the uneconomically flat position of the servos leaves a nice open space under the bonnet. Battery compartment? I do have to look for shorter shocks or shorten the AX10 leftovers. Around 80mm (3.5”) Ik moet nog wel even opzoek naar kortere schokdempers, rond de 80mm. Misschien dat ik met (ingekorte) SCX10 shocks wegkom. Just printed a mount/brace for the steering servo. (It got a bit late so no pictures yet, sorry) T-case is on its way from china, hence the loose drive shafts. Short term to do list: - Built new links - Internals of the axles (beeftubes, shorten axle shafts) - Rework rear suspension This is where it sits right now. Not the fastest built ever. Enjoying every minute of it though. I don’t claim to be ‘on par’ with most builds on this site but I hope to finish it as a capable and (reasonably) good looking rig. |
|
| |
|
02-14-2017, 08:24 AM
| #4 |
| Quarry Creeper Join Date: Aug 2014 Location: holland
Posts: 253
|
So the transfer case arrived. In the previous skid plate I didn’t include any mounting holes or tabs. Assuming adjustments would be needed anyway. Apart from adding the mounting holes for the transfer I also places the lower link mounts more to the outside.  Fitting the transfer case was a breeze with the new skid. (Made new links to replace the sloppy AX10 ones)  I think a nearly full interior should be possible. The shaft between transmission and t-case is a shortened Axial one looks like I need to tilt the motor /transmission a bit backward to reduce the angles on the joints.  I started pre-fabbing a bumper. I unfolded a 3D model of it and printed it (old fashioned ;) ) on paper.  Placed it on a sheet of 1mm aluminium an traced it with a hobby knife.  Then, bending it 2 or 3 times, it cracks and you can fold it back to 3D.  Mocking up for fitment. Edges near the wheel wells need trimming to clear properly. Wells themself as well I’m afraid. At least I can see whether the winch will fit and how to mount it.  |
|
| |
|
02-14-2017, 08:25 AM
| #5 |
| Quarry Creeper Join Date: Aug 2014 Location: holland
Posts: 253
|
There are a couple of dilemmas I’m facing right now, with which I hope some of you can help me with. Mainly it concerns in which order the tackle the different issues. At the moment I’m placing each item needed for a rolling chassis in such a way to avoid clearance issues later on. Is this wise, or should I mount the body first to get the main measurements fixed and attend clearance issue later (altering the just built rolling chassis)? Further I’d like to make a hinge type mount with a hinge at the back and a locking mechanism behind the grill. (Leaving the bumper, sidesteps, bull- and bush bars on the chassis). Since this is my first hard body built (first built other than kit versions that is). Will it be strong enough to secure the hinge part with 2 or 4 bolts in the bed floor? Do I need to reinforce the body front to back or will the 4 screws that connect the cab to the bed be sufficient? Rock sliders (beefed up sidesteps) will be mounted to the chassis, Not to the body. can anyone enlighten me? |
|
| |
|
02-20-2017, 12:06 AM
| #6 |
| Quarry Creeper Join Date: Aug 2014 Location: holland
Posts: 253
| 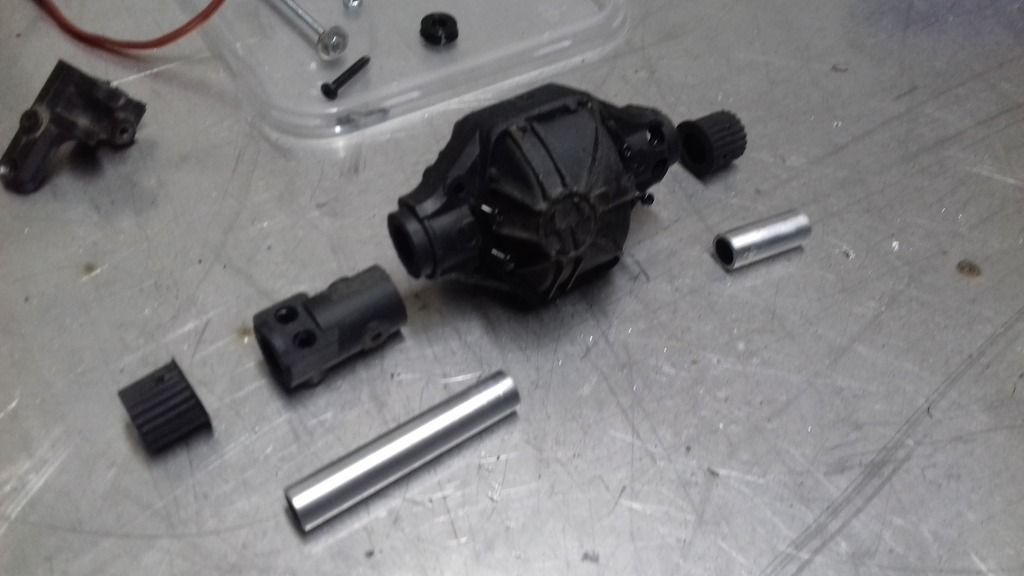 The hacked up Wraithaxles are being tubed. 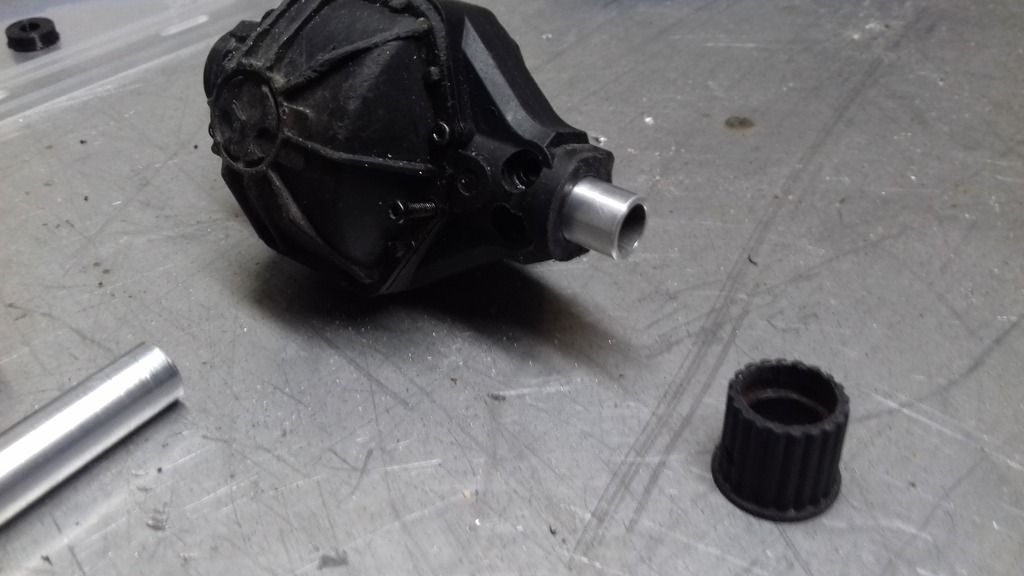 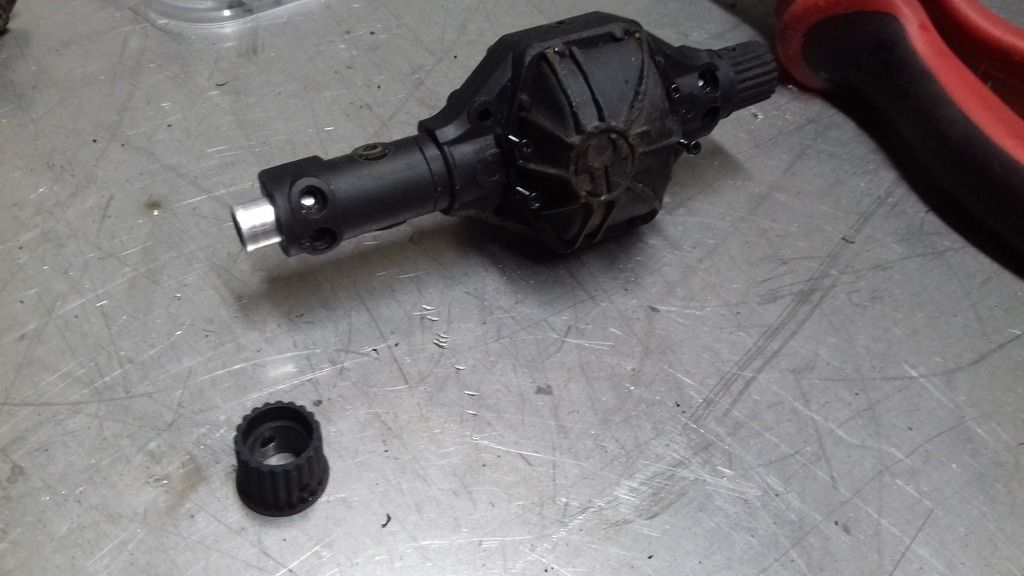 Securing all pieces.  Axle shafts; cut, shortened and welded back together. 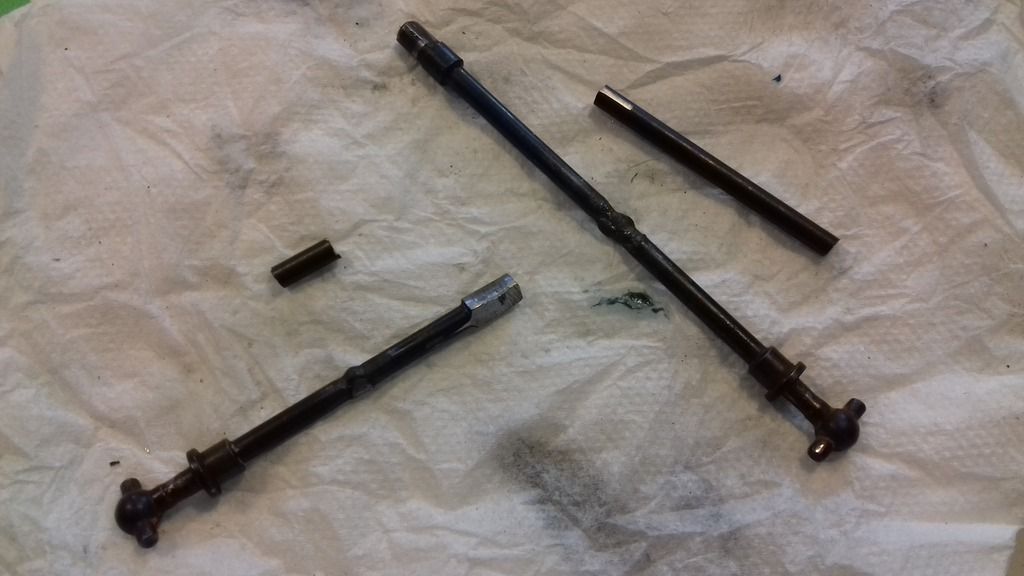 Quick check of the existing bearings….and replaced them all. 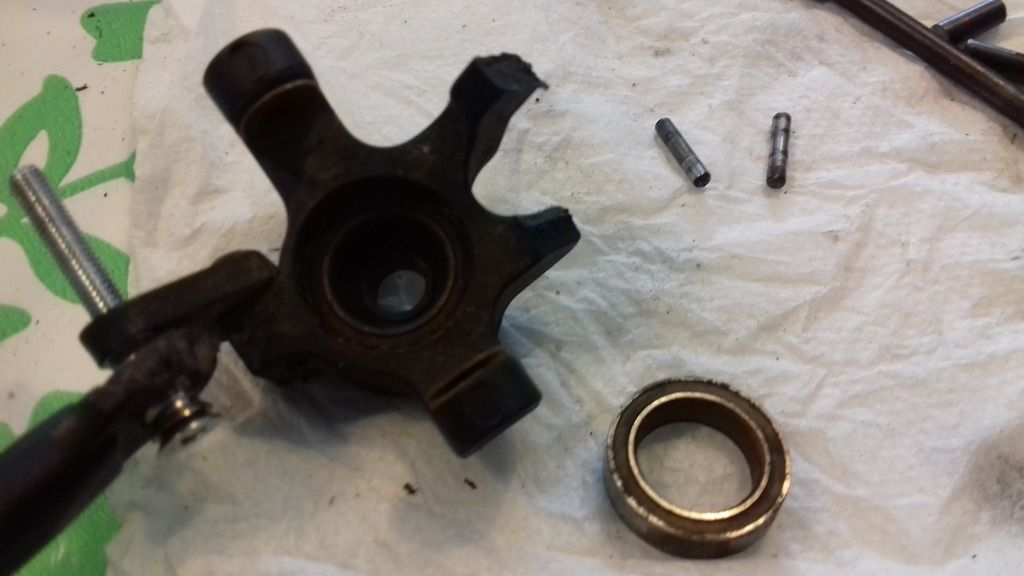 Made an elegant motormount, if I may say so. Looks to do the trick. 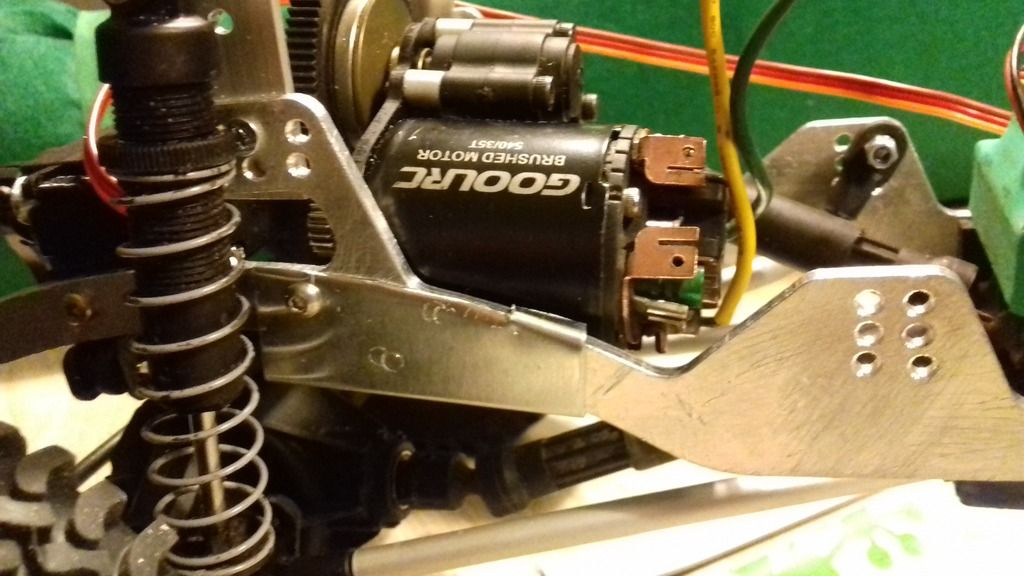 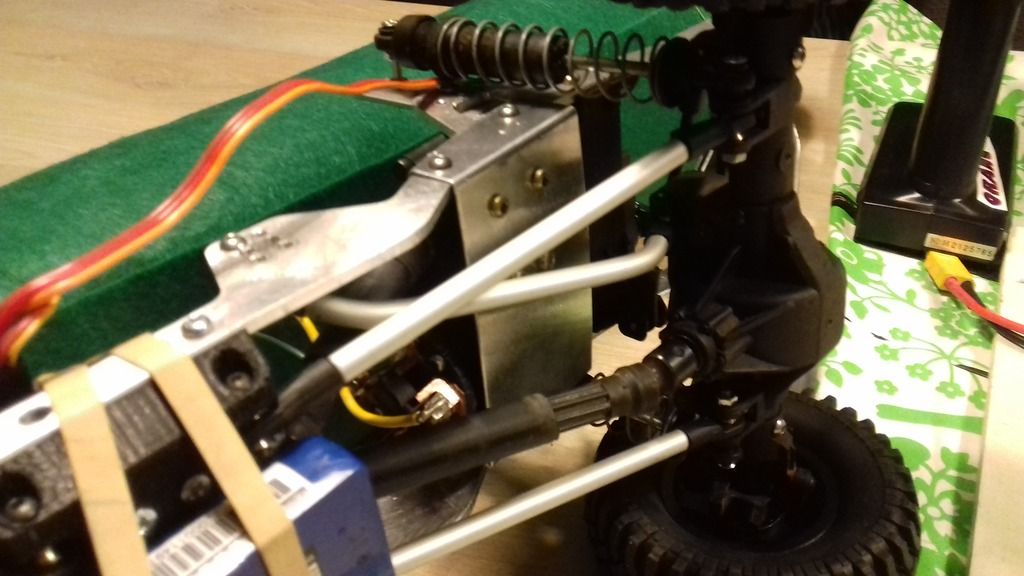 Rubberband-mounting-metthod for all electronics. Commencing testdrive #1 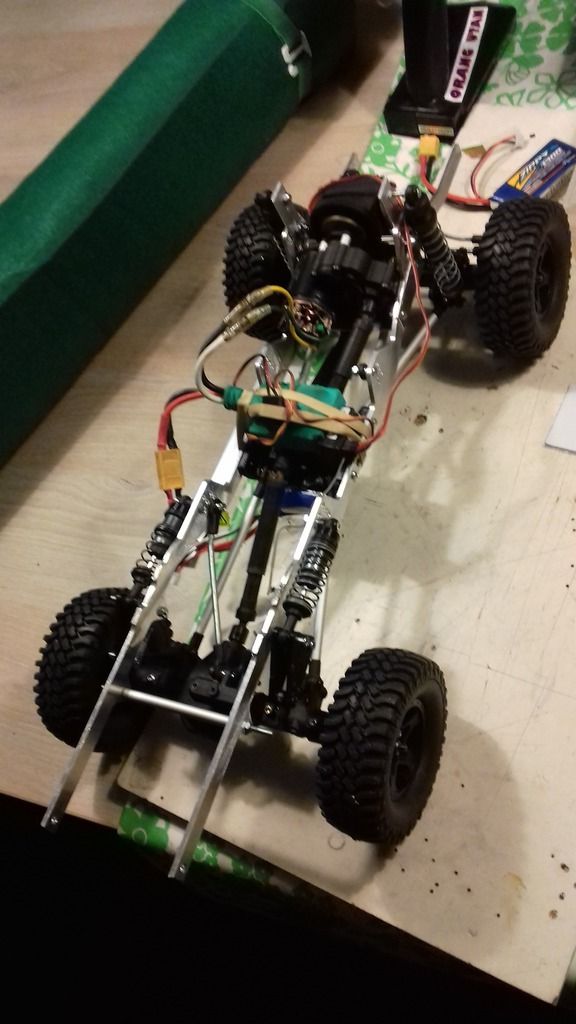 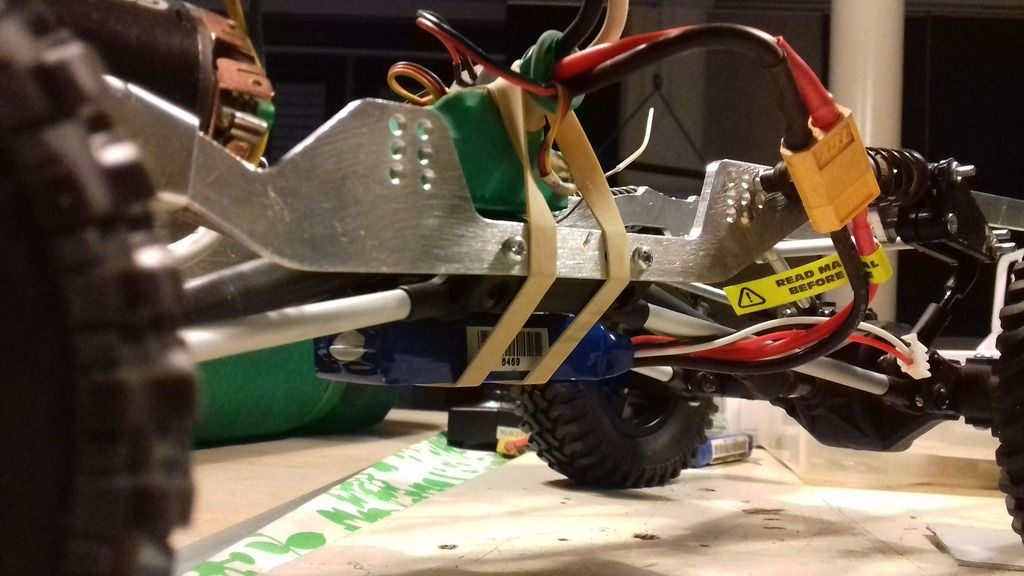 |
|
| |
|
03-06-2017, 07:57 AM
| #7 |
| Quarry Creeper Join Date: Aug 2014 Location: holland
Posts: 253
|   The bumper has been welded. According to the welder: it worked out, but its the last in the series! 0.5mm seems to be tricky to weld. (1/32) After a lot of test fitting and 3 prototypes I decided on an aluminium bracket to reinforce the printed bumper mounts, which turned out to be a bit flimsy. This created a nice spot to mount the servo winch and mounting location for D-shackles on the front in the process.  The standard supplied bumper had to go. Too bad it had the light housing attached. Lets separate the 2 quite a moment to take the plunge and put the saw to a new body for the first time.  Testfit. I can live with this.  |
|
| |
|
03-06-2017, 12:21 PM
| #8 |
| Gold Star Baby!   Join Date: Jul 2011 Location: Warren, MI
Posts: 269
|
That thing is cool looking. Awesome craftsmanship dude!
|
|
| |
|
03-06-2017, 01:19 PM
| #9 |
| I wanna be Dave  Join Date: May 2006 Location: HONDURAS...ROCK HEAVEN
Posts: 5,076
|  |
|
| |
|
04-05-2017, 01:14 AM
| #10 |
| Quarry Creeper Join Date: Aug 2014 Location: holland
Posts: 253
|
Finally I have some progress to report. First I tidied up the suspension. Front and rear. Front was easy enough. Sort out the right length to fit the desired travel.  In the rear I had to fiddle a bit with the links to leave a bit of space for the 3dprinted cantilever setup.  Also I upgraded hinge in the back. When the body comes down it kind of locks into place.  Then | thought it was time to enter the brazing game. I wanted bull-and bushbars from the get go. And the attached rock sliders would give me the basis of a floor.   Bullbar setup. Bending the brass didn’t went all that smooth so a ‘used look’ was inevitable.    Then, conecting the dots: bushbars between sliders and bullbar.    3d printed light bucket seems to fit without issues. Bonus!   Next up: Electronics! Let’s get this thing running. |
|
| |
|
04-05-2017, 01:14 AM
| #11 |
| Quarry Creeper Join Date: Aug 2014 Location: holland
Posts: 253
|
Finally I have some progress to report. First I tidied up the suspension. Front and rear. Front was easy enough. Sort out the right length to fit the desired travel. In the rear I had to fiddle a bit with the links to leave a bit of space for the 3dprinted cantilever setup. Also I upgraded hinge in the back. When the body comes down it kind of locks into place. Then | thought it was time to enter the brazing game. I wanted bull-and bushbars from the get go. And the attached rock sliders would give me the basis of a floor. Bullbar setup. Bending the brass didnt went all that smooth so a used look was inevitable. Then, conecting the dots: bushbars between sliders and bullbar. 3d printed light bucket seems to fit without issues. Bonus! Next up: Electronics! Lets get this thing running. |
|
| |
|
05-01-2017, 03:03 AM
| #12 |
| Quarry Creeper Join Date: Aug 2014 Location: holland
Posts: 253
|
few updates:  Floor is in. Also made an electronics tray. Fits right under the dash.   First testrun. Verdict: passed. Still a lot to do though |
|
| |
|
05-01-2017, 03:05 AM
| #13 |
| Quarry Creeper Join Date: Aug 2014 Location: holland
Posts: 253
|
Paint: Ready for the plunge:  No way back  Got a little chill outside. Second layer applied indoors.  Grill must be black   24h bleach bath. Dont try to rush it with an exacto knife Bumper and bullbar got an upgrade as well. Testfit  Body at 80% finished. Bed needs work still.  The look I was aiming for   |
|
| |
|
05-01-2017, 03:07 AM
| #14 |
| Quarry Creeper Join Date: Aug 2014 Location: holland
Posts: 253
|
Next up: lights. Ever returning issue here is that the wires from the light have to cross from the body to the chassis. Which hinders separating the two. Also in my case, Ill have to raise the body to replace the battery. That calls for a flipping mechanism that allows the body to click into an open position without having to remove the body and disconnect the lights. Took some time and a few prototypes but tadaah!! :cool:  3d printed frame on aluminium linkage in laid down position.  Partly opened.  When the linkage is pushed through its dead point it kinks back and rests on the existing chassis brace.  In this locked position the body rests in an upright position against the flip-frame. Body hinges on the aft brass covered bolts with a V-shaped bracket attached to the body.  The body is not attached in any way to the flip-frame, making it very easy to remove the body Now with this item solved I return to the original challenge: Lights! Well, it proved not to be as difficult as I was afraid of. After determining the right resistor values to get the right brightness I decided on two circuits.  1 for the on status; the blinkers are turned on when the ESC is switched on.   Second circuit operated by the 4th channel switch.  I even got the fender blinkers to light up. ;)  Single plug to electrically detach the body from the chassis. 3 wires do the trick: yellow and red act as + for each circuit and a combined ground wire (brown) Previously I used the electronics from busted (toothless) servos to act as switch. But somehow in this car they get hot, and fry in no time. No matter what the LED load is. Even the one that has served in my SXC10 G6 jeep with not a single issue in a year. Back to the drawing board for a more sturdy solution to convert a PWM signal to a 0-6v output . Ideas anyone? |
|
| |
|
05-01-2017, 09:12 AM
| #15 |
| Quarry Creeper  Join Date: Jun 2013 Location: San Francisco
Posts: 260
|
That bull bar/bumper combo is amazing! Well, all of it is amazing!! Do you have, and would you be willing to share, the drawing/pattern for the bumper? I have been searching for an ARB looking bumper for my SCX10.2 FZJ80 replica of my full size truck, but I have not found anything that looks close yet. That is, until I saw the one you made!
|
|
| |
|
05-01-2017, 10:54 AM
| #16 |
| Pebble Pounder Join Date: May 2016 Location: France
Posts: 124
|
Amazing job ! Lot of ingenuity and home made parts, I love it The color looks pretty sweet on this body What plastic did you use for 3d printed parts ? |
|
| |
|
05-01-2017, 10:56 AM
| #17 | |
| Quarry Creeper Join Date: Aug 2014 Location: holland
Posts: 253
| Quote:
I'll get back on it. | |
|
| |
|
05-01-2017, 11:00 AM
| #18 | |
| Quarry Creeper Join Date: Aug 2014 Location: holland
Posts: 253
| Quote:
It's almost as strong and can handle the stresses on a RC scaler. | |
|
| |
|
05-01-2017, 12:27 PM
| #19 | |
| Quarry Creeper Join Date: Jun 2013 Location: San Francisco
Posts: 260
| Quote:
| |
|
| |
|
06-04-2017, 06:01 AM
| #20 |
| Quarry Creeper Join Date: Aug 2014 Location: holland
Posts: 253
|
Did find a solution to the light switching problem: I placed a $3-10A-china-brew-ESC in the circuit. Works like a charm. I used a similar unit to control the servo winch by the way. While working on the lights I feld the need to incorporate the dashboard. I soon found that the dash decals are semi transparant. This meant I can use them to create a backlit dashboard.   Painted up the rest of the standard dash (okay, I added printed vent grills)    Me like!  In the proces I added door panels   Then the cavas tent on the back. Made a template for the layout to fixate the hoops in place and so braze them in a fixed position.   Added angled brass (0.5x0.5”) to fit it on the bed.  A little touch of black paint…  …and got behind the sewing machine to make a canvas. Panels can be opened or closed individually.      I’ve taken her for first true trail ride as she sits     I finally received the driver figures I ordered.  Size looks about right.  Time to start the interior. |
|
| |
|
 Toyota land cruiser 79 'Ol Jogi' - Similar Threads
 | ||||
| Thread | Thread Starter | Forum | Replies | Last Post |
| Toyota Land Cruiser 70 series | adamsfly | Scale Videos! | 1 | 02-01-2016 04:37 PM |
| Toyota land cruiser 80 | lappdogg | 1.9 Scale Rigs | 25 | 10-14-2014 12:32 PM |
| old vid, toyota land cruiser | greggreg2011 | Scale Videos! | 0 | 12-29-2011 07:17 PM |
| toyota land cruiser???? | rocksteadily | Paint and Body | 0 | 06-06-2009 02:56 AM |
| |


 Linear Mode


