| |
| |||||||
 |
| | LinkBack | Thread Tools | Display Modes |
 03-09-2011, 10:22 AM
| #1 |
| I wanna be Dave Join Date: Sep 2006 Location: Stuck on a Rig in the middle of nowhere Utah.
Posts: 2,024
| First off I want to thank Shon (R2j) for doing the tube work for me  I have never worked on a truggy before or even seen one in person, so I asked Shon to make one for me. It turned out great and love what he came up with for the front grill. I just don't have the creative juices for that type of thing. Shon and I both have a special place for Mopars so it was a no brainer to have him help me with this project. Here is a link to the progress that R2j posted up. I have never worked on a truggy before or even seen one in person, so I asked Shon to make one for me. It turned out great and love what he came up with for the front grill. I just don't have the creative juices for that type of thing. Shon and I both have a special place for Mopars so it was a no brainer to have him help me with this project. Here is a link to the progress that R2j posted up.**70Duncan's "BAD BETTY" Truggy** This is going to be a slooooooooow build. I have a couple of other projects that I am working on and a 70 Charger R/T that I have to get finished restoring. It has been waiting for 10 years to get finished. |

|  |
| Sponsored Links | |
| | |
|
03-09-2011, 10:40 AM
| #2 |
| I wanna be Dave Join Date: Sep 2006 Location: Stuck on a Rig in the middle of nowhere Utah.
Posts: 2,024
| Here is a list of parts that I will be using for this build: Custom Truggy chassis - R2j Metal rear 4-link - R2j Hand made front CMS and 3-link Gunner Beef toobs front and rear Rear HPI ring gear and locker - RCP Front Axial over drive gears - RPP Maxx drive shafts Axial tranny with Robinson gears and Crawler Innovations maxx out puts. Hitec 5955TG servo winch with no creep winch controller from heyok. Hitec 7980 steering servo Traxxas big bore shocks Rocker Wheels from Eritix Pit Bull tires with Nova dual stage foams High steer Axial knuckles and Cs Axial rear lock outs. Super 300 CVDs Mamba Max Pro and not sure what motor yet. |
|
| |
|
03-09-2011, 01:16 PM
| #3 |
| SORRCA Committee Member   Join Date: Dec 2008 Location: Parkston, SD
Posts: 4,523
|
Right on James! Can't wait to see it all done up!
|
|
| |
|
03-09-2011, 01:47 PM
| #4 |
| I wanna be Dave Join Date: Jul 2006 Location: The beautiful Pacific Northwest
Posts: 6,923
|
Wow, looks like a great list of parts....can't wait.
|
|
| |
|
03-09-2011, 02:56 PM
| #5 |
| Rock Crawler  Join Date: Oct 2009 Location: OUT THERE
Posts: 496
|
Glad to see this MOPAR is still alive one of my favs Im a huge MOPAR fan This is my MOPAR not a truggy but it sure does perform.Cant wait to see the progress keep the pics comming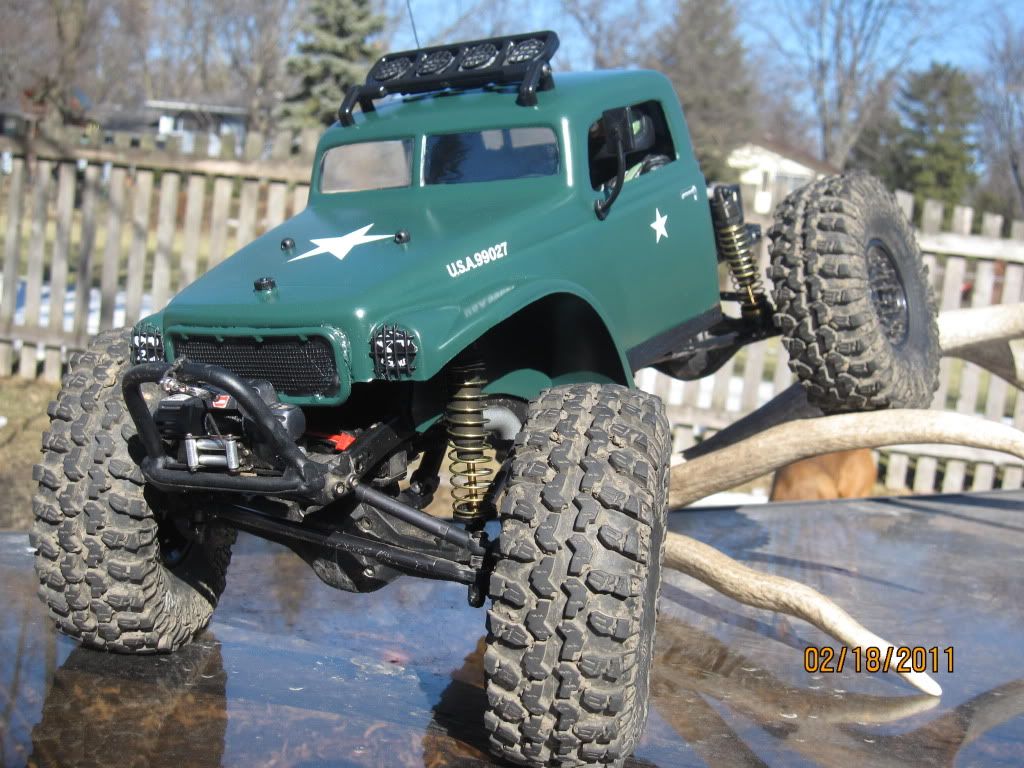 |
|
| |
|
03-09-2011, 03:23 PM
| #6 |
| Quarry Creeper Join Date: Jan 2010 Location: Floyds Knobs, IN
Posts: 286
|
yes! I FINALLY KNOW WHAT TO DO WITH MY BETTY!!!!!! |
|
| |
|
03-09-2011, 07:02 PM
| #7 |
| I wanna be Dave Join Date: Sep 2006 Location: Stuck on a Rig in the middle of nowhere Utah.
Posts: 2,024
| Thanks guys Here is front axle rebuild. I am putting in the Gunner Beef toobs and Axial over drive gears. In the first picture is the new tube installed after drilling out the lip in the axle housing. The second picture is before I drilled it out with 7/16" drill bit. 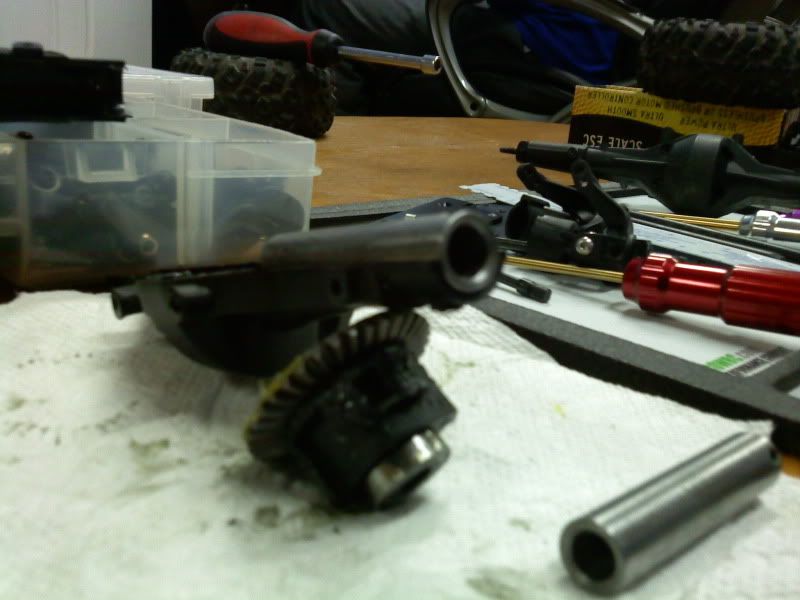 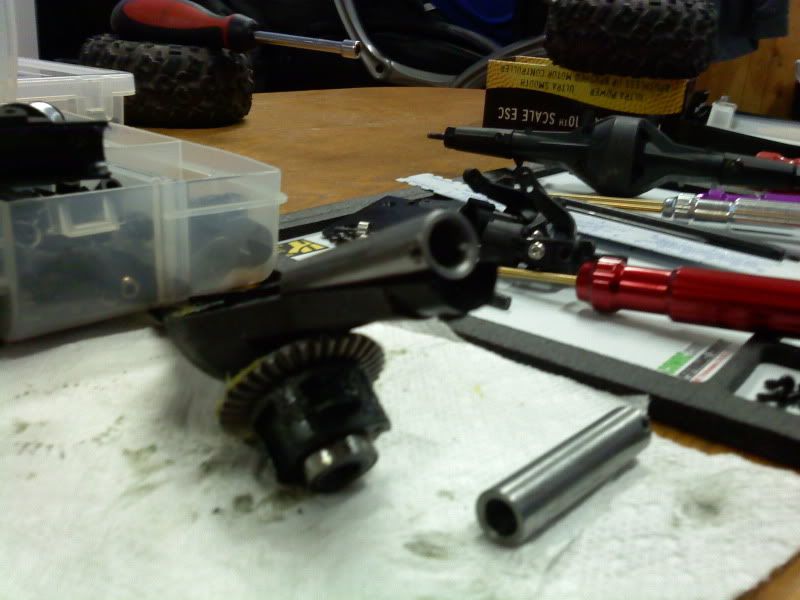 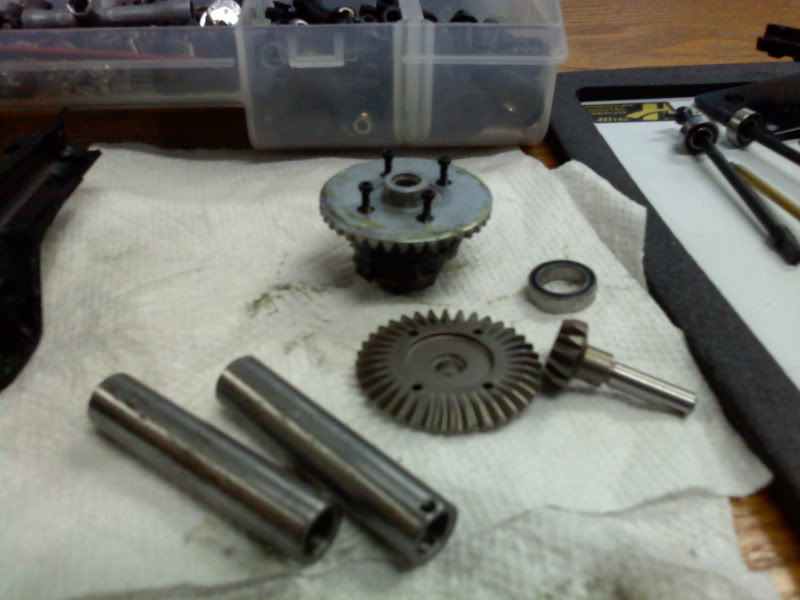 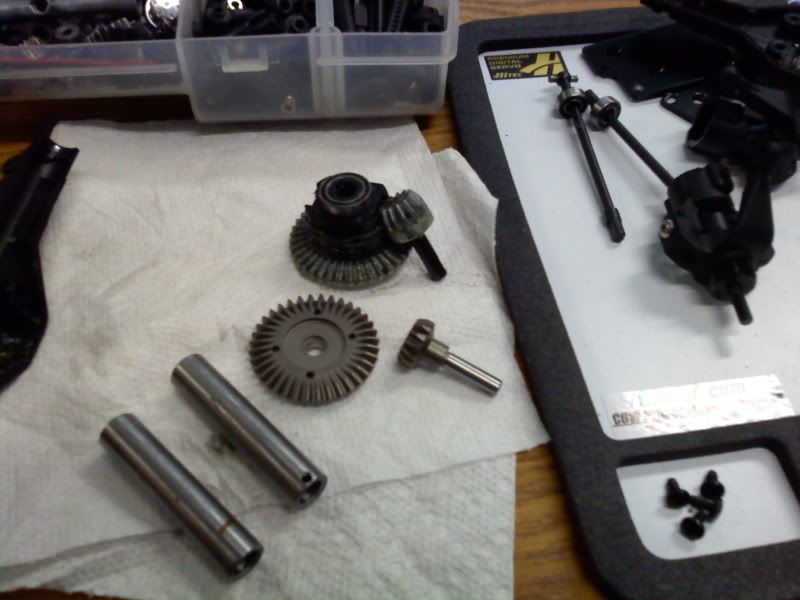 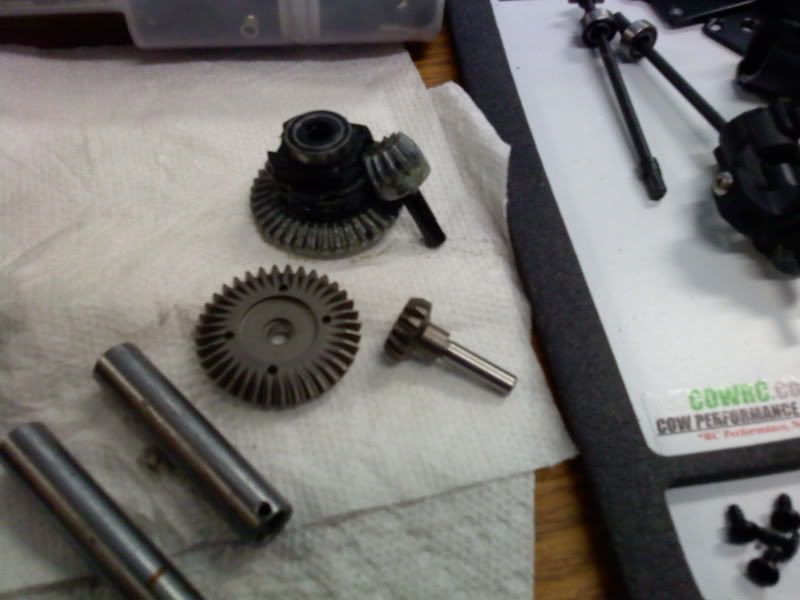 Here is the axle after greasing. I used a silicon grease to cover the tubes and seal the housing from water. I used just High temp bearing grease for the gears. 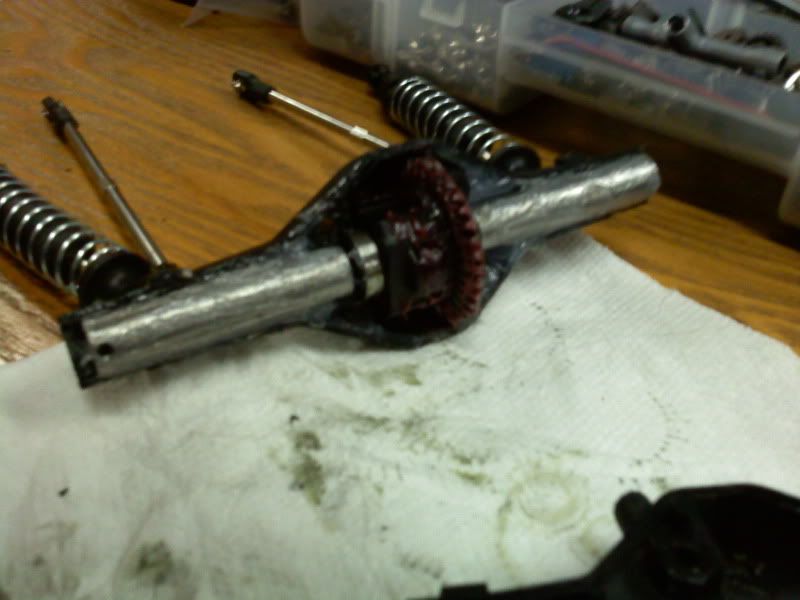 Last edited by 70duncan; 03-09-2011 at 07:08 PM. |
|
| |
|
03-09-2011, 07:18 PM
| #8 |
| I wanna be Dave Join Date: Sep 2006 Location: Stuck on a Rig in the middle of nowhere Utah.
Posts: 2,024
| The rear axle is getting the HPI gear and locker from RCP. It has a 6mm input for the pinion so my Maxx shafts will bolt on directly and not adapter will be needed. 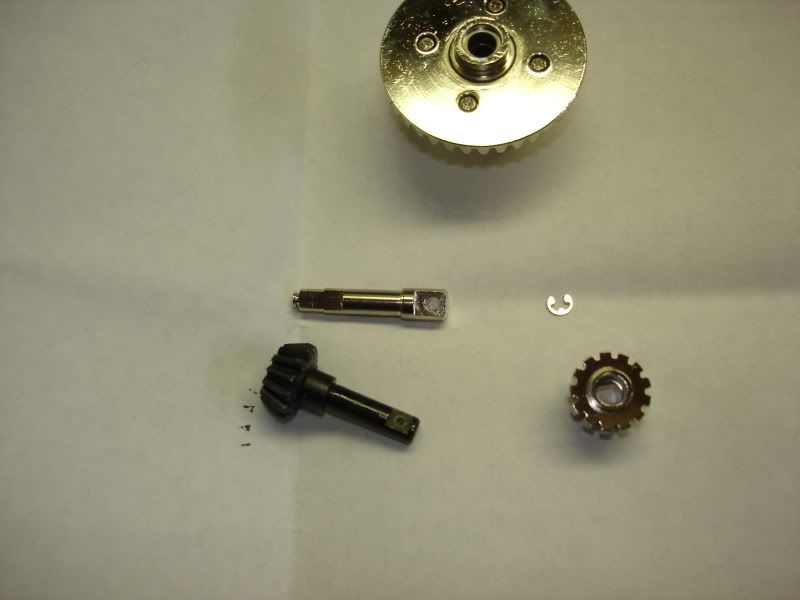 Here you can see the difference in the pinion shafts. 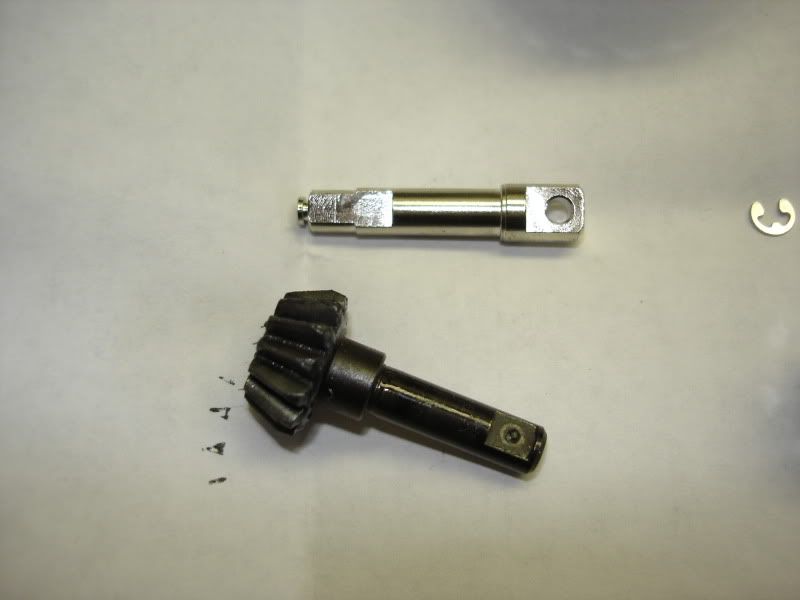 Because of the shaft size difference, you have to slide in the pinion after installing the bearing in the case. 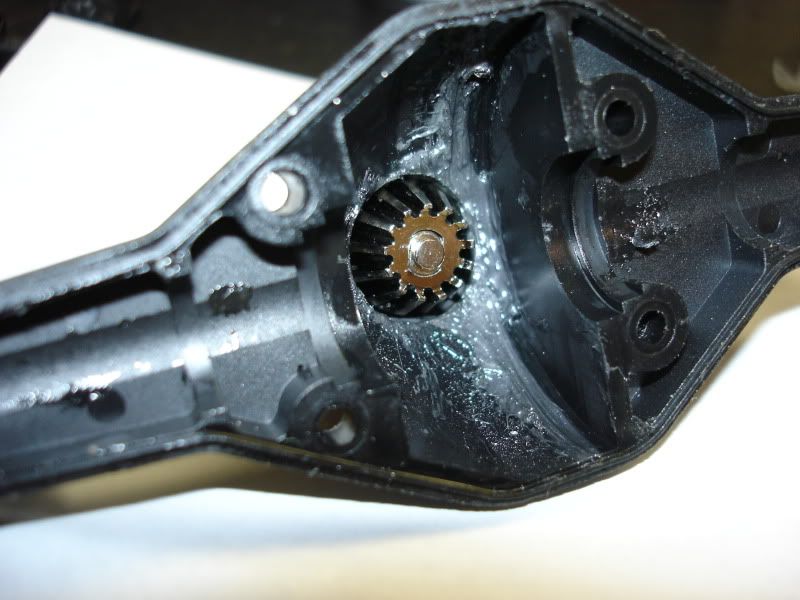 Then put on the pinion to the shaft and install the E clip to hold it together.  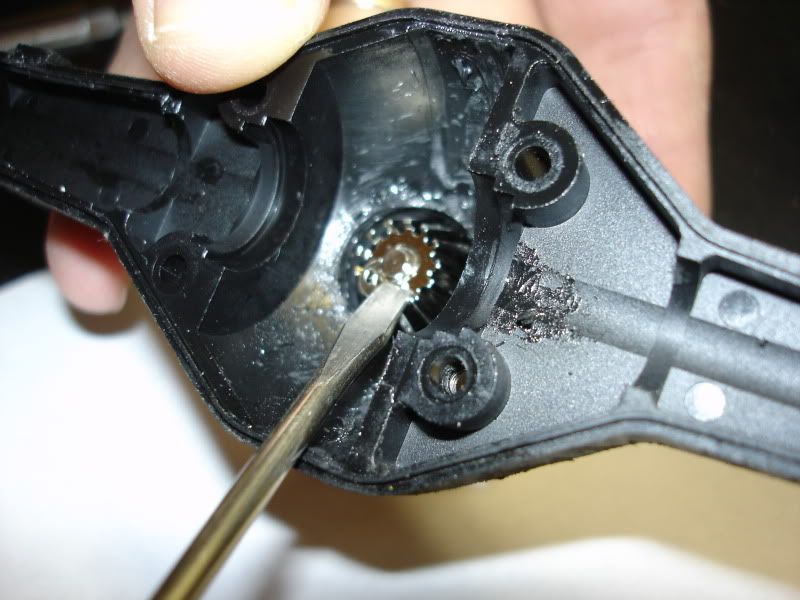 And here it is with the Axial lock outs and R2j truss. 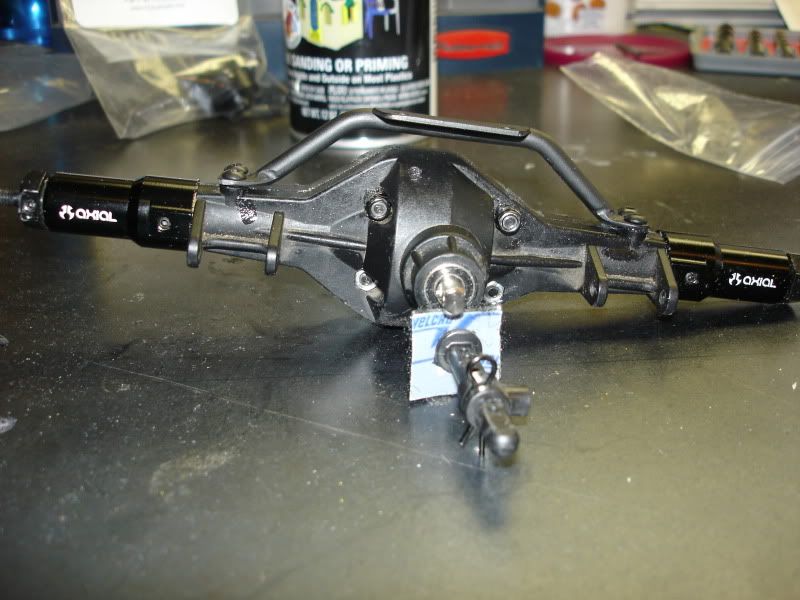 |
|
| |
|
03-09-2011, 07:22 PM
| #9 |
| RCC Addict Join Date: Mar 2009 Location: Across the street from Folsom Prison
Posts: 1,081
|
Hurry up I can't finish mine until I see yours  Just kidding, Shon does some killer tube work. But this build gave me the idea on my TTC build. Looking forward to seeing the progress Just kidding, Shon does some killer tube work. But this build gave me the idea on my TTC build. Looking forward to seeing the progress |
|
| |
|
03-10-2011, 07:46 AM
| #10 |
| Rock Crawler Join Date: Oct 2009 Location: OUT THERE
Posts: 496
|
definatly going to be a POWER WAGON nice work on the axels gonna be a tuff MOPAR |
|
| |
|
03-10-2011, 08:28 AM
| #11 |
| N.E.R.C.C Uncle Blinky   Join Date: Dec 2008 Location: RUKDNME...
Posts: 976
| been watching this one from the start...glad to see the betty body getting some use. and great idea with the hpi gear ill going to give that a try. this is something I did up over the winter bout a month before I saw this thread. keep up the good work. Drail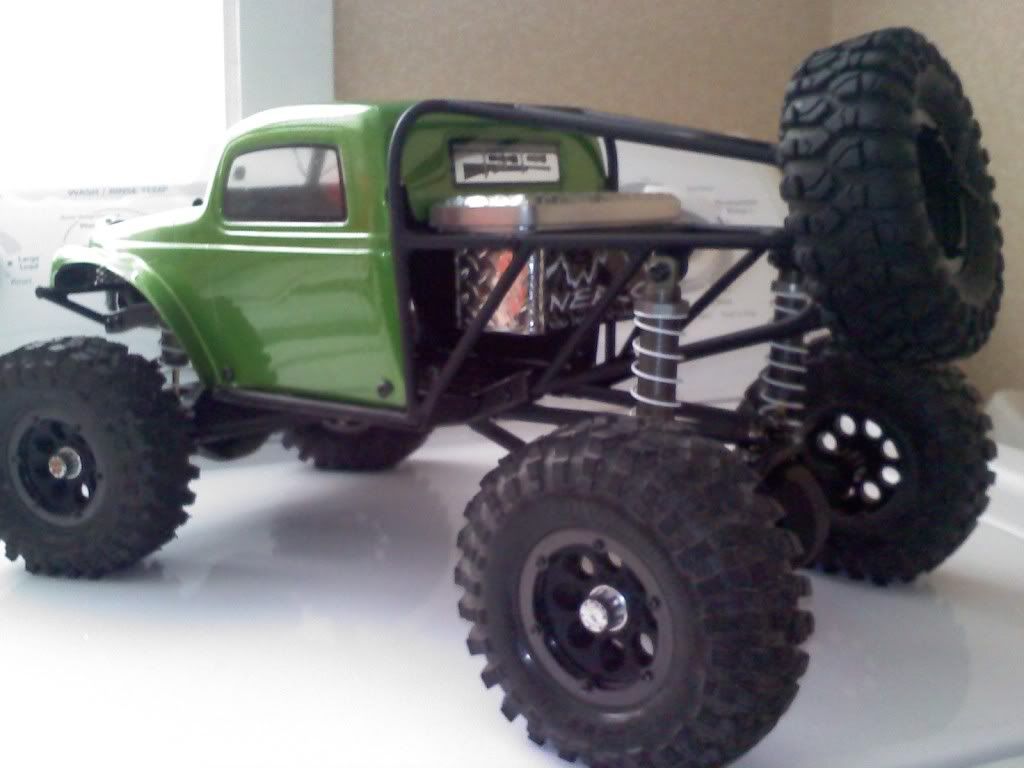 |
|
| |
|
03-10-2011, 08:55 PM
| #12 | ||
| I wanna be Dave Join Date: Sep 2006 Location: Stuck on a Rig in the middle of nowhere Utah.
Posts: 2,024
| Quote:
Quote:
| ||
|
| |
|
03-10-2011, 08:58 PM
| #13 |
| I wanna be Dave Join Date: Sep 2006 Location: Stuck on a Rig in the middle of nowhere Utah.
Posts: 2,024
| Drail, that looks good. I will check for some more info on yours. Did you do a thread on it? |
|
| |
|
03-10-2011, 09:28 PM
| #14 |
| N.E.R.C.C Uncle Blinky Join Date: Dec 2008 Location: RUKDNME...
Posts: 976
| no didn't do a build thread. one thing I am going to do is change up the front end. I really like how your bumper looks. and I took the spare off and it's running 1.9 tsl's now. r2j is da man luv how his stuff looks. it's allways neet and cleen Drail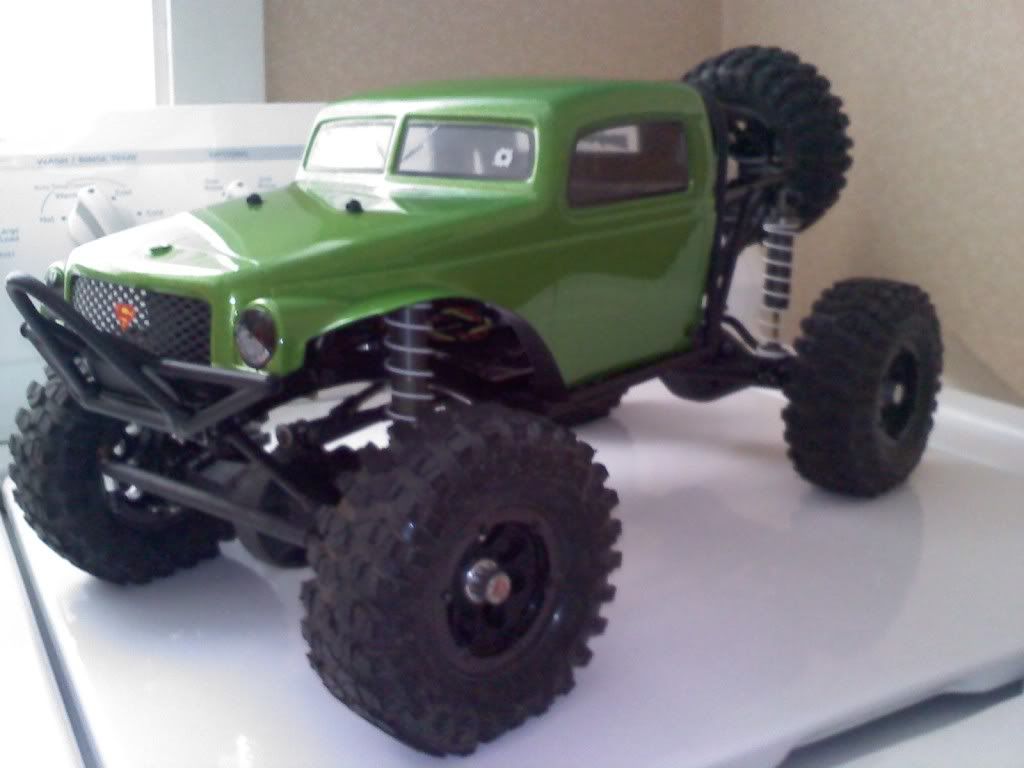 Last edited by Drail; 03-10-2011 at 09:31 PM. |
|
| |
|
03-11-2011, 12:20 AM
| #15 |
| RCC Addict Join Date: Jan 2007 Location: Bouldertown
Posts: 1,554
|
Pretty cool so far! Just an fyi......you dont need adapters for max shafts. The t maxx tranny yokes are 5mm. They fit perfect on stock axial outputs. Well kept secret |
|
| |
|
03-14-2011, 10:00 AM
| #16 |
| N.E.R.C.C Uncle Blinky Join Date: Dec 2008 Location: RUKDNME...
Posts: 976
|
what's up brotha we want a update... Drail
|
|
| |
|
03-20-2011, 11:02 AM
| #17 |
| I wanna be Dave Join Date: Sep 2006 Location: Stuck on a Rig in the middle of nowhere Utah.
Posts: 2,024
| Well, like I said, I have been busy with family and house up keep. But I was able to have my friends over and we watched the 2010 MSD scale national video last night. So I got inspired and worked on my rig last night after I put the kidos to bed. First off I made my winch servo. I used a Hitec 5995TG that was in my 2.2 Bully and had a spot that it would stall at. After taking it apart for the winch conversion, I found that the motor would stick when used on direction only. So that direction is going to be used as the spool out. The other direction worked just fine I used the wright up by Bender, War Pig, and some others to figure out how to do the conversion. Thanks to all that support this site First off I removed the 4 screws that hold it together, then I removed the bottom cover and removed the stock circuit board by de-soldering the connections on the back of the board that hold it to the motor. Then I de-soldered the 3 wires that go in the servo to another piece that I don't know the name of 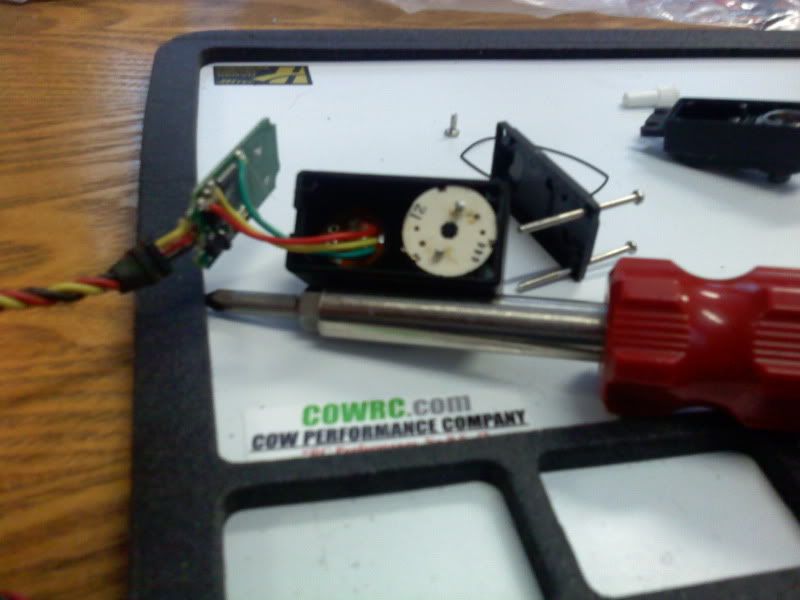 Now it is time to solder in the winch controller from heyok 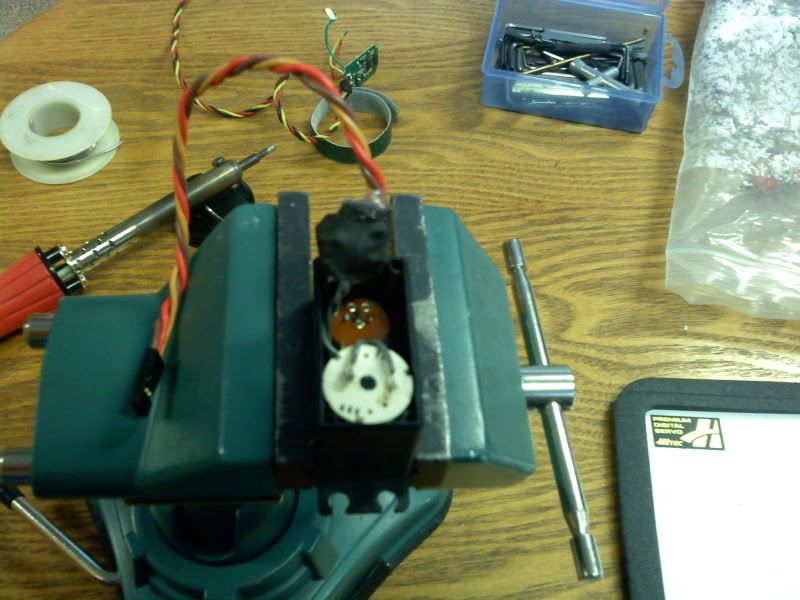 Now it is time for gear side of things. I removed the top cover. 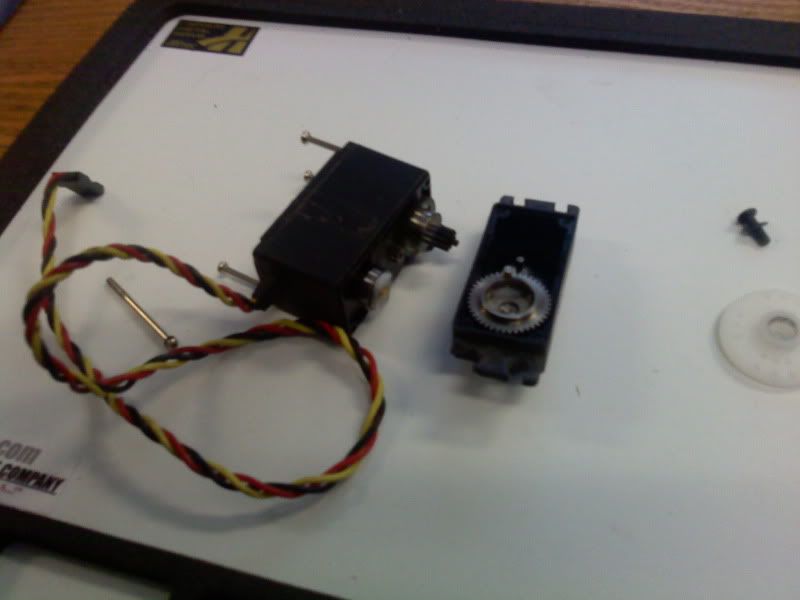 And now that I have the gears out, I removed the pin that is the large gear. This pin is what lets the servo controller board when it is at full throw for left and right. It is a little hard to remove so you might need a small punch to get it removed. 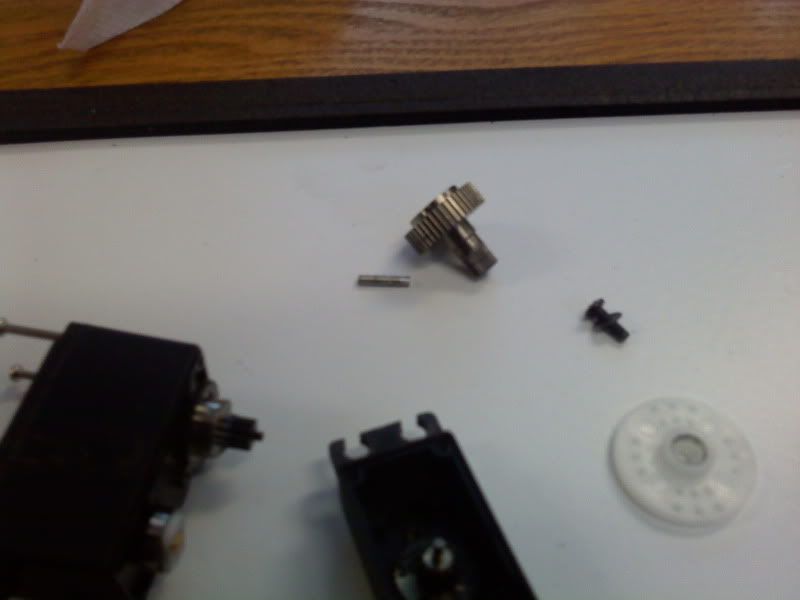 |
|
| |
|
03-20-2011, 11:18 AM
| #18 |
| I wanna be Dave Join Date: Sep 2006 Location: Stuck on a Rig in the middle of nowhere Utah.
Posts: 2,024
| Once I had the hard part done it was time to seal it up. I used Dielectric Silicon to seal up all the parts. 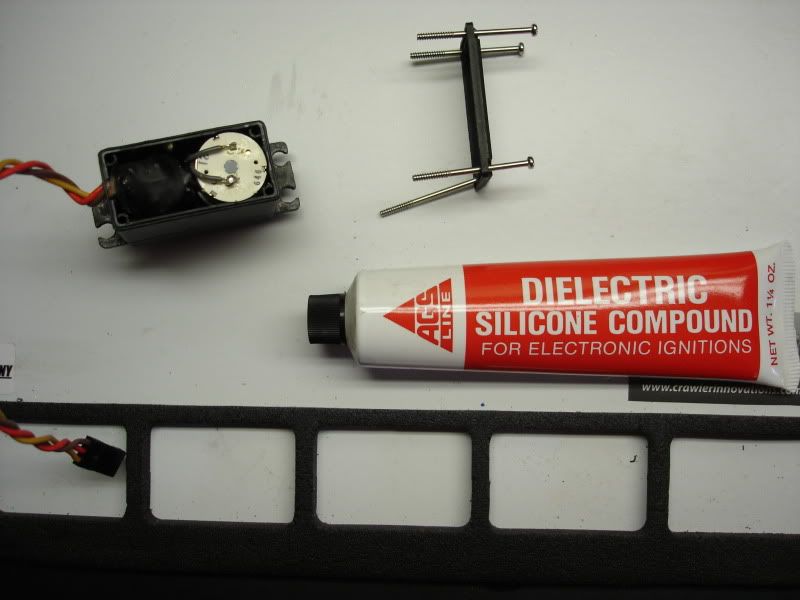 I used the silicon on all the case seals and where the gear comes through the case. Here are some Pictures of what I did. 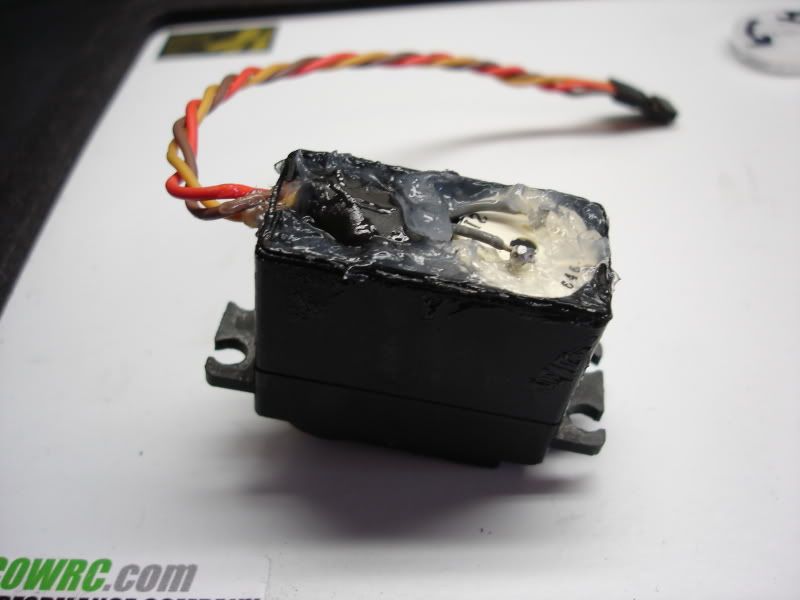 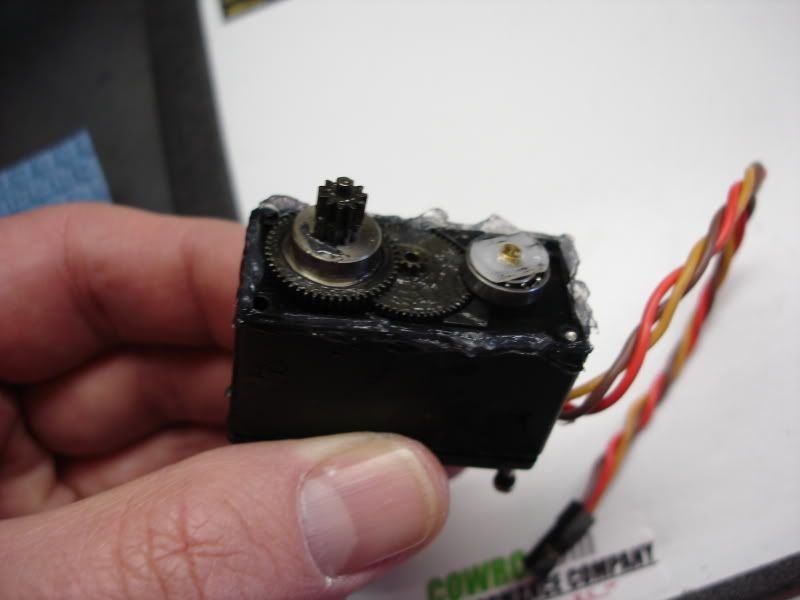 |
|
| |
|
03-20-2011, 11:24 AM
| #19 |
| I wanna be Dave Join Date: Sep 2006 Location: Stuck on a Rig in the middle of nowhere Utah.
Posts: 2,024
| I just need to finish it up now. I have a large assortment of "O" rings that I got at Harbor Freight a few years ago when I was working on vehicles. I figured I could find one to help seal up the out put gear of the servo. 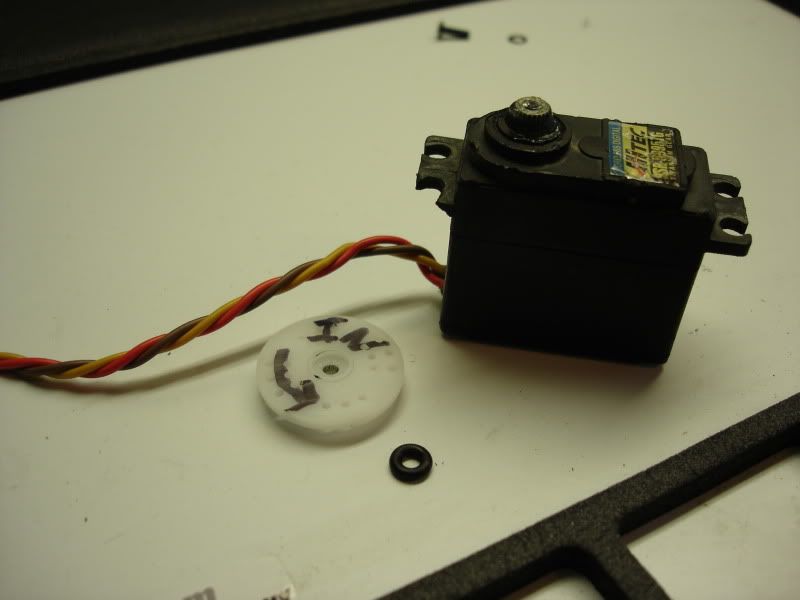 I coated it with the silicon grease and put it on the gear out put. 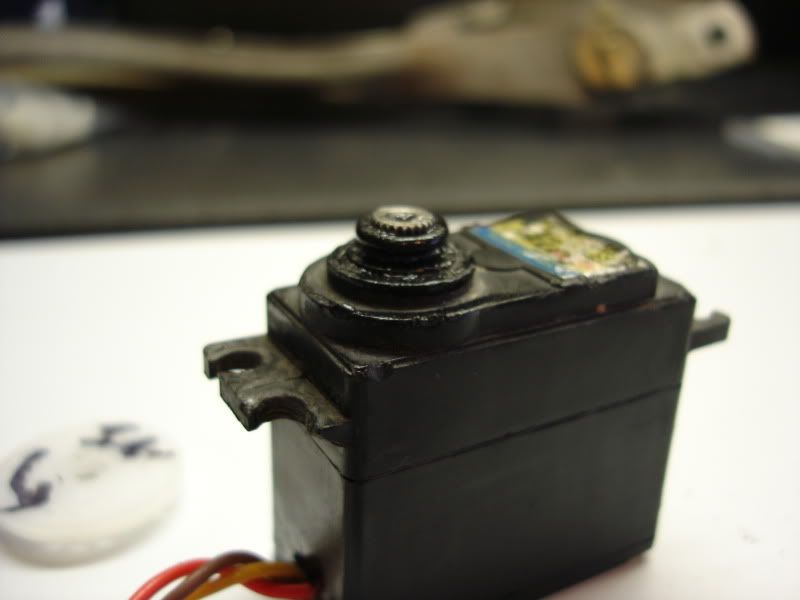 Then I put on the servo horn with my spool from Walmart. 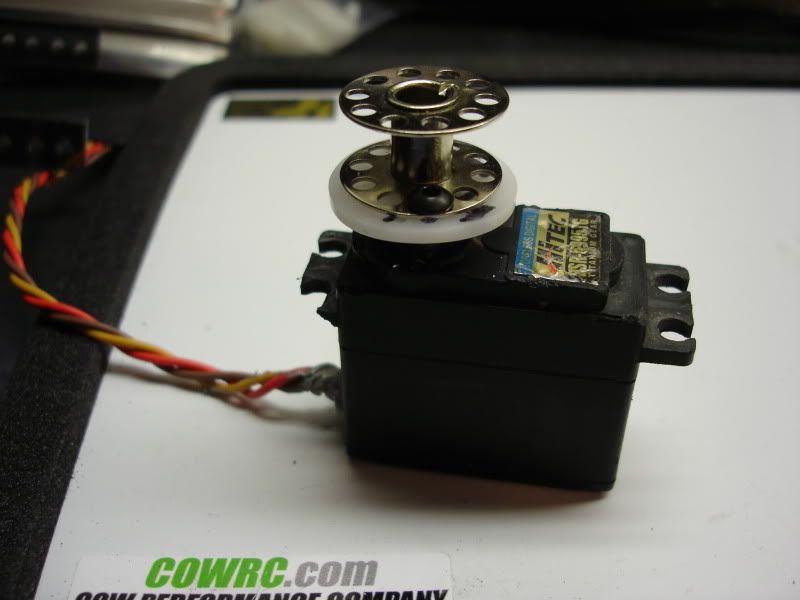 Once all that was done I just wanted to add a little extra protection to the wires so I coated them with some RTV that I used on transmission oil pans. 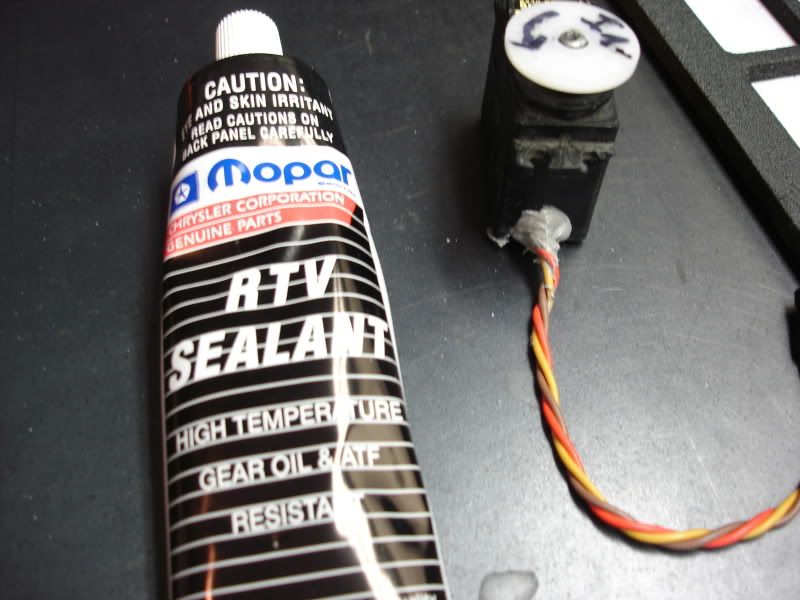 |
|
| |
|
03-20-2011, 11:30 AM
| #20 |
| I wanna be Dave Join Date: Sep 2006 Location: Stuck on a Rig in the middle of nowhere Utah.
Posts: 2,024
| I still had a little time to work on my rig so I started on the front axle. In order for this thing to take the punishment that it is going to see, I though I would make a metal axle truss to hold the track bar and my 3rd link. I bent some metal and drilled the holes so I could just bolt it on with the stock holes in the axle case. This will let me weld on the bracket that I need for the links. 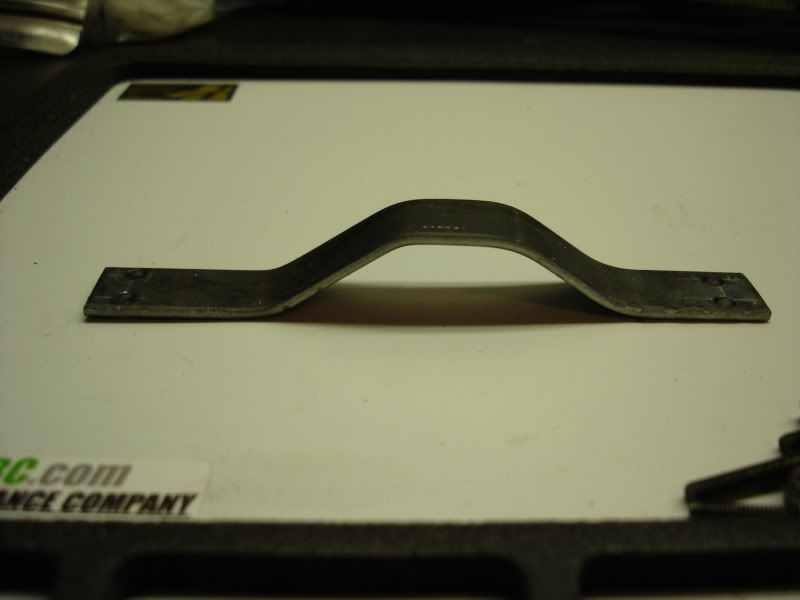 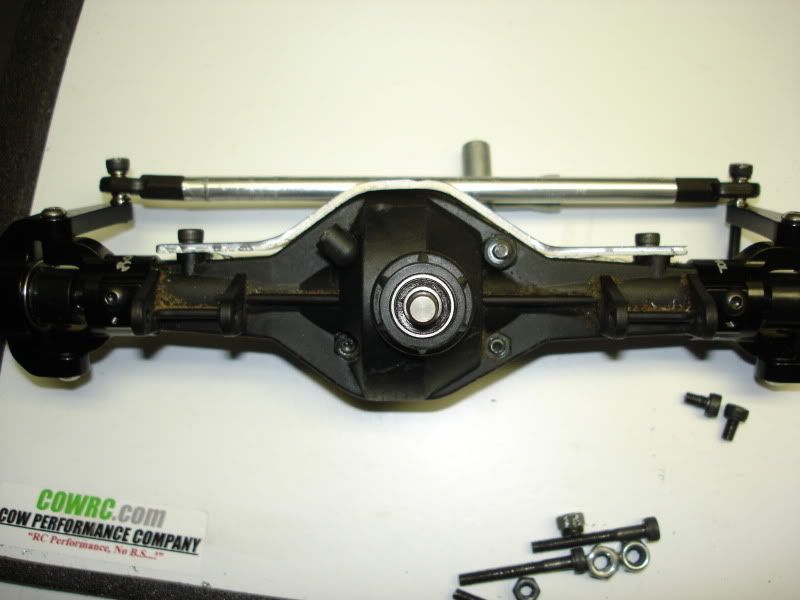 |
|
| |
|
| |


 Linear Mode


