| |
 06-03-2016, 07:51 PM
| #21 |
| Newbie Join Date: Aug 2015 Location: Vestal
Posts: 41
|
It's supposed to all be backwards compatible with the scx10...I'm in the same boat as you as I just built a G6 for my daughter and I, I might get the II down the road so we have two 1.9 rigs..but my wraith will have my attention here shortly as I go brushless!!
|

|  |
| Sponsored Links | |
| | |
|
06-03-2016, 07:53 PM
| #22 | |||||
| I wanna be Dave  Join Date: Apr 2014 Location: North Carolina
Posts: 2,254
| Quote:
Quote:
Quote:
Quote:
Re the diff covers and link mounts, the BowHouse RC team has a plan in the works... Quote:
| |||||
|
| |
|
06-04-2016, 12:14 AM
| #23 |
| Rock Crawler Join Date: May 2012 Location: Upland
Posts: 901
|
Does axial have a mailer kit for the missing pieces yet? Sent from my SM-G900T using Tapatalk |
|
| |
|
06-04-2016, 03:46 AM
| #24 | ||
| I wanna be Dave Join Date: Apr 2014 Location: North Carolina
Posts: 2,254
| Quote:
Quote:
As for the missing link, I called Axial support, and they will send a replacement. I'm going to wait to send them an email until I get through the tranny to see if there is anything else missing. In the meantime, since I'm not particularly patient, I stopped by the BowHouse RC engineering department and stole a link from our chief engineer's kit while he wasn't looking. That was much more fun than making a placeholder out of all thread and break line.  Picking up where I left off with the rear links, when I turned back to the instructions, I noticed what looks like another error. If you follow the diagram for alignment of the ball ends on the rear upper links, the ball ends on the chassis side would be perpendicular to the axle side, leaving the chassis side oriented for vertical screws rather than horizontal ones:  Compare to the diagram for the front upper link, and you'll see what I mean:  I'm pretty sure that's not going to work, so I went ahead and adjusted them from this:  To this:  Much better. Next it was on to the shocks. Although I haven't done a part-by-part analysis, these look to be unchanged from the Icons in prior SCX-10 kits. Some parts pix:   I noticed that the shock collars seemed to have extra plastic around the threads that made adjusting them rather tough once on the shock body:  A little trimming before sliding each one on all the way helps quite a bit. From this:  To this:  Kudos to Axial for including 2 different spring rates (front vs. rear) in recognition that the true forward weight bias requires stiffer springs up front:  Axial includes 30W oil in the kit. Thanks to the influence of a certain crazy Canadian that makes some killer chassis, wheels and interior kits (not toe mention fun YouTube videos), I've been moving towards thicker oil in my shocks to slow them down. This adds stability and make the suspension movement appear much more scale. But I decided to use the 30W for now knowing that will probably go up to slow things down after a few test runs. A few other other assembly notes: -- I put a bit of green slime on the shaft to help lubricate against the o-rings and keep the oil in. If necessary, I'll add teflon plumbers tape to the cap threads to deal with any leaks. -- Carefully trim the pistons after removing them from the tree. Tolerances are pretty tight inside the shock body. -- These are emulsion shocks. No bladder above the oil, so there is air in the cylinder by design. With emulsions, it's very important to get the right amount of oil in the shock so that you have full travel without noticeable air pockets. When filling them, I found that leveling off the oil with the shocks compressed between 1/2 and 2/3 of the way was just about right. So I was left with these:  Fully built, they look to be the same as the ones on my G6 (minus all the dirt and grime, of course), which is a good thing. Those have held up very well to two years of abuse with no leaks, so I would expect the same from these. Next up will be the transmission. At first glance, it looks like it uses the same internals as the Yeti and Bomber, but we'll see soon enough. Pix, notes and comparisons to follow. | ||
|
| |
|
06-04-2016, 05:56 AM
| #25 |
| Rock Crawler Join Date: Dec 2013 Location: Norway
Posts: 689
|
If you do not want the red diffcovers and link mounts, put them in a bath of black Rit dye, and they will be black as the night.
|
|
| |
|
06-04-2016, 06:32 AM
| #26 |
| Newbie  Join Date: Jan 2016 Location: Durham
Posts: 26
|
Nice to know I'm not alone with my link and shock collar issues. Thanks for posting the tips about the shocks, I may need to do some re-building once I get everything together. as long as I find my missing pin today I hope to finish soon!
|
|
| |
|
06-04-2016, 07:46 AM
| #27 |
| Newbie Join Date: Nov 2015 Location: St. Peters
Posts: 13
|
I did the same thing with the bearings in the rear axle,I had spares so I just left them in there. I have to agree about the links, the picture is wrong. When in doubt look farther ahead for another picture. Thanks for the info on the shocks. Looks like I'll be rebuilding them tonight. The large gear in the trans has a slot for a pin in each side, they are not the same depth. If the trans feels rough flip the gear over, that smoothed it out. I got stuck last night on the trans output. I only have 5 5x10x4 bearings and 6 are required. So I'll have to skip ahead that step till monday when the bearings I ordered are delivered. |
|
| |
|
06-04-2016, 08:11 AM
| #28 |
| Rock Stacker Join Date: Feb 2011 Location: Washington DC
Posts: 76
|
Thanks for the great thread! Quick question - the body is precut correct? I believe its the case with all axial bodies?
|
|
| |
|
06-04-2016, 09:02 AM
| #29 | |
| Quarry Creeper Join Date: Feb 2009 Location: Houston
Posts: 411
| Quote:
| |
|
| |
|
06-04-2016, 09:40 AM
| #30 |
| Pebble Pounder Join Date: Dec 2015 Location: mishawaka
Posts: 141
|
How smooth do the axles spin with these new gears?
|
|
| |
|
06-04-2016, 09:58 AM
| #31 | ||||
| I wanna be Dave Join Date: Apr 2014 Location: North Carolina
Posts: 2,254
| Quote:
Quote:
Quote:
Quote:
| ||||
|
| |
|
06-04-2016, 10:45 AM
| #32 |
| I wanna be Dave Join Date: Apr 2014 Location: North Carolina
Posts: 2,254
|
I got some more work in this morning (tranny/t-case is done, chassis now assembled), and let's just say the honeymoon is now over. Let me get a few things off my chest before I get back to the step-by-step. First, the tranny is huuuuuuge. Like 5th scale huuuuuuge. Here it is next to an SCX-10 tranny:  Why is it so big? There's a ton of unused space to make room for a 2-speed conversion option:  Yes...those shafts are pressed up against the housing and those are the only two gears inside the transmission. I've lived in apartments smaller than the tranny housing. I'm all for 2-speeds (I have them in 2 TF2s, an Ascender, a Beast and a Yeti). But this one is just too big, and it creates real packaging and placement issues, especially if you want to stick with the single-speed and add a full interior. Here it is mounted in the chassis:  There are other packaging issues. The battery tray is clever, but also massive, and the servo mount gets attached to the battery tray: 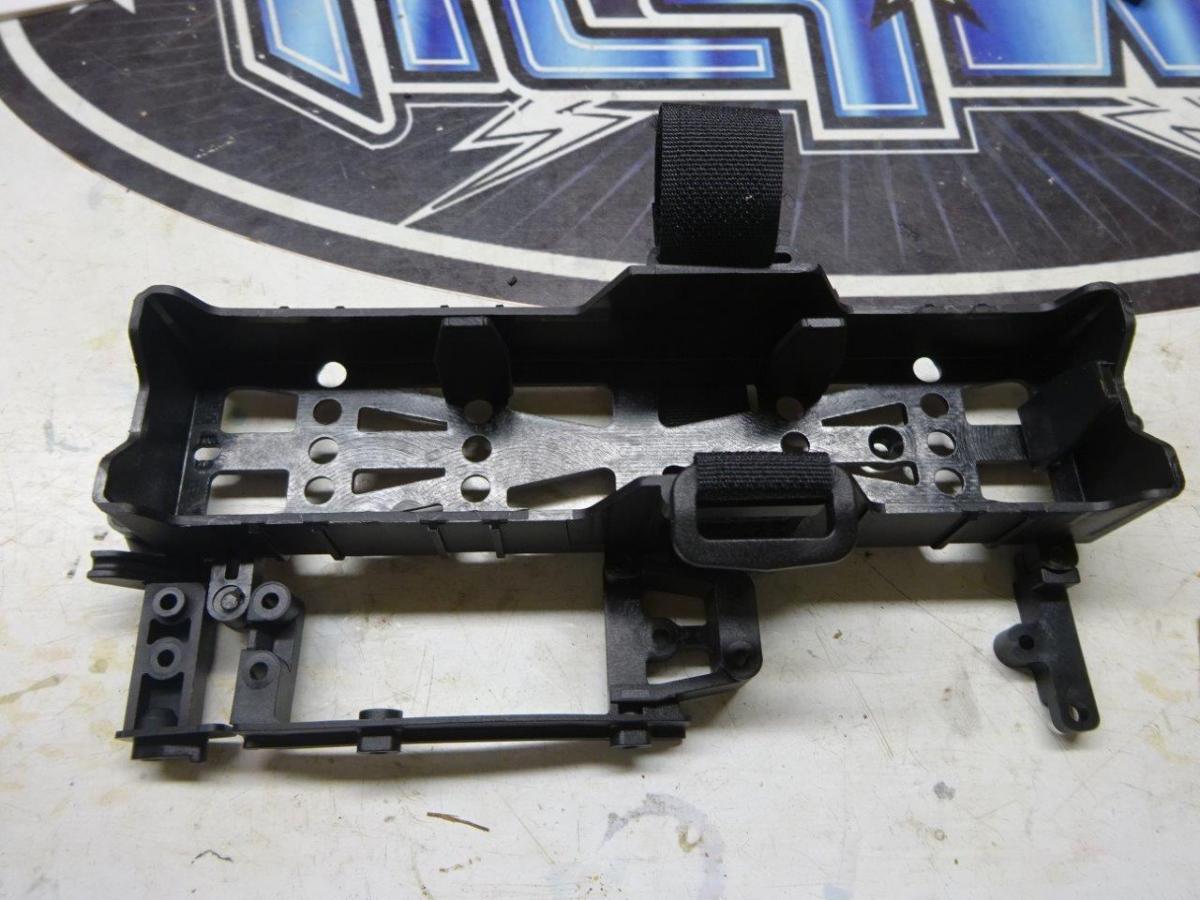 So moving the battery means you'll need a new servo mount. That's true of just about anything you'd want to rearrange. Be prepared to do some fab work. Or wait for the aftermarket to step in with some options. (I can't wait to see what GCM comes up with for this one.) With that off my chest, let's get back to it. I thought the tranny might use the same internals as the Yeti and Bomber, but I was wrong. Here's a side-by-side of the SCX-10 II and Yeti tranny instruction pages:  No worries. I already showed how much empty space is in the housing. When you're assembling, look out for the different pin sizes:  Also don't forget the plug for hole in the housing that's there for the 2-speed shifter:  Tranny together:   I noticed some extra plastic inside the transfer case housing:  It was easy enough to clean out. Be on the lookout when you build yours. You wouldn't want that gumming up the works. The spur and dual slipper look beefy:  This could be the first time I've ever run a stock Axial tranny/slipper/spur combo, so I'm curious to see how it holds up. One other noteworthy item is the motor plate. It comes in two pieces and is very, very thick:   You'll need the pinion hanging off the end of the motor shaft to get enough gear mesh (spoiler alert):    The cutout that allows you to insert a hex wrench to swap pinions is a nice touch. Once it's all together, you see that Axial has done a very nice job with surface detailing:   If I were the patient type and planned to keep the tranny (another spoiler alert, maybe?), it would be fun to detail and weather the case. Gotta help the wife get ready for Roo's birthday party. More to come later... |
|
| |
|
06-04-2016, 10:59 AM
| #33 |
| Pebble Pounder Join Date: Mar 2016 Location: GC
Posts: 142
|
The 4 unsealed bearings need packed and are used on lockers
|
|
| |
|
06-04-2016, 06:28 PM
| #34 |
| I wanna be Dave Join Date: Apr 2014 Location: North Carolina
Posts: 2,254
|
Before moving on with the build, I took a couple of pix showing the old vs. new axle housings:   Needless to say, this is a biiiiiig improvement (minus the red diff covers, lol). Back to the build. Since I didn't have drive shaft lengths at the time I ordered, this will be my first time using Wild Boars. My kit was missing a couple of driveshaft set screws, but I had a couple of extras lying around. The directions and parts numbering for the drive shafts are a bit confusing, in part because I had a floating group of three middle sections that didn't seem to have any tree number and one of the middle sections wasn't attached to the tree where it belonged:   I decided to go with the shortest middle shaft for the front and the longest for the rear, and it all worked out:    In case you were wondering, the front shaft is 90mm hole to hole fully compressed, and the rear shaft is just shy of 140mm hole to hole fully compressed. One nice find is that Axial includes a skid that is pre-drilled with the AX10 mounting hole pattern:  I suspect that a lot of people will end up choosing to go that route instead of the new tranny for packaging reasons alone. When I mounted the tranny to the skid, I noticed that there isn't much clearance at all between the rear driveshaft and skid:   If you are planing to shorten the wheelbase, you may end up needing to trim the back of the skid to provide more clearance. From this point forward, the build starts to get fussy. The battery tray seems overthought. The three spacer tabs are supposed to be adjustable to accomodate a different battery sizes, but the adjustment range is quite narrow:     On the plus side, my Helios RC 3S 5200 mAh pack fits in nicely and provides super long run times:  The servo bracket mounts to the chassis on one side and battery tray on the other:  As I mentioned before, I'm not a fan of this setup, because it complicates the process of relocating the battery if you want to reclaim that space. There's another problem with the servo mounting location, which you'll see once I have everything mounted to the chassis. Speaking of servos, I'll be using the RC4WD Twister Ultimate High Performance Waterproof Servo:   This is one of my go-to servos for class 1 and class 2 scalers with over 270 oz-inch of torque and fast transit times. It's a pretty good deal for $75. On the topic of electronics, it should come as little surprise that I'm going to put some serious heat into this build:  Holmes Hobbies is now offering to solder the BEC to the ESC battery lead as an optional service. Since I was feeling lazy when I orderd, I ticked that box plus waterproofing and a servo y-harness for a plug-and-play setup:  Nice job, Mr. Holmes. With the tranny complete and the battery tray/servo mount done, it was time to start putting together the chassis. Chassis rails look very familiar (apparently the same as the old ones with a few extra holes drilled):  If you tightened the forward tranny truss pieces all the way when you put them together, this would be a good time to loosen them so you can get them aligned into the rails properly:  More pix:     Once you have the chassis put together, you can see how the packaging doesn't use space very efficiently and just doesn't have the same flexibility that the old SCX-10 has. Here it is again next to my SCX-10 G6 kit build:  I moved quite a few things around with my G6 and had to do very little fabbing to make it happen. It looks like moving things around with the II will take quite a bit more effort. |
|
| |
|
06-04-2016, 08:58 PM
| #35 |
| Quarry Creeper Join Date: Mar 2015 Location: Castle Rock, Colorado
Posts: 377
|
I, and I'm sure others, really appreciate your unbiased commentary on how this build is going. You are doing a great job of pointing out things to look out for. Thanks! Sent from my iPad using Tapatalk |
|
| |
|
06-04-2016, 10:51 PM
| #36 |
| RCC Addict Join Date: Jan 2007 Location: Arkansas
Posts: 1,782
|
Sheesh that trans is huge. It kinda looks like flipping it around would require the servo to be mounted perpendicular to the frame rails up front? The Wildboar HD driveshafts are tough. I havent torn one up yet, even on my brushless Bomber. |
|
| |
|
06-04-2016, 11:16 PM
| #37 |
| I wanna be Dave  Join Date: May 2015 Location: Moving
Posts: 2,580
|
Yeah, if I wasn't already planning on running an SCX10 trans, this thread would have made my mind up. All that unused space between the motor and servo, even the option for 2 speed wouldn't be worth it to run the motor an inch further back and half an inch higher. Why would you put so much emphasis on the transfer case being low cog when the real weight in the motor and rest of the transmission is higher and hanging out the back. This one has me wondering. Did they really assume more than 50% of buyers would be insisting on a 2 speed? Did it really need to be the same size as a Yeti trans? I'm glad the battery tray is up front but packaging didn't need to make concessions for a 5000mah battery to ensure 3 hour run times. Oh man I can't wait to get mine and start building this thing. So much "ROOM" ,pun intended, for improvement. Great job with the build documentation N2R, keep it up.
|
|
| |
|
06-05-2016, 12:34 AM
| #38 | |||
| I wanna be Dave Join Date: Apr 2014 Location: North Carolina
Posts: 2,254
|
I had a good conversation tonight with a friend who has been at this a fair bit longer than I have and whose perspective I respect greatly. It reminded me of a couple of things. First, there is no way to design and build a truck for everyone. Many people are happy buying and running these trucks bone stock. Those people wouldn't be happy with designs or features that appeal to customer builders, and vice versa. Second, on balance, I firmly believe that we should encourage vendors to bring new products to market that continue to push the envelope of our hobby. Quote:
Quote:
Re the Wildboars, I'll be finding out soon enough, lol. Quote:
| |||
|
| |
|
06-05-2016, 01:01 AM
| #39 |
| I wanna be Dave Join Date: Apr 2014 Location: North Carolina
Posts: 2,254
|
Feeling a bit reinvigorated by the conversation with my friend, I decided to get back to the build and get this thing running. Mounting the axles and shocks was very straightforward. I must say that I very much appreciate that the lower links and shocks no longer share a mounting screw at the axle:  So much easier to mount and service later. Clearance between the servo horn and chassis panhard mount is very tight. The stock plastic horn clears, but not by much:   Since I haven't had great luck with plastic horns, I tried an Axial aluminum servo horn that I had sitting around, but it wouldn't clear:  Fortunately, I also had a spare Racer's Edge horn with a much lower profile:   Much better. So if you're planning to use an aluminum horn, make sure it's a compact one. Once I had that sorted, there were just a few more things to add (bumpers, sliders, electronics, wheels/tires). I am very eager to try out the BFGs that came with the kit, but I don't have a spare set of 1.9 beadlocks on which to mount them. So I went with a set of Baja Claws mounted on GMade Steelies that I had sitting around, which got me to to this:   While I was at it, I decided to trim the body and see how it looks:   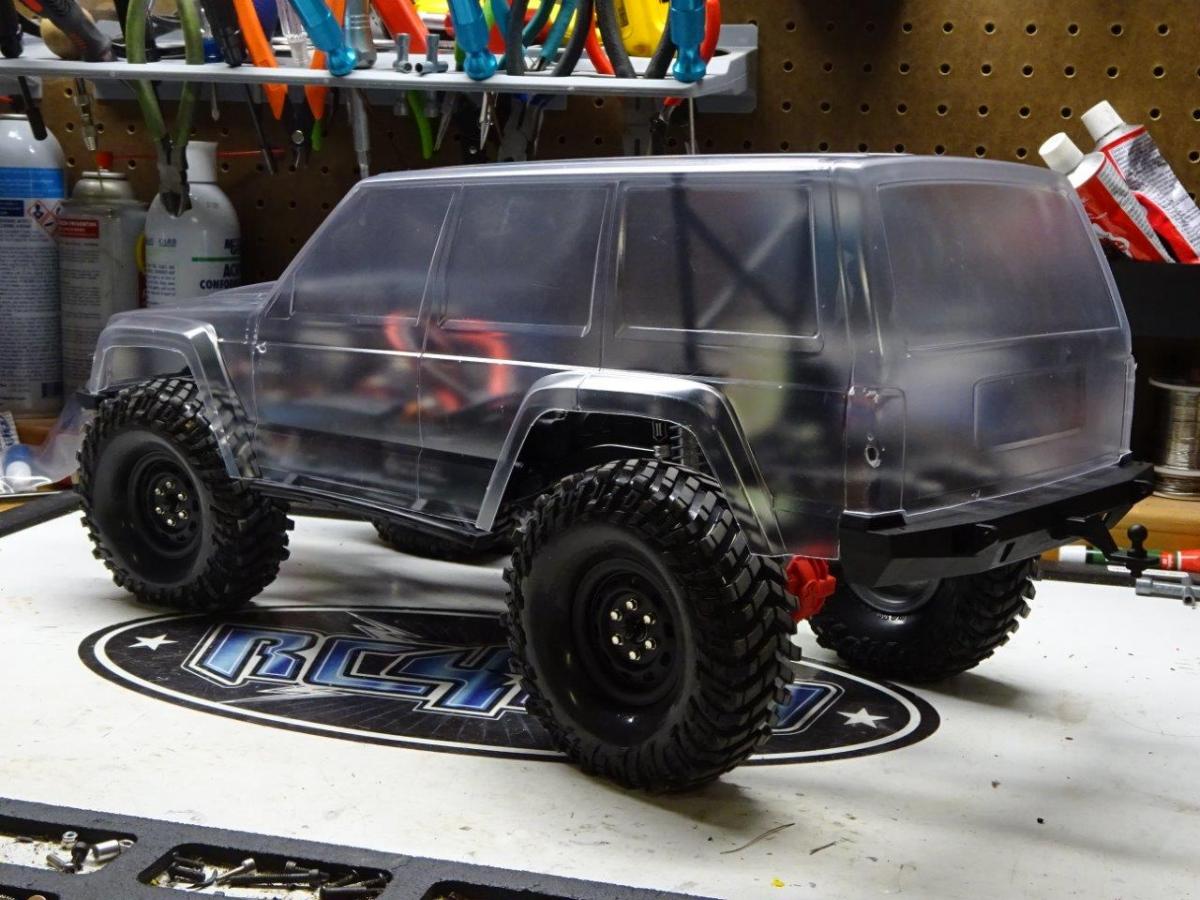 That is one good looking truck. This may have the best proportions I've seen on an Axial body. It looks really, really good, even without paint or accessories. One little interesting tidbit about the body - it has front and rear bumpers molded into the lexan. If you like those bumpers for more of a stock, street look, you won't be able to run them with the stock bolt-on bumpers. I say trim off the lexan molded bumpers and go with either the stock bumpers or an aftermarket set. I had a chance to play around for a few minutes in the garage, and it was very impressive. I'll post up some further thoughts in the morning. |
|
| |
|
06-05-2016, 06:01 AM
| #40 |
| Quarry Creeper Join Date: May 2011 Location: scituate RI
Posts: 269
|
Great build n2r I can't wait for mine to get here from rpp
|
|
| |
 |
 SCX10 II by newIIrocks - Similar Threads
 | ||||
| Thread | Thread Starter | Forum | Replies | Last Post |
| Rc4wd trailfinder 2 axial scx10 hilux scx10 rubicon jeep | TAFF1969 | Scale Videos! | 0 | 03-08-2016 07:11 AM |
| Newbie. Ordered CRC ScX10 rtr and SCX10 jeep kit. | Mattdaddy1974 | Axial SCX-10 | 15 | 07-11-2015 02:50 PM |
| |


 Linear Mode


