| |
 09-23-2010, 11:24 AM
| #1 |
| 2006 2.2 National Champ   Join Date: Dec 2004 Location: Big Bear Lake
Posts: 8,328
|
Finally had a chance to snap a few pictures of my most recent set-up. The more I drive this rig the more I am amazed at what it'll do. Specs: Axial XR10 Axial XR10 Stage 2 Carbon Fiber Kit Axial Hardline Body Takashima Designs Paint Axial Machined High Clearance Links (Lowers) Axial 30* Aluminum Links (Uppers) Axial 13t Steel Pinions Axial 2.2 VWS Beadlocks Vanquish Wheel Weights Futaba 4PK Radio Futaba BLS152 Brushless Steering Servo Robitronic Servo Horn Dual Tekin FXR ESC's Castle Creations BEC Tekin 45t motors MaxAmps 1800 3S lipos White HB Rovers TCS Rockhammer Reach Foam (Front) Dual Stage Pro-Line Foams (Rear) Last edited by BENDER; 09-23-2010 at 01:10 PM. |

|  |
| Sponsored Links | |
| | |
|
09-23-2010, 11:27 AM
| #2 |
| I wanna be Dave Join Date: Jul 2008 Location: appleton
Posts: 2,067
|
That is one nice looking xr10 makes my stock xr look stock lets see some vids in action nice build
|
|
| |
|
09-23-2010, 11:29 AM
| #3 |
| RCC Addict  Join Date: Jun 2009 Location: California
Posts: 1,494
|
Very nice....setup looks good....
|
|
| |
|
09-23-2010, 11:52 AM
| #4 |
| I wanna be Dave Join Date: Oct 2007 Location: Scumrise, Flooriduh
Posts: 5,181
|
Looks amazing Brad. I love the red against carbon fiber. Setup wise what is different now from Nat's if anything?
|
|
| |
|
09-23-2010, 12:05 PM
| #5 |
| Im Brandon  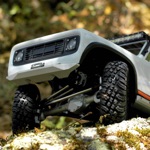 Join Date: Feb 2005 Location: Colfax, CA
Posts: 8,156
|
Looking good!!  |
|
| |
|
09-23-2010, 12:06 PM
| #6 |
| RCC Addict Join Date: Feb 2008 Location: Crawlerado
Posts: 1,411
|
Where's the tamiya plugs? |
|
| |
|
09-23-2010, 12:14 PM
| #7 |
| Rock Crawler  Join Date: Apr 2006 Location: Hartland, MI
Posts: 788
|
Is there a specific reason you inverted the rear shocks and not the fronts?
|
|
| |
|
09-23-2010, 12:23 PM
| #8 | |||
| 2006 2.2 National Champ Join Date: Dec 2004 Location: Big Bear Lake
Posts: 8,328
| Quote:
Quote:
Quote:
Thanks guys. | |||
|
| |
|
09-23-2010, 12:54 PM
| #9 |
| I wanna be Dave Join Date: May 2007 Location: Taylors Falls just hanging with the MNRCRC crew.
Posts: 7,843
|
That looks good, incredible paint and those after market parts maker for a impressive rig Brad. |
|
| |
|
09-23-2010, 01:12 PM
| #10 |
| I wanna be Dave Join Date: Sep 2009 Location: Nor Cal
Posts: 2,213
|
Looks Bad-Ass with all that carbon and red Are those body mounts what you need when switching to carbon? Or can you use the stock mounts? And are those the stock axial red springs? |
|
| |
|
09-23-2010, 01:15 PM
| #11 |
| owner, Holmes Hobbies LLC  Join Date: Nov 2004 Location: Volt up! Gear down!
Posts: 20,290
|
Thats pretty slick for a plug and play rig! So when do we see the return of Bender customs parts?
|
|
| |
|
09-23-2010, 01:17 PM
| #12 |
| I wanna be Dave Join Date: Sep 2009 Location: Nor Cal
Posts: 2,213
|
Did you narrow the NWTT Rockhammer foams? And are they #5 or #8's?
|
|
| |
|
09-23-2010, 01:22 PM
| #13 |
| Rock Stacker  Join Date: Oct 2009 Location: Boston
Posts: 53
|
Really nice, I love the red all over it. Where did you get those shock caps?
|
|
| |
|
09-23-2010, 01:33 PM
| #14 | |||||
| 2006 2.2 National Champ Join Date: Dec 2004 Location: Big Bear Lake
Posts: 8,328
| Quote:
Quote:
You can still use the stock body mounts with the CF upgrade kit. I went this route to try and shave a little weight off the top of the chassis, but I don't think it saved much. The springs I am running are prototypes from Axial. The front's are 1.04 lbs/in, and the rear's are 1.43 lbs/in. They are very soft, softer then anything else I have found that is available right now. So far they work awesome. Quote:
Quote:
Quote:
The red shock caps were a special order item that Brandon got for me. | |||||
|
| |
|
09-23-2010, 01:34 PM
| #15 |
| Rock Stacker Join Date: Sep 2010 Location: Mission Viejo
Posts: 55
|
Watching Bender and his rig is impressive to say the least. Here's a pic of his rig in action from yesterday's lunch practice session:  |
|
| |
|
09-23-2010, 01:36 PM
| #16 | |
| 2006 2.2 National Champ Join Date: Dec 2004 Location: Big Bear Lake
Posts: 8,328
| Quote:
| |
|
| |
|
09-23-2010, 01:47 PM
| #17 |
| Rock Stacker Join Date: Sep 2010 Location: Saint Louis
Posts: 65
|
Bender, can you walk me through how you wired your BEC? I am building a kit right now with the exact same electronics, and I could use all the advice I can get with the BEC before I start to solder. Looks great by the way! Last edited by eddiepfund; 09-23-2010 at 01:53 PM. |
|
| |
|
09-23-2010, 01:57 PM
| #18 | |
| 2006 2.2 National Champ Join Date: Dec 2004 Location: Big Bear Lake
Posts: 8,328
| Quote:
The easiest way is per the Castle directions. Pull the red power wire from both ESC's. Then solder the BEC + and - leads to your Deans plug coming off the ESC's or to either one of the battery terminals. Then, just plug the BEC into the battery port on your receiver. | |
|
| |
|
09-23-2010, 02:04 PM
| #19 | |
| Im Brandon Join Date: Feb 2005 Location: Colfax, CA
Posts: 8,156
| Quote:
If you want something different you can try soldering the wires directly to one of the "+" & "-" battery posts on the FXR's. The BEC will receive the same voltage at this location as it will directly from the Deans plug at the ESC/Battery connection. In the picture below you can see the BEC wires just long enough to solder to the FXR battery posts. In this picture the black BEC wire will solder to the post with the blue (negative) and the red BEC wire will be soldered to the post with the red (positive) on the ESC. Please ignore the ugly soldering | |
|
| |
|
09-23-2010, 02:06 PM
| #20 | |
| 2006 2.2 National Champ Join Date: Dec 2004 Location: Big Bear Lake
Posts: 8,328
| Quote:
| |
|
| |
 |
| |


 Linear Mode


