| |
| |||||||
 |
| | LinkBack | Thread Tools | Display Modes |
 04-20-2011, 07:37 PM
| #1 |
| Pebble Pounder Join Date: Aug 2010 Location: Sioux Falls, South Dakota
Posts: 135
|
Hello, I'm new to crawling (I have about 1.5 hours run-time on an AX-10 I bought last fall...2 weeks before I moved to a place with no crawling spots) and have decided to build a XR-10 rig now that I'm back in a city that has a nice place to crawl. So far I've only put the shocks, links and part of the chassis together. The only thing I have left to order is the Futaba 4pl radio and some Deans plugs. I don't have anything too exciting to take pictures of yet but that will change. Chassis Parts: - Billet Works Designs XR-Wedge bodied chassis - Billet Works Designs XR-10 upper/lower hi-clearance links - Billet Works Designs hi-leverage steering arm - Billet Works Designs rear axle brace - Billet Works Designs servo mount - Billet Works Designs electronics tray - Crawler Innovations lightened servo guard/clamp - P/N: CISG - Crawler Innovations 2-stage foams - Crawler Innovations 1/3oz aluminum wheel weights (x3 sets)- P/N: CIAVPW - HB Sedona tires - Losi gold springs (x2 pair) - P/N: LOSA5144 - Robinson Racing 14t pinion gears (x2) - P/N: 1014 - Robitronic servo arm - P/N: R17002 - Vanquish Products 1oz stainless steel wheel weights (x2 sets)- P/N: VPS01065 - Vanquish Products silver motor plates (x2)- P/N: VPS02321 - Vanquish Products silver gear cases (x2) - P/N: VPS02321 Electronics: - Castle Creations Mamba Micro Pro ESCs (x2) - Castle Creations 10A BEC - P/N: 010-0004-00 - Futaba 4pl radio - Hobbico CS-170 servo - Holmes Hobbies TorqueMaster Pro Handwound 45t motors (matched pair) - SkyLiPo 40c 1000mah 2s and 3s LiPo batteries (2 of each) 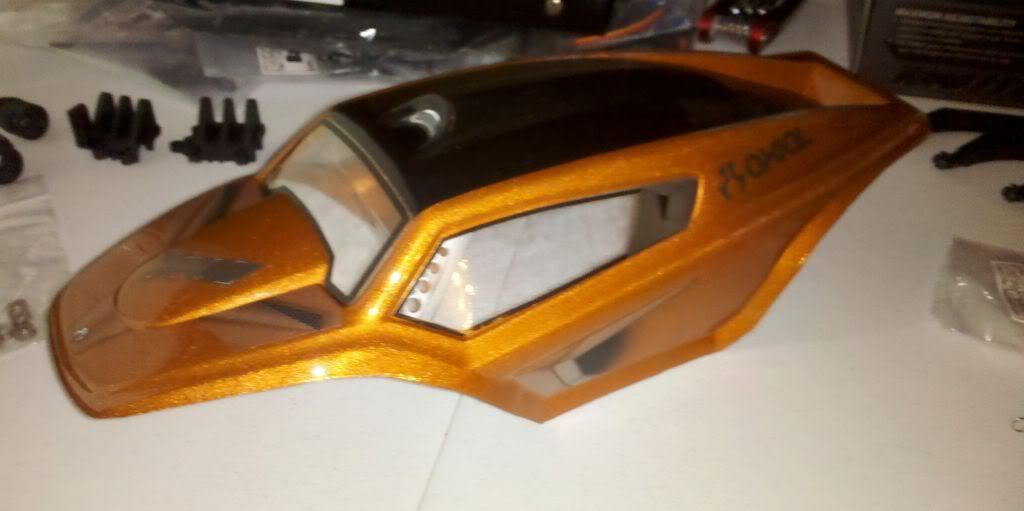 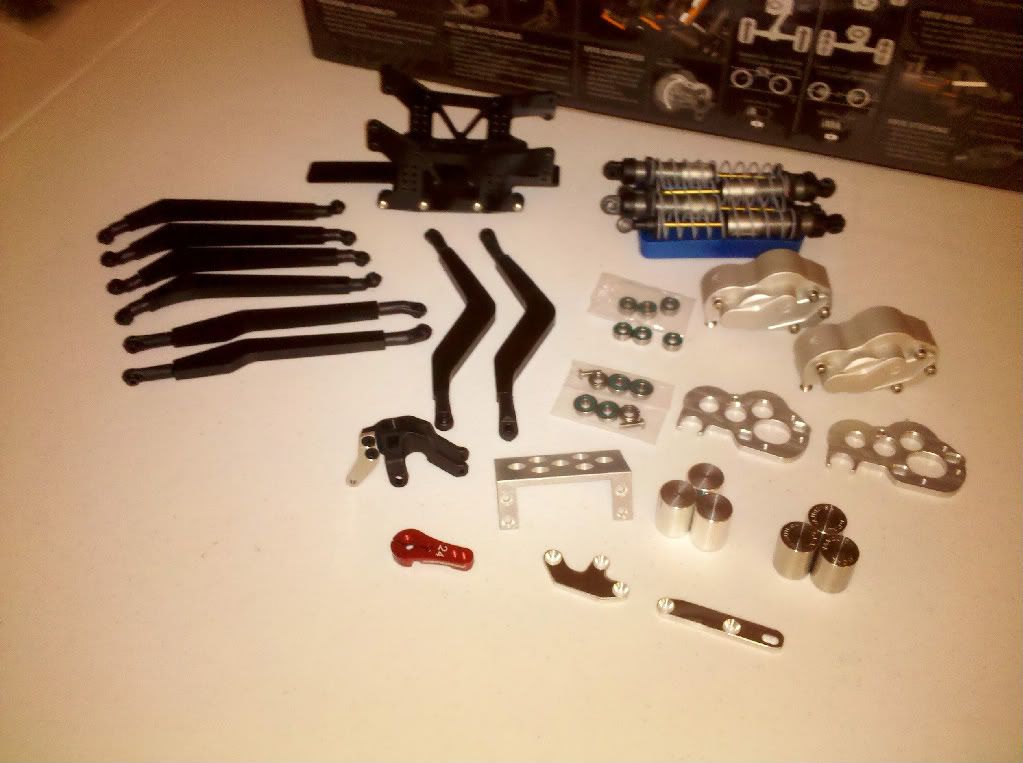 |

|  |
| Sponsored Links | |
| | |
|
04-21-2011, 08:12 AM
| #2 |
| RCC Addict Join Date: Oct 2008 Location: Tyler, TX
Posts: 1,619
|
Nice start you got there!  Nothing like dropping some serious coin and a rig before even getting to drive it, but well worth it to have it your way. |
|
| |
|
04-21-2011, 10:49 AM
| #3 |
| 20K Club   Join Date: Jul 2004 Location: Sending illegals home one Hayabusa at a time.
Posts: 22,981
|
Nice list! You should make the trip down to Omaha next weekend for the Central States Challenge. |
|
| |
|
04-21-2011, 12:35 PM
| #4 |
| Rock Stacker Join Date: Jan 2011 Location: Parker Co.
Posts: 85
|
Great start, I have the BDW lower links on mine and can't say enough about them!!!! Look forward to following your build!!
|
|
| |
|
04-21-2011, 08:54 PM
| #5 |
| Pebble Pounder Join Date: Aug 2010 Location: Sioux Falls, South Dakota
Posts: 135
|
Thanks guys! Harley, without your numerous threads I would have been lost. I just ordered a Futaba 4pl radio last night and I have your 4pl help thread bookmarked. The awesome amount of support from fellow members and also vendors is what drew me to these forums and RC crawling. That...and the money burning a hole in my pocket. lol I got the gear boxes put together tonight. 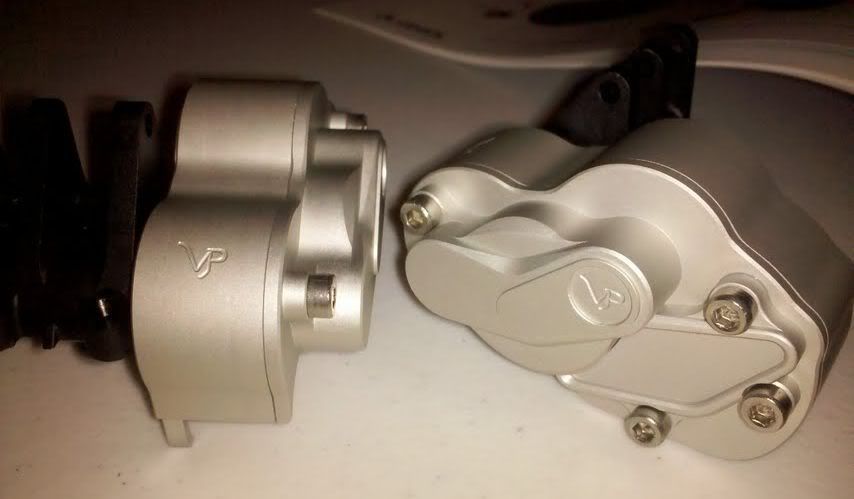 |
|
| |
|
04-22-2011, 08:39 AM
| #6 |
| 20K Club Join Date: Jul 2004 Location: Sending illegals home one Hayabusa at a time.
Posts: 22,981
|
You definitely need to see if you can make it down next weekend. It would be a great event for you to attend. Let me know if you have any questions when you get the radio. More than happy to lend a hand. |
|
| |
|
04-22-2011, 07:32 PM
| #7 |
| Quarry Creeper Join Date: Sep 2010 Location: Port St Lucie
Posts: 484
|
Your build is looking awesome and you have mighty fine assortment of parts your using. Harley helped me wioth my radio questions and got me goin with a 4pl. Keep it up and once you get ALL the parts and $1200ish invested when you mess up you cant blame it on the rig.... only on driver error..... |
|
| |
|
04-25-2011, 10:13 PM
| #8 | |
| Pebble Pounder Join Date: Aug 2010 Location: Sioux Falls, South Dakota
Posts: 135
| Quote:
After seeing some of the pictures of the HobbyTown HobbyPlex there in Omaha I'm even more excited.A few updates: I'm getting the axles put together and I got the wheels together. I also de-anodized the Robitronic servo arm as the red didn't fit in with my orange/black/silver color scheme. It actually matches the color and finish of the VP gear boxes quite well. My Holmes handwounds also came in the mail today. 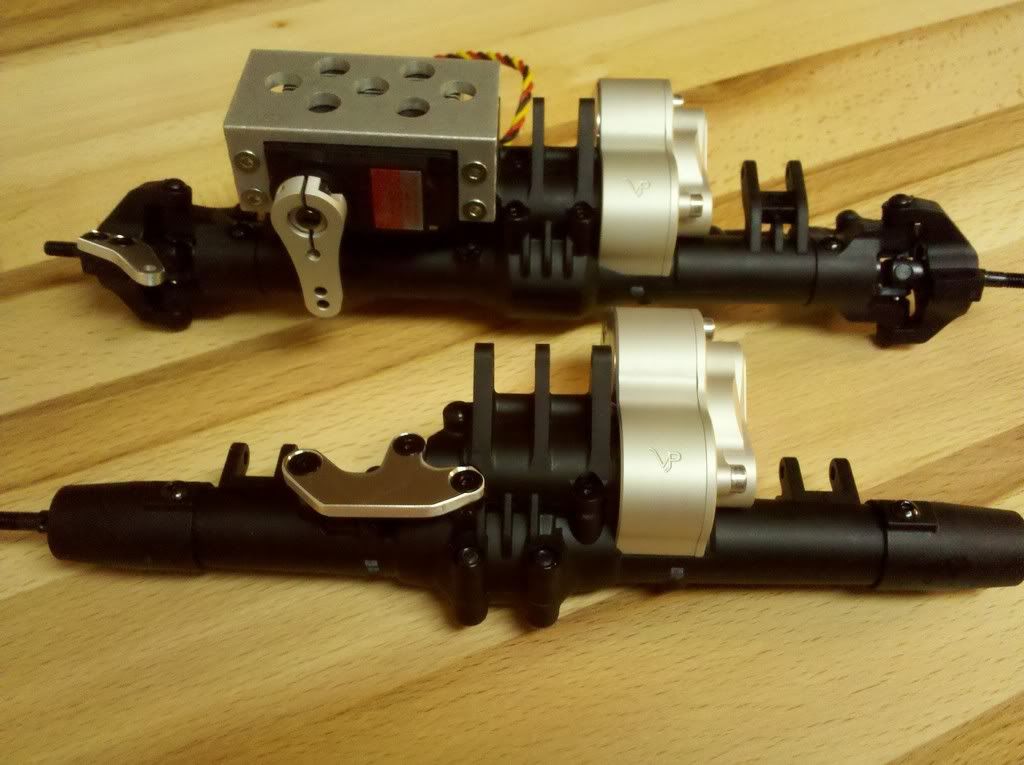  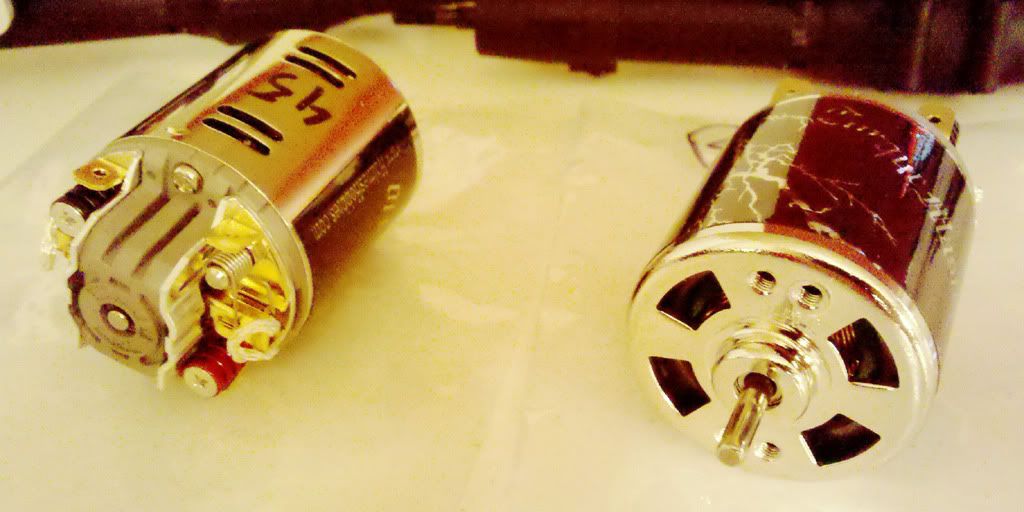 | |
|
| |
|
04-25-2011, 11:10 PM
| #9 |
| Newbie Join Date: Jan 2011 Location: AUS
Posts: 30
|
How did you deanodize the steering horn? I have some parts I want to do the samew to.
|
|
| |
|
04-26-2011, 02:08 PM
| #10 |
| Rock Stacker Join Date: Nov 2009 Location: ft waste
Posts: 54
|
i use easy-off oven cleaner. just dont soak to long
|
|
| |
|
04-26-2011, 02:55 PM
| #11 | |
| Newbie Join Date: Sep 2009 Location: quebec
Posts: 28
| Quote:
Best way for small part!! Dam those VP part are sexy.... | |
|
| |
|
04-26-2011, 03:00 PM
| #12 | |
| 20K Club Join Date: Jul 2004 Location: Sending illegals home one Hayabusa at a time.
Posts: 22,981
| Quote:
Rig is looking good. I have to get around to deannodizing my servo horn too. | |
|
| |
|
04-26-2011, 04:35 PM
| #13 | |
| Pebble Pounder Join Date: Aug 2010 Location: Sioux Falls, South Dakota
Posts: 135
| Quote:
As for de-anodizing...here's how I did it (except with a spray-bottle version of the Greased Lightening...not a 1 gallon jug): http://www.youtube.com/watch?v=FLvxMJ5_WZE I would recommend having a toothbrush handy to rub down the part(s). My servo horn looked black before I took a brush to it and got a layer of anodizing off. I also just used a soup can (with a disposable metal pie plate underneath to catch drips, etc.) for my container and heated that up on the stove. | |
|
| |
|
05-04-2011, 09:43 PM
| #14 |
| Pebble Pounder Join Date: Aug 2010 Location: Sioux Falls, South Dakota
Posts: 135
|
This week I bought some good solder, a soldering iron and a heat gun and went to town on my wiring. Soldering was a piece of cake once I took the time to Google what type of solder and iron are best. I also made motor/gear box skid plates out of a $1.69 plastic binder from Staples, loomed the motor and servo wires and installed a Chaotic Crawlers stainless steel "Axial-straight" steering rod. I have assembled the entire crawler now. I still have to program the ESCs and BEC so the wiring is still a bit messy up top until I get those items ready to connect. I'm also not sure what the final setup for link locations (and wheel weights) will be but this is a start. When I get the wiring %100 complete and have better lighting I'll take better chassis pictures to hopefully show some detail amongst all the black. 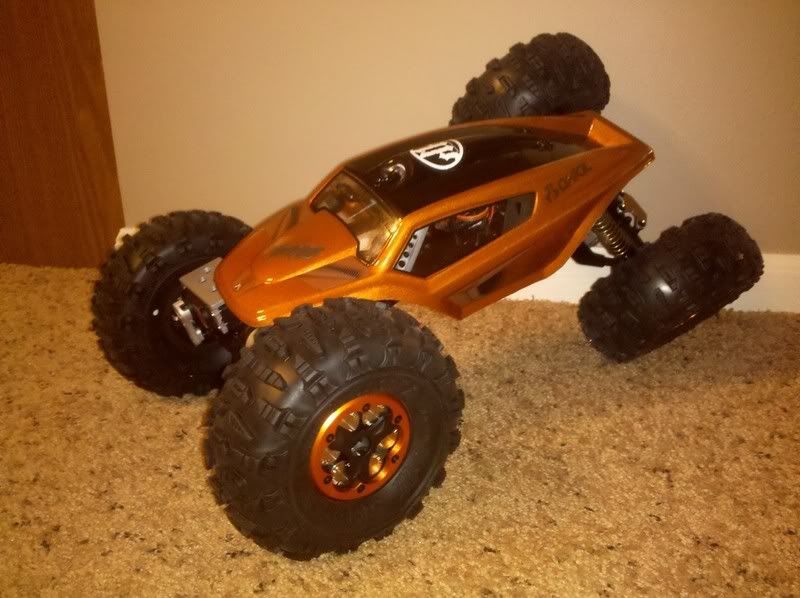 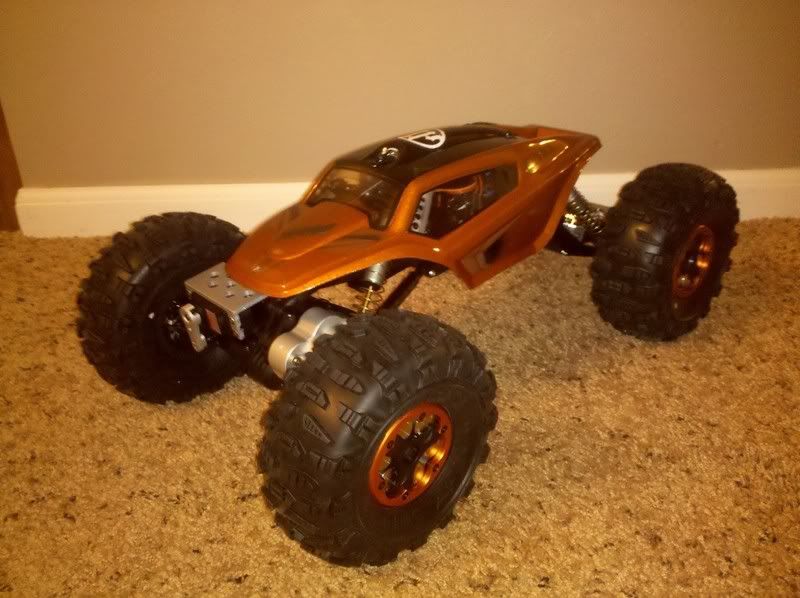  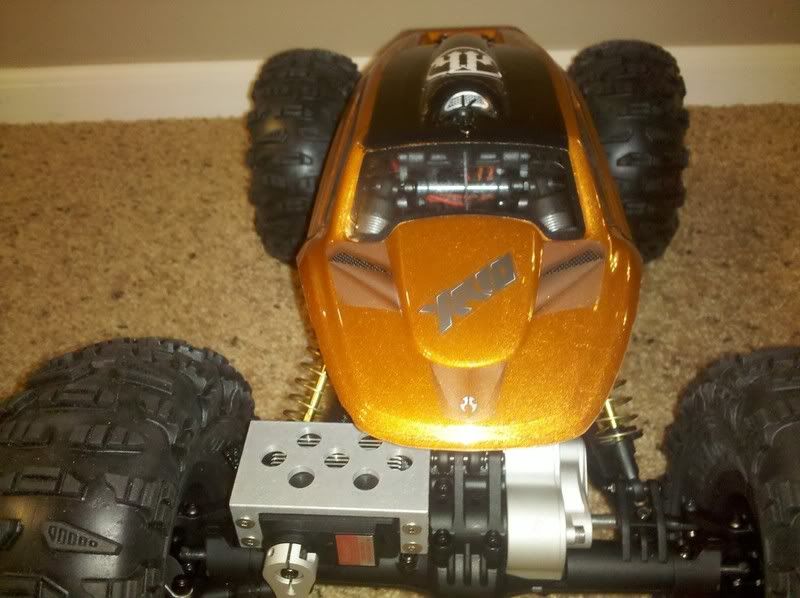 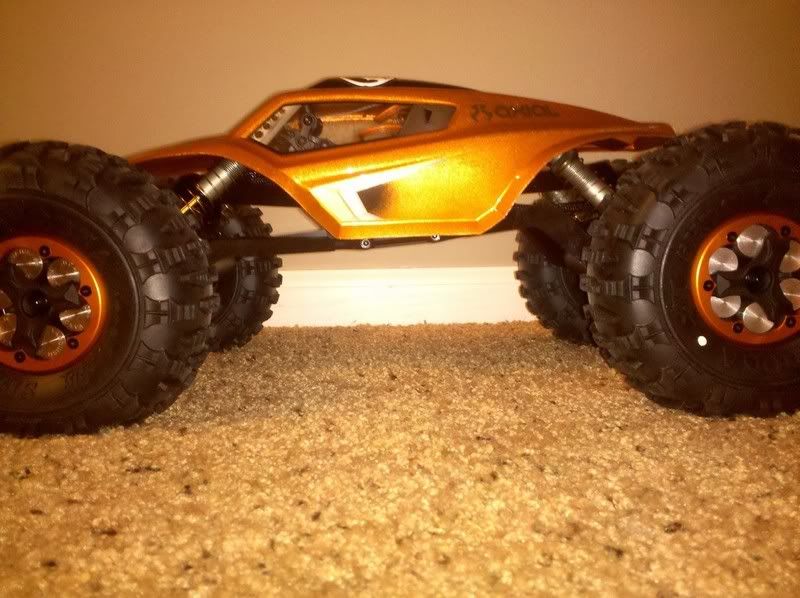 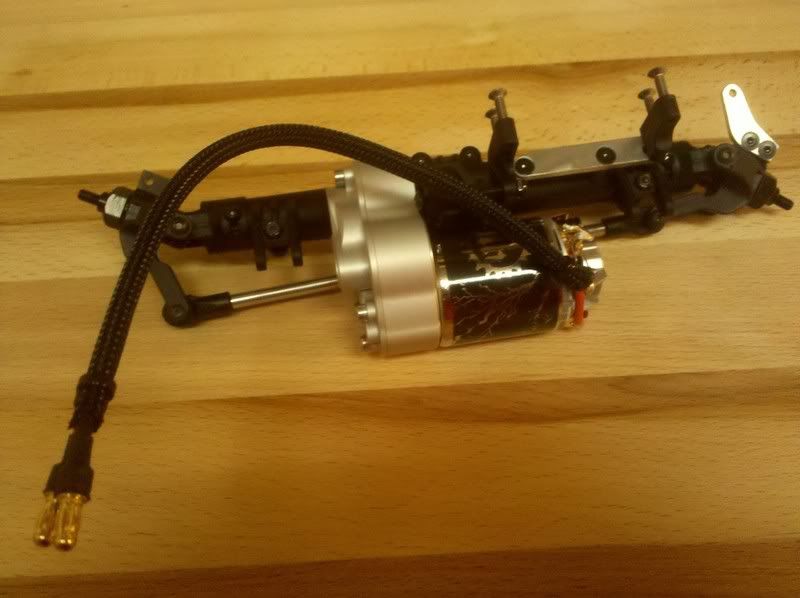 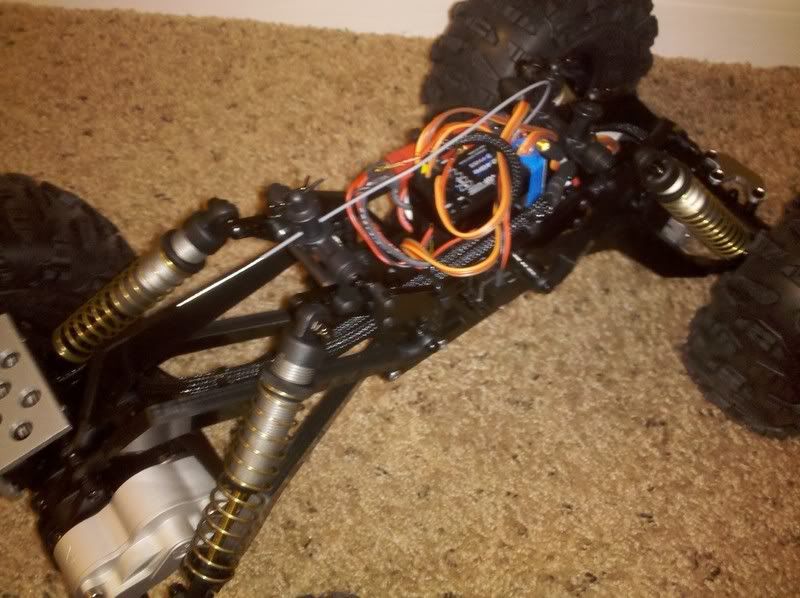  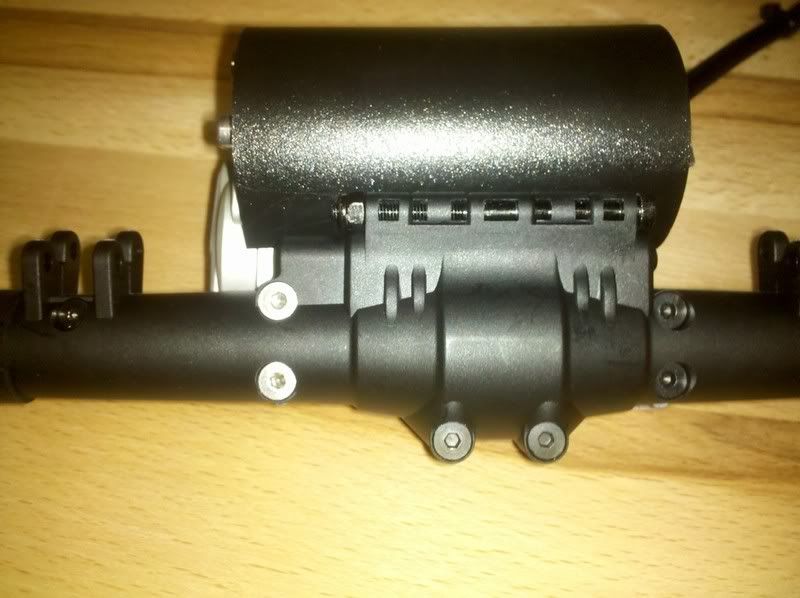 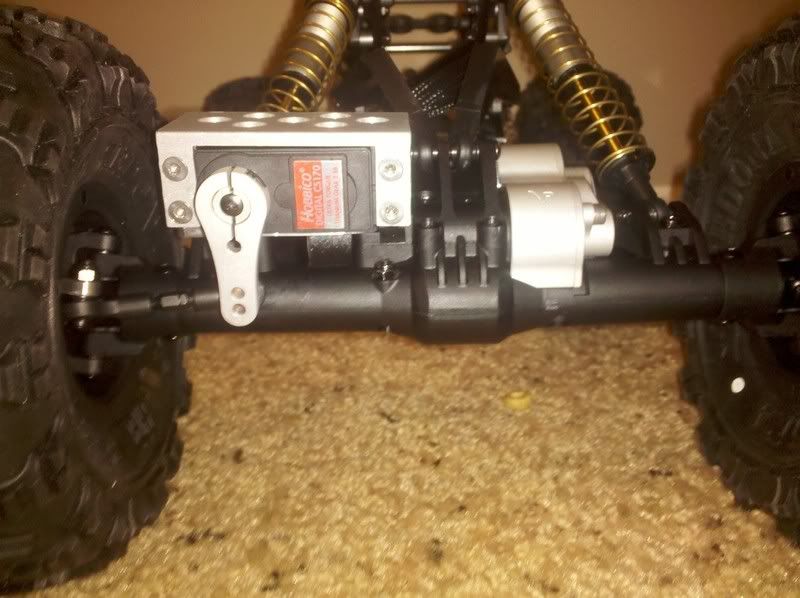 |
|
| |
|
05-05-2011, 04:46 AM
| #15 |
| Rock Crawler Join Date: Feb 2010 Location: Chapin, South Carolina
Posts: 666
|
Looks good but one questions, why do you have wheel weights in the rear?
|
|
| |
|
05-05-2011, 07:50 AM
| #16 |
| Quarry Creeper Join Date: Jan 2011 Location: Spokane
Posts: 225
|
Looks like they are the aluminium ones so thats like running 2 vanquish weights |
|
| |
|
05-05-2011, 08:09 AM
| #17 | |
| I wanna be Dave Join Date: Oct 2008 Location: Sumter
Posts: 6,141
| Quote:
| |
|
| |
|
05-05-2011, 08:10 AM
| #18 | |
| I wanna be Dave Join Date: Oct 2008 Location: Sumter
Posts: 6,141
| Quote:
| |
|
| |
|
05-05-2011, 08:20 AM
| #19 | |
| Quarry Creeper Join Date: Jan 2011 Location: Spokane
Posts: 225
| Quote:
 | |
|
| |
|
05-10-2011, 09:11 PM
| #20 |
| Pebble Pounder Join Date: Aug 2010 Location: Sioux Falls, South Dakota
Posts: 135
|
Yeah, initially I had all VP weights up front (so 6 oz in each front wheel) and Crawler Innovations weights in the rear (so 2 oz in each rear wheel). I finished up my build last Friday (10-6-2011) and took some poser pictures on Saturday (they're only new once, lol) and some actual crawling pictures today. So far I've dropped the front weight down from 6 oz to 4 oz in each wheel and changed the front upper link mount positions. I'm also thinking about dropping the rear weight from 2 oz down to 1 oz or even 0 oz to see how that effects the handling also. 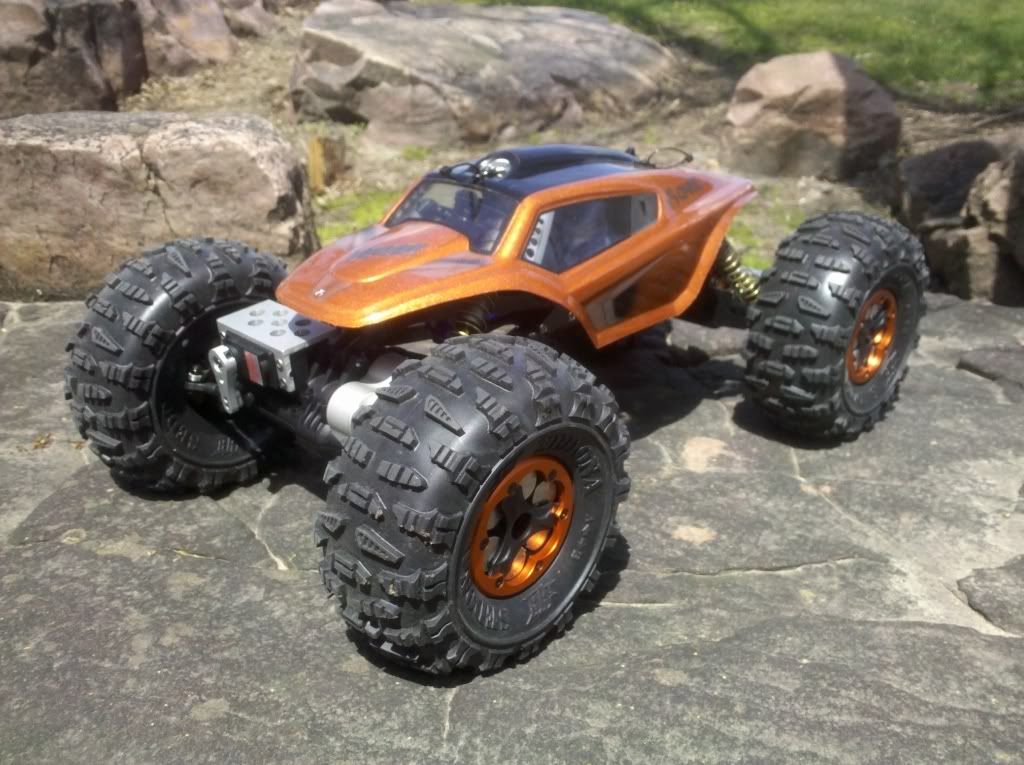 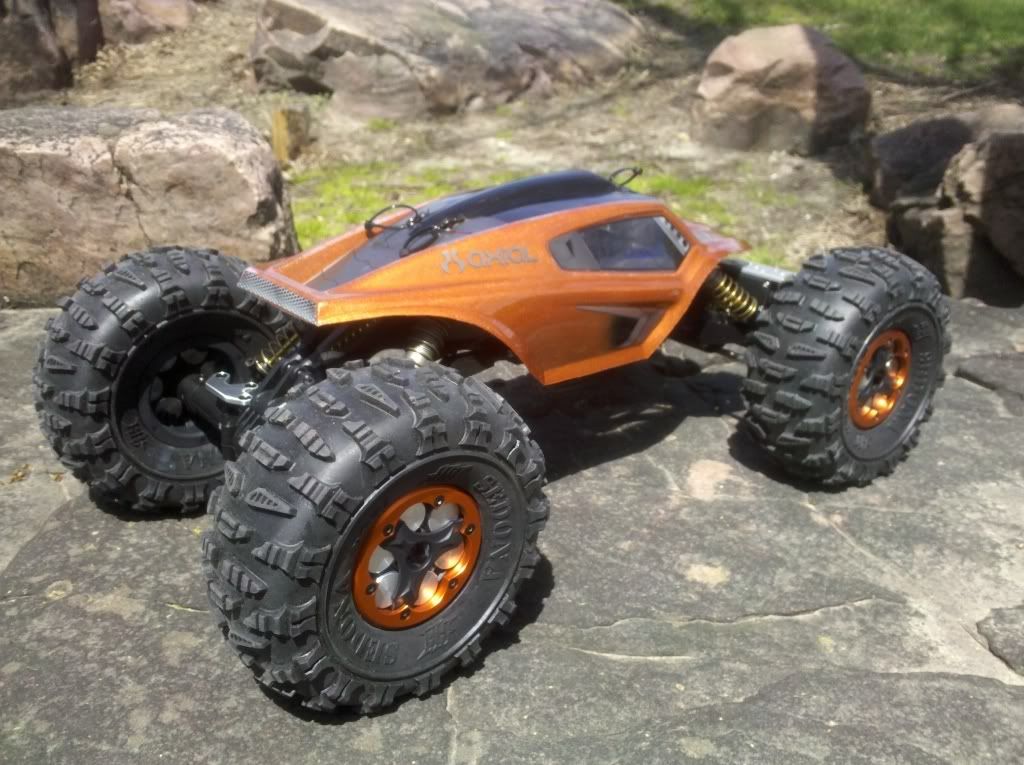 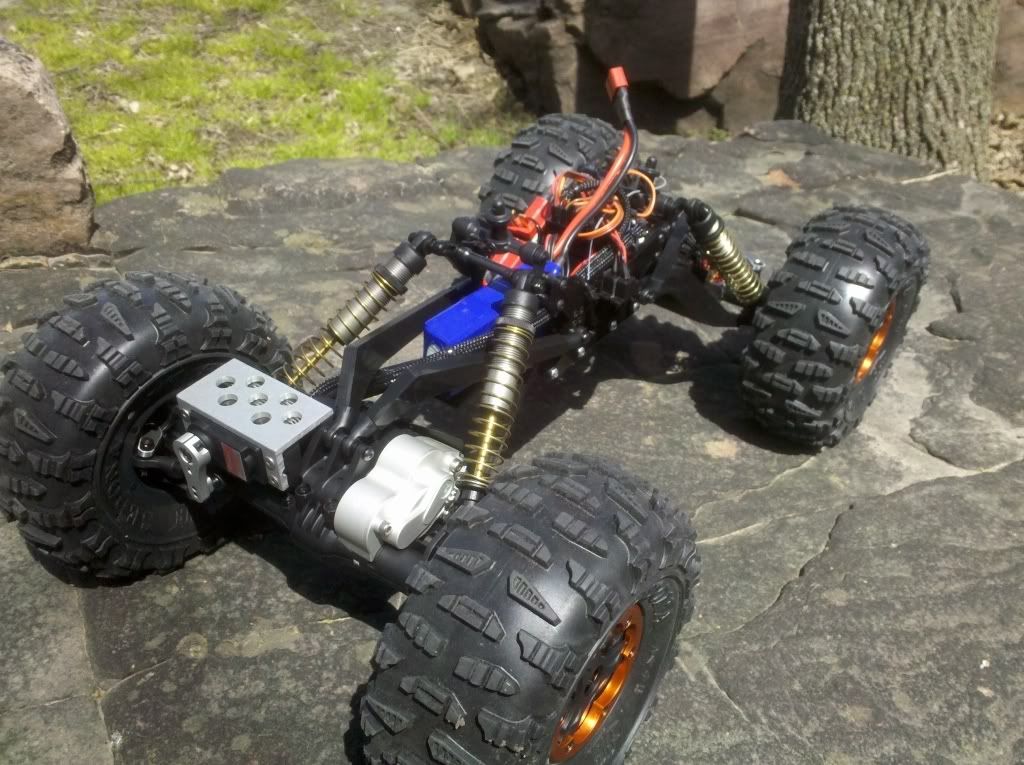 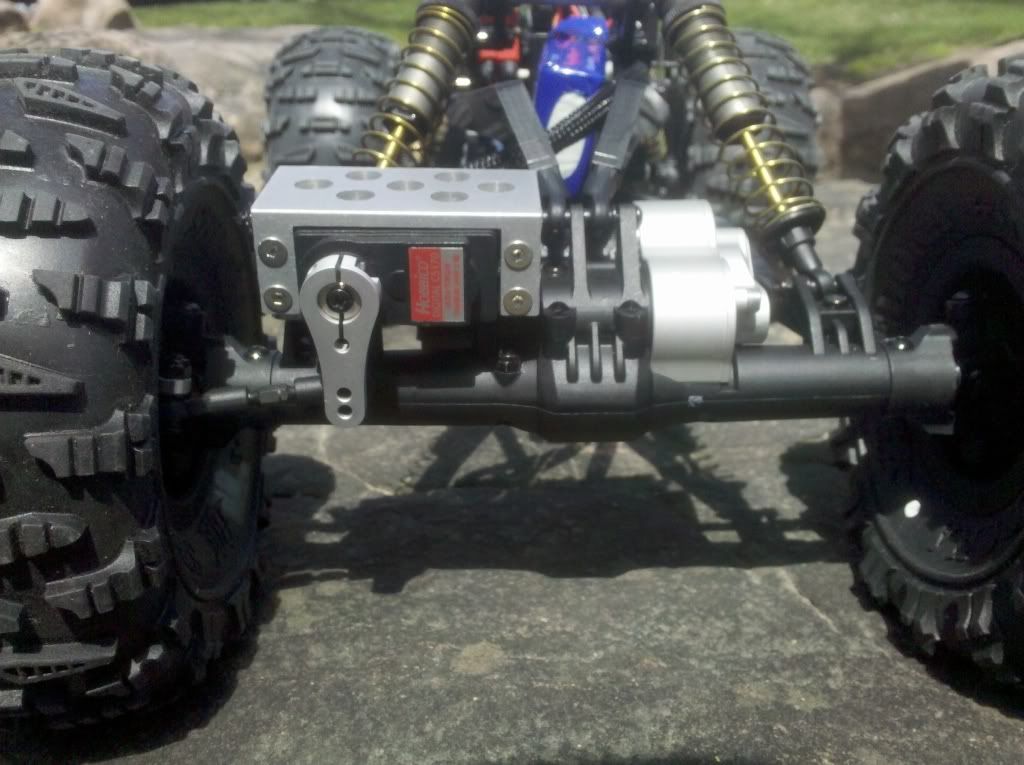 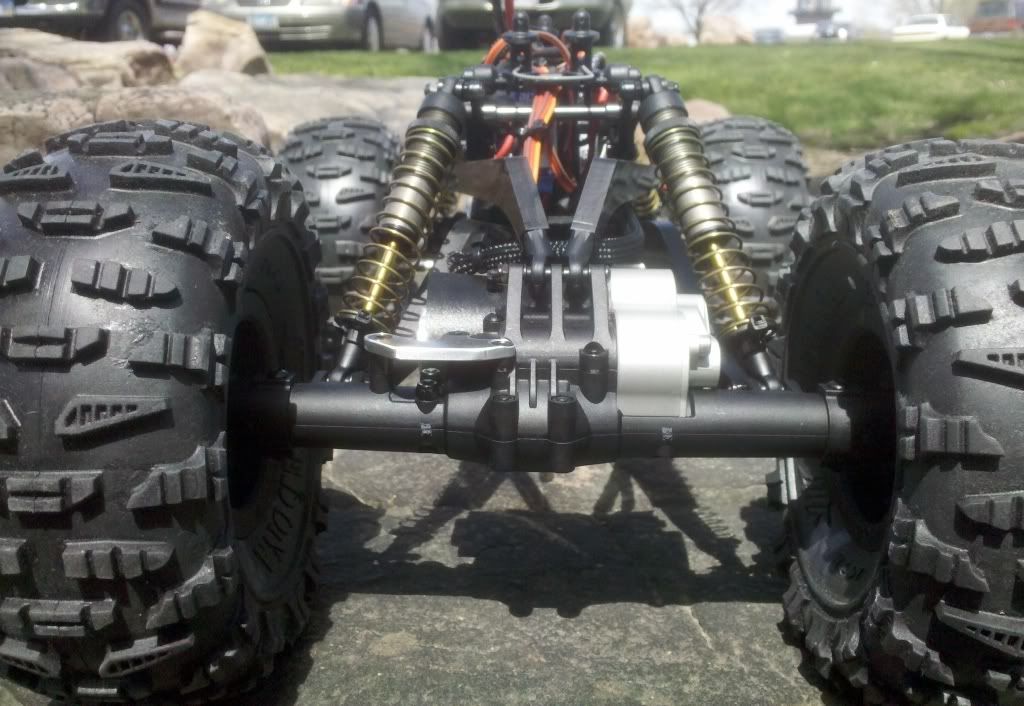  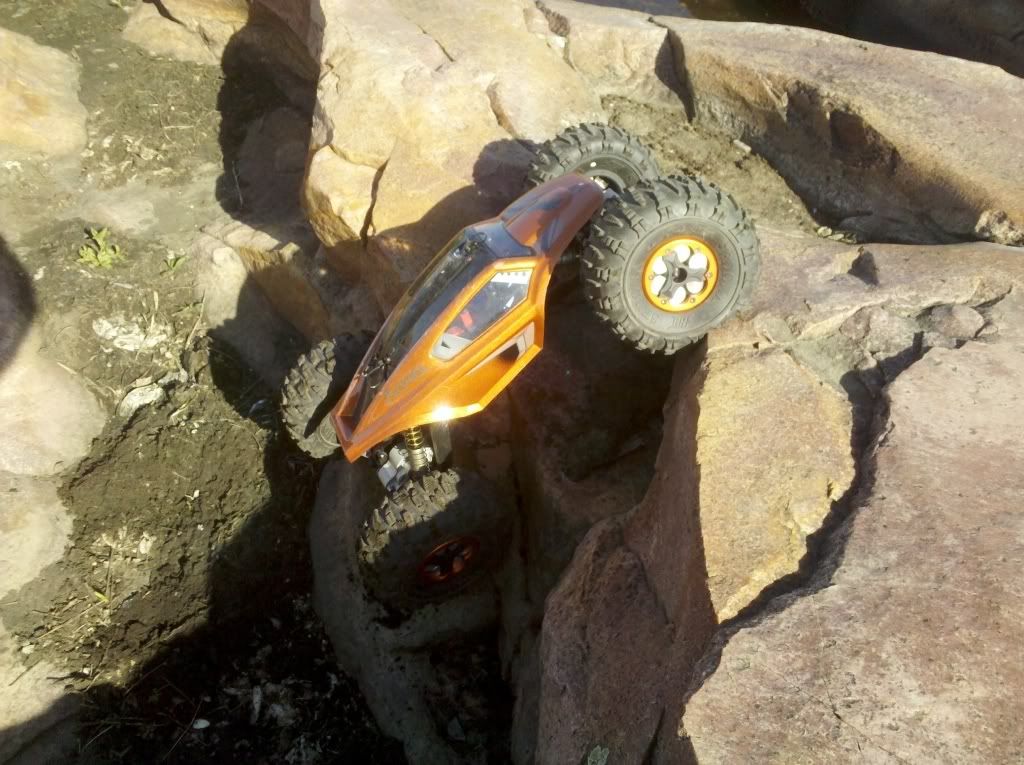 |
|
| |
|
 LinkBacks (?)
LinkBack to this Thread: http://www.rccrawler.com/forum/axial-xr10/312656-omegas-xr-10-now-xr-mantis.html | ||||
| Posted By | For | Type | Date | |
| Omega's XR-10 - Now XR-Mantis - Page 2 - RCCrawler.com Bulletin Board | This thread | Refback | 10-04-2011 04:14 PM | |
| |


 Linear Mode


