| |
 03-12-2009, 03:07 PM
| #1 |
| Pebble Pounder Join Date: Oct 2008 Location: Grand Junction, CO.
Posts: 167
|
I called this semi custom because I made the chassis, but it's basically a SWX Clone. It looks a little different because I extended it for body mounts made it 5mm wider and machined the sides a little different. I also made the skid plate. Here's the rest of the parts at this point. Berg axles Novak 55T motors 2 X Castle Creations Mamba Max Castle Creations BEC Futaba 3PK TX Futaba RX Vanquish DH Wheels Panther Cougars Losi Crawler Shocks Futaba S9157 (425oz) for Steering JConcepts thing for testing Berg Tie Rod Axial Links for the most part. CKRC high steer front knuckles CKRC Lockouts and solid rear axles Custim body mounts and electronics tray. Started with the machining.  Finished chassis and a few other parts.  Assembled Chassis  With the VP DH Revolvers and Panthers.  From the side 2 3/4 inch clearance as it sits, I like my belly dragging AX10.  With body mounts etc.  Ugly body I sprayed to take truck out testing.  Picture beside my SWX Chassis AX10.  On my testing I discovered I appearently made one huge mistake in buying the Mamba's instead of some other speed control. The digs arean't very effective because of the lack of extreme drag brakes. The rocks here in Western Colorado have huge traction and the front has no trouble pulling the rear around. The rear also has no trouble pushing the front. I'm not really sure what to do at this point. I'm not really wanting to dump another $300 into this thing for different speed controls. When I drove it I quite frankly wasn't really impressed. I don't think it will do much if anything better than my AX10 other than going down hill, but the lack of manuverability with the semi functional Digs make me feel like just selling it and running the AX10. I do know I'm going to run both trucks this weekend and see if I can find any advantage with the Berg. The Berg will climb better than the AX10 if I put the lighter AX10 wheels on it which of course makes it really wide. Rite now I'm thinking of trying 1 speed control and switches but hate to have to rely on the switches that I've seen fail on other peoples trucks. I'm also considering putting the rooster off my AX10 on the back of the Berg. That might make for an interesting setup. At any rate I think it looks pretty nice. Last edited by MystRacing; 03-12-2009 at 03:18 PM. |

|  |
| Sponsored Links | |
| | |
|
03-12-2009, 03:30 PM
| #2 |
| Rock Crawler Join Date: Aug 2007 Location: Atlanta
Posts: 615
|
Good thing you made enough changes to the SWX to keep people from getting mad. It looks great!  |
|
| |
|
03-12-2009, 04:59 PM
| #3 | |
| Keep it real  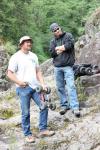 Join Date: Jun 2006 Location: Yakima,WA
Posts: 6,532
| Quote:
Motor quality will affect how the dragbrake works. Give the Holmes Manly switches a try if you go that route, shouldn't have an issue with them | |
|
| |
|
03-12-2009, 05:47 PM
| #4 |
| I wanna be Dave  Join Date: Jun 2005 Location: On the G-Train!!!!!
Posts: 6,081
|
Nice wheels, I have mine comming in tomorrow, same colors too. Are your MM drag brake set at 100%? that will help. Also, kill the anteana tube. It just ruins the look. You don't really need it while walking 2 feet behind it. |
|
| |
|
03-12-2009, 09:59 PM
| #5 |
| Quarry Creeper Join Date: Dec 2008 Location: Punta Gorda, Flo-rida
Posts: 453
|
Drag break only goes to 70% on the Mamba Max never mind just updated to the new firmware it goes to 100% now Last edited by paintballer9876; 03-12-2009 at 10:09 PM. |
|
| |
|
03-13-2009, 11:18 AM
| #6 | ||
| Pebble Pounder Join Date: Oct 2008 Location: Grand Junction, CO.
Posts: 167
| Quote:
Quote:
I got rid of the antenna tube on the AX10 and the dang thing started glitching. I'm thinking I might cut it shorter and just hide it under the body. I've had antennas on my race cars for 20+ years so the look doesn't bother me. I do worry a little about hitting a gate with it though. | ||
|
| |
|
03-14-2009, 01:36 AM
| #7 |
| RCC Addict Join Date: Oct 2008 Location: Alpine,CA
Posts: 1,258
|
Not sure how you've got yours set up, But I know almost all the berg's i run with have Mamba max's, All work great. You'll never have a full lock like your shafty, Your only resistance is the magnet, your switch's are interupting the ESC's signal to the motor, Thus no drag brake under dig if my theory is correct. |
|
| |
|
03-18-2009, 01:04 PM
| #8 |
| I wanna be Dave Join Date: Sep 2008 Location: behind the wheel of a monster truck...
Posts: 2,878
|
Awesome build man,great work on the chassis,I like it.So how does it perform?Got any vids? |
|
| |
|
03-18-2009, 04:25 PM
| #9 |
| Quarry Creeper Join Date: Dec 2008 Location: Route One
Posts: 465
|
Your rig looks good, I like when someone makes anything out of ambition or need or whatever. You made your frame in you r rig. And it works. props If you take a clean sheet of paper, establish a reference point, establish your pivot points for your links and shocks placements, and anyone should be able to draw a shape around those dots on the paper and make their own frame. right? I say good job; this is afterall a hobby. Trying to sell a blatant copy of someone's product is a whole other ball game. I say try and make everything you can yourself..... I do; thats part of what I consider as the "hobby". If I cant then I buy it! |
|
| |
|
09-10-2009, 11:04 AM
| #10 |
| Pebble Pounder Join Date: Oct 2008 Location: Grand Junction, CO.
Posts: 167
|
Well I got frustrated and sold this truck back in March and have been competing with my AX10. I was going to stick with the shafty for the rest of the season then give the Berg another shot. In May I heard the Berg I built was for sale and though I was tempted I decided to ride out this year with the shafty. However, I got a call from a mutual friend of the guy I sold the Berg to recently saying he was selling the Berg. Being as I was going to try a Berg again in a couple months I decided it was fate that I kept getting offers and bought it back. Here's a picture of it at one comp when the other guy owned it.  So here's the new plan, I'm going to go with one Mamba Max, and Dig switches, or a Punk Dig Switch when I can get one. Also do the following: Clock the front axle 25 Degrees Install the M300 CVD's Install CKRC Steering Setup Switch to light weight wheels Rework the electronics layout So to Berging I go again. I'm also switching to a stick radio (DX6i), and have a comp on the 19 in a points series I'm currently leading. I don't think I'm quite as crazy as that probably sounds, I raced with a stick radio for 12 years so it's not all that awkward feeling to me to drive a crawler with one. |
|
| |
|
09-10-2009, 02:20 PM
| #11 |
| Pebble Pounder Join Date: Oct 2008 Location: Grand Junction, CO.
Posts: 167
|
Last night I decided to get to work on the berg for the 19th of Sep. competition deadline. When I first built the truck I was a little concerned about messing up clocking the axles so I didn't do it, but have since decided it's just the right thing to do. I figured I could handle it; after all I built the 1/8th scale truggy below from a Hyper 7 buggy before most people had a clue what a truggy was, including shock towers, radio plate, a custom spur gear and wheel extenders.  If worse comes to worse I could use my lathe and mill and make a new axle housing. I took some measurements and did a quick drawing in AutoCad to determine my 25 degree clocking would require new holes 3.5mm from the edge of the old holes. I decided to go 25 degrees so I could have the motor around 22 and about 3 degrees of positive caster. The caster probably doesn't really matter that much because most tight turns are made at pretty much a stand still, but being a long time racer I just can't deal with looking at the negative king pin angle. So as to not be too much of an engineer I scribed a line with my calipers 2.5mm from the outer edge and then another line 3.5mm from the existing holes to mark the new hole location. I chucked it up in my Mini Mill and used my laser to align the mark, center drill, drill, tap, well that was pretty easy. Threw an aluminum end mill in the 1/2" drill chuck (Had to mention that to make any real machinists cringe) locked her down and milled an enlarged clearance area for the side of the transmission case. Went to bolt the housing to the right side of the transmission and guess what .................. No I didn't drill the holes on the wrong side :-P it fit perfectly. I then checked the other marks to see if they were in the right place, center punched them and drilled tapped etc to finish that side. I then ran some long screws through the housing I had just finished from the wrong side in the old holes and bolted it to the other housing. This allowed me to use a transfer punch to mark the exact location of the holes on the other part. Drill tap mill etc. about an hour and here's what I came up with. Sorry about the blurry picture but the wall in the background looks awesome  All in all it was easier than I had expected. A buddy of mine clocked his axles with a hand drill and a dremel. I'm a little too much of a perfectionist for that but for anyone considering it, it's really not that big of a deal. Though I would definitely get one of those clocking fixtures if you're going to use a hand drill. |
|
| |
|
09-10-2009, 03:38 PM
| #12 |
| Keep it real Join Date: Jun 2006 Location: Yakima,WA
Posts: 6,532
|
Nice work. I have added caster for quite a while in my rigs, it helps in more than a few situations |
|
| |
|
09-10-2009, 04:14 PM
| #13 |
| Pebble Pounder Join Date: Oct 2008 Location: Grand Junction, CO.
Posts: 167
|
My Super 300 Experience So the clocking was done and it was only 7:30 in the evening, pretty sweet , now for the easy part. The Super 300's. My first impression was man these things are tough looking. You really need to see a set of these up close to appreciate them. I had read the threads about the Super 300's, so first I put my spacers in the CKRC high steer Berg knuckles and placed the knuckles over the ends of the C's. These suckers were tight with the ax10 spacers but fit real nice and loosened up once the screws were in. None of the screws protruded past the inner portion of the C so I was good to go on that Clearance issue. Next I tried to insert the half shafts into the locker. The short shaft was snug but slid right in, the long shaft was considerably more stubborn and after son tapping etc. I finally decided to use the de-burring wheel on the bench grinder to take the finish off the end. It was still tight but didn't need a ball peen hammer to drive it home. No biggie there, even the stock shaft was tight in that side probably more a Berg Tolerance issue. Next I moved to the bearings, the small bearing on the short shaft slid on fairly well ad then got a little stubborn about where is should sit. On the long shaft about half way down the shaft and stuck. After trying the gentle tap with a socket I decided to go ahead and take the finish off down to where the bearing should sit anyway. This worked out pretty well when I was done the bearing was basically locked in place by the finish in the proper location. Putting the shafts in with the knuckles went pretty easily as you would expect. They're kind of chunky like expected but not a concern based on other peoples experience. I then went to put in the axle pin. I had read that they were tight. Mine was tight on the short side. I would even say really tight. It reminded me of the roll pins Associated put in their 1/4" axles back in the day. I'm sure I had 40 or 50 blood blisters over the years from the pliers slipping while trying to force those roll pins in. Fortunately I had that experience, I tapered the end of the pin slightly on the de-burring wheel to get it started and used the needle nose pliers to center it. Ahhh the nostalgia; it took about 5 tries going to far back and forth before I got it centered. I drilled the wheel hexes and put one on almost home free at this point. I once again tapered the pin slightly and proceeded to spend about 5 minutes trying to get it started in the hole. Not a chance the hole just simply wasn't big enough. I measured the pin diameter and pulled out the 110 bit drill index with 0-60 on the top rail and a bit the same size. After running it through a couple times I try again. I can get it started now but about half way through she totally seizes up. Can't get it out, so now time to get out the punch throw the axle in the vise and punch out the pin. Can't find a small enough punch so I try what basically amounts to a dull ice pick. Does the trick I'm back in business. Grab the next larger bit and put it in the drill. Start drilling and half way through hear this grinding crunching noise as the drill bit shatters with the tip lodged in the middle of the axle. So it's back in the vise and out with the ice pick again. Not a chance on this one the tip of the bit that's lodged in the hole is sideways and the ice pick wont go in far enough to get it out. Had to think about this one for a while. First thought was to throw it in the trash and go play with my AX10. Next thought was I basically already did that when I sold this thing the first time. So the axle goes back in the vise. I take a smaller pin and hold it in the hole and smack it with a hammer. Nothing...little harder and nothing.....little harder. This thing is really stuck. Good hard swing...... The axle assembly flies out the bottom of the vise the pliers fly up and hit the cabinet, as a reaction I grab for the axle and catch it before it hits the concrete floor while watching a shower of drill bits go flying across the garage from my 110 bit index while simultaneously registering the pain from my elbow smashing into the steel box the bits were in. I would type what I said at that point but it would probably suffice to mention I'm a Navy Veteran. My wife comes running into the garage and I see the dog cowering in the corner as if it had just been beaten. Fortunately the blood pressure medication seemed to be working as I didn't have a stroke. After confirming to the wife that I was just frustrated with a mechanical issue and the blood streaming down my arm was a minor cut, then apologizing to the dog for scaring it out of a deep sleep I take a look at the axle. What do you know the fractured drill bit came out. After thinking for a bit I get the dremel and try to find some sort of bit to loosen the hole. I'm not even going to consider another drill bit. First I try a carbide bit which doesn't even seem to polish it, and then a diamond bit. The diamond bit did the trick it got it to where I was able to get it started and with it in a vise use the punch to get the pin in. The pin isn't coming out anytime soon I can assure you of that. Needless to say I was less than happy last night, however; I read this morning that they were going to make the holes bigger in the next batch. I'm thinking good idea. Now there is a clunking noise when I rotate the axles if the left knuckle is turned to the right. I thought about taking it apart for a couple microseconds but it was past ten and I didn't have the energy. Hopefully this will just wear in and not be a problem. The noise is coming from a bur on the side of the cvd by the ring where it somehow got a ding on it...wonder how that could have happened. I expect a diamond grinding wheel would make short work of it anyway. Here's my sighly beaten Super 300  If they don't break I'm okay with it I. If these break it'll be a good thing I'm on blood pressure medication I'm betting I'll be very happy with them now. |
|
| |
|
09-11-2009, 02:42 AM
| #14 | |
| Newbie Join Date: Sep 2009 Location: Norway
Posts: 16
| Quote:
| |
|
| |
|
09-11-2009, 08:45 AM
| #15 | |
| Keep it real Join Date: Jun 2006 Location: Yakima,WA
Posts: 6,532
| Quote:
| |
|
| |
|
09-11-2009, 08:51 AM
| #16 | |
| Newbie Join Date: Sep 2009 Location: Norway
Posts: 16
| Quote:
| |
|
| |
|
09-11-2009, 09:56 AM
| #17 | |
| Pebble Pounder Join Date: Oct 2008 Location: Grand Junction, CO.
Posts: 167
| Quote:
My street car doesn't have a dig so I'm not sure how that would work in 1:1 | |
|
| |
|
09-11-2009, 10:04 AM
| #18 |
| Pebble Pounder Join Date: Oct 2008 Location: Grand Junction, CO.
Posts: 167
|
Now back to the subject at hand. After the CVD adventure the night before I mostly worked on my scale truck last night, however I did put the ckrc ota tie rod on and mount it back to the links. Here's hoe the reworked axle looks now.  Here's the way it looks from the side. I'll play with the upper link length out on the rocks and see what I like for best for caster.  |
|
| |
|
09-12-2009, 05:47 PM
| #19 |
| Quarry Creeper Join Date: Oct 2008 Location: Reno, NV
Posts: 396
|
just be shour to keep the nuts on the knuckes that hold the tie rod on lose so that it can move back an fourth |
|
| |
|
09-12-2009, 06:02 PM
| #20 |
| I wanna be Dave Join Date: Feb 2009 Location: 20 miles southeeast of downtown Sacramento
Posts: 2,373
|
Ya can use some 3m knuckle bushings on the tie rod ends. |
|
| |
 |
| |


 Linear Mode


