| |
| |||||||
 |
| | LinkBack | Thread Tools | Display Modes |
 05-09-2009, 04:15 PM
| #1 |
| Quarry Creeper Join Date: Feb 2008 Location: Rhode Island
Posts: 275
|
Hey guys, here is my writeup of the new Mayhem Engineering LS2.0 Chassis. I got it knowing it was based on the AX10, but it looked promising so I bought it for my Berg build anyways. I talked to him about it, and he sent me two chassis plates with the support beam, because there wasnt a need for one side to be open, as these don't have transmissions on the chassis. I chose textured powder coated black, as all my stuff is going to be black/silver/gray. I still have my rear lockouts in the mail, along with some spare axle shafts. Pics will be updated as the new parts come in, as this will be my build thread and I will just keep updating it. So anyways, I got the chassis in the mail and decided to go to work on it. I built everything at once, didnt even assemble the berg with the stock chassis, considering the chassis from Mayhem arrived before the Berg Kit actually did. As soon as I started this, the first thing I did was completely dissassemble the front and rear axle, and loctite everything, and smeared white lithium grease on all the gears as the stock oil is pathetic IMO. Here is the chassis. It comes with two standoffs, screws for them and then four for the lower links, and also a very nice Delrin skid plate that allows you to triangulate your lower links if you like. I personally did not, as my links were too long for that. Ill get into that later though. 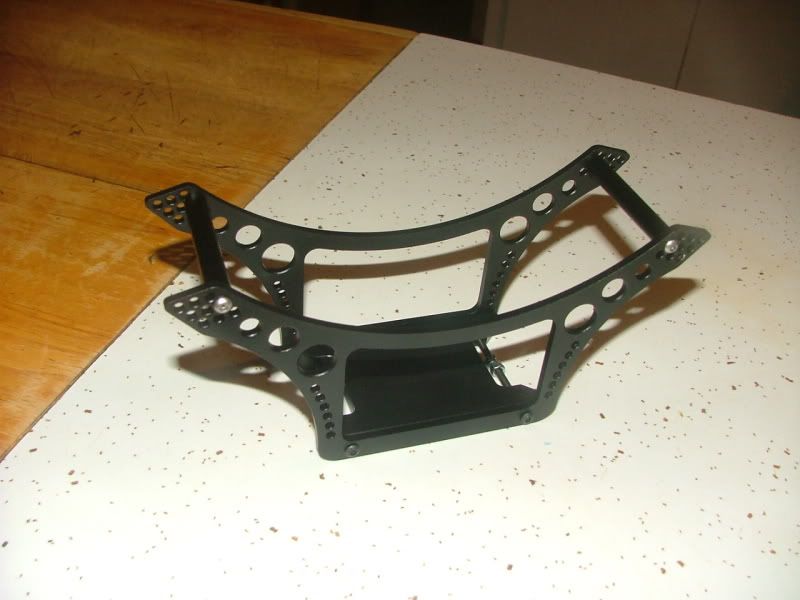 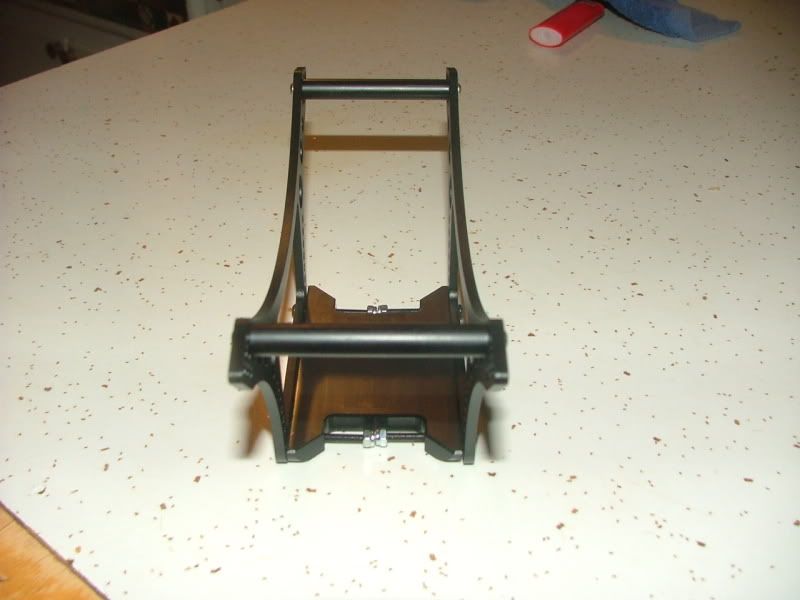 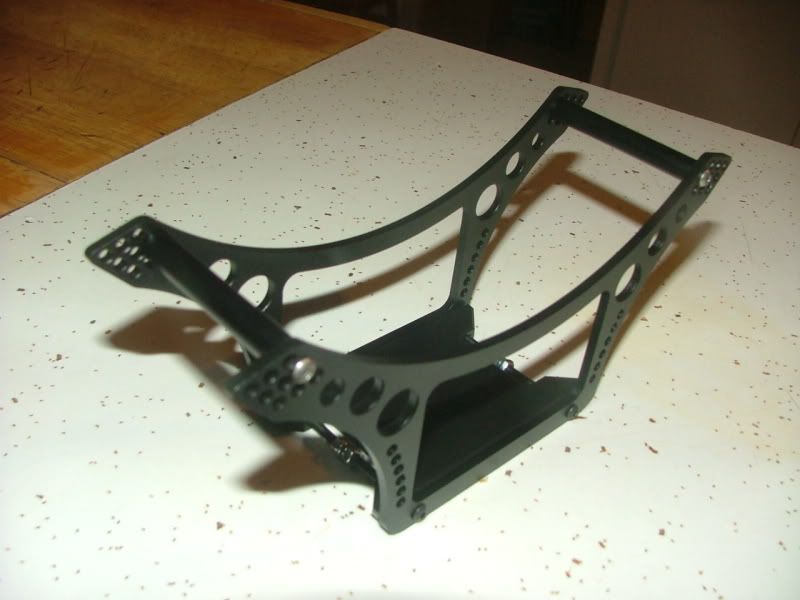 So now that I have my chassis all built, I decided to get to work on my Dig switch box. I got the cheapest servo amain hobbies had, and bought all the other parts at radio shack. Following the directions In this link I was able to easily make the box. There was also enough room behind the servo to place my CC BEC. 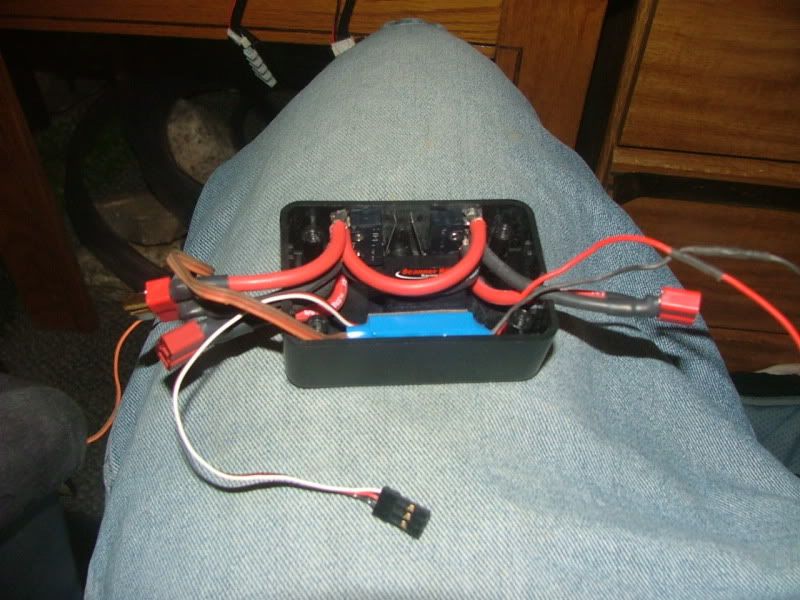  I already had my Hitec HSR5995TG Steering servo, and Spectrum Reciever for my DX3. 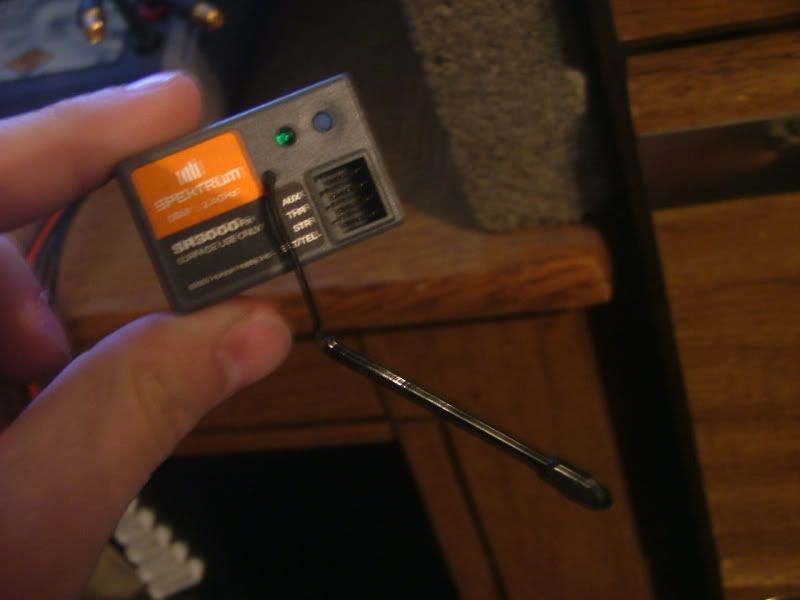 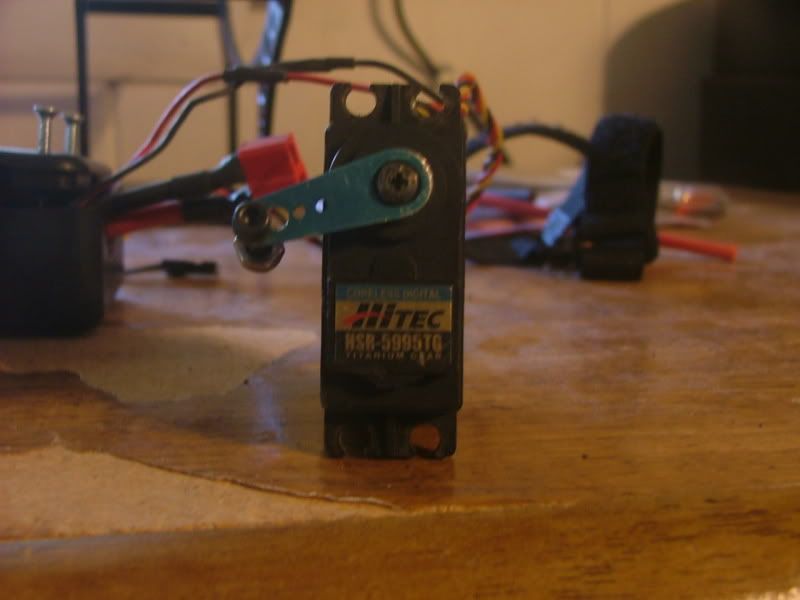 So I started the build. First off, I really liked the stock berg links, since they are already bent, and they come with nice metal rod ends, so that is a nice feature as I have seen plastic ones break in the past. The stock berg links ARE too long though to have a 12.5" or smaller wheel base, so what I did was take the stock berg side plates, and put the two chassis rails togeather, and drill the bottom holes where they would mount stock on the berg. I then just slowly drilled into the delrin with a bit a little smaller than the screws, then just basically threaded the screw into the hole going easy, to allow it to thread. The upper mounts were pretty much spot on, the links arent exactly centered in the bottom of the chsasis, I have the chassis about 1/4" forward compared to the rear. Here you can see the new holes I had to drill on the bottom of the chassis. The two in the center. 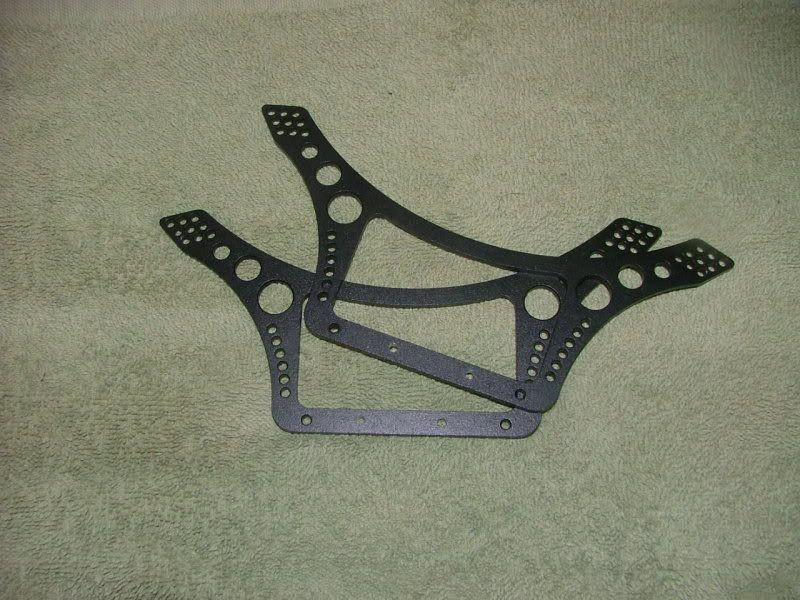 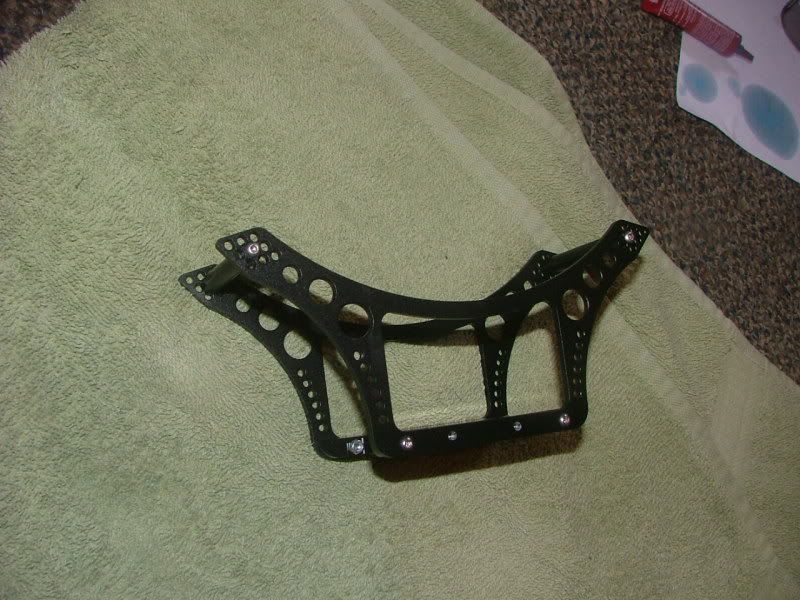 Here it iswith the links installed. 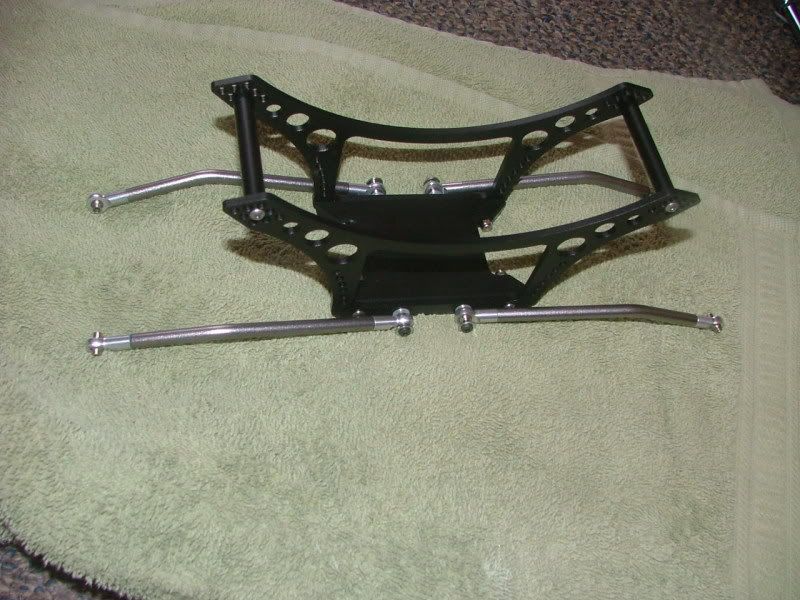 Now I just installed front links. The kit gives you bent upper links, but I dont like bent uppers, so what I did was use the standoffs the stock chassis uses, and they were perfect length. Then used revo links for mock up while my 70MM Axial links were in the mail. That allowed me to clock the rear axle upwards a bit, so its inline with the bent part of the rear lower links. 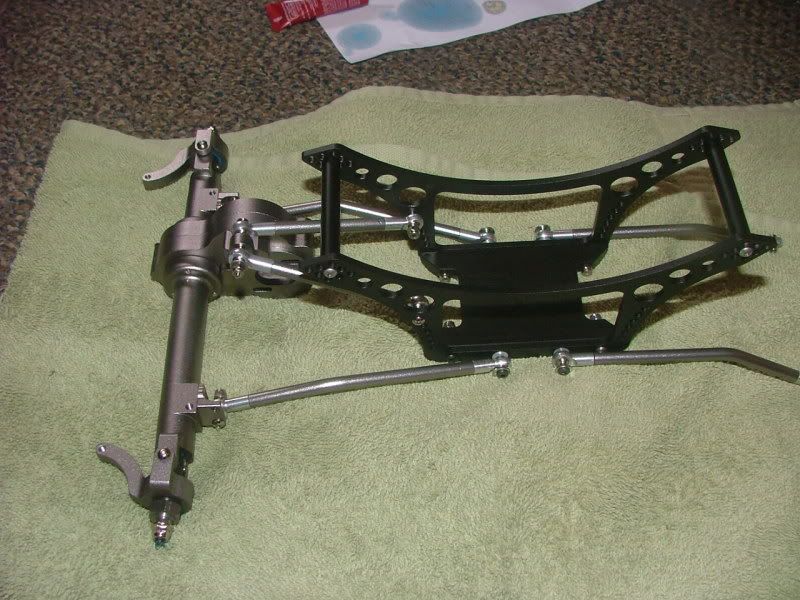 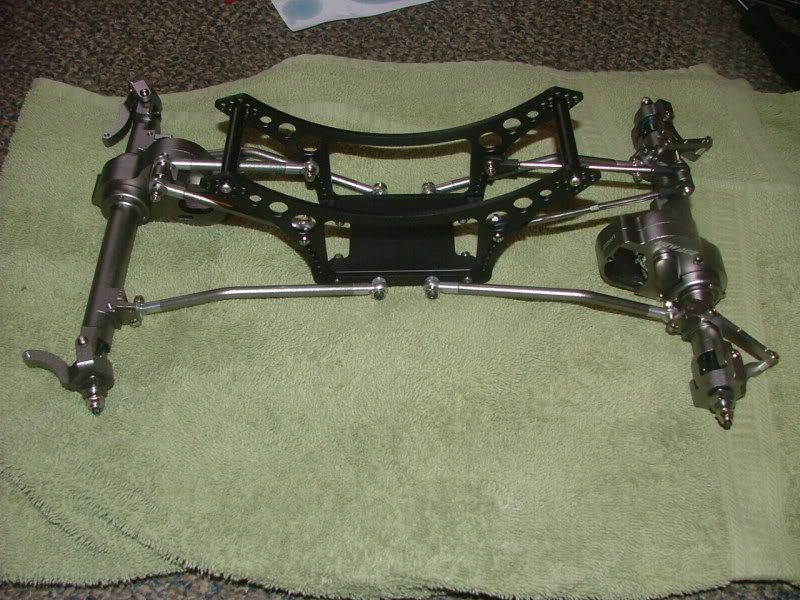 Now I took the stock berg shocks, and limited them a LOT from the inside with fuel tubing. This gave me a 3" ground clearance running Panther Tires. I have some 80MM shocks in the mail though, which will give me a LOT of flex becuase the body is small. I dont personally LIKE a lot of flex, but it gives me the option to fine tune it. The stock berg shocks, the bodies are too long, so unless you have a rediculous ride height, you wont have much uptravel. Also the stock springs are wayyy too stiff for my liking. I also installed the stock body posts in one of the upper link mount locations, and to my surprise it was actually perfect from my last setup (I never sold my body when I sold my old AX10), so I didnt have to redrill any new holes in the body which was a plus. 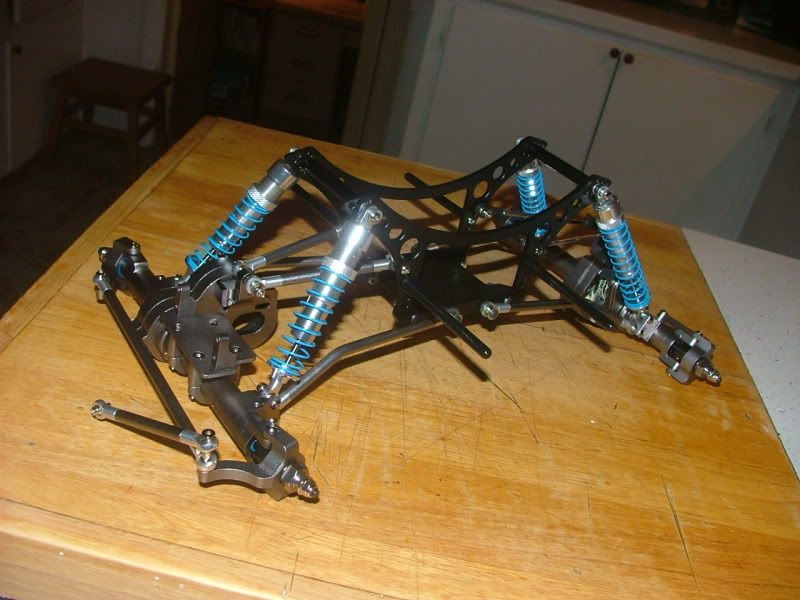 Here you can really see how nicely it clocked the rear axle upwards a bit. 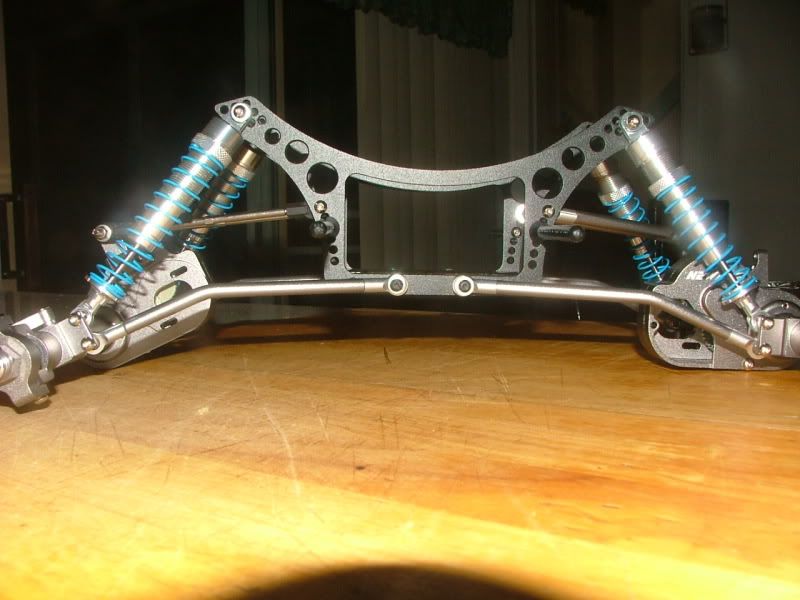 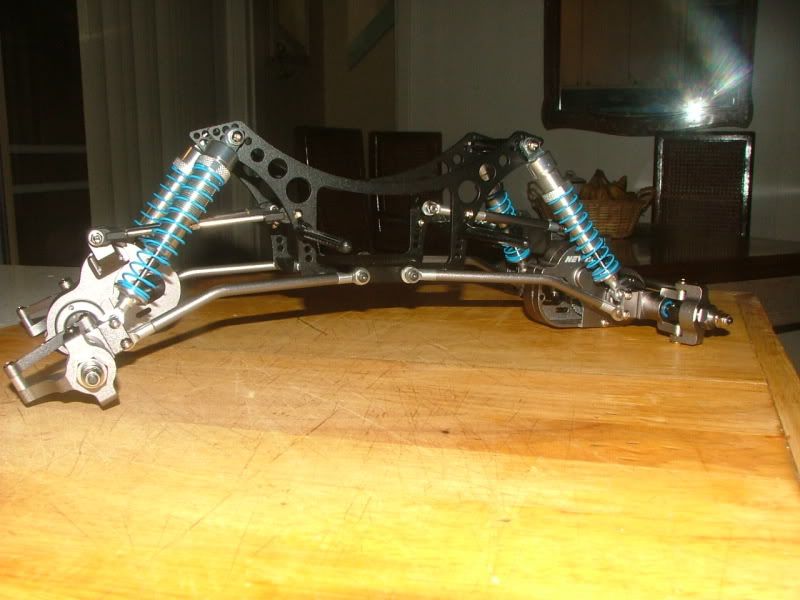 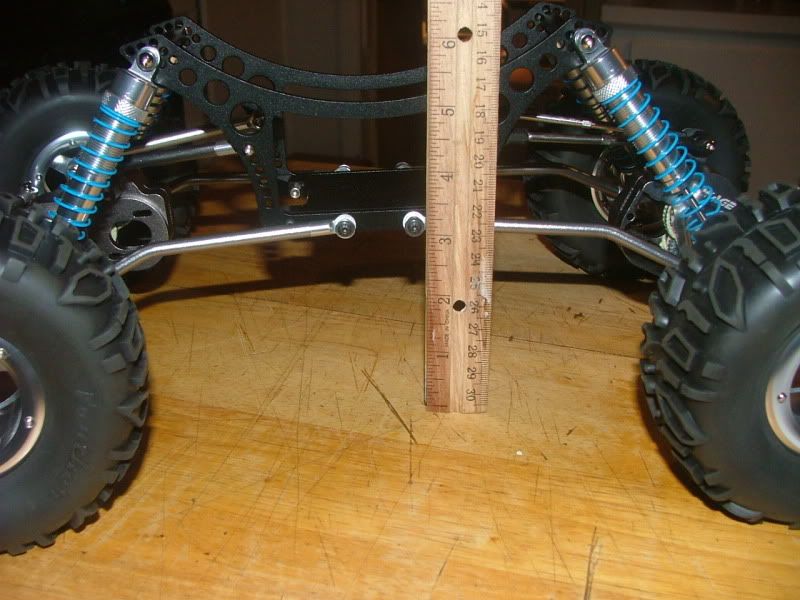 Here it is with the stock berg wheels mounted to my panthers.  Installed the stock tie-rod and draglink, I have the Kamikaze link sitting here, just going to install it later on tonight. 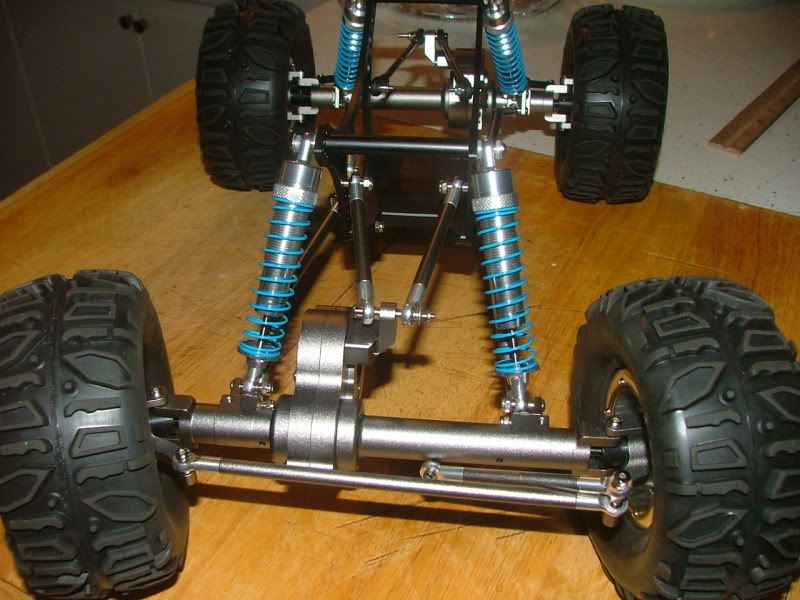 I forgot to take pics of the next couple steps, because it was really just straight forward. I started mounting my electronics. First I soldered the wires onto the motors, then mounted the motors on the axles and cut the wires to length. Then soldered deans plugs on them. The dig box fits PERFECT inside this chassis along the side. So I double sided taped the box to the bottom, and then taped the ESC and Reciever to the top of that, leaving the other side open for my 3S Lipo. I then hid all my wires under one of the motor wires leads going into the dig box, zip tied everything nice and here is how it sits. 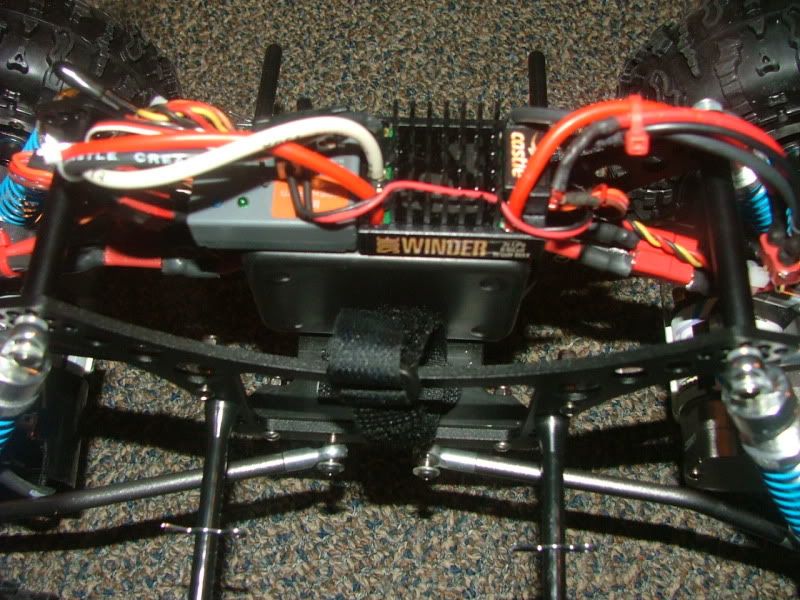 I taped a little bit of velcro on the bottom, so that my two straps that hold the pack in place dont swing out and let the battery fall out of the side. It wont, but I dont want it to move regardless. 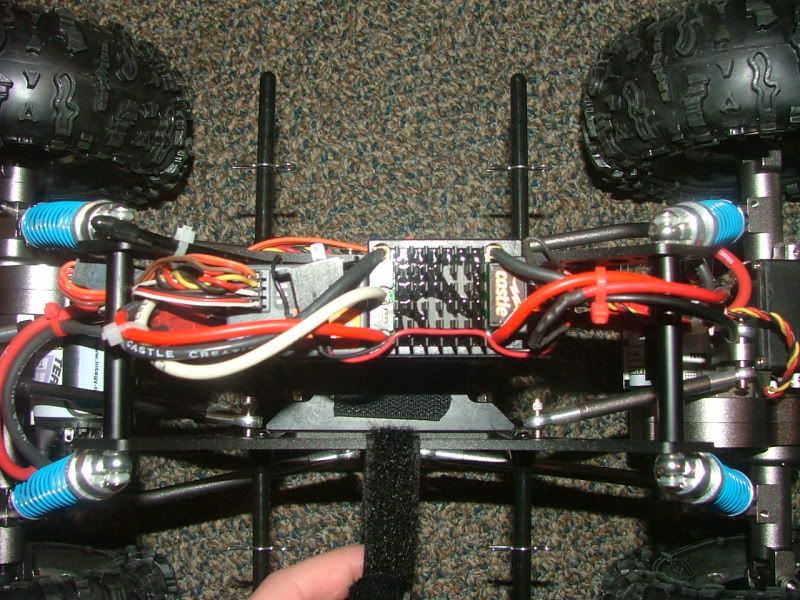 Here you can see the battery how perfect it fits inside the chassis. I just pop it in the side, and strap it down with two straps. 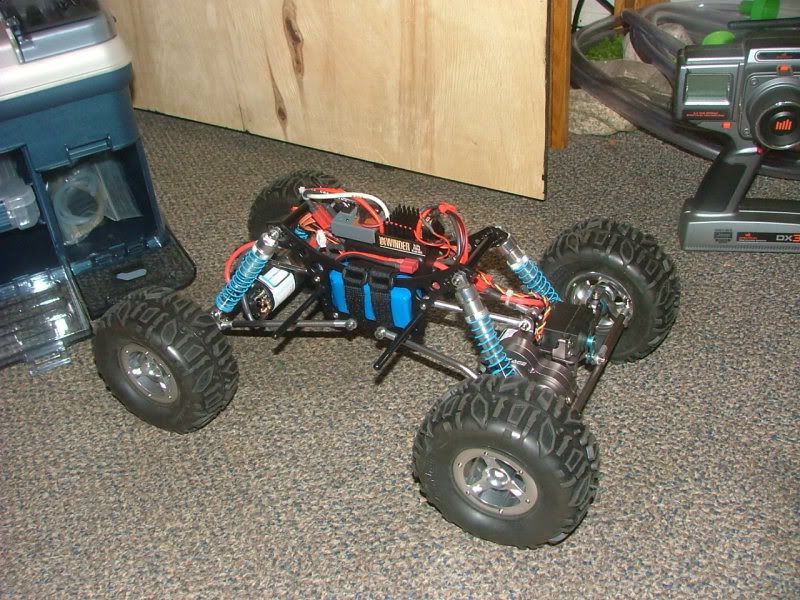 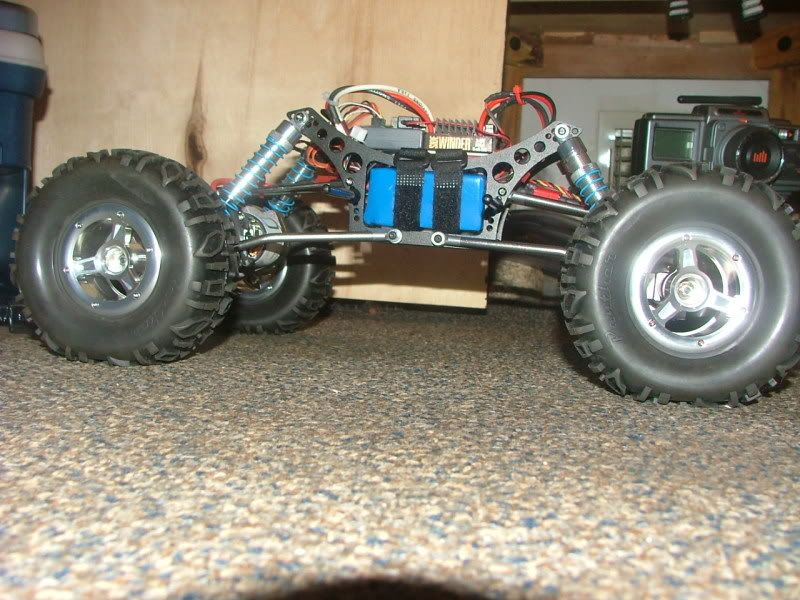 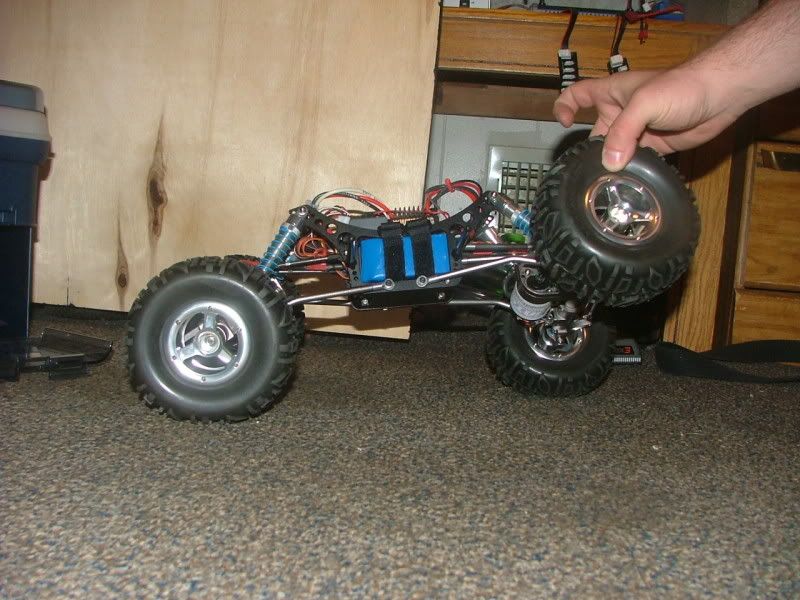 I got my nice new Mayhem 7's in the mail today. Berg offset, with 16 holes on the rims and 8 holes on the rings. To go with my color combo, I went with black wheels and silver rings. These wheels are a work of art, for anyone who hasnt owned any Mayhem wheels before. The care that was taken in machining these wheels is amazing, and the quality control is superb.  I saw a thread about venting wheels, and I always vent mine, but I hate the idea of dirt getting in the hole and ruining the foams. I saw someone on here do this to the wheels. I apologize, but I forgot who I stole this idea from was. Anyways, since I have 16 holes on the rims and 8 on the rings, what I did was drill an extra hole in four of the rings, which will be for the backside. Then I drilled into the rims until it went into one of the holes for a screw. Line the two up and bam, you have a vented rim. (All four are drilled, 2 kinda rolled away as I took the pic 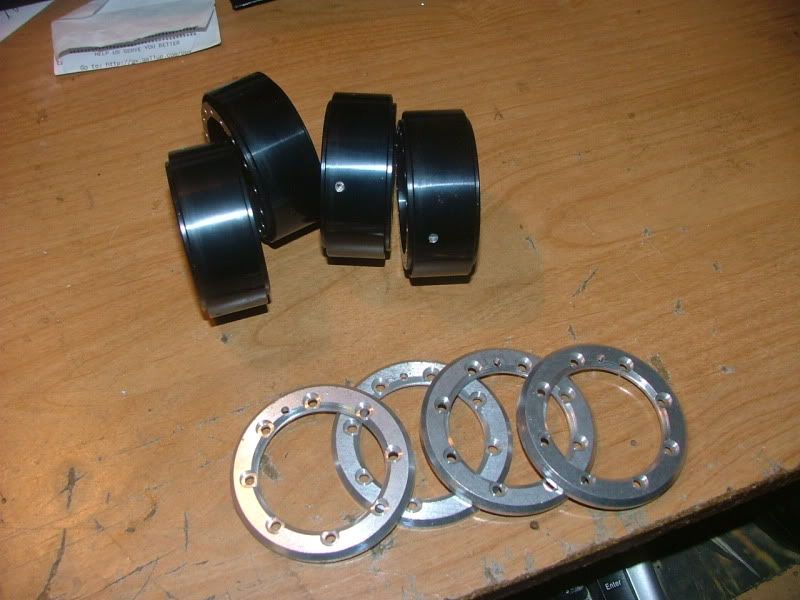 I personally found the Rovers to be the most amazing tire to mount ever, compared to other tires I have mounted. Gotta love new tires and nice new minty fresh rims! 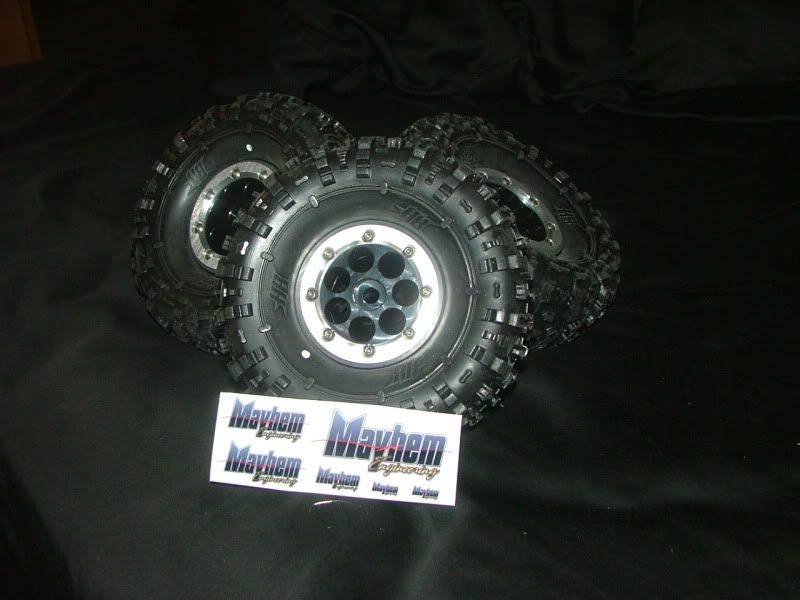 Here they are on the chassis. 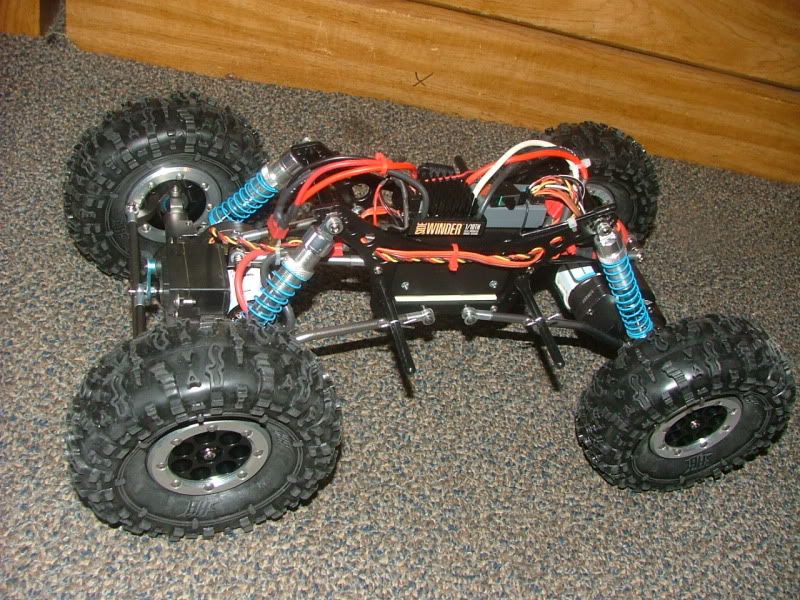 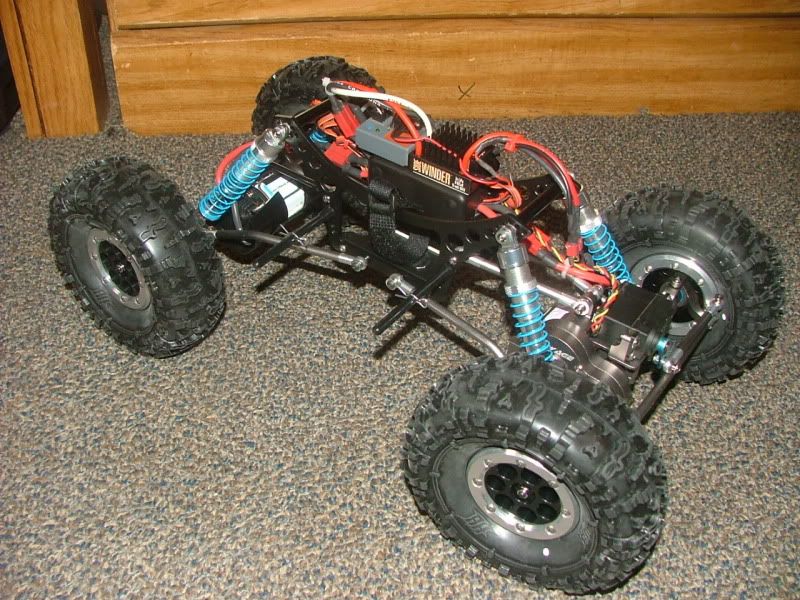 I then mounted them to the truck, popped on my body and here is how she sits now. 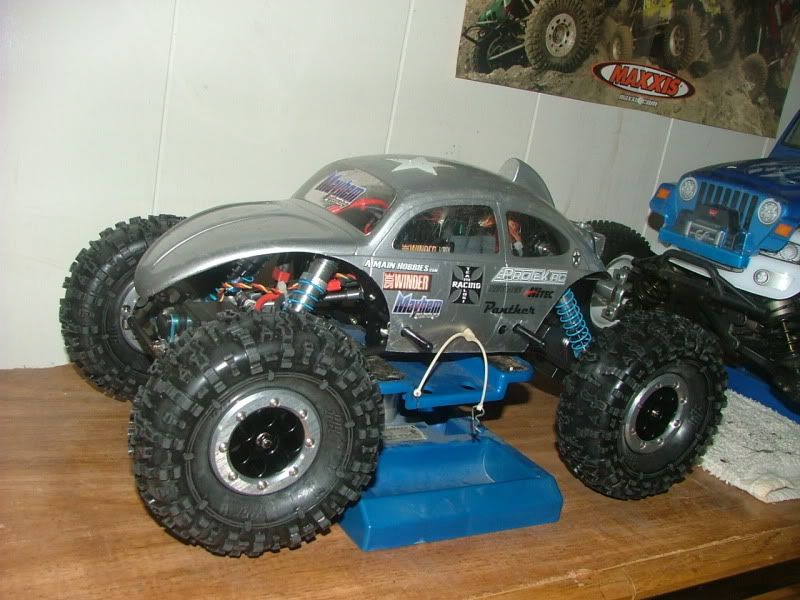 So far this thing is amazing. It has a low COG, which allows it to lay on its side without tipping, and the extra clearance from the rovers was real nice for the kind of wheeling I do. Overall I am extremely impressed with this chassis, and reccommend it to others! Here is where you can get his chassis. Here is where you can get his wheels. Or you can visit his site right at www.mayhemengineering.com I will be updating this thread with more pics as I get things done. Things that are coming: Installing the KK Drag Link Rear JP Customs Lockouts in the mail Last edited by PapaGeno21; 05-09-2009 at 04:21 PM. |

|  |
| Sponsored Links | |
| | |
|
05-09-2009, 07:15 PM
| #2 |
| Old guy   Join Date: Jan 2007 Location: Northwest Arkie-saw and we got ROCKS!
Posts: 7,548
|
Nice build and write up. Let us know how running your lower links on the out side works for you. How wide is the skid on that chassis.
|
|
| |
|
05-09-2009, 07:21 PM
| #3 |
| Quarry Creeper Join Date: Feb 2008 Location: Rhode Island
Posts: 275
|
2 3/8's Wide. It works fine with the links on the outside. I cant put the links on the inside because first off they are too long, and second off, they wont be able to clear the motors. I already know my caster is fine. Thats why I never mentioned it. 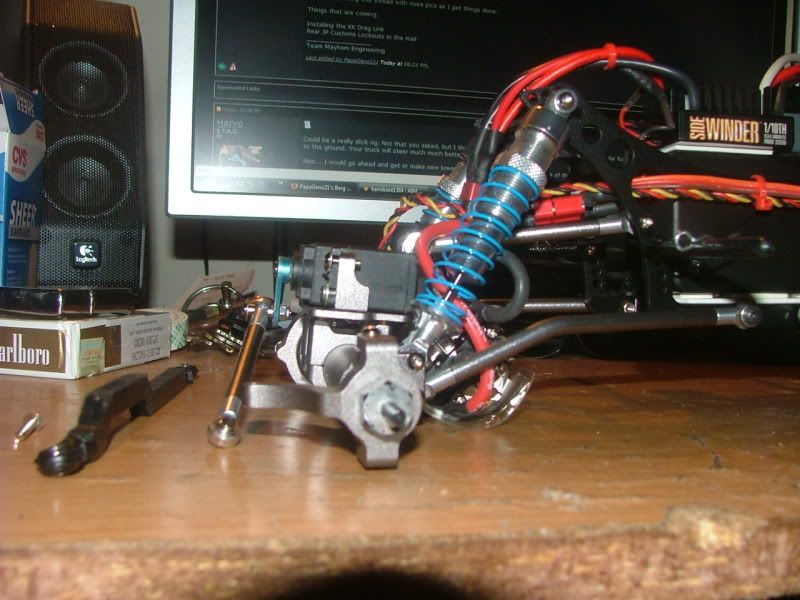 |
|
| |
|
05-09-2009, 07:26 PM
| #4 |
| I wanna be Dave Join Date: Mar 2008 Location: In the Dark Edges of your Mind
Posts: 6,386
|
Looks good... It just looked way off in one of the first pics toward the top. But then I was looking at the rear axle I'm not as think as you slow I am Last edited by Harvo; 05-09-2009 at 07:29 PM. |
|
| |
|
05-09-2009, 07:35 PM
| #5 |
| Quarry Creeper Join Date: Feb 2008 Location: Rhode Island
Posts: 275
| I have my moments too.. They just happen more frequently with my jeep vs the rc cars. |
|
| |
|
05-09-2009, 08:49 PM
| #6 | ||
| I wanna be Dave Join Date: Dec 2007 Location: Not here
Posts: 2,814
| Quote:
Quote:
| ||
|
| |
|
05-09-2009, 08:57 PM
| #7 |
| Quarry Creeper Join Date: Feb 2008 Location: Rhode Island
Posts: 275
|
He has a better ruler than me... Just got done redrilling and cutting off the excess on the knuckles. KK Tierod installed!   Last edited by PapaGeno21; 05-09-2009 at 10:25 PM. |
|
| |
|
05-10-2009, 11:11 AM
| #8 |
| WOOPOOW!! Join Date: Nov 2008 Location: Atlanta, GA
Posts: 4,218
|
Damn geno, I leave for 2 days and you build a better rig than mine :-( lol glad that tie rod works out for you. It served me well as you can see with all the scratches. Keep the pics commin and give us a video! |
|
| |
|
05-10-2009, 11:19 AM
| #9 |
| RCC Addict Join Date: Oct 2008 Location: Alpine,CA
Posts: 1,258
|
Looks Good. Get some delrin links and Triangulate the lowers  |
|
| |
|
05-10-2009, 11:27 AM
| #10 |
| Quarry Creeper Join Date: Feb 2008 Location: Rhode Island
Posts: 275
|
Im almost positive I cant do that. The skid was designed for the AX10, so the skid is really long. The links would have to be real short, and im pretty sure it will hit my motors. 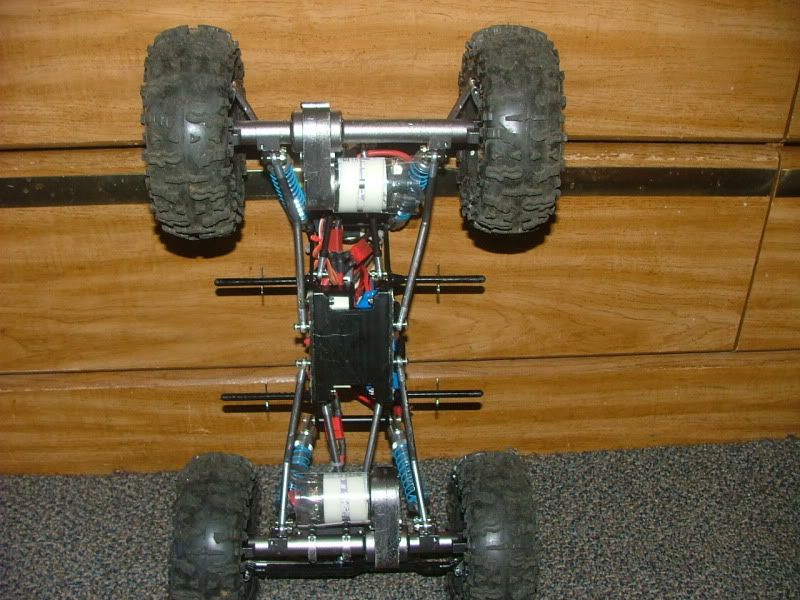 |
|
| |
|
05-10-2009, 11:56 AM
| #11 |
| RCC Addict Join Date: Oct 2008 Location: Alpine,CA
Posts: 1,258
|
I have faith it'll work Mine are practically touching my motors.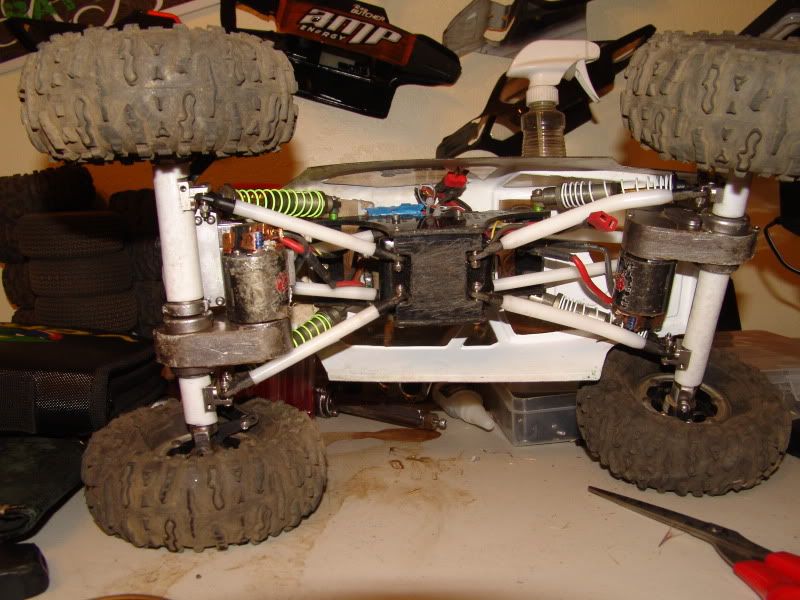 |
|
| |
|
05-10-2009, 01:12 PM
| #12 |
| Quarry Creeper Join Date: Feb 2008 Location: Rhode Island
Posts: 275
|
Look at the size of your skid. Then look at the size of mine. |
|
| |
|
05-10-2009, 01:17 PM
| #13 |
| RCC Addict Join Date: Oct 2008 Location: Alpine,CA
Posts: 1,258
|
True. But im not 50/50 link spread |
|
| |
|
05-10-2009, 01:28 PM
| #14 |
| WOOPOOW!! Join Date: Nov 2008 Location: Atlanta, GA
Posts: 4,218
|
Geno, just buy some of the small kamikaze links or make some delrin links. I beleive www.mcmaster.com is where you can buy delrin? Would make your geometry so much nicer and you wont get hung up on where your links mount on the outside |
|
| |
|
05-10-2009, 04:02 PM
| #15 |
| I wanna be Dave Join Date: Jul 2008 Location: appleton
Posts: 2,067
|
nive looking rig great build
|
|
| |
|
05-10-2009, 04:33 PM
| #16 | |
| TEAM MODERATOR   Join Date: May 2004 Location: Tennessee
Posts: 10,855
| Quote:
| |
|
| |
|
05-10-2009, 04:44 PM
| #17 | |
| RCC Addict Join Date: Oct 2008 Location: Alpine,CA
Posts: 1,258
| Quote:
Yes the mayhem's skid is longer then my skid or jeffs skid or most berg skids. What i was trying to show is im about 40/60. So my skidplate is rather close to my motor, Not to mention how close the links are to the case/motors with no interferance. Close yes, Interferance. No. The Benefit/gain is well worth the effort to see if they fit, If not. Cut the skid | |
|
| |
|
05-10-2009, 04:55 PM
| #18 | |
| TEAM MODERATOR Join Date: May 2004 Location: Tennessee
Posts: 10,855
| Quote:
I see what your saying though. I run a front bias set up on mine also,and the links get VERY close to the motors triangulated. Any closer,and I'd run parallel lowers. | |
|
| |
|
05-10-2009, 07:45 PM
| #19 |
| I wanna be Dave Join Date: Oct 2007 Location: Houston
Posts: 3,761
|
Geno, if they don't clear you can bend them in a bit and use some axial angled rod ends on the skid end of the links. |
|
| |
|
05-10-2009, 08:18 PM
| #20 | |
| Quarry Creeper Join Date: Feb 2008 Location: Rhode Island
Posts: 275
| Quote:
| |
|
| |
|
| |


 Linear Mode


