| |
| |||||||
 |
| | LinkBack | Thread Tools | Display Modes |
 12-30-2008, 02:22 PM
| #1 |
| RCC Addict Join Date: Jun 2008 Location: Mudville
Posts: 1,592
|
well, i have wanted to do a tuber build for a while now. I was, and am still thinking on building one myself. but for the time being, I found a nice deal on a Moon Buggy tuber that should be here anyday. I will be doing quite a bit to it to get it complete as I envision. I expect the tuber anyday now, and most the ordered parts will be here tomorrow or friday, so i can put it together saturday and run it sunday, with any luck. So I figured I would start a thread to share the progress as it goes together, and get some setup tips help, and maybe learn a few things, and help a few others along the way. I dont do any comping, atleast not yet, so this is going to be more of a fun/scale type build, but i do want it to crawl well and be competative as hell, so performance will be key. any help, tips, info, conversation you wish to share is dandy. heres a list of the build items and some pics of the items going in. CHASSIS Custom built Moon Buggy Chassis from Crawler374 over on scale 4x4rc. Looks like he has done a nice job on it, will see when it arrives, lol. He said it has shock mounting tabs on it now for the front, though they were not on in the pics. I was hopeing to see it delivered yesterday or today. hopefully its here tomorrow? Bought it with a IH Scout body/tube frame he was selling a few weeks back. the scout will be its own thread. couple pics of the MB Chassis.     Suspension will be going with Axial or Axial compatable items for the majority of the build. Links will be 4 linked and Dual Triangulated using the EEM Dual Trianulation Skid Plate (on the way) and a couple DYI 4 link plates. new Axial shocks assembly with aluminum shock bodys and red springs. will need to buy some white, yellow, and pink springs for some adjustment, or should i go Droop setup maybe, and use internal springs, and what srpings if i go this route? suggestions??????? ( shocks on hand, need to order aluminum shock caps and springs though)  Axial complete Link upgrade kit in Red. (on the way) (always thought Black and Red or Black and Orange go well together. went with Red on this build as the Scout is Orange so...)  DriveTrain - Tranmission Stock Axial Transmission with original VF Dig/Hitech 225 (have and assembled) 1 TTR modified MIP C-Drive Spline set for AX10 with Dig (on the way). Axles Stock Axial housings, ring/pinion gears and diff cups on F/R Front Axle: Axial Knuckles, (on the way) Axial Cs (on the way), Axial CVDs (on the way) and Axial Iron Cross Locker (on hand). Cs will be modified for turning clearince by counter sinking the mounting hole and using countersunk flathead screws, which will allow for more turning radius/clearance. Should they be in the way once I setup clocked, which depend on if I need the axle angle. Knuckles will be run on opposite sides, so I can do the DYI BTA steering assembly. Similar to how my Wrangler scaler is setup (which will also be getting a full redo). Rear axle: Axial Lockouts (on the way), Axial axle shafts for the lockouts (on the way), and Axial Iron Cross locker for diff (on hand). 3racing Red Hexs (need to order but which,. REALLY leaning towards the rotors for the scale look.   if i see problems with the stock ring/pinion in the axles, i ll likly install the 3Racing beveled ring/pinions. for those that havnt seen these.  Spare Parts to have on hand some new ends and such for the new Red Links 1 AX10 Scorpion RTR Hardware Upgrade Kit (on the way) 1 Flanged Ball 3x5.8x7mm (cuz one can never have enough spare balls) (on the way) Setup ideas/questions Shock and lower link mounting locations on the axle is where im currently up in the air atm. Should I mount to the stock locations, or should I mount the shocks on top of the axle to gain link clearnace, or maybe on the inside of the stock mount location??? Mount the links in stock location or to the outside? will have to look at this once I get the rest of the parts here. Also if i droop, then what other clearance issues may i have with the links, or even the BTA Steering. the one thing im finding alot when reading thru the site is alot of link/shock mount binding. I want to avoid this from the start, and fwiw, my plan is to mount the bent links in the rear and straight links in the front. atm, im seeing some driveshaft riding going on with bent links up front on the ax 10 as it is in semi stock form with the MIPs. For more scale appearances, i have a slew of ideas i ll be incorporating including, OLD SKOOL fuel tank, Dash with gauges and Scale Moving steering wheel, seat and driver, lights, and some other ideas i may bust out. well thats about the jist of it. hope you enjoy following along as much as i enjoy putting it together and trying it out. as far as what i ll be doing for Rims/Tires, atm i ll be running a set of 8shooters with claws weighted 5 1/4 each front and 3 3/4 each rear. Im still not sure if im going to run 1.9s or 2.2s yet either. 1.9s may look really good on it once its built. ideas? rock stompers or maybe something similar in a super narrow????/ one of the reasons im really hopeing the tuber and stuff shows up this week, is sunday, i need to have it together to run a new proto weighted rim to see how it functions. so i need to get it built by saturday, so i can have abit of tweek time before i test the new wheels. Thanx for looking |

|  |
| Sponsored Links | |
| | |
|
12-30-2008, 02:53 PM
| #2 |
| Rock Stacker Join Date: Aug 2008 Location: BC Canada
Posts: 69
|
Looks cool. Have you tried the 3 racing HD bevel and pinion set yet? I installed mine the other day and did not notice a big reduction in gear movement like I had hoped (like the axial HD set claims to do). I like the scale orientation, will be tough to fit all of that in a small package. Can't wait to see what you come up with.  |
|
| |
|
12-30-2008, 03:41 PM
| #3 |
| WOOPOOW!! Join Date: Nov 2008 Location: Atlanta, GA
Posts: 4,218
|
Can't wait to see where this goes. Eric makes very strong tubers. I couldnt seem to break mine :-P The scout handles very well for what it is. It seemed as though it had a very low COG the very few times I saw it run. You wont be dissapointed. Im sure if anything happened he will hook you up. I think the 1.9 flatirons would look really scale on the buggy as long as the wb isnt too long. When he mocked the tuber up next to his comp truck it looked like 2.2's would be the way to go, if thats the case some 2.2 cut crushers would look beastly. |
|
| |
|
12-30-2008, 05:20 PM
| #4 |
| RCC Addict Join Date: Jun 2008 Location: Mudville
Posts: 1,592
|
im going to shoot for a 11 3/4 to 12 in wb. been thinking about aset of crushers. they do look the part. Im just eager to get going on it. i havnt tried the 3racing ring/pinion yet. just seen them yesterday looking thru fleabay. Seems they are coming out with some pretty decent ideas/items. and while there is SOME skepticism on their gear, and ethics, you can only make some things so many ways, and it seems they appear to be putting some of their own designs into play. which is more than anyone can say about intecrap. Last edited by Timmahh; 12-30-2008 at 05:23 PM. |
|
| |
|
12-31-2008, 01:35 PM
| #5 |
| RCC Addict Join Date: Jun 2008 Location: Mudville
Posts: 1,592
|
DAYYYYYYYYYYYYYYYYYYYYYYYYYYYYYYYUM is all i can say here. Made an order with RPP. Corey happens to be closed between Xmas and NYs, but sent an email after calling him to hear the recorded closed message. so i no more click send message from his site, and my freaking phone rings. for shizzle, its Corey, he just happens to be at the store doing some things, and missed picking up the phone when i called, so calls me back. tell him i wanted to make an order, but since he was closed, would just wait until he was open again. Corey tells me, submit the order, im here, i ll get it packed and otu the door. this was Monday afternoon for me. well today i get my mail and theres a box from RPP Hobby there. im like no way. sure as poo, open it up and find my complete, well packed order from Corey, here in Michigan, from RPP Hobby in north Cali, in 48hrs. Now thats Customer service you just cant buy!!! THANX ALOT COREY< YOU ROCK Brohter!!!!!!!!!! but.... alas.... no chassis today. should see the linkset by friday, so other than the chassis, im pretty much ready to build. heres a pic of the loot from RPP.  |
|
| |
|
01-01-2009, 01:12 AM
| #6 |
| RCC Addict Join Date: Jun 2008 Location: Mudville
Posts: 1,592
|
a bit of tonights work. Thunder Tech Modded for DIG-MIPs Built and ready  Front and Rear stock axles taken apart.  Front and rear Diffs rebuilt with Axial Iron Cross Lockers.       Rebuiding front axle  Axial CVD Assembly  insert center swival barrel   Slide Drive cup over axle and barrel and line up pin hole  insert pin  and slide into place and finish off by sliding ring over. these are a slightly loose fit, pin and retaining ring. use something like a dab of grease to hold the pieces in place until you can put the whole axle assembly together. they are a pita to keep together otherwise. build up      ready to use  i ll save the hoopla on the rear end, as its simple enough to figure out.I will add, you get a small shim pack with the axle rear lockout axles, i had to use ONE shim on each side to tighten up the minimal axle lash i had. rears built and ready to use.  F and R axles with MIPs installed. notice the front hubs are set for BTA steering.  Cleaned up all bearings, they all felt good, so i didnt bother to replace or repack them. when/if i redo the pinion/ring gear, i ll re pack them with my Fast Eaddy Bearing Greaser. now it time to pull the tranny/dig off the scaler, and install it on the EEM Dual Triangulation Skid and for the time being, install the Novak 55T motor i ll be useing until i get my sensor plate on the 18.5 repaired. |
|
| |
|
01-01-2009, 01:49 PM
| #7 |
| RCC Addict Join Date: Jun 2008 Location: Mudville
Posts: 1,592
|
pulled the tranny dig out of the scaler, and put it on the EEM, then took the green lower links I have here unitl the reds get here and did a lil mock up.       lasnt night I picked up a few more items for the build directly from EEM, a set of STNC Servo Mount plates in Red.  and a pair of Link plates, also in Red.  and a few pars from an ebay seller to get things going.   Last edited by Timmahh; 01-01-2009 at 01:58 PM. |
|
| |
|
01-01-2009, 11:47 PM
| #8 |
| RCC Addict Join Date: Jun 2008 Location: Mudville
Posts: 1,592
|
this is what happens when your BORED Off your ass and remember how to use ms paint to a point, and have nothing better to do but hope and prey your new chassis and remaining parts for your build arrive intime. lol  |
|
| |
|
01-06-2009, 02:07 PM
| #9 |
| RCC Addict Join Date: Jun 2008 Location: Mudville
Posts: 1,592
|
got the MB chassis today!!!!! Its pretty nice. i can see a couple Small things than will need to be done before i can fully assemble the rig. Will try to get them done Thursday when im at Clayton78s for a while stealing some tool time. lol heres some pics of the chassis and a general mock up of the build.     need to mount the tranny/vf dig to the skid plate that came with the chassis. there is just enough room for the dig to fit. so it should be pretty good once its done. have to figure out where to mount my upper links to the chassis, but that shouldnt be too hard once i have the skid/tranny/dig mounted. |
|
| |
|
01-06-2009, 02:24 PM
| #10 | |
| Quarry Creeper Join Date: Nov 2007 Location: Funky Town
Posts: 211
| Quote:
Slow Down! Looking good so far. Is that a pre-made tubular or self-made? | |
|
| |
|
01-06-2009, 02:38 PM
| #11 |
| WOOPOOW!! Join Date: Nov 2008 Location: Atlanta, GA
Posts: 4,218
|
Its hand made by one of the locals from here in Atlanta. He and I are pretty good friends |
|
| |
|
01-06-2009, 09:57 PM
| #12 |
| RCC Addict Join Date: Jun 2008 Location: Mudville
Posts: 1,592
|
Crawler374 over on scale4x4rc.org made up the chassis as Colby mentioned. heres as far as i can go until i get to Claytons Thursday to make a few minor changes to the chassis, the EEM Dual Triangulation skid plate, and have to figure out where to mount my upper links and install some tabs for them to mount to. I also may need to make a few mounting tabs for the front upper shock mounts as im not sure the current spot will work out. heres a few of the mock up pics   close up of the BTA mod  more later in the week. |
|
| |
|
01-08-2009, 11:18 PM
| #13 |
| Rock Crawler Join Date: Dec 2008 Location: Marengo, Ohio
Posts: 980
|
Very nice, i like the red and black look. Im doin it as well, even though its just a 1:18 Nylint haha.
|
|
| |
|
01-09-2009, 01:42 AM
| #14 |
| RCC Addict Join Date: Jun 2008 Location: Mudville
Posts: 1,592
|
thanx, i like the somewhat unorthodox color combos. 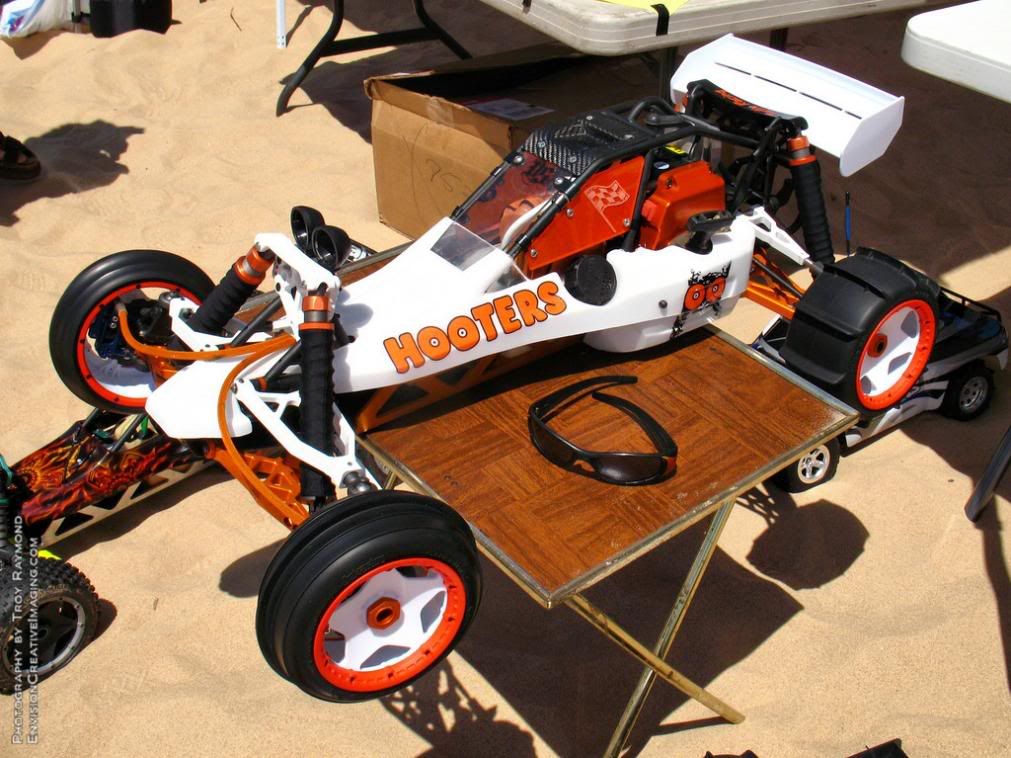  so after some time today, i got the EEM Skid trimmed to fit, mounted the lower links and gazed at it for an hr thinking of the best way/place to mount the lower links, and also the shocks. theres mounts already in place for the front/rear shocks, but im going a different route, and going to cut out 4 plates, and get them tigged on the front and rear lower side of the chassis. once thats done, it ll be time to drill mounting holes, and setup the upper links, and the shocks. WB should be at 12 and 1/8th inches, and im shooting for 2 3/4 to 2 7/8ths in ride height. i spent a bit of time dinking with the BTA steering mod. have changed it up a bit, will post that up tomorrow. |
|
| |
|
01-09-2009, 10:52 AM
| #15 |
| Rock Crawler Join Date: Dec 2008 Location: Marengo, Ohio
Posts: 980
|
Yeah i like going that way too, kinda the same build as someone else sometimes but totally different, Diggin the orange and white |
|
| |
|
01-09-2009, 09:52 PM
| #16 |
| Newbie Join Date: Jan 2009 Location: searcy
Posts: 29
|
hooters. nice. |
|
| |
|
01-18-2009, 08:22 PM
| #17 |
| RCC Addict Join Date: Jun 2008 Location: Mudville
Posts: 1,592
|
finally something to update. had a SLOW day at the crawling spot, so i took most of the day (ran about 8 minutes. lol) and cut, and brazed on the 4 quarter panels if you will. this gives me the locations for top shock mounts and for upper link mounts.    and where its at tonight      Last edited by Timmahh; 01-19-2009 at 01:42 AM. |
|
| |
|
01-19-2009, 10:46 AM
| #18 |
| RCC Addict Join Date: Jun 2008 Location: Mudville
Posts: 1,592
|
and one with wheels on and shock not mounted yet. checking artic and smoothness.  i need to get my BTA steering link closer to the axle to create some bottom shock cap clearance yet. |
|
| |
|
01-19-2009, 03:11 PM
| #19 |
| RCC Addict Join Date: Jun 2008 Location: Mudville
Posts: 1,592
|
another round of updates a couple more pics from todays progress. i just set the front shocks in what i think is a decently working postion. i still need to decide if im going to use the position 374 installed, or if im going to do a different spot. im also thinking of using the RC4WD 100mm white scale shocks, these 124 axials i think are going to be too long. links arranged and setup, shocks not mounted so this is at full squat. the front crossmember bar is actually stopping any more downward travel in the front, and the rear lower links are hitting the upper links and stopping the squat in this pic  elec plates installed  front top shock mount position  ( i also clocked the front axle using the clockale axial Cs to gain a tad bit of shock spring clearance with the BTA steering link. the shocks limited articulation as you can tell in this pic, when compared to the above pic with out shocks mounted.  but its still pretty decent   now to come up with a rear location mount for the shock, or atleast how to secure it in its current location. ok, i guess its in roller condition. still have one mod to do, the steering short link needs to be shortened. the shock and link setup, though not ideal i know, appears to work pretty good for smooth articulation from front to back and one side to the other smoothly and without binding up anywhere. i get full shock compression, though all four shocks are slightly compressed in this location. can lift one wheel and the other 3 will stay planted for most of the compression range, which i think is pretty good. I also moved the rear upper link mount a bit for the 3rd time (few holes to patch up now.lol). but i got the clocking i needed on the rear axle to get rid of the nastyass angle i previously had. im going to be adding some more weight to all four tires. currently there is 5 1/4 in each front and 3 3/4 in each rear. im thinking of going to 9 F and 5 R.       Last edited by Timmahh; 01-19-2009 at 06:32 PM. |
|
| |
|
01-19-2009, 08:28 PM
| #20 |
| Rock Crawler Join Date: Jul 2007 Location: Rectalville
Posts: 889
|
Nice build, but a few comments/suggestions. First, the RC4WD 100MM White scale shocks suck, and aren't really the proper look for a build like this. But the 110mm dual-spring shocks are PERFECT for your rig. If the springs that come with them are too stiff, you can use losi mini-t front springs (same length/diameter and available in a variety of spring rates at any half-ass stocked hobby store around the country.) Second, your shock-mounting postions are all wrong, In my humble opinion. You should mount your shocks more like the 1:1 moonbuggy's do, like shown: 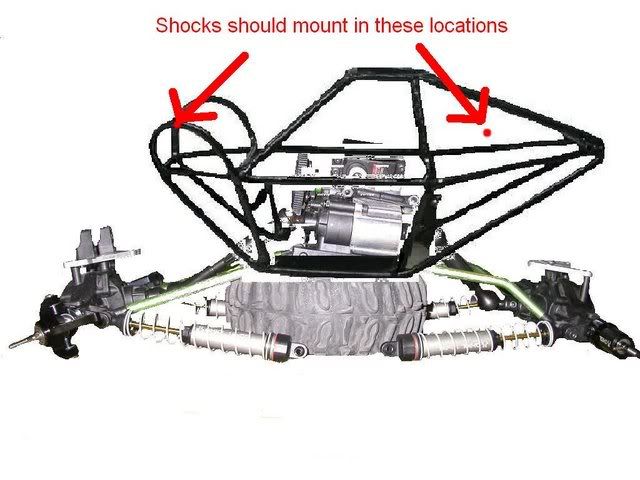 This will do several things: 1. It will improve the scale looks of your rig drastically 2. It'll make it handle better out on the rocks 3. It will drop your over-all ride-height some (I know, what you're thinking, but TRUST ME it sits waaaaay too high. This will also improve your link-angles) 4. It will limit your total articulation some. To be able to lift one tire to the top of a 12oz. beer can is about right for total travel. Any more will just make the rig unstable and easier to get bound up/twisted up in a crack. These days, many top comp guys are running far less than that, even! |
|
| |
|
| |


 Linear Mode


