| |
 05-20-2007, 06:19 PM
| #1 |
| Pebble Pounder Join Date: May 2007 Location: Titletown
Posts: 132
|
Okay flame away or offer tips literaly first RC I have ever owned and built. I know I still need to make a few corrections, need longer lower front links for sure. Was shooting at 12-12.5 WB but sitting at 11.5 now and its got my front pinion way out of wack. Also used carbon rod to make tie rod and drag link, works great for drag link, but broke the tie rod in a few second just testing flex. Back to the drawing board. Still need to run the electric but enough of that heres the pics...             |

|  |
| Sponsored Links | |
| | |
|
05-20-2007, 07:25 PM
| #2 |
| Pebble Pounder Join Date: Dec 2006 Location: Great Lake State
Posts: 137
|
Looks like a solid start Dave ! Welcome to the addiction...and to the best Crawling forum on the web.  |
|
| |
|
05-20-2007, 08:09 PM
| #3 |
| Rock Crawler Join Date: Dec 2005 Location: houston
Posts: 650
|
I'm no expert, but that looks like a GREAT start, and an even better first R/C. Keep us updated.
|
|
| |
|
05-20-2007, 08:33 PM
| #4 |
| I wanna be Dave Join Date: Jul 2006 Location: Moscow Mills MO
Posts: 2,204
|
Definately doesnt look like you are a noob at this. Looks awesome!
|
|
| |
|
05-20-2007, 08:39 PM
| #5 |
| Pebble Pounder Join Date: Jun 2006 Location: under my truck
Posts: 130
|
what kind of chassis is that thats bout what im looking for
|
|
| |
|
05-20-2007, 08:46 PM
| #6 |
| ΜΟΛΩΝ ΛΑΒΕ   Join Date: Dec 2006 Location: In tha Bush of Louisiana
Posts: 4,343
|
looks good did you make the motor plate ? very interesting
Last edited by chip cross; 05-20-2007 at 08:48 PM. |
|
| |
|
05-20-2007, 09:56 PM
| #7 |
| RCC Addict Join Date: Nov 2005 Location: Utah
Posts: 1,530
|
othern the geolanders it looks good. with wk axles being so wide you might get hung up on a lot of stuff.
|
|
| |
|
05-20-2007, 10:12 PM
| #8 |
| 20K Club  Join Date: Jul 2004 Location: Sending illegals home one Hayabusa at a time.
Posts: 22,981
|
That is a great start. The geos are good scale tires and I always liked mine. I am actually starting an almost identical build here very shortly. |
|
| |
|
05-20-2007, 11:08 PM
| #9 |
| Pebble Pounder Join Date: Apr 2007 Location: San Antonio
Posts: 127
|
Looks good to me. Keep us posted as it progresses. |
|
| |
|
05-20-2007, 11:50 PM
| #10 |
| Quarry Creeper Join Date: Mar 2007 Location: AZ
Posts: 229
|
That does look like a really good start. Are you using this chassis? http://www.tcscrawlers.com/product.php?productid=16143&cat=103&page=1  |
|
| |
|
05-20-2007, 11:57 PM
| #11 |
| I wanna be Dave Join Date: Jul 2006 Location: Moscow Mills MO
Posts: 2,204
|
did you test fit the holes on your motor mount? might wanna slot that area instead of having the holes if you didnt. I really like that frame btw. 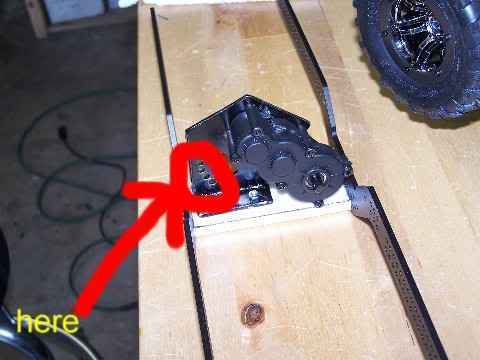 |
|
| |
|
05-21-2007, 06:52 AM
| #12 |
| Pebble Pounder Join Date: May 2007 Location: Titletown
Posts: 132
|
Thanks all. The frame is the MFM Chasis I got from one of the Forum Vendors (The Crawler Store) I did modify the chasis, since I was using a modified Clocked Tranny mount I got the idea from a post on a build by Gentbent on this forum ( T.O.R.C. tuber - build log ) I had to widen the chasis by 1/2 an inch. The motor mount holes are aligned for both the stock motor and the 55T I have waiting to go in. I was orginally going to slot them, and pre drilled the area I was going to dremmel out, but my Pre-drilled holes align perfect so I left it as is. Im not the biggest fan of the Geolander tires, but they where a ready inexpensive tire at our local hobby store that fit the Beadlocks I bought. I might change later on, I would love to stay somewhat scale and the Geolanders work for now. I vented the Axial beadlocks, hollwed the foam and added weight to the center of the wheels, they feel grippy and I think I have a good combination of surface contact and sidewall stiffness. I have 2 problems to solve before I fire it up, I need longer front lower links. Im using Traxxis Revo 112mm links, and I need them longer, I am assuming 10-20mm longer, So I have to build or find a longer link. The second problem is the tie rod, I took a piece of carbon rod and and cut 2 pieces of 1/8 threaded rod which I epoxied into the ends with the links. It felt durable but once I mounted the wheels and put it under pressure is spintered at the rod end links. Back to the drawing board. ( I would love any suggestions on building a durable tie rod) Dave |
|
| |
|
05-21-2007, 05:54 PM
| #13 |
| Quarry Creeper Join Date: Apr 2007 Location: Katy, TX
Posts: 482
|
DaveFL, i just purchased the same chassis. I was wondering what size upper links are you using? This may or may not sound dumb, but I thought upper and lowers were supposed to be the same size. Am i correct, or way off? Thanks buddy. By the way, that looks great!!! |
|
| |
|
05-21-2007, 06:06 PM
| #14 | |
| I wanna be Dave Join Date: Jul 2006 Location: Moscow Mills MO
Posts: 2,204
| Quote:
I might have to order that chassis myself. Your build should sell a few of em for The Crawler Store. | |
|
| |
|
05-21-2007, 08:23 PM
| #15 |
| Pebble Pounder Join Date: May 2007 Location: Titletown
Posts: 132
|
As far as I know upper links can be shorter or longer as long as the geomtry is set up correct, the upper and lower links also determine your pinion angle based on length. In my case if I used longer uppers my pinion would have been vertical and um thats kinda hard to mate a driveshaft to without binding I was doing some reading and actually was thinking along the 60/40 lines I think I may lengthen the entire rear and keep the front set as it is but shorten the uppers to bring my pinion back in line. I am looking for a 12-12.5 WB As for the motor slots yes I actually meshed it togther before I decided not to slot it. Thats the reason I didnt take it apart and slot it. there is a slight amount of play in each of the holes but I have perfect contact. I just got lucky on the pre-drills. |
|
| |
|
05-21-2007, 08:37 PM
| #16 |
| Quarry Creeper  Join Date: Jan 2007 Location: Kansas City
Posts: 337
|
Looks good man |
|
| |
|
05-21-2007, 08:42 PM
| #17 | |
| Quarry Creeper Join Date: Jan 2007 Location: Kansas City
Posts: 337
| Quote:
Run the rod through the entire length. It may still split if you force it against a rock..actually it will split. I make my rods out of Delrin ...5/16" with revo rod ends. No problems there. You can also use brake line with allthread inside as well. Many options | |
|
| |
|
05-23-2007, 07:05 AM
| #18 |
| Pebble Pounder Join Date: May 2007 Location: Titletown
Posts: 132
|
Okay ran into some problems last night that if anyone is using the chasis set up should be aware of. I was setting it up for good travel but keeping a Low COG, using the servo mount on the front axle that I got from the servo mount templates results in contact with the frame rails before maximum compression can be reached. Im trying to see what can be done about this, it does look if you offset the shocks more to the rear it twists the axle enough causing the servo to miss the frame, but using 4" shocks you loose height. Im actually looking at possibly using two different length shocks now. My mind is kinda dead from re-working the suspension and trying to figure out best performace lengths and placements of shocks, but I did split the suspension lengths last night and was wondering if anyone had feedback on putting 60% of the arm length up front vs the rear? I was thinking along the lines of longer front arms with a slight nose down droop. The batter craddle will be centered between the frame rails in the front, so it appears this may provide me with the best set up for hill climbs and descents, but it also means a loss of weight for traction in the rear for climbs. Im open for ideas or opinions for some of the guru's here. I tried to take some pics but battery was dead in the camera may get some up later today. Also, is there anyway to set the shocks up to give me more down travel or droop? I dont like the idea that the shocks keep the suspension so rigid. Dave |
|
| |
|
05-23-2007, 07:38 AM
| #19 |
| Quarry Creeper Join Date: Apr 2007 Location: Northern PA where the rocks grow wild
Posts: 418
|
you can get jato long shank rod ends to lengthen your lower links or you can also get 128mm revo links. that would be the easiest. i used them on my new build for the lowers & the 112 mm for the uppers & they work great. i am fixin to post pics of the new build. on a seperate note, you might wanna consider remaking the servo mount with the extra tab that screws to the axle hub or the axle c, i made my original one just like you did & after a couple runs, it started flexin & i wasnt gettin full steering capability. I remade it with the extra tab & it works great. great lookin rig, specially for a very first rc & custom build |
|
| |
|
05-23-2007, 10:05 AM
| #20 |
| Pebble Pounder Join Date: May 2007 Location: Titletown
Posts: 132
|
The servo mount is actually 1/8 Aluminum, I guess it could flex but would take a lot to flex it. I used thicker alum to prevent this. I am actually rethinking the servo mount based on contact with the frame. I was actually looking at a possible verticale mount or 45 degree over the diff. Still a lot of suspenion tweaking and testing before I start hooking up electrics. |
|
| |
 |
| |


 Linear Mode


