| |
| |||||||
 |
| | LinkBack | Thread Tools | Display Modes |
 11-01-2007, 03:55 PM
| #1 |
| Rock Stacker Join Date: Sep 2007 Location: Orange County
Posts: 66
|
I was recently introduced to the crawling world and have been absolutely hooked! This website has been like an IV stuck in my arm for a couple months now. I would like to start by thanking all of you out there because there is so much information on this site my head is spinning. So, what has all this searching resulted in? Well, I started by following HPI's build and it was really cool! But...I couldn't stop Chassis - Offroader5's Widow design (1/4" aluminum) - Thanks!! Stock WK axles (locked with JB) Stock Tranny (removed spring inside, replaced with spacer) Stock Electronics Motor - Integy 55T lathe Front axle mount (1/8" aluminum) - template provided by Harley0706 - Thanks!! Clocked motor mount - template provided by Harley0706 - Thanks again!! Shocks - Traxxas xxl (i think), 100Wt shock oil w/ "clicky pen" inner springs. I still need to cut another axle mount for the rear and get rid of the flimsy plastic setup for keeping the wheels straight. I would also like to add a winch for pulling the suspension in for steep inclines. A dig setup is in my sight as well. New wheels and tires are much needed also...but, i'm on a budget :-( So, here is what I have so far. Any suggestions would be greatly appreciated! Oh...I still haven't even crawled on actual rocks yet either...just the flower bed bricks and entry way steps lol! I have to warn you...my metal cutting abilities suck! This is the result of tons of dremel cut off wheels and several tries at the chassis with a jig saw Sorry the pics are blurry, the camera on my phone doesn't do so well with my shaky hands :( Last edited by goo; 11-01-2007 at 04:10 PM. |

|  |
| Sponsored Links | |
| | |
|
11-01-2007, 04:11 PM
| #2 |
| Quarry Creeper Join Date: Aug 2007 Location: Lumberton
Posts: 463
|
Looking good man.  I just got the links for my build and should get the chassis and battery box tommorow (building it from the ground up). I just got the links for my build and should get the chassis and battery box tommorow (building it from the ground up). |
|
| |
|
11-01-2007, 04:14 PM
| #3 |
| Rock Stacker Join Date: Sep 2007 Location: Orange County
Posts: 66
|
I already have my battery setup done. I just need to make the mount for the rear. I split a 6 cell battery into 3 sections, they will be placed on the axles except for the spot where the steering servo is. Trying to get my COG as low as possible |
|
| |
|
11-01-2007, 04:41 PM
| #4 |
| Quarry Creeper Join Date: Aug 2007 Location: Lumberton
Posts: 463
|
Good work. I see you know something bout crawling, cause you need the center of gravity as low as possible. but not to low or you will scrape the ground. lol. joke. |
|
| |
|
11-01-2007, 05:17 PM
| #5 |
| Newbie Join Date: Oct 2007 Location: SW WA
Posts: 45
|
Great build! What body do you have planned? |
|
| |
|
11-01-2007, 05:20 PM
| #6 |
| Rock Stacker Join Date: Sep 2007 Location: Orange County
Posts: 66
|
I'm still a bit undecided on the body. For now i'm just going to cut up the stock body. I have thought about the baja bug simply because they would be perfect in case of a roll over and easy recovery I guess i should start thinking about that. I've spent so much time researching all the dynamics of the build, i kinda forgot about the body lol. |
|
| |
|
11-01-2007, 05:56 PM
| #7 |
| Quarry Creeper Join Date: Dec 2006 Location: Corbin KY
Posts: 392
|
is your wheel base 12.5? also what kind of shocks are you using. i already have one of the chassis made of cutting board and it climbs like no other. im cutting my new one out of 1/8" diamond plate tomorrow. i also did the tranny mount like you but my chassis still had tons of torque twist. i think it will help alot if i get the right shocks. i really like your setup and you did a good job with the cutting.
|
|
| |
|
11-01-2007, 06:14 PM
| #8 |
| Rock Stacker Join Date: Sep 2007 Location: Orange County
Posts: 66
|
Thanks for the compliment...maybe i'm just a picky SOB. Last time I checked my WB is right at 12.5, but I might shave the links a tad just to be sure. The shocks are Traxxas xxl part number 3762A. http://www3.towerhobbies.com/cgi-bin...762A&search=Go I used losi 100wt shock oil to try and reduce torque twist and there are "clicky pen" springs inside, mostly to limit the distance the shock travels. I still haven't really tested it yet, but it does really well around my yard. I have been able to climb the steps on my porch which I couldn't do before I made this chassis. I will be visiting the socal rc competition this weekend and will let you know how it does. |
|
| |
|
11-01-2007, 08:55 PM
| #9 | |
| Quarry Creeper Join Date: Aug 2007 Location: Lumberton
Posts: 463
|
Hey quick question? Where exactly do you get the chassis at (link please and thank you). Quote:
| |
|
| |
|
11-02-2007, 10:39 AM
| #10 |
| Rock Stacker Join Date: Sep 2007 Location: Orange County
Posts: 66
|
There is a link to it in this thread: Custom Chassis'd WK Crawler I printed the template, glued it on a sheet of 1/4" aluminum and started cutting. |
|
| |
|
11-02-2007, 12:23 PM
| #11 |
| Picky Fab'r/Acetal Junky  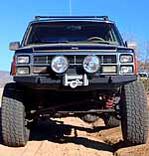 Join Date: Jul 2006 Location: Arizona Desert/AJ
Posts: 3,073
|
Wow...1/4" aluminum |
|
| |
|
11-02-2007, 12:37 PM
| #12 |
| Rock Stacker Join Date: Sep 2007 Location: Orange County
Posts: 66
|
Yeah, it is pretty damn thick stuff. But i really didn't want to have to worry about cutting another chassis. Time is not a resource i have much of. I figured I'll just make it strong enough (while adding the extra weight :-() to handle a good fall if it happened. I'll definitely get some more pics and video of it as more work is done. EDIT: Thanks again Offroader for the template! It's a great design and seems to be quite the hit! |
|
| |
|
11-02-2007, 12:55 PM
| #13 |
| Pebble Pounder Join Date: Aug 2007 Location: 909 Highland
Posts: 129
|
Looks good! The clocked motor mount looks great. Something that I have been toying with doing, just haven't had the time lately.
|
|
| |
|
11-02-2007, 01:29 PM
| #14 |
| Rock Stacker Join Date: Sep 2007 Location: Orange County
Posts: 66
|
It was pretty easy to do since I had a drill bit big enough to bore out those holes for the tranny. The area where the motor mounts up got pretty sloppy, but it works. Instead of laying the tranny on its side, I rotated it so the motor wasn't on top of the tranny and made that little bracket to hold it in place. It keeps everything nicely tucked inside the chassis |
|
| |
|
11-02-2007, 01:57 PM
| #15 |
| Pebble Pounder Join Date: Apr 2007 Location: va beach
Posts: 171
|
looks good, are you planning to run a brick pack on the front axle? and what body? |
|
| |
|
11-02-2007, 02:03 PM
| #16 |
| Rock Stacker Join Date: Sep 2007 Location: Orange County
Posts: 66
|
I already split a regular 6-cell stick battery into 3 sections (2 cells each). One will be strapped on the front axle next to the steering servo. The other two will be on the rear axle, one on each side. This way they are as close to the axle as possible and do not sit too high. I still haven't seen how efficient it really is yet though. I'm going to play with different weight distributions and right now i'm starting with keeping an even balance and go from there.
|
|
| |
|
11-02-2007, 02:26 PM
| #17 |
| Picky Fab'r/Acetal Junky Join Date: Jul 2006 Location: Arizona Desert/AJ
Posts: 3,073
| |
|
| |
|
| |


 Linear Mode


