| |
| |||||||
 |
| | LinkBack | Thread Tools | Display Modes |
 11-23-2008, 12:04 PM
| #1 |
| Newbie Join Date: Nov 2008 Location: NW Arkansas
Posts: 36
|
I have been bored waiting for my Losi MRC to arrive at my LHS. In the meantime I built some fake rocks that would be easy for my son to move around and design difference courses. I originally thought these would be a bit cheesy (might still be) but due to all the paint fumes while painting them I really started to like them. Oh, and if you look close at the base of the two vertical "rocks" you will see the lexar body (the jeep cj) for the Losi MRC.....this will give you some idea of size. I welcome honest feedback....  Last edited by getoutandplay; 11-24-2008 at 06:27 AM. Reason: photo trubble |

|  |
| Sponsored Links | |
| | |
|
11-23-2008, 12:12 PM
| #2 |
| Quarry Creeper Join Date: May 2008 Location: Franklin
Posts: 263
|
Looks good. don't worry about what they look like as long as you can crawl them.
|
|
| |
|
11-23-2008, 03:03 PM
| #3 |
| Pebble Pounder Join Date: Oct 2008 Location: San Jose
Posts: 129
|
Those look pretty cool to me, what did you make them out of?
|
|
| |
|
11-23-2008, 03:43 PM
| #4 |
| Newbie Join Date: Jul 2008 Location: carlyle
Posts: 12
|
they look like either A. Sundaes or B. dog poo Either way they look like good crawling obstacles.  |
|
| |
|
11-23-2008, 03:47 PM
| #5 |
| Newbie Join Date: Nov 2008 Location: NW Arkansas
Posts: 36
|
Great Stuff insulation foam. It all starts with pizza though. Well, a good excuse to order pizza that is. I think the best size "rock" is a pizza carton folded all the way open. Then I raid my wife's recycle bin for yogurt containers, coke cans, starbucks cups, etc.. At first, I was hot gluing these items to the pizza box but that is just for ease and not necessary. Once you have your set up then just spray the insulation foam (very slowly....too fast and it will look like a bunch of little snakes). Come back in a couple of hours and the foam should have expanded quite nicely. It won't be completely dry but it will dry enough to add another layer of foam to areas you want to make taller. Once the foam is all the way dry then I used a serrated knife to carve rock like edges in the foam. Otherwise, it will be too rounded. Once all your edges are cut I recommend shaking out all the little foam bits or blowing them out if you have compressed air handy. To finish them off and make them look somewhat realistic I used spray paint (the textured kind for wrought iron furniture). I used three shades of brown to get the finished look you see in the photo in the first post. These are easy to move around and if you make enough of them you will find endless courses to make with them in different arrangements. |
|
| |
|
11-23-2008, 04:08 PM
| #6 |
| I wanna be Dave Join Date: Oct 2007 Location: Castle Rock, WA
Posts: 8,785
|
Those look good, alot better than mine. I made a test course for my garage about a year ago. Two pieces of OSB with two hinges for a variable angle. The foam does deteriorate after a while. I ran a super a couple of times on it but my 2.2 lived on it while i was testing the SWX. Some old tire foams and 36" plastic printer paper rolls got new lives. Last edited by Szczerba; 11-23-2008 at 04:14 PM. |
|
| |
|
11-23-2008, 05:18 PM
| #7 |
| Pebble Pounder Join Date: Oct 2004 Location: Southern Wisconsin
Posts: 187
|
I've been making "rocks" the same way, but after I take the knife to my foam covered garbage, I then apply 2 layers of a grout/mortar mix to them for added durability. Found the idea on another thread in the General Crawler section: Indoor course ... How to: |
|
| |
|
11-23-2008, 05:35 PM
| #8 |
| I wanna be Dave  Join Date: Dec 2005 Location: Happiness is a warm AK.
Posts: 12,563
|
3 4x8 sheets of plywood covered w/ packing foam in random placment, covered w/ plaster cloth an then painted w/ latex paint. It's kinda slick, but it provides a challenge. 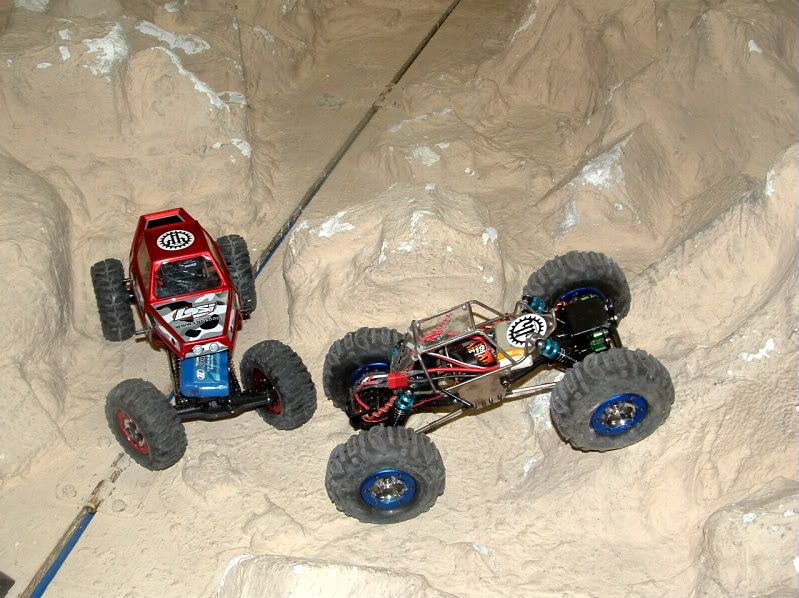 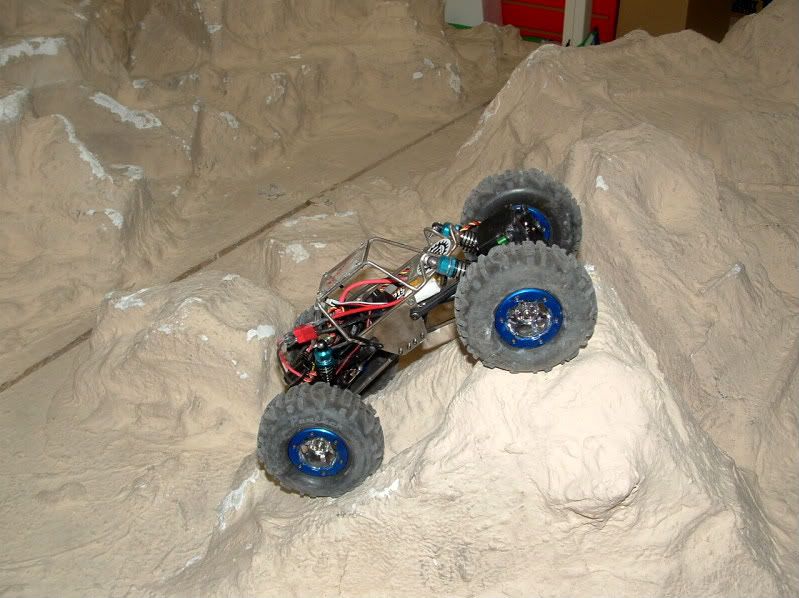 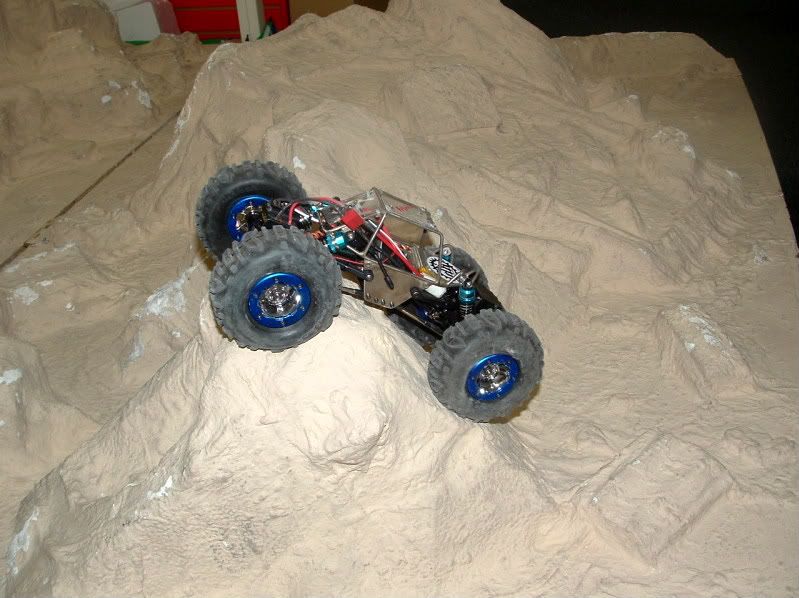 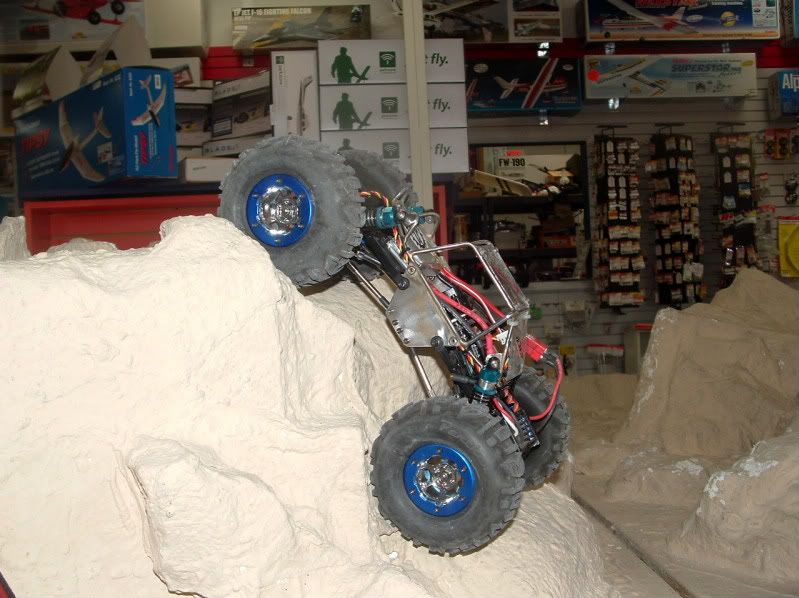 |
|
| |
|
11-23-2008, 05:40 PM
| #9 |
| Newbie Join Date: Nov 2008 Location: NW Arkansas
Posts: 36
|
how did you get the plaster cloth to stick to the foam. did you use adhesive spray or just lay it down then paint. this would be a quick and easy way to build a course after christmas when tons of packing foam is available.....
|
|
| |
|
11-23-2008, 05:45 PM
| #10 |
| I wanna be Dave Join Date: Dec 2005 Location: Happiness is a warm AK.
Posts: 12,563
|
Just dipped the plaster cloth in water and applied it to the foam and the boards. Once it dried, we painted it w/ the latex paint. It's needs a little touch up now.
|
|
| |
|
11-23-2008, 07:54 PM
| #11 |
| Rock Crawler Join Date: Sep 2008 Location: Kennesaw
Posts: 630
|
Thats some sweet rocks OP. Even better it came from a fellow MAC user.
|
|
| |
|
11-23-2008, 09:01 PM
| #12 | |
| Newbie Join Date: Jan 2007 Location: St.Louis
Posts: 32
|
It looks so clean after the shopvac treatment. Joe, i was looking at this thinking man that looks so familiar before I saw my red MRC. Quote:
| |
|
| |
|
11-23-2008, 09:14 PM
| #13 |
| I wanna be Dave Join Date: Dec 2005 Location: Happiness is a warm AK.
Posts: 12,563
|
HAHAHAHA! I bet it did, you need to get the paint out and touch it up!:-P |
|
| |
|
11-24-2008, 03:15 PM
| #14 |
| Rock Stacker Join Date: Sep 2005 Location: Ft Knox (but always from Flagstaff AZ)
Posts: 92
|
I like it! i have about 10 rocks and concrete pieces inside and want to add some fake rocks . do you think throwing some sand on the wet paint will work for texture?
|
|
| |
|
11-24-2008, 04:58 PM
| #15 |
| Newbie Join Date: Nov 2008 Location: NW Arkansas
Posts: 36
|
I think that if you threw sand on while the paint was wet you would also need to go back over it with another coat of spray paint to help secure it. Over a short period of time though the tires would easily knock off the sand particles as they wouldn't adhere very permanently with just paint holding it there. The best method is to go to the trouble of the sand/grout (mud) method that redmike did (and mentions above in post #7). This method would have the best texture and longer durability, IMO. The easiest approach might be the way that I went which skips the mud method and goes straight to textured paint after carving the foam. However, dezfan's method is even quicker since it is just using the cloth. I think next time I build some rocks I will go with dezfan's method and then cover in "mud" as redmike did. |
|
| |
|
11-24-2008, 05:30 PM
| #16 |
| Newbie Join Date: Jul 2008 Location: carlyle
Posts: 12
|
have an idea, you know those styrofoam molded boxes to secure a rc truck well they have all sorts of ledges and what not. much like that come with at least traxxas trucks it all layered in ledges and would work great for a MRC. |
|
| |
|
11-24-2008, 05:32 PM
| #17 |
| Newbie Join Date: Nov 2008 Location: NW Arkansas
Posts: 36
|
Yup....those styrofoam boxes are under quite a few of my "rocks" and dezfan has tons of them under his plaster cloth....
|
|
| |
|
11-24-2008, 06:04 PM
| #18 |
| I wanna be Dave Join Date: Dec 2005 Location: Happiness is a warm AK.
Posts: 12,563
|
We also used Hot Glue to stack pieces of the foam to other portions of the foam to add to the surface abnormalities and then used a hot knife on the edges to further the details.
|
|
| |
|
| |


 Linear Mode


