| |
| |||||||
 |
| | LinkBack | Thread Tools | Display Modes |
 05-21-2009, 03:04 PM
| #1 |
| Rock Crawler Join Date: Mar 2009 Location: Cottontown
Posts: 880
|
As most of you know by now, RcBros has just released there miXer chassis to the public. I was lucky enough to get on of the very first kits out under the strict condition that I do a build up thread with pics and video. And of course William insisted that I ummmm "test" it. Which, knowing me, and the area that I live in means that I'm going to abuse the hell out of this thing, and purposly try my best to break as many pieces of it as I can and offer my feedback to him and to you the consumer. After waiting and waiting and waiting to get the thing in the mail, and buying a few little things that I thought I would need to make this thing as bulletproof as I could while also staying on a strict budget, and getting my miXer in I began the assembly process. Upon ripping the packages open like a kid at christmas I took the time to thouroghly examine each and every part so I could get an idea of how strong and beefy this thing was. Here is my short list of things that I have already talked to William (RcBros) about that I think you will need to know before you buy. 1st. the skid (as has been heavily discussed) does have some sharp edges on the leading and trailing ends where the lower links mount. 2nd. There are a ton of options for mounting and testing loads of diffrent setups, however, if you are faily new to the whole rock crawling thing and dont already have a good idea about suspension geometry then it may be a little tough to get the most out of the chassis from the begining. I have established a good baseline of where to mount your links to get you started. 3rd. The lower link material is in my opinion about 1/8th of an inch short. With the end links mounted flush with the end of the delrin as is designed to do, you only get an eight inch wheelbase. This is a long way from comp max. Adding 1/8th of an inch to each lower link would move the wheelbase out to 8.25 inches, and allow for safe extending to get that maximum 8.5 for anyone wishing to do so. (I simply left each end link 1/8th out from touching the delrin which added 1/4inch to each end and giving me a max comp legal 8.5 inch wheelbase) Other than those little quibbles here are some of those good baselines that I told you about earlier 1st. Lower link mounting. Mount 1 nut as close to the skid as you can get it, then slide the link on and nut it in place. do the same for the other links. 2nd. Upper front links. Mount these on the fifth inside hole from the bottom. 3rd. Upper rear links. Mount these on the 3rd outside hole from the bottom. 4th. Attatch both front and rear links to the second set of mounting holes in the fourlink plates. 5th. Shock mounting. Mount the shocks to the 1st, farthest outside holes on the chassis. 6th. Motor. Mount the motor in the first, or second set of holes closest to the front of the rig. 7th. Link lengths. The upper links, both front and rear should be built so that both end links are touching the delrin links. The rears should be left out 1/8th of an inch for both the chassis side, and the axle side (extending each link 1/4inch, which adds up to the above mentioned 8.5 inch wheelbase). Now, on to the build pics Once you open the box the chassis kit is shipped in, you are greated by a large bag that says "miXer" on it, This bag contains all of the materials to build the chassis. Here it is all laid out. 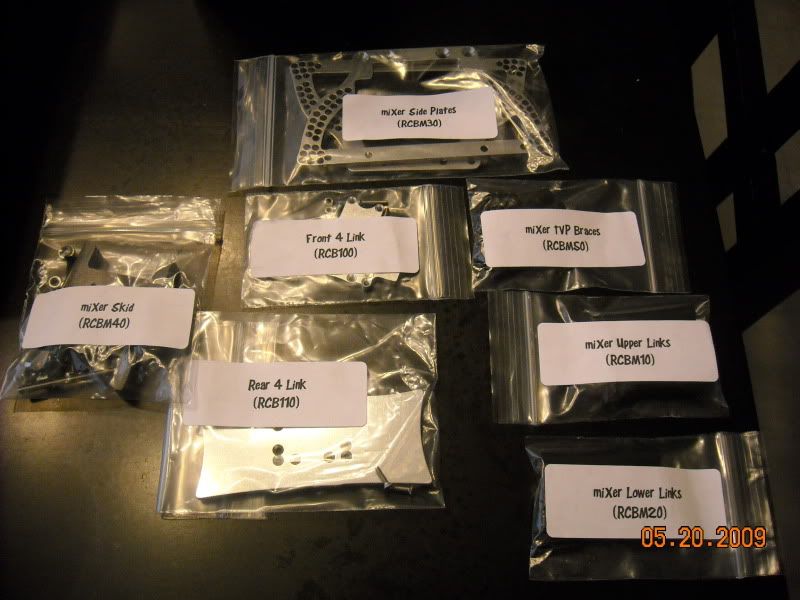 These next two pics show the TVP's and skid mounted together without the upper braces. I would recommend not installing the braces until you have the motor and trans mounted where you want them. 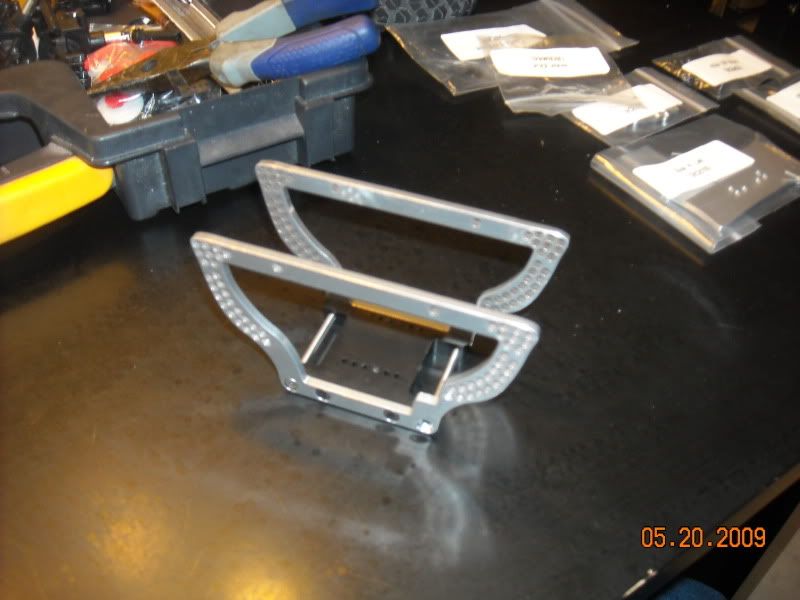 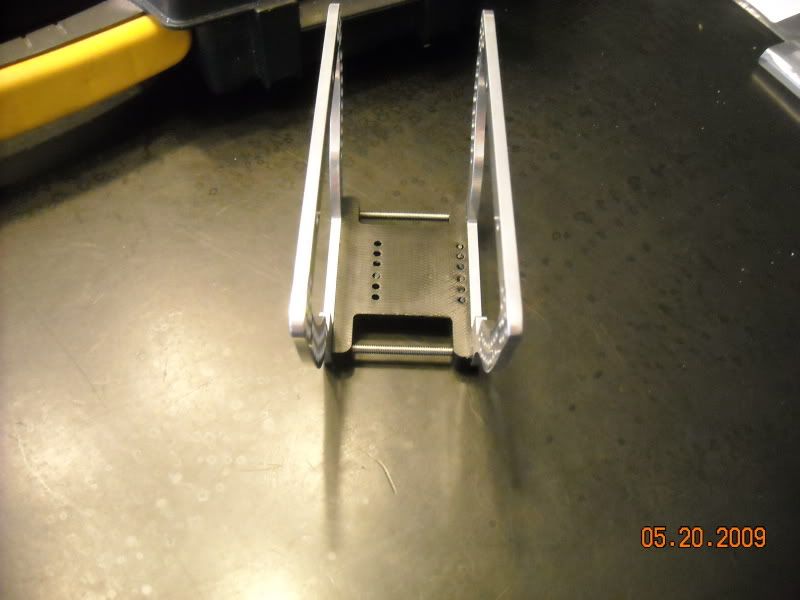 Here in the next two pics we have the motor and trans all mounted up. Notice how forward I mounted the motor/trans. I did this to move the center of gravity as far forward as I could get it. 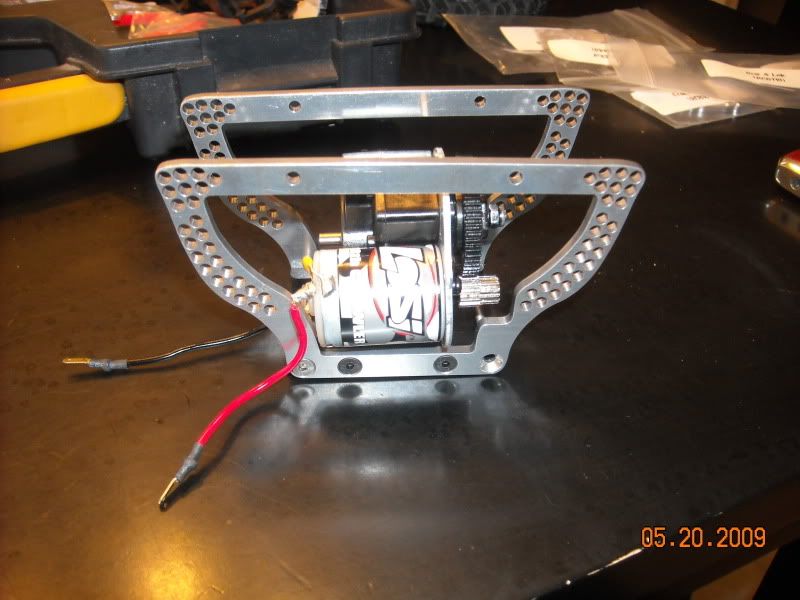 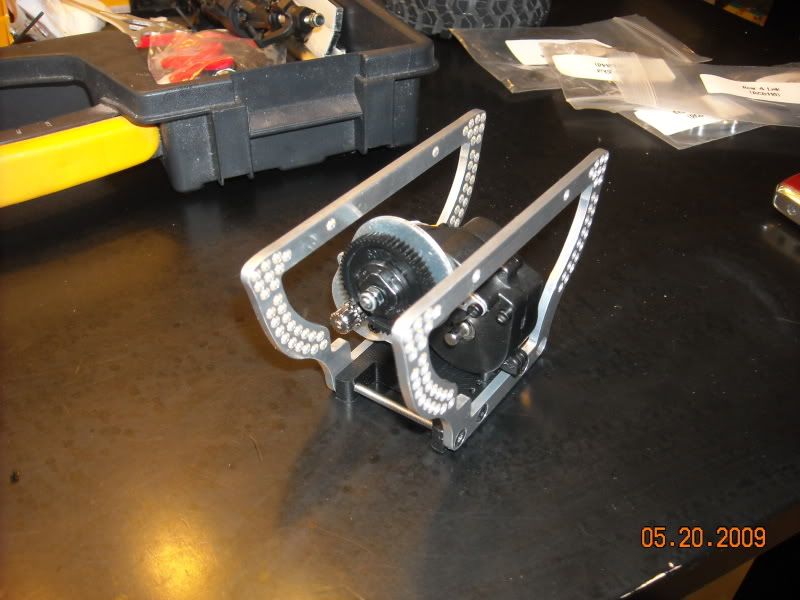 Here we have the rear four link plate all mounted to the rear axle. Notice that I did not mount the links up yet. The reason for this is I wanted to be able to set the overall wheelbase with just the lower links first. 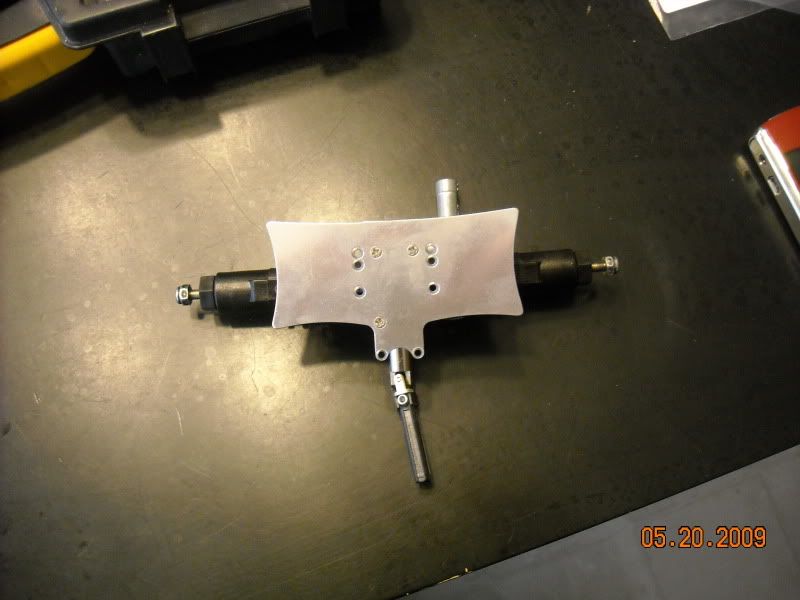 And the front four link/servo mount plate hooked up to the front axle. 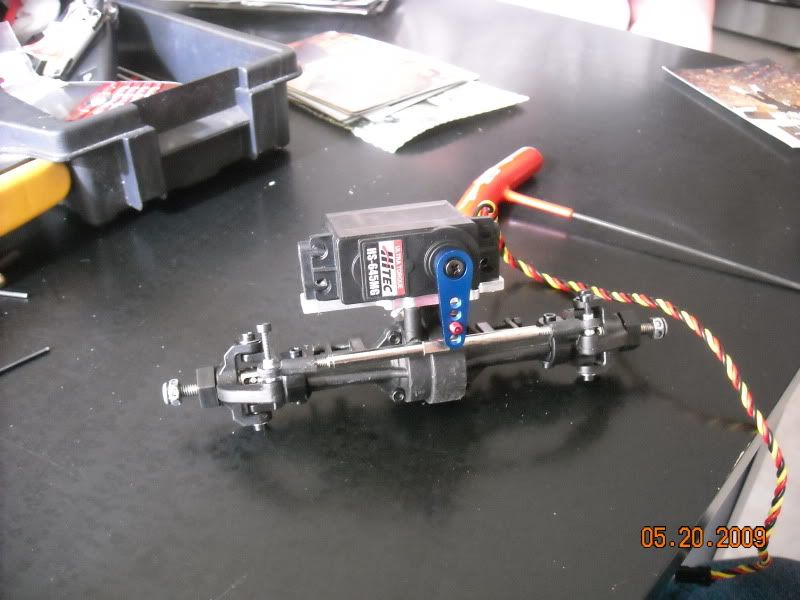 I chose to forgo the pics showing the actual building of the links themselves because building them is a really straight forward process. So, without further delay, here are some roller chassis shots. *note the link mounting points and the "stretch put into the lower links" 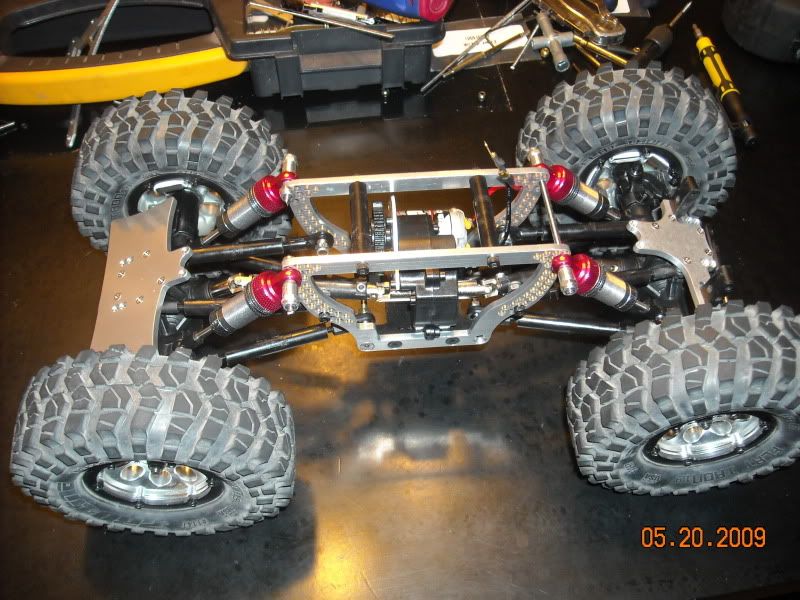 side view of the chassis. Notice how straight the links are. 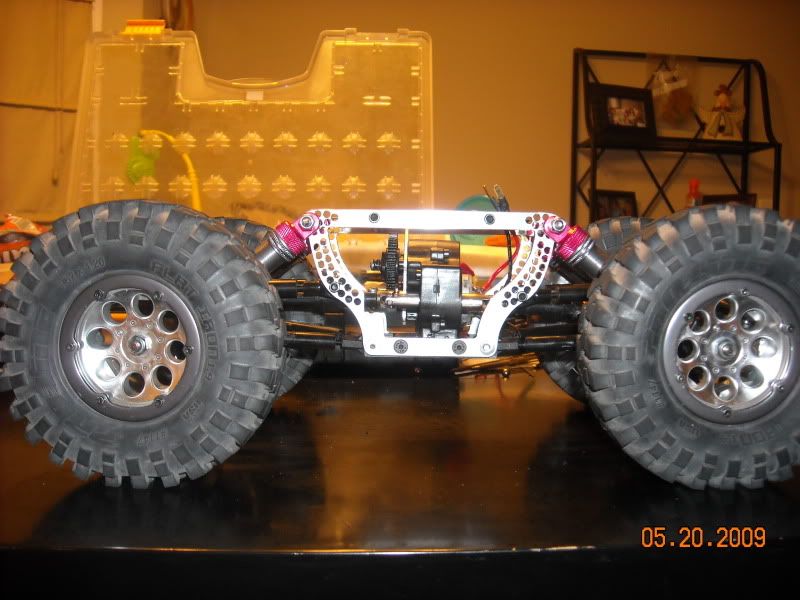 This is an articulation shot. The funny thing, that tape measure what the biggest thing I had handy... Thats only about 1/3rd of the articulation this thing has. 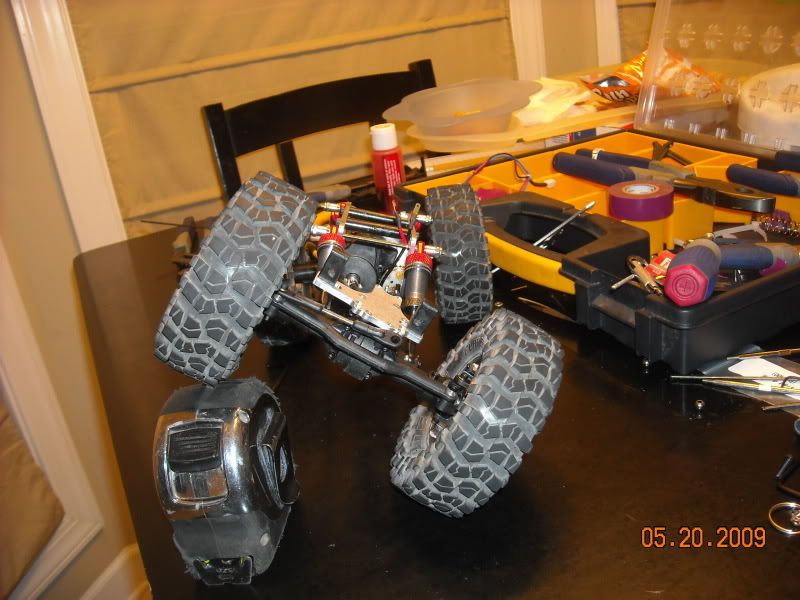 Ahh, the bottom view shot. You can clearly see the extended lower links as well as where the motor/tranny is mounted to. 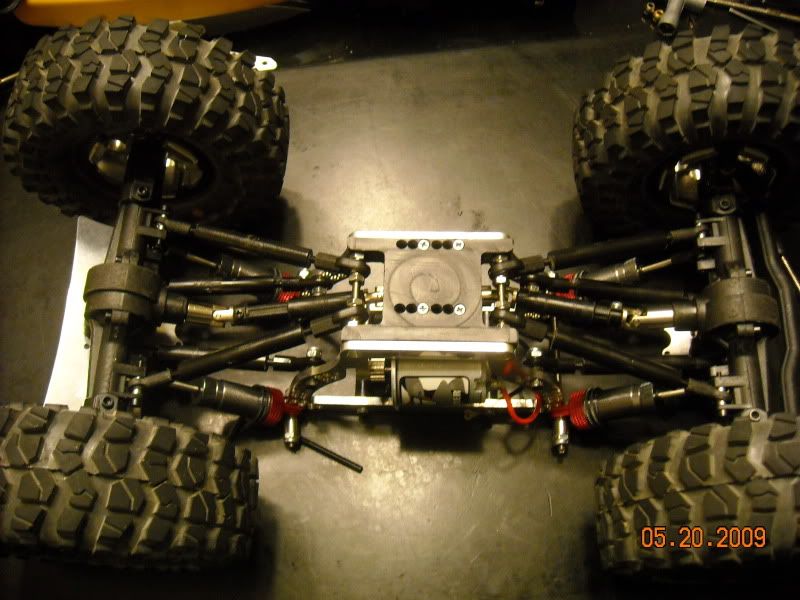 And the completed roller. 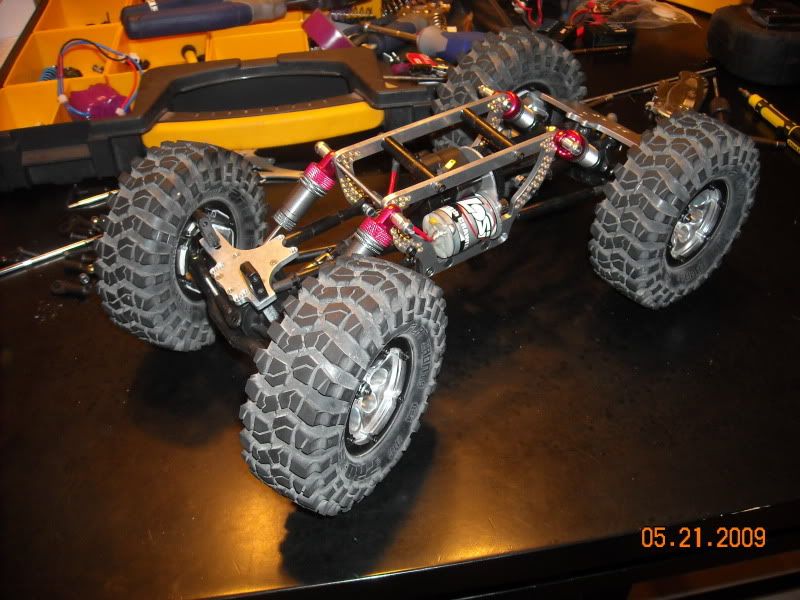 I have already made a few changes as to how the shocks were mounted. I really, really did not like how I mounted them in these pics, I'll get some new pics up once I figure out something better. I will post some more once I get the electronics mounted up where I want them and the battery all sorted out. Once I get that done, I'll get to some preliminary testing, and post up some pics and video of that. Thanks to William at RcBros for a great chassis. This thing has more options than you can shake a stick at and the build quality is next to none. Last edited by soundcolor; 05-21-2009 at 04:56 PM. |

|  |
| Sponsored Links | |
| | |
|
05-21-2009, 03:14 PM
| #2 |
| Quarry Creeper Join Date: Jul 2008 Location: Asheboro N.C
Posts: 486
|
Pics don't work for me.
|
|
| |
|
05-21-2009, 03:43 PM
| #3 | |
| Rock Crawler Join Date: Mar 2009 Location: Cottontown
Posts: 880
| Quote:
sorry bout that. when I uploaded them to photobucket, I sized them too small, and had to fix them. | |
|
| |
|
05-21-2009, 05:00 PM
| #4 |
| RcBros Hobbies   Join Date: Nov 2005 Location: Oregon
Posts: 4,646
|
Lookin good soundcolor, I choose not to run the comp max length because as the kit comes the rig is extremely stable. As you increase your wheelbase you also slightly decrease your ride height and I feel that it does well with the shorter wheelbase. As for the shocks, insert fuel tubing into the shock caps and secure with the longer nuts supplied with the chassis braces. The fuel tubing will allow your shock to flex like it would with the ball end, but gives it a tight mounting surface. |
|
| |
|
05-21-2009, 05:01 PM
| #5 |
| Newbie Join Date: May 2009 Location: Eugene, Oregon
Posts: 40
|
Great post Soundcolor. I got mine yesterday  |
|
| |
|
05-21-2009, 05:51 PM
| #6 |
| I wanna be Dave Join Date: Mar 2008 Location: In the Dark Edges of your Mind
Posts: 6,386
|
Good start. Suggestions... Put a spacer in your lower link gap or you might start to strip the delrin threads. Shorten your front uppers. Your servo plate needs to be flat for the best steering performance. Questions... What rod ends did you use for the upper chassis side? I used axial and I can only mount them so low, then the ball starts hitting the driveshaft. How do you like the shocks? Are the internally sprung? Or are you going to run droop? Looking good though... anxious to see how it comes out. |
|
| |
|
05-21-2009, 07:45 PM
| #7 |
| RCC Addict Join Date: Apr 2008 Location: Old Hickory
Posts: 1,137
|
Would like to see some shot's from above with the steering left and right and straight if you would please! Looks great get it together and bring it over to test out! |
|
| |
|
05-21-2009, 08:03 PM
| #8 |
| Quarry Creeper  Join Date: Mar 2009 Location: ON THE ROCKS
Posts: 253
|
this thing is so cool i love this chassis its at least the best for the money and mabey the best ever
|
|
| |
|
05-21-2009, 09:25 PM
| #9 | ||||
| Rock Crawler Join Date: Mar 2009 Location: Cottontown
Posts: 880
| Quote:
Quote:
Quote:
Quote:
Tommorow gonna work on the batts, and figure out some body mounts and do some testing. I'll have more pics and build tips tommorow evening. I'm gonna wait on the video until I can get out to the rock quarry down the street from my house... its crazy out there. | ||||
|
| |
|
05-22-2009, 04:55 AM
| #10 |
| I wanna be Dave Join Date: Mar 2008 Location: In the Dark Edges of your Mind
Posts: 6,386
|
The spacers for the lower links are axial spacers. I'll try and get the part number, but they are 2mm I believe. My LHS had them. Only 6 in a pack though... thats why I ended up with 2 green ones I inverted the bolt/nut on that rode end by the driveshaft too but it still rubs if I get it down in the bottom 2 holes. Can you shoot a pic of that rod end in that spot close up? If you don't have one, I reccommend a different motor. It really changes the truck! That plus the chassis are like night and day from stock !! |
|
| |
|
05-22-2009, 11:32 AM
| #11 |
| Rock Crawler Join Date: Mar 2009 Location: Cottontown
Posts: 880
|
Alright gentlemen, I've got the electronics almost done. The only thing I still need to do is redo my batts and mount them. Thought I would thow up some pictures and add a little more tips and tuning tricks. Let me apolgize for the size and clarity of the pics. Couldnt get a real good focus with all the light in front of me. I moved the motor forward 1 hole. It balances out the driveshafts alot better and allows for a perfect place to mount the ESC. If you have the stock motor, you will need to file down either the motor pin, or the chassis just a hair to get it to fit just right. No big deal really. Another good plus to moving the motor 1 space is that you will not have any issues with the upper link bolts contacting the driveshaft as HARVO mentioned earlier. I also redid how the shocks mount you have to pay close attention to see what I mean. I'm still not 100% on likeing this, but it works really well... I was going to try what RcBro Suggested with the fuel tubing, but didn't have any nuts for the fine threaded bolts that are supplied. In addition to this I would recommend using lock-tite on the small nuts that attatch the upper links (both front and rear) to the four link plates. I ran my rig for about 15 mins. and they were already coming loose. If you choose to mount your reciever as I did, please note that the plugs have to be on the inside of the chassis, or the body will not fit correctly. If you have the stock ESC and wish to mount it where I mounted mine, which I did because I wanted 4 cells on the rear plate, You are gonna have to follow these simple steps. (if you have another ESC and its smaller than the stocker you should have no problems at all mounting it in this location. 1st. Unscrew the TVP braces about 1/8th of an inch on each side. 2nd. Slide the side of the ESC with the wires (the ones coming out of the side with the on/off switch) down below the bottom of the TVP's first, and then slip the other side down. *note, make sure you go ahead and bend the wires down flat with the ESC or it wont fit* 3rd, tighten the center braces back up and your doe. Now, on the reciever, if you wish to mount it to the side of the TVP as I have done, use a piece of double sided tape and stick a strip about 2 inches in between the two center brace bolts. With the reciever plugs facing inside of the TVP's mount it flush with the top of the TVP. You are going to want to plug it in before you mount it. Upper links. I choose to run down the end links on the upper links until they were touching the delrin rod. This rotated the pinion to a more suitable angle as well as flatening out the electronics/servo mounting plates. I mounted the silver springs that came with my RcBros "red" shocks. They are a little stiff, but I am working on a quick and easy solution that everyone should be able to do. I did not limit the shocks internally because I did not want my rig to set any lower than where I have it now ( 1 and 7/8ths to the bottom of the skid). If you choose to lengthen the wheelbase to 8.5 inches be prepared for the rig to sit alot lower. The only way to combat this is by either installing some springs, or switching to a heavier weight shock oil. (I "think" 70-80 weight should do fine) Now, on to the pics. These first four pics show how I mounted the electronics, as well as the body mounts 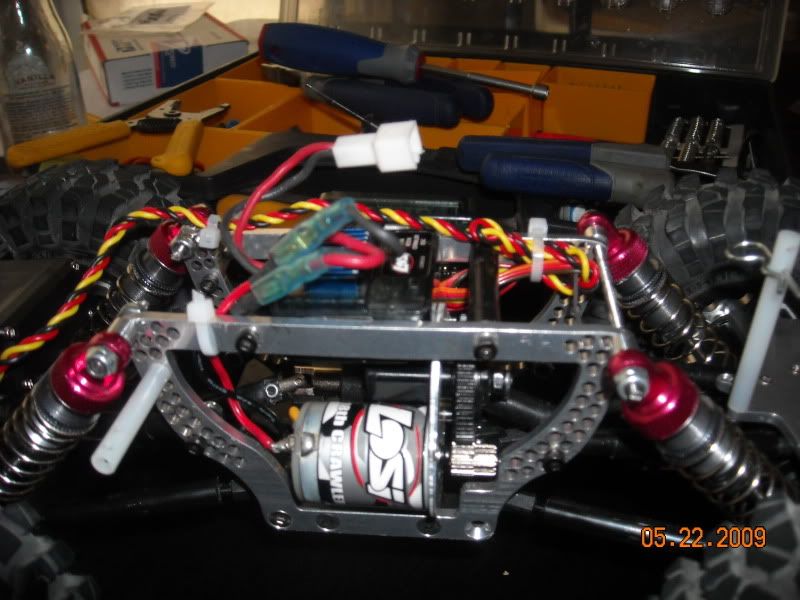 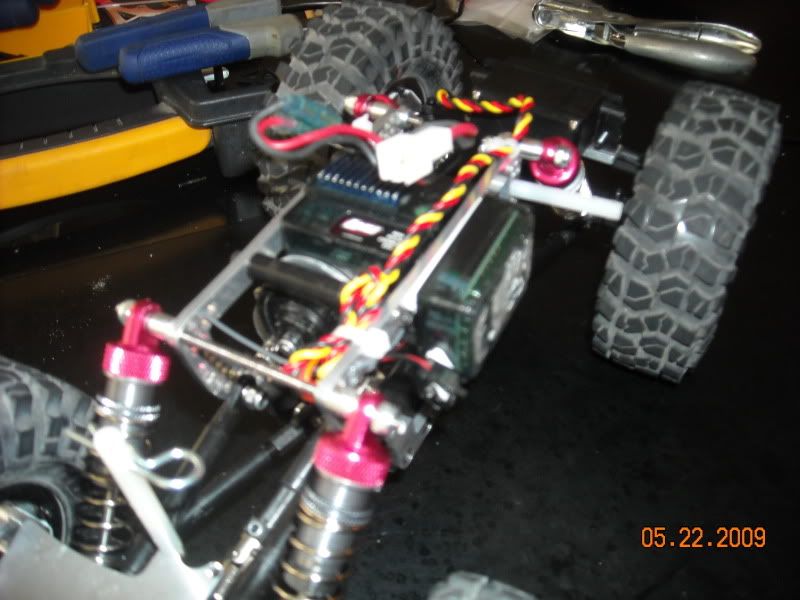 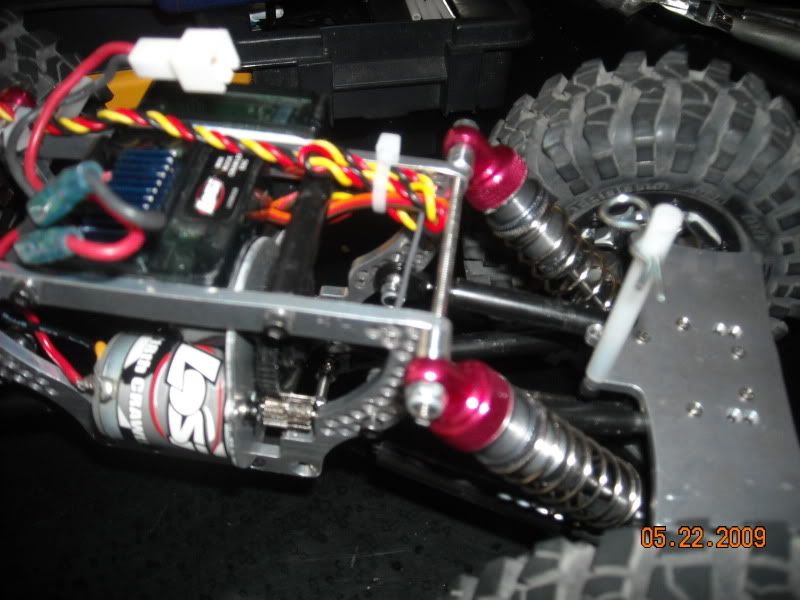 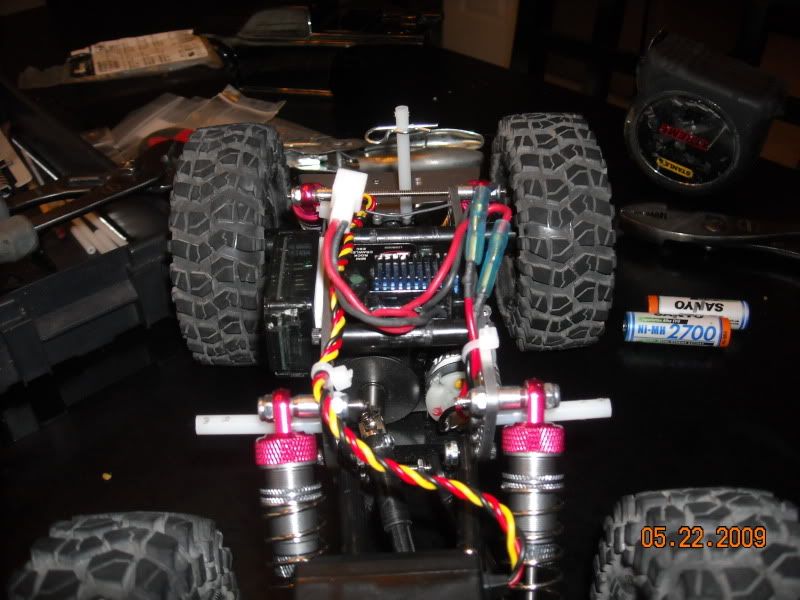 In the next pics as requested by MrEd, you can see the wheels turned to the right and left and the clearence they have in relation to the shocks. I had the truck and reciever turned off for this, so the end points weren't being taken into consideration. There is more clearence with the end points being in effect. 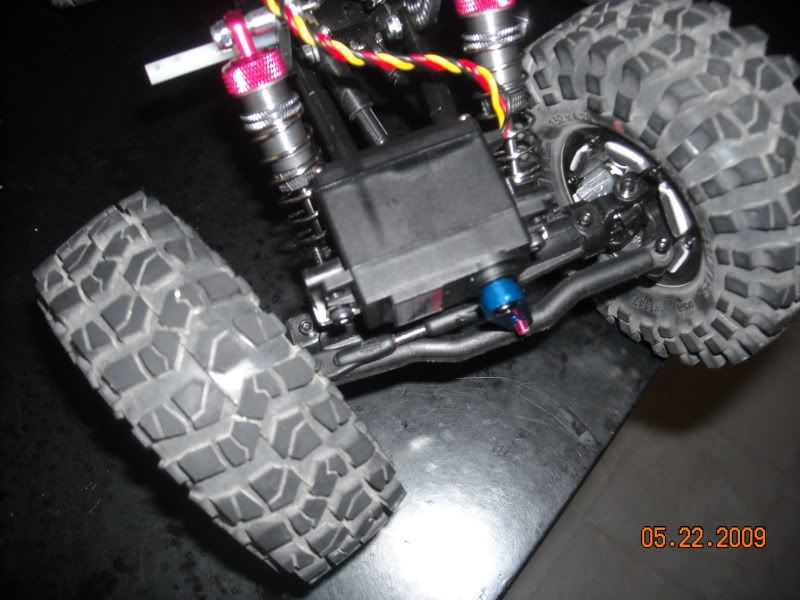 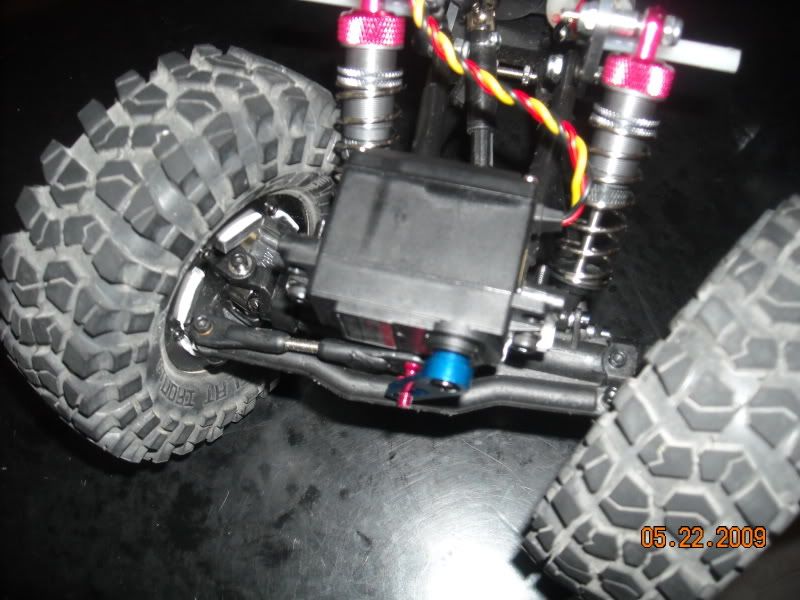 And finally we have some pics of the body all mounted up, and showing the wheelbase of my rig at exactly 8.5 inches. 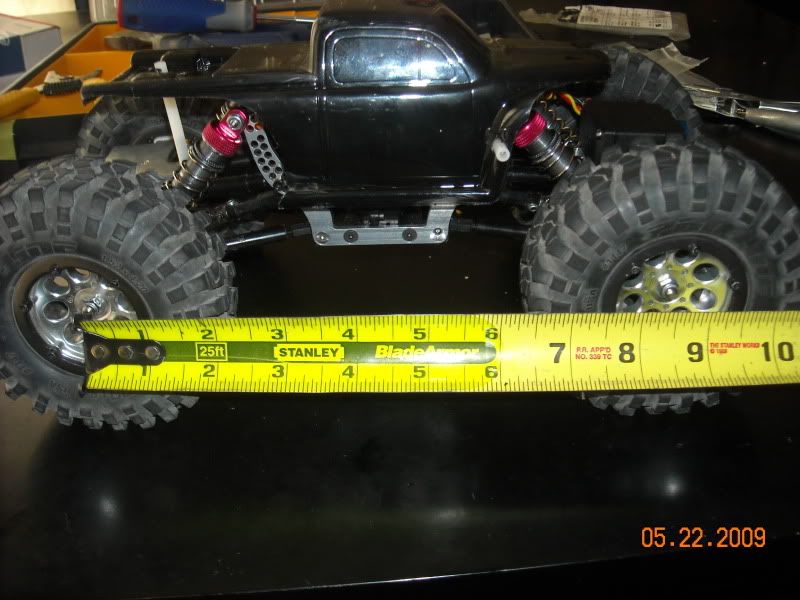 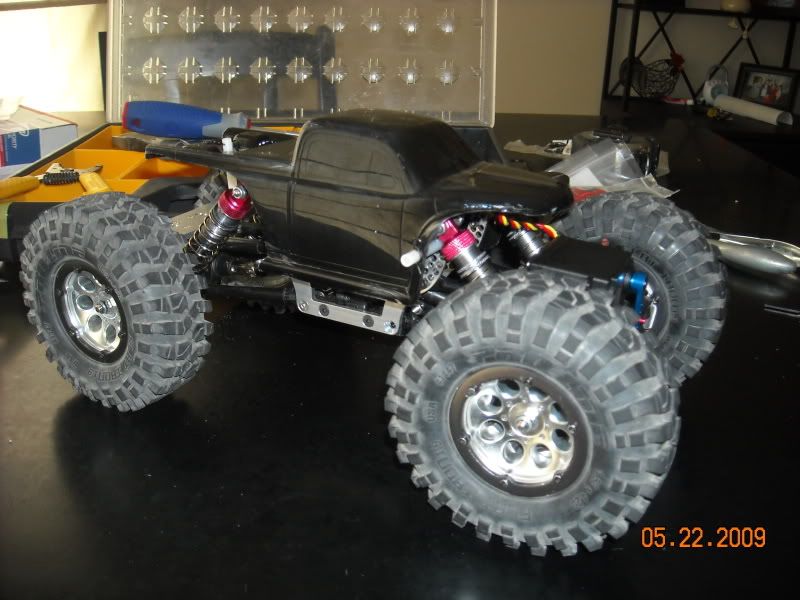 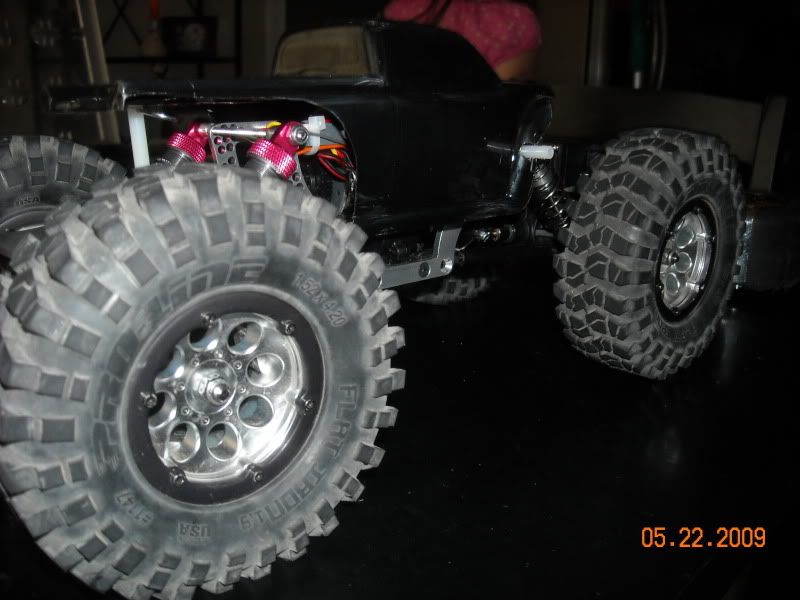 Well fellas I should have the batteries, and the springs all set up in a bit and will post pics when I'm done. Darryl |
|
| |
|
05-22-2009, 10:23 PM
| #12 |
| Quarry Creeper Join Date: Oct 2008 Location: Crawlin' in NorCal!
Posts: 416
|
damn dude your wife doesn't let you talk much does she??? J/k, nice build up man very good explanation of what ya got going on! |
|
| |
|
05-23-2009, 04:59 AM
| #13 |
| I wanna be Dave Join Date: Mar 2008 Location: In the Dark Edges of your Mind
Posts: 6,386
|
I noticed weights stuck on your wheels. How much does each f/r wheel/tire combo weigh?
|
|
| |
|
05-23-2009, 06:26 AM
| #14 | |
| Rock Crawler Join Date: Mar 2009 Location: Cottontown
Posts: 880
| Quote:
| |
|
| |
|
05-23-2009, 03:55 PM
| #15 |
| Rock Crawler Join Date: Feb 2009 Location: Surprise, Az
Posts: 848
|
Doesn't the body limit the articulation with the body mount on the rear axle?
|
|
| |
|
05-23-2009, 07:38 PM
| #16 | |
| Rock Crawler Join Date: Mar 2009 Location: Cottontown
Posts: 880
| Quote:
On the subject of testing.... I got some new pics with my rig doing some real climbing on some big, sharp, jagged rocks... They will be posted first thing in the morning... should be around 7 am. So stay tuned | |
|
| |
|
05-26-2009, 08:35 AM
| #17 |
| Rock Crawler Join Date: Mar 2009 Location: Cottontown
Posts: 880
|
O.k. I have been building and testing my miXer for a little over a week now. I finally have it set up to what I think is the perfect compromise for the diffrent terrains that I crawl on. I have been promising a tips and tricks section to help with your build. I could have posted this last week, but I felt that as much time as RcBros put into building their miXer chassis, that I owed it to them to test the thing pretty well, and try lots of diffrent setups before I posted any kind of tips. I can be pretty long winded at times, so I'm gonna try to keep this short and sweet. Without further delay... Chassis setup tips. 1st. File down the leading and trailing edges of the skid before you "finish" mount it. Keeps you from having to do it later. You can use a dremel, or a file. I used a file. 2nd. When installing the lower link bolts. Run one in from right side of the chassis, and one in on the left. IMO, this cross bolting adds a little extra support of the skid to chassis. 3rd. File, or Dremel the motor gear relief that is already pre-cut into the chassis. You only need to file it a little, to get the motor to where it needs to be. 4th. Mount the motor in the 2nd set of holes, this balances out the driveshafts and will help them from twisting. This will also give you a good place to mount your ESC. Link setup tips. 1st. I have found through my testing that most of the "hang ups" occur not at the skid, but rather the Traxxass rod ends. So, take some time to taper them so there is a nice smooth slope to ease the transition from end-link to skid. 2nd. IF you are going to "extend" the links (buy leaving the endlinks out a little) then be sure to install a spacer in between the endlink and the link material. Not that I think it will be a problem as far as breakage, but it creates a rough edge for hang ups. 3rd. Be sure to run a 3mm tap through the links before you try to run the set screws into the links, or the endlinks. This GREATLY aids, and speeds up the installation. 4th. Mount the lower links to the skid bolt as far to the outside edge of the skid as possible, when you have finished attatching the axles, then you can move them inboard. 5th. Be sure to loc-tite the tiny nuts that hold the upper links to the 4-link plates. Don't be excessive with the loc-tite, but not use to little either. If you don't loc-tite them they will come loose, creating a lot of lateral movement at the axle. 6th. Mount the upper links to the second hole of the 4-link plates, both front and rear. 7th. Mount the upper links to the chassis with the stock 3 link nuts and bolts from the stock Losi TVP's. this will eliminate any rubbing issues. Servo mounting. 1st. If your poor like me, or are just looking for a cheap alternative to mounting the Servo, then use the stock servo mounts. Clip the little tab off the back side of the mount, use a razor knife and slightly "clearance" the underside of the servo mount so that it will fit into the 4-link slot. Drill a hole with in the bottom of the servo with a 5/16ths bit, and then tap with a 4/40, or 3mm tap. 2nd. Your (or at least my) steering arm would no longer fit, so make one out of either delring, or do what I did, and make one out of 4/40 all thread, and one of the losi lower link ends and a DuBro 4-40 ball end link with the ball removed. Use a ball end from the stock Losi shock mount and thread it from the inside of the servo horn, grind off as needed. Shocks. 1st. Running the stock shocks does provide a little more clearance for the upper links, If you are going to run them, then be sure to use at least 50wt oil, and limit them internally 3/8ths of an inch. This will keep the truck down to a 2" belly height. Strongly consider getting the Losi Mini-T upgrade springs, If you do, run the blues in the rear, and greens up front. 2nd. If you have the RcBros shocks (as I do) then use a piece of nitro fuel tubing to slide through the bottom mount so that the lower link doesnt "walk" in the axle mount. 3rd. When mounting them to the chassis, mount them either the first three, or second row upper 2 mounting holes. In my experience, any farther lays the shocks to flat and hurts their ability to work. 4th. Use the "silver" ball ends to mount the shocks to the upper chassis. Use 4.40ss allthread to make a bar long enough to go through the chassis, and through the ball ends. Mount the ball ends with the ball facing outward. Use 4.40 nuts to hold them in place. Be sure not to tighten them down to much as you will bend the chassis. Other tips. Dont even consider using the any of the springs that come with your RcBros shocks... they are way to stiff. Do make sure to get the upper links the right length. You dont want your pinion angle to be to steep, or your 4-link plates to be rotated down. You want them as close to flat as you can be without hurting the pinion angle. Dont be scared to push this chassis. It can take a beating. Do try to make it flip. You'll find just how far you can push it this way. Dont be a sissy, find those rocks you couldn't even dream of getting up before, and go destroy them. Do get some good tires. I like the G8 FlatIrons. The blue claws are also good. Dont rush through the build. Take your time. If you dont, you'll just be tearing it apart to redo somethings you missed. Do try several different setups. There's lots of em. Find the one that works for you. Thats about it. I would like to take time to say thanks to William at RcBros. He has been more than helpfull and always took the time to answer every question I had, and also provided me with his "setup" on his miXer so that I would have a decent baseline. Having good customer service is a long lost idea in the world today. But RcBros really, really takes care of you, They go out of their way to make sure your happy. Congrats to them for building one of, if not the very best chassis on the market. Their dedication to building a strong product should be well noted. If you are considering getting a chassis kit for you MRC, the miXer should be at the very top of your list. You wont find a better kit, and deffinatly not when you consider the price. Around 50 bucks. Last edited by soundcolor; 05-26-2009 at 08:46 AM. |
|
| |
|
05-26-2009, 01:27 PM
| #18 |
| I wanna be Dave Join Date: Mar 2008 Location: In the Dark Edges of your Mind
Posts: 6,386
|
That's a lot of info I just ordered the RCBros shocks and the orange springs. I hear they are the ticket The chisels showed up today too so I will finally be able to start my tuning for real now. I couldn't tell jack poo with the stock tires |
|
| |
|
05-26-2009, 01:53 PM
| #19 | |
| RCC Addict Join Date: Mar 2009 Location: Chilton
Posts: 1,622
| Quote:
| |
|
| |
|
05-26-2009, 02:57 PM
| #20 |
| Rock Crawler Join Date: Mar 2009 Location: Cottontown
Posts: 880
|
Any plastic, or metal that is 1/4 inch in overall diameter will work. If you are using something that doesn't have a hole pre-drilled, then just drill and tap. If it does have a hole, then just tap for the set screw and your good. If you find something that has a larger inside hole than the set screw, you should still be fine, just make sure you have a good bond with the set screw and the endlink.
|
|
| |
|
| |


 Linear Mode


