| |
| |||||||
 |
| | LinkBack | Thread Tools | Display Modes |
 02-15-2010, 06:40 PM
| #1 |
| Newbie Join Date: Feb 2010 Location: West Jordan
Posts: 38
|
I picked up a Losi MRC for my 11 year old son last Xmas to take with us on our Jeep runs. It has been a great bonding toy for us with all the maintenance, repair and upgrading that we go through. Not to mention the play time. We decided to step it up this season and go for a chassis upgrade. This will be our first build so any insight and/or suggestions are welcome. Modifications to date: - Metal differential lockers (front & rear) - Losi 1.9 aluminum beadlocks - Pro line 1.9 flat irons (mini BFG KM2’s) - Losi 12mm aluminum wheel hex set - we have also replaced a drive shaft and motor but with stock/factory replacement parts. Being fairly new into RC crawling we weren’t sure what chassis to go with. So we looked around at the LHS’s and seen what others were using and how they liked them. The chassis we chose to go with is the Mini NiNo2 from Chaotic Crawlers. We liked the fact that the fabricator of the chassis is local, we hadn’t heard any bad and the price was very reasonable. New items to incorporate: - Mini NiNo2 Chassis - Losi aluminum threaded shocks We picked the chassis up Saturday (2/6/10) and have been fiddling with it since. Here are some pics of the chassis compared to stock: 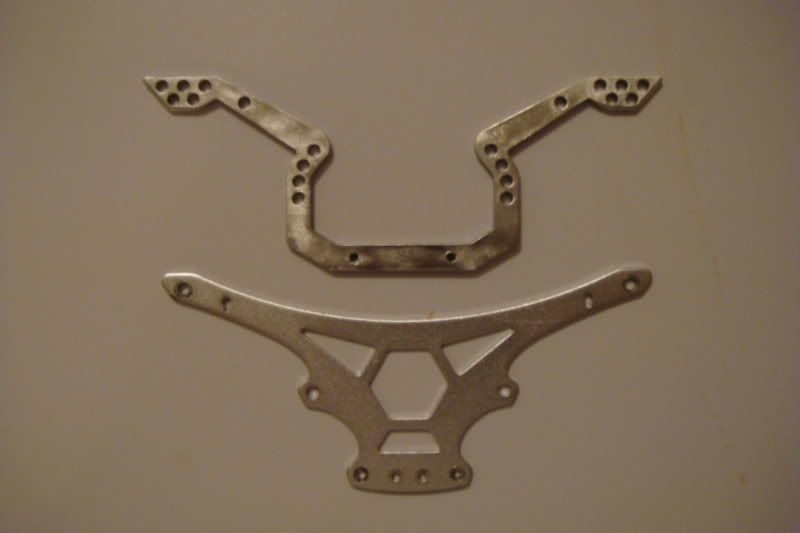 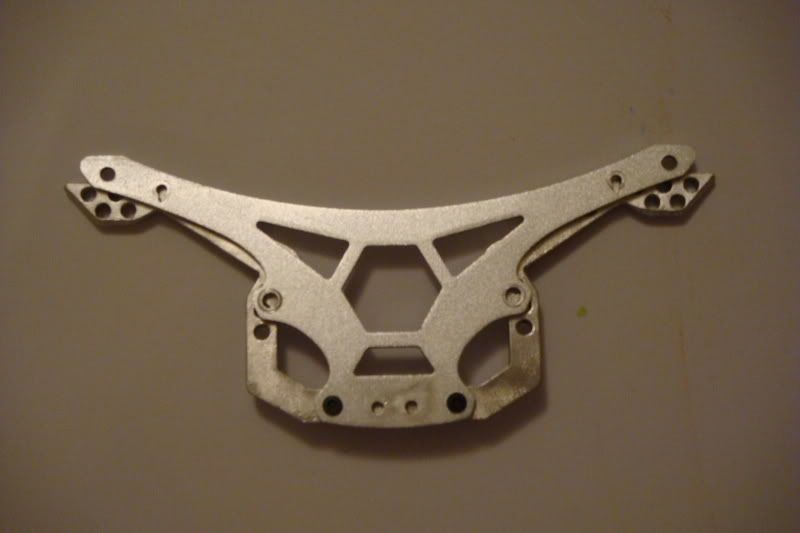 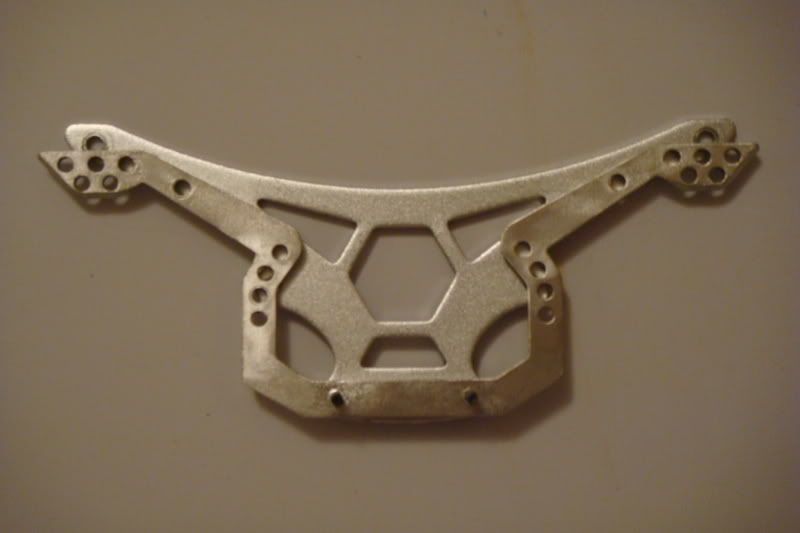 Last edited by scrogg; 02-15-2010 at 06:44 PM. |

|  |
| Sponsored Links | |
| | |
|
02-15-2010, 06:45 PM
| #2 |
| Quarry Creeper Join Date: Dec 2009 Location: Jacksonville, FL
Posts: 273
|
Nice. That's a chassis I would like to try if I get sick of my GC3.
|
|
| |
|
02-15-2010, 07:01 PM
| #3 |
| Newbie Join Date: Feb 2010 Location: West Jordan
Posts: 38
|
We have worked on this for about a total of 16 hours since picking up the chassis, not including time spent at LHS’s or online here. At this time we are still using the plastic upper Y-arms. We were able to get everything put together without any binding of the suspension components. It's kinda tough to see but we ground the sharp corner edges of the chassis where the shocks mount. The Losi shocks were rubbing against it. They could use another millimeter in height between the top of the shock and the center of mounting hole. Or I guess you could push them further away from the chassis but we opted for a little grinding. The only interference issue that we have is between the front tires and the shocks. The tire will hit the shock at full lock prior to full compression of the suspension. I believe this to be mostly due to the size of the flat irons since they are about 3/8” bigger in diameter than the stock tires. There is no interference when the stock tires are on. Here are a few pics of it at it's current stage: 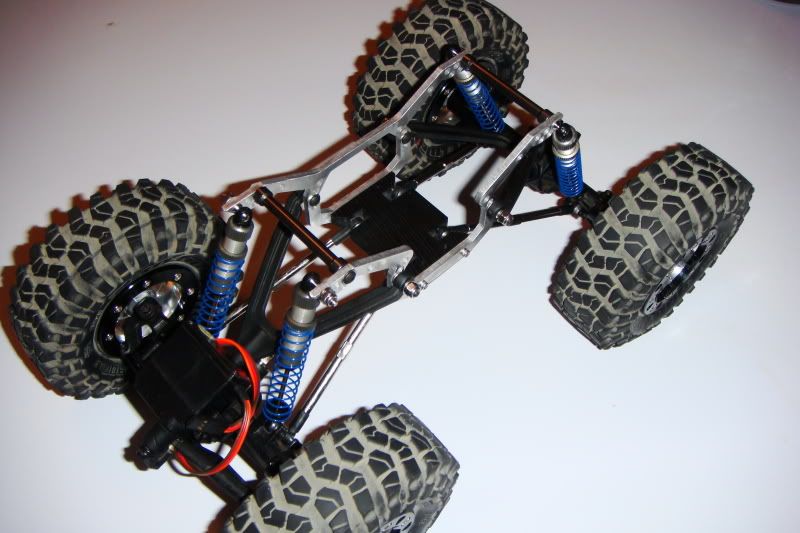  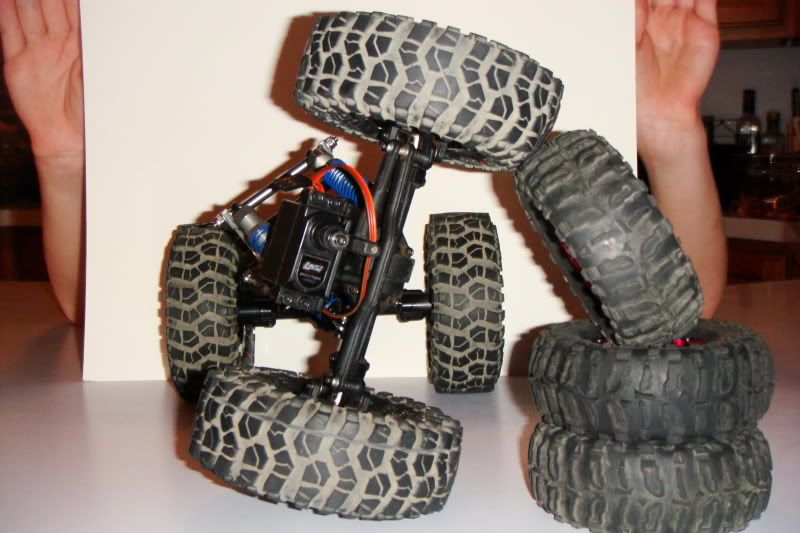 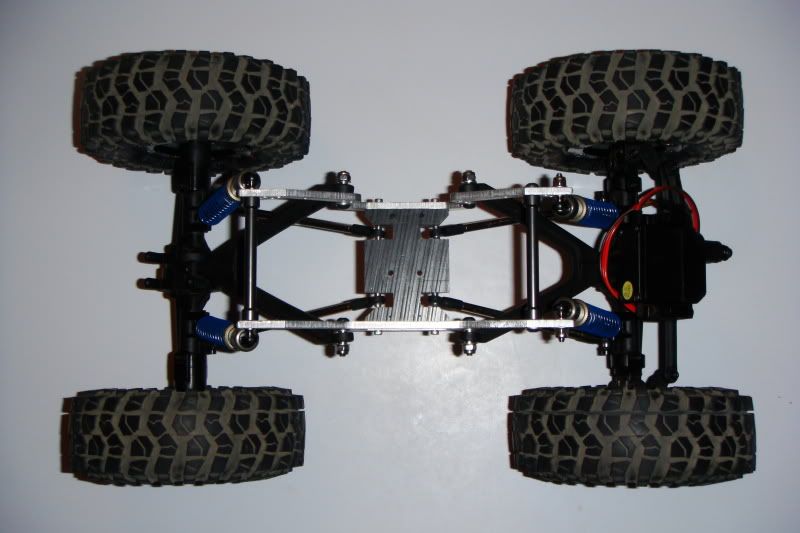 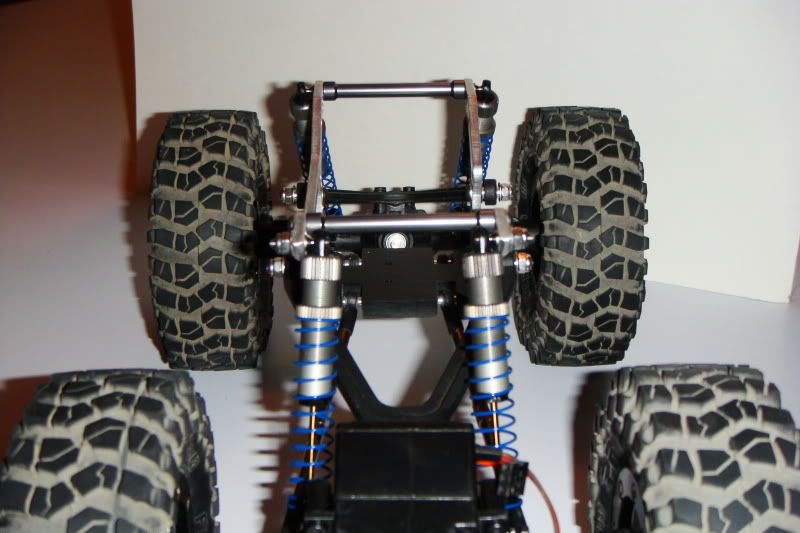 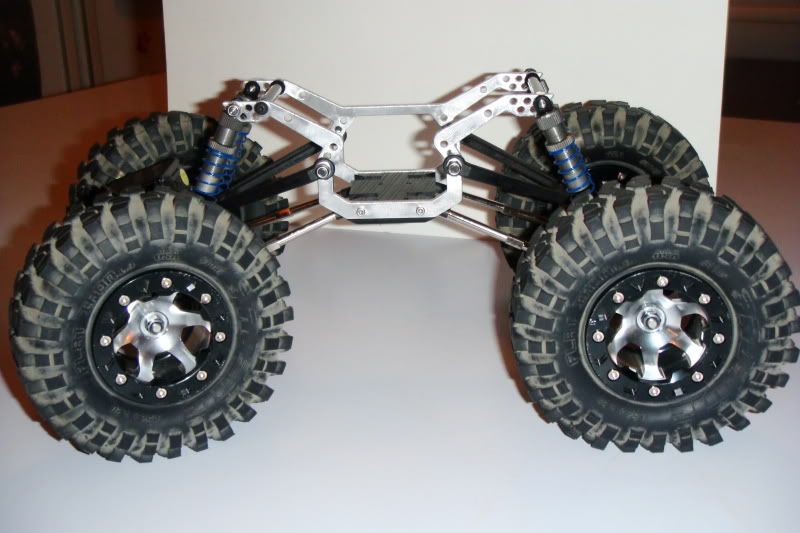 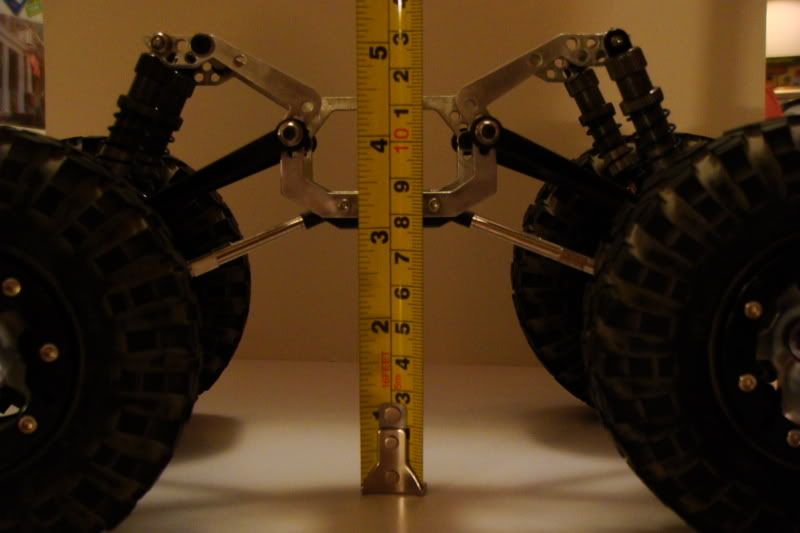 We are pleased so far as to how things are coming along. Although we have noticed that even though you have several holes in the chassis for mounting options, not all were feasible to us. Where the front upper link mounts to the chassis on the closed chassis side, the third hole up is completely blocked by the motor/trans. The only way I seen to make this hole usable is to counter sink a bolt from the inside. I am surprised at how long it took us to get the chassis set up this far. Next up is 4-linking the rear. It would appear as though we are going to lose some articulation with the four link but if it eliminates alot of TT then I think the trade will be acceptable. Last edited by scrogg; 02-18-2010 at 12:33 PM. |
|
| |
|
02-15-2010, 08:58 PM
| #4 |
| I wanna be Dave Join Date: Dec 2008 Location: anderson
Posts: 2,288
|
looks good but i would turn the perloads up on it to get it down lower . you should have about 2 2 1/2 belly closer to 2
|
|
| |
|
02-16-2010, 12:43 AM
| #5 |
| Moderator   Join Date: Sep 2008 Location: PA
Posts: 13,935
|
I've always liked the look of this chassis. It's going to be a cool build for sure. I have to say my Flat Irons rub my Losi shocks on my stock MRC before I limited the shocks. They might still rub a bit. I don't remember. But you definitely need to limit the travel on those shocks! |
|
| |
|
02-16-2010, 08:30 AM
| #6 |
| Rock Crawler  Join Date: Mar 2009 Location: West of Eugene, OR
Posts: 942
|
She's looking good. Glad to hear it's been a good motivator for additional bonding time. As suggested, don't worry about losing some articulation: that picture definitely shows that you've too much already. A good place to start is about a tire's height. It doesn't sound like much, but more articulation is not always better as it makes the rig unstable on the rocks. 3" is awfully high. It looks cool, but it's going to keep/put your Center Of Gravity higher than is practical; and with too much articulation it's going to be even a bigger challenge to drive. Getting up and down inclines, or sidehilling, she's going to be be more prone to rolling end over end, or sideways. I'd drop the rig an inch and go from there, maybe even a little lower, considering those tall Flat Irons will help with ground clearance. If you're not going to make your own, you might check out RCBros (a vendor here), as they sell individual axle plates for Four Linking the front and rear of the MRC. Though you might ask around to verify clearance between the axle plates and shocks, etc. |
|
| |
|
02-16-2010, 10:16 AM
| #7 |
| Newbie Join Date: Feb 2010 Location: West Jordan
Posts: 38
|
We are planning to get the belly lower to somewhere in the 2.25" to 2.5" range. We didn't really want to go to a full droop setup since the primary use of the rig is just for play time on the Jeep runs. Maybe in the future we'll look into actual competitions but I think we're a ways away from that now. Threading the shock ring all the way up lowered it about .375". My concern there was about losing the lower spring seats when drooped which happened with our stock shocks. any ideas on how to keep those things from popping of without glueing them in place? Was cosidering internal springs but need to look into those more. This chassis came with plates to mount to the top of the axles for 4-linking the front and rear. We are using those, or at least the one for the rear to set the rear up. The front plate has some interference with the shocks when articulating so the front will remain a 3-link for now. Thanks for all the feedback guys. |
|
| |
|
02-16-2010, 08:16 PM
| #8 |
| I wanna be Dave Join Date: Jun 2005 Location: drillin Holes for the man
Posts: 2,736
|
I would suggest adding a .4" piece of fuel tubing to the inside of the shock to limit them. That way they will keep the springs seated on the cups, as well as lower it and limit the flex some " you have way to much right now ".  This will also fix the problem with the front upper link mount as well. This will also fix the problem with the front upper link mount as well.
|
|
| |
|
02-22-2010, 03:23 PM
| #9 |
| Newbie Join Date: Feb 2010 Location: West Jordan
Posts: 38
|
Made some more progress on the build. The 4-link rear is completed and I am very pleased to say the least. I used a pair of 45mm frame braces for the link itself, a set of bent rod ends at the chassis end and normal rod ends at the axle ends. We also upgraded to some bent lower links. 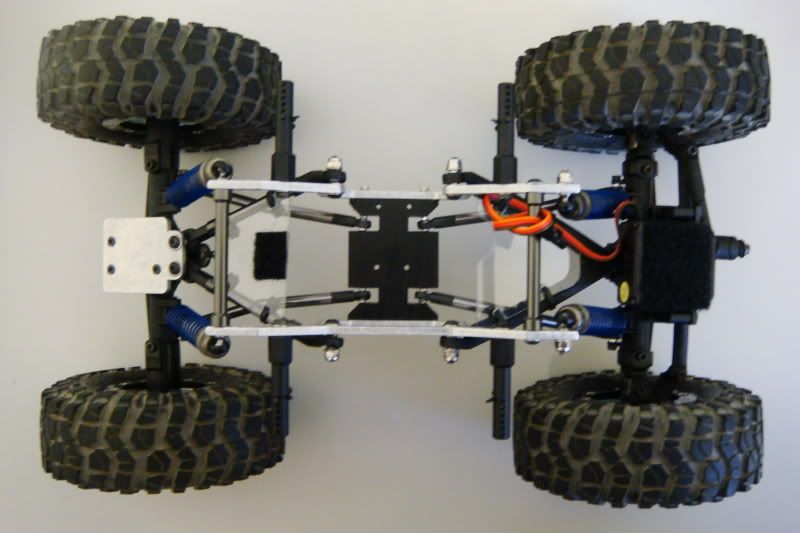 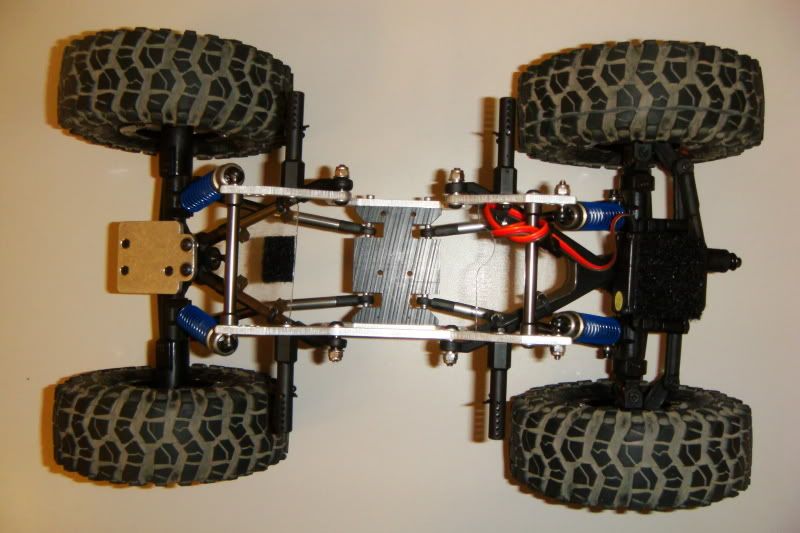 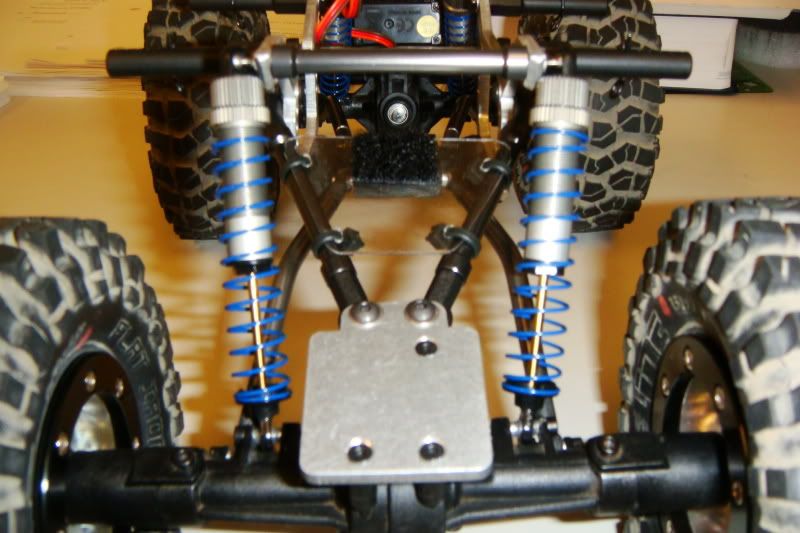 I also put a .3125 (5/16") length of fuel tubing inside the shocks to limit thier extension and then lowered them. It now has a belly height of about 2.4375" (2 7/16") with the flat irons installed, and 2.25" (2 1/4") with the factory wheels/tires. 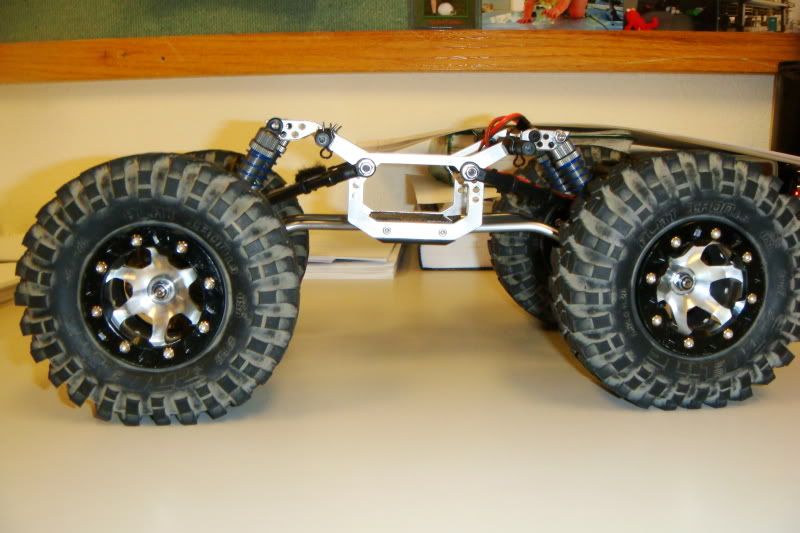 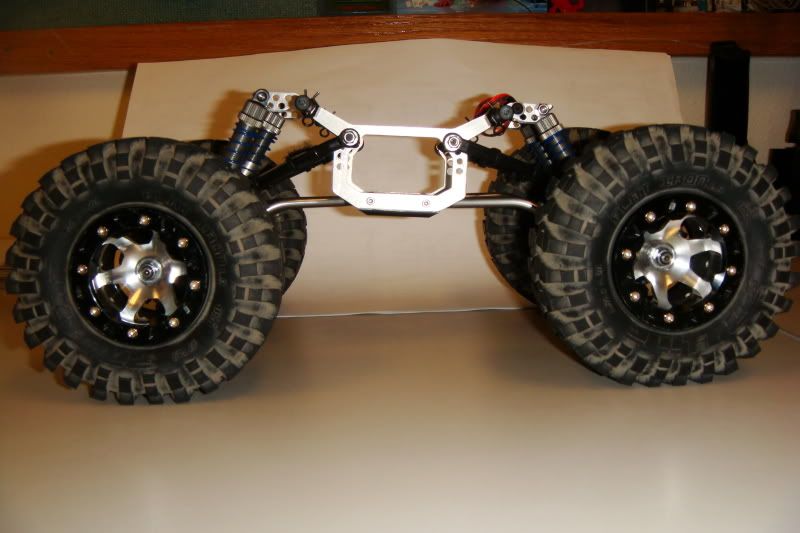 |
|
| |
|
02-22-2010, 03:29 PM
| #10 |
| Newbie Join Date: Feb 2010 Location: West Jordan
Posts: 38
|
There is no binding on any of the components and plenty of flex to boot. We did lose a little bit of the flex but it still has plenty now: 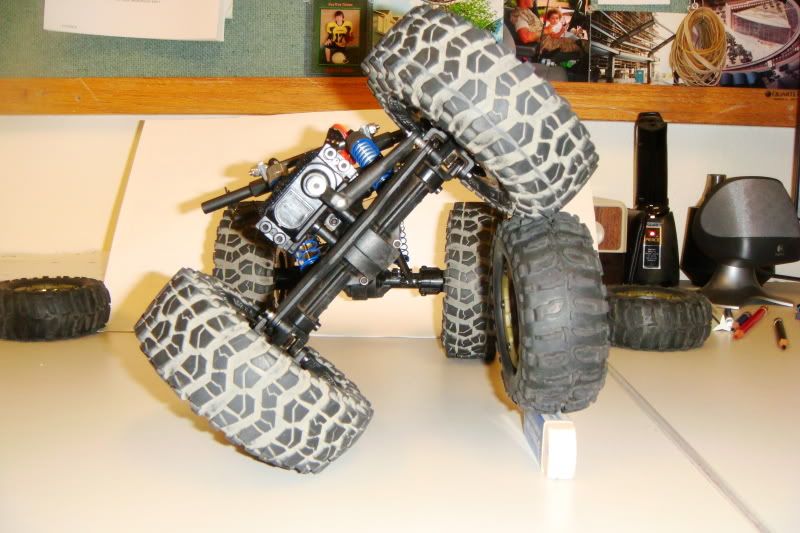 And set up as it is now the front tires don't hit the shocks at full lock and flexed. 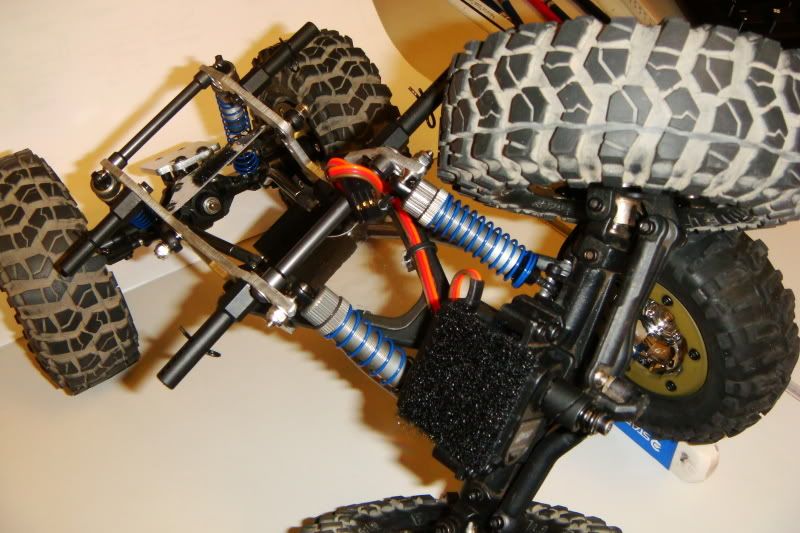 We did this with high hopes of eliminating some of the torque twist. so after we got this far we temporarily put it all together and drove to see how it worked out. It still has a little bit of TT but no where near the amount it used to. It was definitely worth doing to get rid of all that it did. |
|
| |
|
02-22-2010, 03:33 PM
| #11 |
| Newbie Join Date: Feb 2010 Location: West Jordan
Posts: 38
|
I let my son pick out and paint whatever body he wanted. He found a Halo Warthog body on ebay and that is what he chose. It's a little bit big for the MRC but with the factory wheels/tires it'll work out ok. It's gonna sit pretty high though. He painted the rings to match. 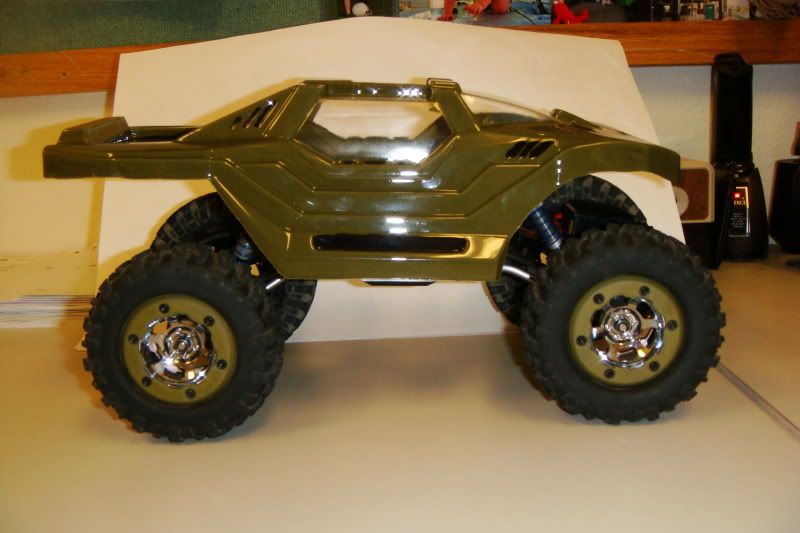 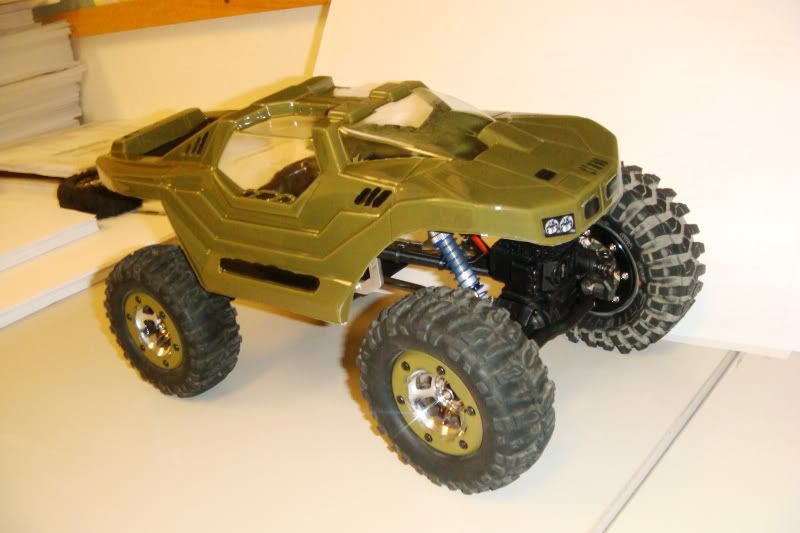 |
|
| |
|
02-27-2010, 02:43 PM
| #12 | |
| Quarry Creeper Join Date: May 2007 Location: home
Posts: 369
| Quote:
A way to fix the angle of your rear shocks is to mount them on the outer side of you axle. I used an extra ball from the shock end in the stock location then put a longer screw thru it. Check out the pic.  What problems with binding were you having with the front 4 link? I think possibly your shocks binding with the front 4 links is because your just running way too much flex. Flex is awesome for pictures but just has been proven too much doesnt perform well. Other than that build is looking awesome. Have you run the rig yet?? Click Here for a link to my build with the same chassis. It might help out. | |
|
| |
|
02-27-2010, 05:29 PM
| #13 |
| Rock Crawler Join Date: Mar 2009 Location: Frisco, Texas
Posts: 721
|
nice body!!! love the worK!! ;)
|
|
| |
|
03-01-2010, 12:22 PM
| #14 | |
| Newbie Join Date: Feb 2010 Location: West Jordan
Posts: 38
| Quote:
We have worked out the front since. We stripped the gears in the stock servo and got a full size (hitech 645) and used the front plate that came with the chassis. I reduced the pinion angle of the front axle a bit so that the servo/plate are closer to being level and used a pair of tie rod style rod ends that were on that same parts tree (#AX80005). The front has no binding at all now. I'll have to post some pics. I did see that you mounted the rear shocks on the outsides of the axle brackets (if you can call them that). I considered doing that but after the little bit of grinding to the frame all is good. We have run some. Mostly in the living room from floor to love seat to couch using the throw pillows in strategic locations. We also took it out to intermountain rc raceway to play in the rock garden for a bit. It did pretty good. We watched a couple others that could easily out perform ours but they were in full droop set up and the drivers were far more experienced than we were. It was cool to see. Last edited by scrogg; 03-03-2010 at 10:13 AM. | |
|
| |
|
03-01-2010, 12:23 PM
| #15 | |
| Newbie Join Date: Feb 2010 Location: West Jordan
Posts: 38
| Quote:
| |
|
| |
|
02-22-2012, 11:27 PM
| #16 |
| Newbie Join Date: Feb 2010 Location: West Jordan
Posts: 38
|
Wow, almost 2 years since the last post. We've done a few things since the last post. 4 linked the front, Replaced the motor twice with the most recent being an Insane 370. I really like this motor. It added lots of speed, which we then changed out the pinion gear from the factory 14 tooth to an 11 tooth. Slowed her down some and definitely added some good torque. Which can only help turn these Pro Line Flat Iron tires that are bigger than most other 1.9 tires out there. Ya gotta love that KM2 look. Here are a few gratuitous pics: 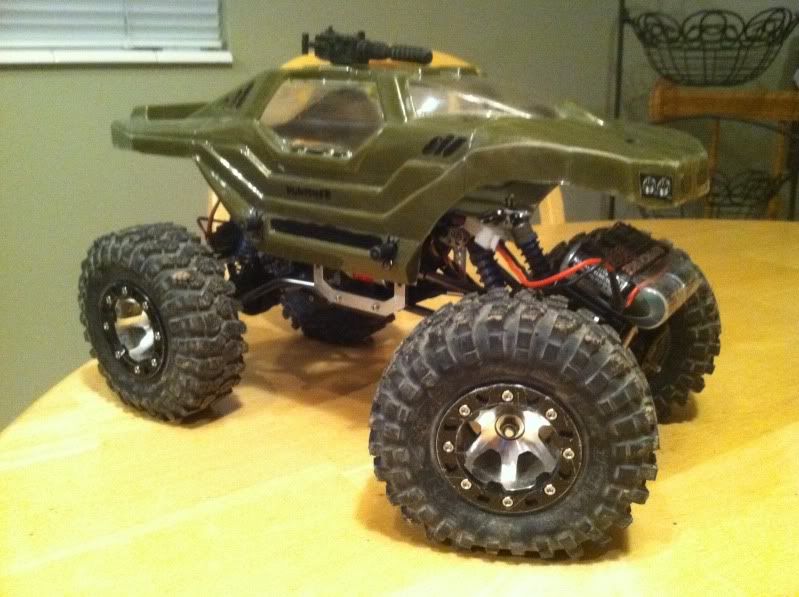 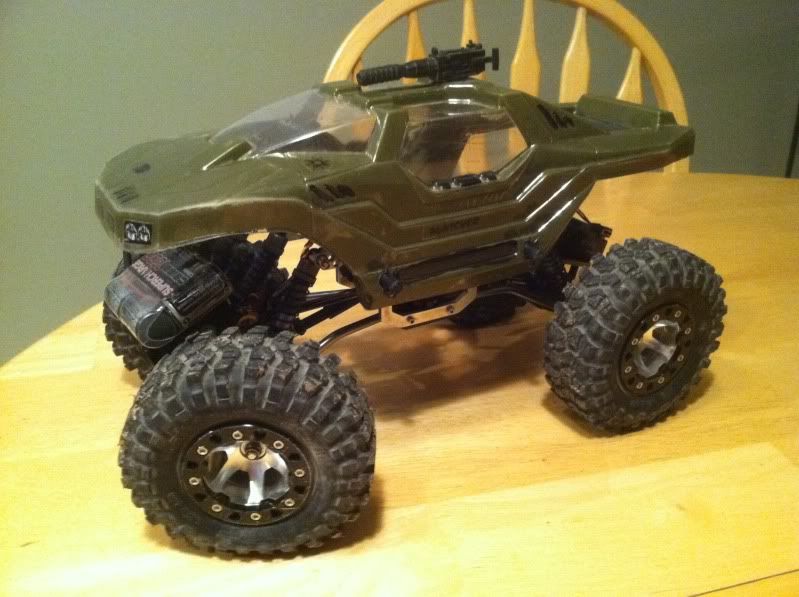 She still has plenty of flex and with no binding or rubbing: 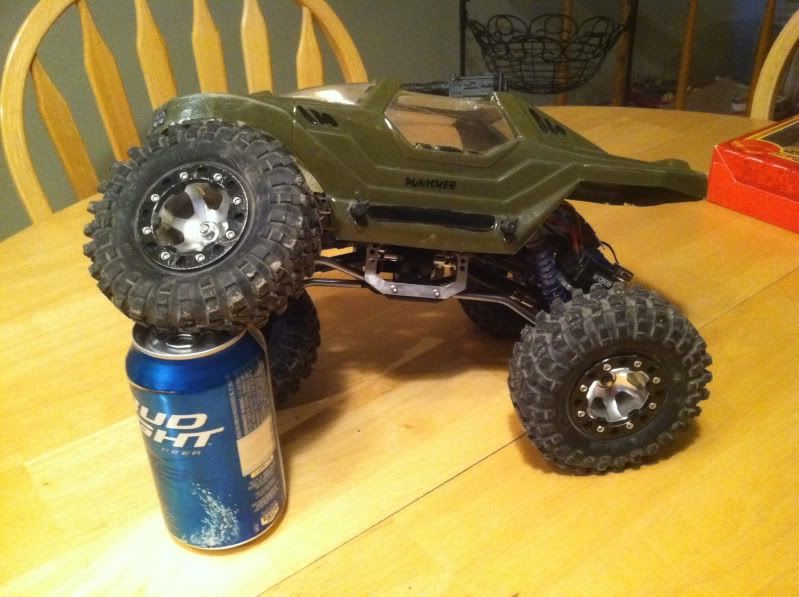 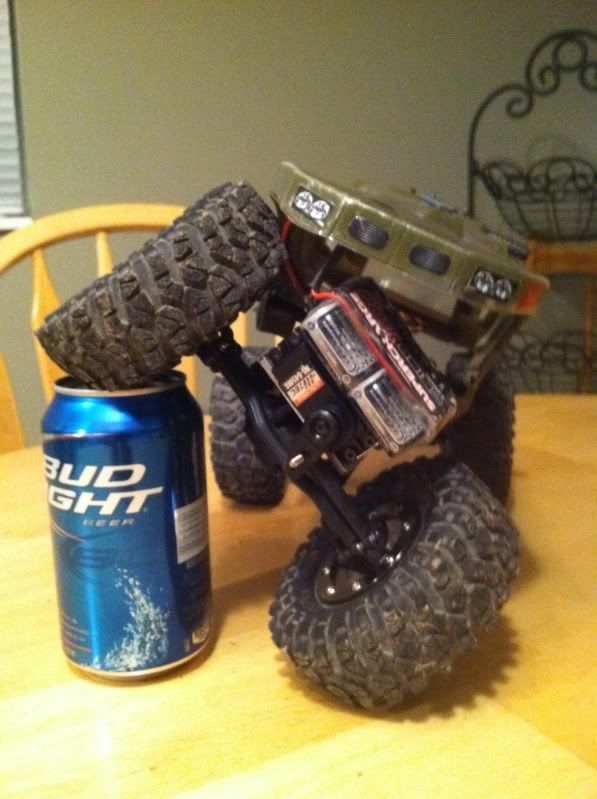 A close up of the 4 link systems: rear: 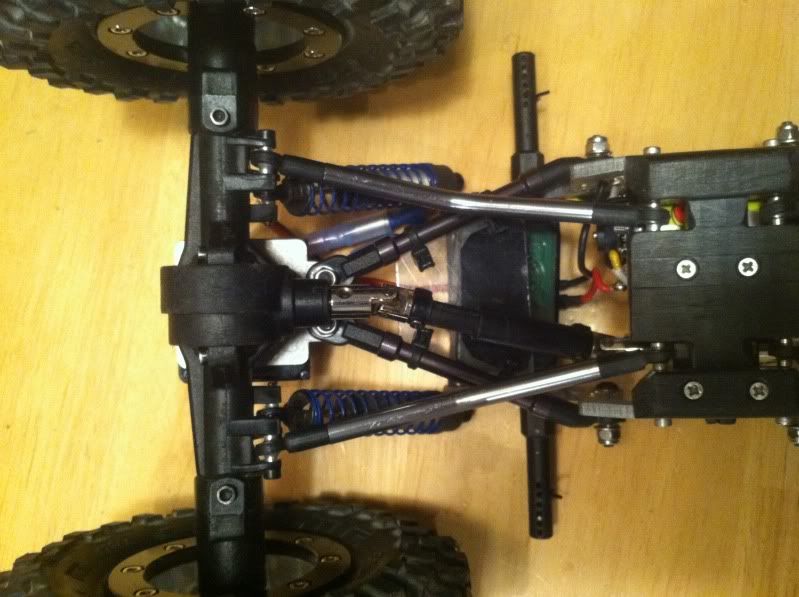 front: 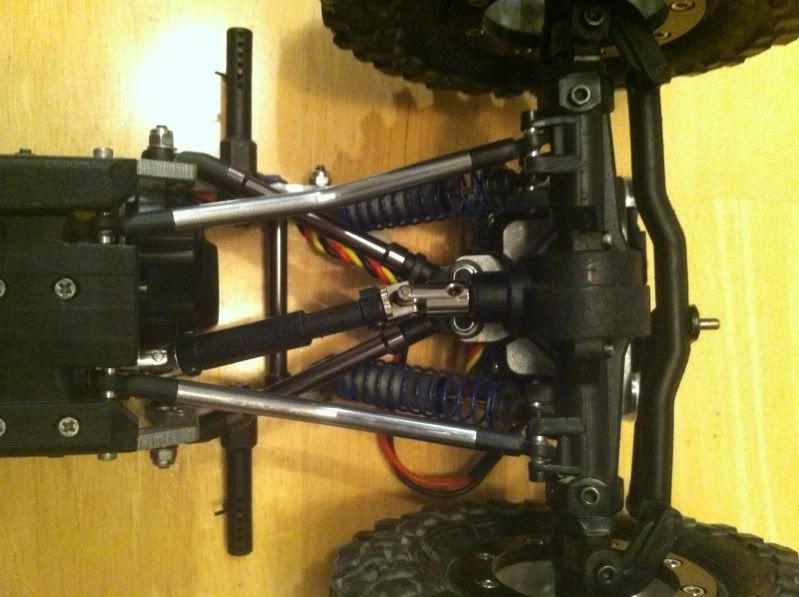 overall top view: 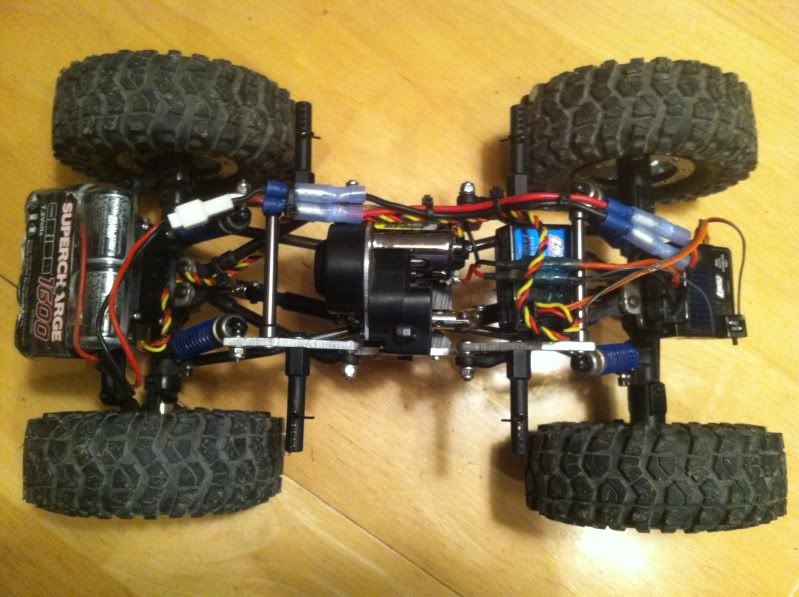 I know it looks like it sits high, and it does for sure compared to all the comp rigs out there. But if you notice that the the body posts are nearly at the highest point on the chassis and that there isn't much of anything above them, then it's only the body that sits high: 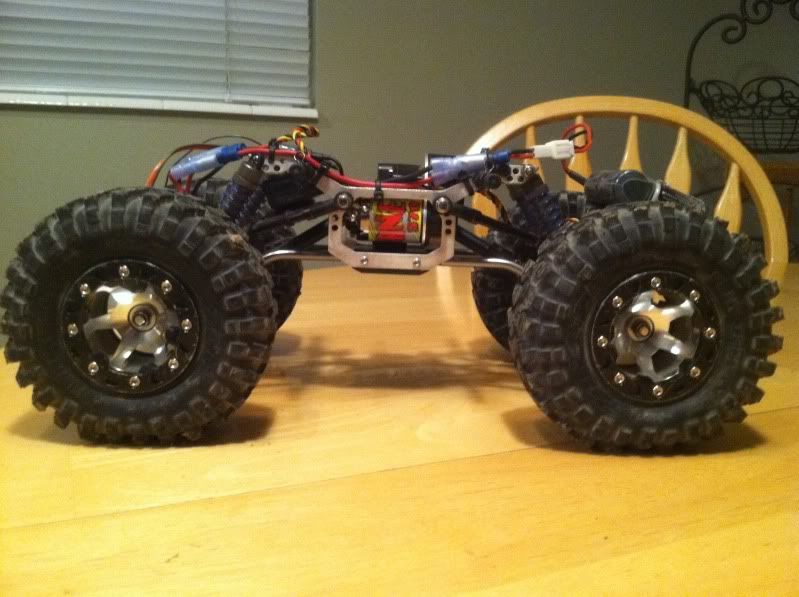 This thing has provided tons of entertainment for us. Wether it be on trail in the big Jeep or at home in the backyard, or even in the house albeit against the wishes of the Mrs. Only a couple other things that I am planning to do still which are outboard the rear shocks at the axle mount end and an RCBROS OTA front steering system if I can ever catch the high steer knuckles while in stock. Eventually maybe get different axles and drive shafts, CV style that is. Oh, and of course..., I wanna build another one. But don't we all?! Last edited by scrogg; 02-22-2012 at 11:30 PM. |
|
| |
|
| |


 Linear Mode


