| |
| |||||||
 |
| | LinkBack | Thread Tools | Display Modes |
 04-24-2018, 07:44 AM
| #1 |
| Rock Stacker Join Date: Aug 2017 Location: UK
Posts: 99
|
Always wanted a multi axled rig ! I'm not 100% sure of the origins of this particular body but I think it might be one made by another forum member "Dready" a while back????  Seeing as of late I seem to be a touch obsessed with building roll cages and full custom chassis out of tube - it was always a given that this truck would feature a full eco-cage on the cab unit. The chassis has been made by utilising some of the cheapo chinese scx10 style knock off chassis rails that I had lying around, trimmed to suit and welded together with plenty of cross bracing. First thing to do was make the cage for the cab which is a combo of 4mm stainless tubing and 6mm solid for the bits likely to take the hits (plus - that's all I had knocking around and want to keep the costs down on this build if I can) Also - let me apologise for the slightly naff photos - I do most of the work in a very dark car-port late at night! This is the results of the first afternoon making the cage I've never used a totally hand build body before so not sure as to how strong they are - so I might have gone a bit overboard on the protection - but hey - I like the look of it.  - - - Updated - - - This is the truck I'm taking inspiration from   The chassis plans are for a 6x6 using scx10 axles with overdrive in the front to help with turning circle and a pass through drive shaft SSD Scale transmission Chassis mounted servo LOTS of LEDs LOTS of scale accessories originally for the rear 2 axles I was planning on using some kind of walking beam system just to be a bit different. So I tabbed up a system whereby the 2 x rear axles were tied together and then kind of a pivoted 4 link system running above them in the middle - so came up with this    I worked GREAT - BUT - there was sooo much travel in the suspension that it was giving me drive shaft length issues due to the massive swing up/down it gave So in the end I've resorted to a traditional 4 link on the 2 x rear axles with the rear most axles links mounting to some custom brackets I've slung down from between the chassis rails.   Wheels are all 1.55 SSD Steel beadlocks with 1.55 Pitbull Growlers fitted  and when using a nice and short metal Cross RC Driveshaft the wheels end up nice and close Still testing out various shocks for the rear but so far 70mm MST Shocks seem to work the best - mounted straight to the chassis rails. The axles are now the metal Boom Racing SCX10 housings which for the money, I'm really pleased with sorted out my lighting layout  and made a massive front bumper using the steel case of an old PC Network switch unit we had lying around at work :biggthumpup:  Also decided that the spare wheel carrier on the cab had to be functional - so made a swing down bracket on the cage  The whole front cab is suspended through the roof and secured to tabs I welded onto the cage. I made a hinged front mount for the cage that bolts onto the front chassis rails which means the entire front cab section can be tilted up to allow super easy access to the motor / servo area etc. For the rear bed I've started out with a simple framework of 6mm tube steel which is bolted to the chassis rails, and it also acts as the rear support for the hinged cab Then added more tube work to the frame to strengthen it up a bit and to also reflect the 1:1 truck providing the inspiration threaded tabs have been added to frame to support an aluminium sheet "deck"   As the front cage, front mounted motor & gearbox has made this a VERY front heavy vehicle I decided that I should try to get the battery mounted towards the back - so made a hinged "tailgate" section on the back panel which allows access to the area between the rear chassis rails.  I've then made a kind of cage section which holds a 5000mah 3S lip high enough to not cause any interference with the rear axle pumpkin.  Next it was time to start thinking about accessories! After tinkering for a few hours on tinkercad I came up with this design for a fuel tank to sit at the very back - just like the 1:1 truck   which lead to this  which after a bit of sanding and filling lead to this......  Also needed a pair of sand ladders for the back of the truck (again - just like the 1:1 version) came up trumps again with the 3D printer and knocked these up   brazed on a few mounting brackets for them too and the ladders are now held on with M3 thumb screws. And added some tail light housings and shackles to the back along with "boxing in" the side panels of the bed to hide away some of the chassis. In the above photo you can also just make out the 2 x cross bars I've added running between the top of the cab cage and the middle bit of the rear bed tube work. These are basically just ultra long link rods with revo ball ends - so they just add a bit more to the cage protection (protecting the forthcoming shipping container) but they also act as the hold downs for the cab - stopping it tilting forwards on its own. We then need some kind of shipping container for the back too - so found an "Italeri" 1:35 scale 20ft shipping container kit on ebay which seems to be around about the right size to mirror the 1:1 trucks storage container.  then on to paint! whilst looking around at various cams painting techniques I came across this picture of a gun  liked what I saw - so started playing around with rattle cans and using garden foliage for stencils and came up with this!  Liking what I saw with the paint job on the container I carried on to the body work / chassis / roll cage using the same technique of using various garden leafs / twigs as stencils    really happy with how it's turned out. spraying the hell out of it with lacquer has also caused some "crazing" of the paint which in my opinion has added to the paint job! One of the rare times when you are happy with flaws in a paint job :laugh: I made my winch! Took a metal geared servo - did a servo winch mod to it, removed the potentiometer and replaced with 2 x 2.2kOhm resistors to try and limit creep. Then made a steel "cage" for the servo and winch "spool"  chucked on an alloy round servo horn, brass tube, flanged bearing, long m3 screw slid through the brass tube.   Then chopped up a plastic chewing gum container to act as faux motor / servo cover, added a bit of styrene to box in the cover and hey presto!   Then made a long stainless tube for the winch line to run through all the way to the fairlead on the front bumper.  The shipping container is now housing most of the electronics - 6 channel receiver, bec, light switches, voltage booster (for the lighting circuits). The ESC is slung underneath the aluminium bed. Onto the interior made a dashboard from styrene  This is velcro'd onto the front of the cockpit - just got to decide whether i'm going to wire it for LEDs or not token storm trooper added  made a seat out of the packing foam the motor came in Made some vinyl decals for the gauges / GPS unit too  Also added a clear lexan front screen I cut and some Cross MC-6 wipers brazed together some soda stream CO2 cartridges (used of course) and these will be mounted to the bed to mirror the 1:1 truck thats providing the inspiration.  - - - Updated - - - the 3D printed fuel tank is now screwed to the main bed and the 3D printed sand ladders have been painted and mounted too  And here is a detail shot showing the rear end and how the battery compartment is accessed.      here are some detail shots of the underside of the chassis and suspension. Axles are all the widely available metal SCX10 style axles - with overdrive gears in the front. For the chassis rails it was simply lengthened SCX10 rails, welded together and cross bracing added. For the rearmost axle, I fabbed up out of steel a drop down section which in turn is braced together to give zero flex. The 4 link system is then connected to that structure to give a super stable mounting system. drive shafts are Axial WB8 HD all round apart from the rear most which is from Cross RC - had to be pretty short to get the 1.55 wheels and tyres close enough together and still give a bit of flex. The links are 6mm OD / 4mm ID Stainless tube 4mm sleeving M4 stainless threaded rod. On the front i'm using SCX10ii Samix shock hoops with the integrated panhard bracket. On the front axle I've fitted an SSD panhard bracket and then bent up a panhard link, again using M4 threaded rod and stainless tubing. Works great with virtually zero bump steer. Front shocks are Traxxas big bores and rears are 70mm ones I had sat around left over from an MST kit.        Here's there functional spare wheel carrier that hinges down.   roll cage bars using rev rod ends - these bars also function by holding the tilting cab down  and when tilted forwards - loads of room for maintenance  Also made a hinged storage crate from styrene  mounted and painted up  and already put some crap in it :biggthumpup:  Last edited by THX_138; 07-09-2018 at 11:04 PM. Reason: Merged, posts a minute apart |

|  |
| Sponsored Links | |
| | |
|
04-24-2018, 07:55 AM
| #2 |
| Rock Crawler  Join Date: Jul 2008 Location: River Falls
Posts: 673
|
Great work!
|
|
| |
|
04-24-2018, 08:16 AM
| #3 |
| RCC Addict Join Date: Aug 2008 Location: Paulina
Posts: 1,213
|
Wow! Nice write and pictures on this one. Great job on the build, it looks fantastic.
|
|
| |
|
04-24-2018, 08:37 AM
| #4 |
| Rock Stacker Join Date: Aug 2017 Location: UK
Posts: 99
|
thanks Still a few more jobs to do but here are a few pictures in the wilds of the garden! it does rather well on the inclines! :wow:       |
|
| |
|
04-26-2018, 02:27 AM
| #5 |
| RCC Addict Join Date: Sep 2015 Location: Southern Maine
Posts: 1,024
|
Amazing work. Perfect paint, perfect scale details, very nicely built chassis. I dont like this body style at all, Im an American big rig guy through and through, BUT, Id be proud of this rig no doubt!! Ben |
|
| |
|
04-26-2018, 03:52 AM
| #6 |
| Rock Stacker Join Date: Aug 2017 Location: UK
Posts: 99
|
Thanks for all the feedback |
|
| |
|
05-07-2018, 11:49 AM
| #7 |
| Newbie Join Date: Dec 2017 Location: Las Vegas
Posts: 46
|
Skillful build. Great write-up.  |
|
| |
|
01-22-2019, 11:03 AM
| #8 |
| Pebble Pounder Join Date: Jan 2019 Location: Douglas, MA
Posts: 104
|
That thing is awesome! Just getting back into RC after about a 10 year hiatus. Bought a Bomber but I have fully caught the sickness looking at these multi axle rigs and am researching for a build... I know it’s been months sense the last post here but I was wondering what you used for winch cable? Couldn’t tell if it is some kind of thread or rope if it’s some kind of small gauge braided wire.
|
|
| |
|
01-22-2019, 12:50 PM
| #9 | |
| Rock Stacker Join Date: Aug 2017 Location: UK
Posts: 99
| Quote:
Thanks. I use 1mm thick Dyneema cord for winch lines Super strong and very easily available online | |
|
| |
|
01-22-2019, 01:00 PM
| #10 |
| Rock Crawler 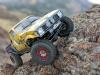 Join Date: Dec 2012 Location: Utah
Posts: 955
|
Very nice build. WOW!
|

| |
|
01-23-2019, 05:29 AM
| #11 |
| Pebble Pounder Join Date: Jan 2019 Location: Douglas, MA
Posts: 104
|
Thanks for the response, don’t know why I didn’t recognize that sense I have spools of 3/16” for making slings for hanging camping hammocks.?
|
|
| |
|
 6x6 MAN KAT Custom Build - Similar Threads
 | ||||
| Thread | Thread Starter | Forum | Replies | Last Post |
| my 6x6 beast man kat | doudou | Multi Axle Rigs | 27 | 12-03-2013 04:39 PM |
| Showing off my truck! Man Kat 1 6x6 | rccreator | Multi Axle Rigs | 4 | 10-01-2013 05:45 AM |
| Man kat 6x6 | way6317 | 1.9 Scale Rigs | 7 | 06-30-2013 03:09 PM |
| Scratch 6x6 trials **UPDATE.. Now MAN-KAT 6x6** | dankycrawler | Multi Axle Rigs | 37 | 04-18-2013 02:09 PM |
| |


 Linear Mode


