| |
 07-23-2006, 06:10 PM
| #1 |
| Newbie Join Date: Aug 2005 Location: Scappoose, OR
Posts: 26
|
ok so since i am a newb and i just got my first crawler ever i need some help. i basicaly need a dumbys guide to doing it since i dont really know what i am doing |

|  |
| Sponsored Links | |
| | |
|
07-23-2006, 06:50 PM
| #2 |
| Quarry Creeper Join Date: Apr 2006 Location: Gervais
Posts: 302
|
When you are putting the diff together right before you put the housing on fill it up with hot glue like you would with diff fluid. then put it together.
|
|
| |
|
07-23-2006, 06:51 PM
| #3 |
| Pebble Pounder Join Date: May 2006 Location: WI, near Green Bay
Posts: 159
|
First off if you assembled the diff already then take it apart and clean out the grease. Then put all the gears in the diff except the top one, put jb weld or whatever around the spider gears (the 3 small ones) make shure it gets all around the gears, and on top as well. Put the final gear in the diff and reasemble it. If you are looking for a less permanent option, i hear you can put one spider gear between the two, i haven't tried it, but it should work. |
|
| |
|
07-23-2006, 06:56 PM
| #4 |
| Quarry Creeper Join Date: Apr 2006 Location: Gervais
Posts: 302
|
Two different ways. Use hot glue like diff fluid. glue the gears together. It is'nt permenant.
|
|
| |
|
07-23-2006, 07:09 PM
| #5 |
| Rock Stacker Join Date: May 2006 Location: Somewhere in...
Posts: 69
|
I think it is easiest to put all three gears side by side rather than in the triangle formation. It isnt messy and can be changed easily.
|
|
| |
|
07-23-2006, 07:14 PM
| #6 |
| I wanna be Dave  Join Date: Mar 2004 Location: The Haunted Forest
Posts: 3,586
|
Also be sure to read the stickies in this TLT forum. Lots of useful info for newbies building their 1st trucks. have fun! ryan |
|
| |
|
07-23-2006, 09:02 PM
| #7 |
| Newbie Join Date: Aug 2005 Location: Scappoose, OR
Posts: 26
|
ok i know htis is gogin to frustrat you all byut do i just por it in there or liek do i have to be spasific about what i do??? and do i let i all dri and hten put the top gear on or likeclean it out and hten what i mean i am so lost hear. pictures woudl help ALOT!!!!!!! i am a very visual person. thanks alot.
|
|
| |
|
07-23-2006, 09:28 PM
| #8 |
| Rock Stacker  Join Date: Nov 2005 Location: Perth, Australia
Posts: 69
|
Honestly, it would be much easier for people to help you if your spelling and typing was cleaned up a little bit!!
|
|
| |
|
07-23-2006, 10:04 PM
| #9 |
| RCC Addict Join Date: May 2005 Location: Auburn, WA
Posts: 1,191
|
Fill it in, and while it's still hot close the diff up, then cut the excess off. Take your truck apart and you'll understand. I agree with BALISTIC, don't rush your posts, it makes you sound like an idiot.
|
|
| |
|
07-23-2006, 10:17 PM
| #10 | |
| Rock Crawler Join Date: Feb 2006 Location: jacksonville beach
Posts: 848
| Quote:
| |
|
| |
|
07-24-2006, 02:29 AM
| #11 |
| Newbie Join Date: Aug 2005 Location: Scappoose, OR
Posts: 26
|
ok i will take more time in my typing. but i cant spell very good so im sorry about that. ok hopfull yi will understand when i take it apart. lol but i am still a little confused on the fill it up completly and then close it up part . wont that maeke it to where your axel wont turn at all?
|
|
| |
|
07-24-2006, 03:18 AM
| #12 |
| RCC Addict Join Date: May 2006 Location: In England, looking for the threadlock...
Posts: 1,150
|
What diffs have you got? This will help a lot
|
|
| |
|
07-24-2006, 08:51 AM
| #13 |
| I wanna be Dave Join Date: Dec 2005 Location: between heaven and hell.
Posts: 3,367
|
Hope this helps. and the concept is the same with most axles. well kinda. All the parts. As you can see I seperated them into sections. The set on the far left has all the parts taken out. The next one has the one gear in the diff cover. and so on. I know the pic isn't that great but you can see what's going on. 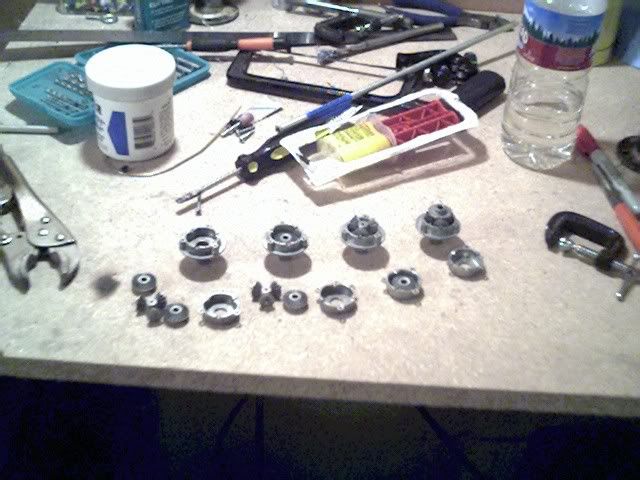 this one shows where I put the two part epoxy. I put the epoxy on here the put the 3 gear combo on top. Did the same with the other gear just put the one gear on the three after I applied the epoxy to it. 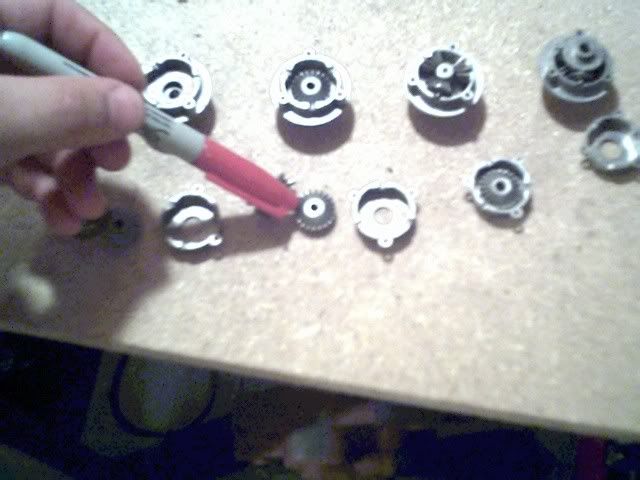 set it on top of those. Let it set up for about 10 to 15 minutes. Then closed the case. Let it cure for 24 hours. 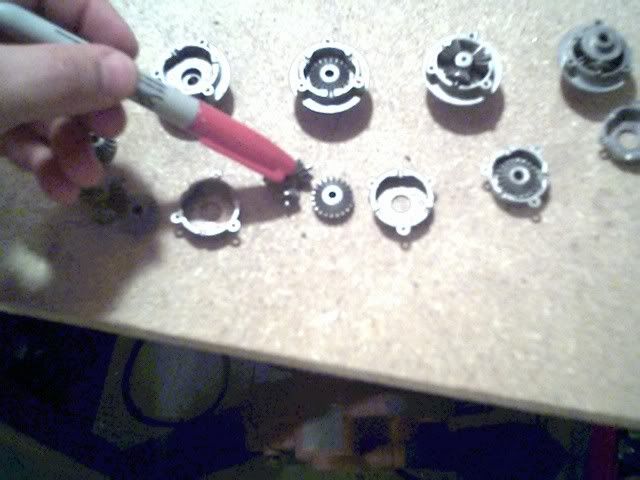 Hope that helps. |
|
| |
|
07-24-2006, 09:23 AM
| #14 |
| Newbie Join Date: Aug 2005 Location: Scappoose, OR
Posts: 26
|
ok ya thazt helps alot thanks. and i dont really understadn what you where talking about but everything is stock. if that helps you ourt at all.
|
|
| |
|
07-24-2006, 09:53 AM
| #15 |
| Quarry Creeper Join Date: Apr 2006 Location: Gervais
Posts: 302
|
Is your problem solved? There is one other link I'll find it right now.
|
|
| |
|
07-24-2006, 09:57 AM
| #16 |
| Quarry Creeper Join Date: Apr 2006 Location: Gervais
Posts: 302
|
Here you go read the whole page as it will also help you. FAQ: TLT-1 to TLT-Crawler ***NEWBIES READ!!!*** |
|
| |
|
07-24-2006, 10:06 AM
| #17 |
| I wanna be Dave Join Date: Dec 2005 Location: between heaven and hell.
Posts: 3,367
|
I added this pic to that ^ thread. 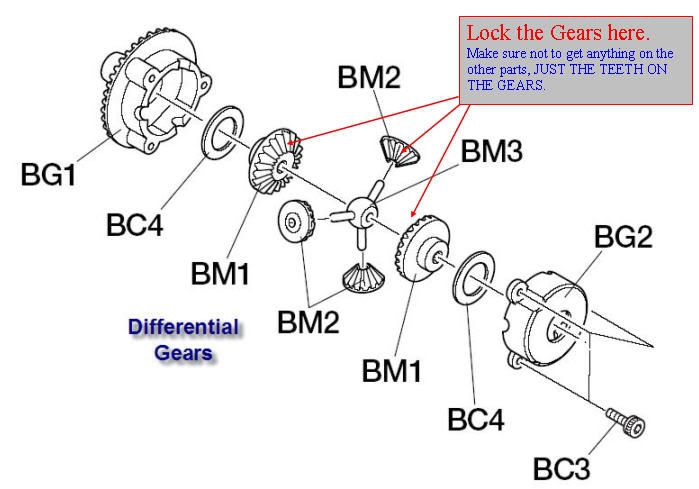 |
|
| |
|
07-24-2006, 10:07 AM
| #18 |
| I wanna be Dave   Join Date: Apr 2005 Location: Eastern WA
Posts: 2,489
|
Put one of your spiders inbetween the other spiders, needs a lil workin in, I guess sometime it could magically fall in spot, but you might have to turn the other spider gears!
|
|
| |
|
07-24-2006, 01:58 PM
| #19 |
| Newbie Join Date: Aug 2005 Location: Scappoose, OR
Posts: 26
|
ok this is starting to make some sence. but i have one more quick question about the diagram that was posted. so do i glue all three bm2 gears to the bm3???? or do i put some glue in the teath of the bm2 gears adn then on the bm1 gears as well and put them together??? well just wondering. thansk
|
|
| |
|
07-24-2006, 02:21 PM
| #20 |
| Pebble Pounder Join Date: May 2006 Location: WI, near Green Bay
Posts: 159
|
you don't have to glue the small gears to the carrier. Start to assemble the diff from BG1 up to BM1 according to the diagram But glue or epoxy on top of BM1 Put the spiders (BM2) onto BM3 and put that assembly on top of the BM1 that has the glue on it. But more glue on top of that and put the next BM1 on it and put the rest of the diff case on. Screw it together and wipe/cut the excess off. I hope that helps. |
|
| |
 |
| |


 Linear Mode


