| |
| |||||||
 |
| | LinkBack | Thread Tools | Display Modes |
 03-11-2013, 07:09 PM
| #1 |
| RCC Addict Join Date: Apr 2011 Location: San Diego
Posts: 1,630
|
So I've painted easily 20 RC bodies both lexan and hard plastic/styrene (Tamiya/New Bright) and this is probably the 1st time I've ever experienced this phenomenon. This is the build thread http://www.rccrawler.com/forum/axial...teering-3.html It is a New Bright 4 door jeep body. I've painted 2 of these previously and did not experience these results I'm currently experiencing. -I sanded the body thoroughly -Washed it with water only -Used Tamiya Primer White as a base. 1 layer -Then applied 1 layer of Tamiya Matte Black (TS6 for plastic models) and this was the result on various portions of the body. AIR BUBBLES 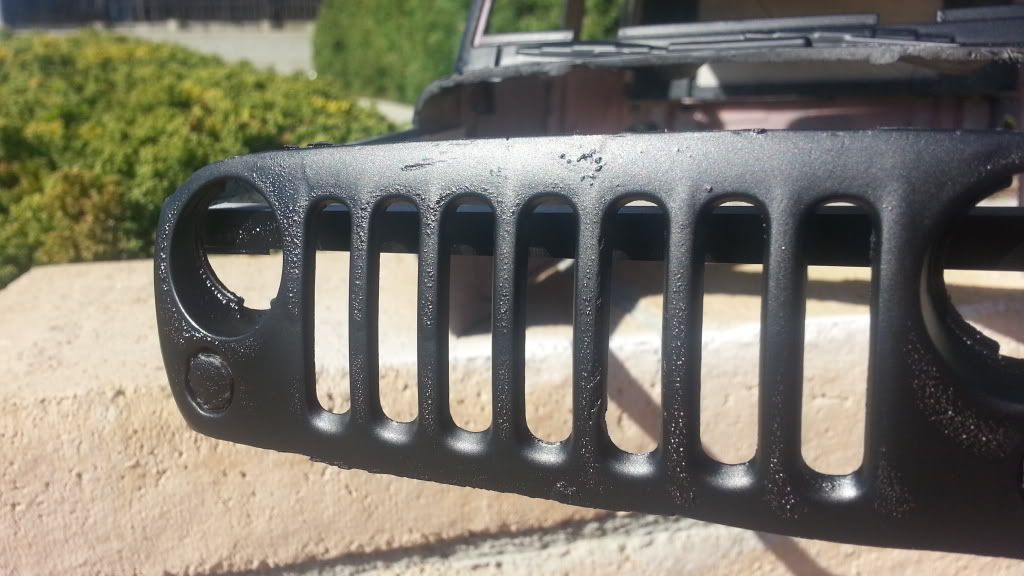 Frustrated, I let it sit for 48 hours. I wet sanded all the air bubbly areas and applied a fresh coat of the Matte Black TS6. This time went much better. Next went to mask off the body and apply the Testors Racing Orange for Enamel paint Plastic models. Testors » Paints » Enamel Paints » Car & Truck Enamel Paint » Racing Orange » Racing Orange (G) MM - 3 oz. Spray Applied the first layer and immediately saw a fury of air bubbles, significantly more prevalent than the first. I nearly threw it on the ground to say F it. I've since let it dry and am perplexed as to why this is happening. I will admit I recall air bubbles forming on a lexan body where I touched it with my finger and left my finger print. Is this the culprit? I'm not cleaning thoroughly enough prior to applying? This is also my first time using Tamiya paints but I've heard nothing but good things about them. Am I painting too close? Too thick of a layer? Help me paint gurus!! I'm going to wet sand it again, clean it and try to put more orange to finish the body. But this has by far been the most frustrating and time consuming paint jobs I've ever done in the 15+ years I've been in the RC hobby. Thank you for any advice in this matter.  |

|  |
| Sponsored Links | |
| | |
|
03-11-2013, 07:38 PM
| #2 |
| Rock Crawler Join Date: Feb 2012 Location: NORTH SYRACUSE N.Y.
Posts: 828
|
I dont think it is air it looks to me like solvent pop it happens when the primer or base has a different dry time then the top coat , how long between your primer and top coat ? I just had the same thing happen to me but mine was on a hood for a 1:1 tractor trailer .... It can also happen if your paint it a little heavy or thick the outer layer drys before the inside and the solvent cant get out |
|
| |
|
03-11-2013, 08:31 PM
| #3 |
| RCC Addict Join Date: Apr 2011 Location: San Diego
Posts: 1,630
|
I would say 1.5-2 hours. Then between the black and orange about an hour. An I trying to do new coats too soon?
|
|
| |
|
03-12-2013, 06:21 AM
| #4 |
| Quarry Creeper Join Date: Feb 2013 Location: Northcentral Wisconsin
Posts: 237
|
check the products you are using for the recommended dry/flash/recoat times - it looks like solvent pop to me too. most solvent based products should have a flash/recoat of within XX minutes OR after XX hours... As an example - within 30 minutes, or after 24 hours. (not actual times, just an example) if you miss the recommend short window - the 30 minute example, it is best to wait the longer time - the 24 hours in the example, before trying to recoat. |
|
| |
|
03-12-2013, 06:26 PM
| #5 |
| RCC Addict Join Date: Apr 2011 Location: San Diego
Posts: 1,630
|
Did not.find any flash info on the testors can. Well I let it dry for 72 hours since I was out of town. Went to paint today. Masked, washed thoroughly, and put down a layer of orange. And this was the result. 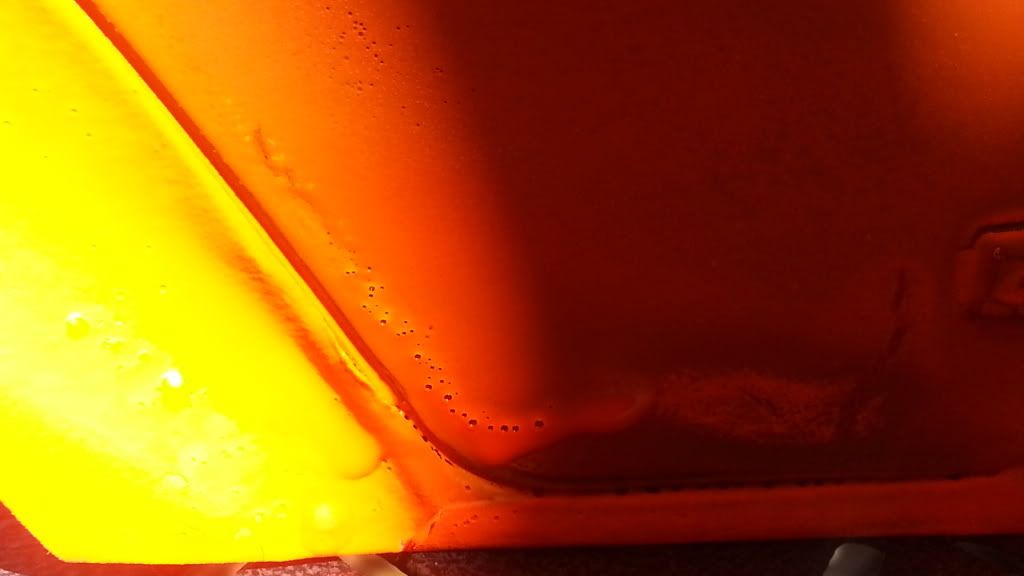 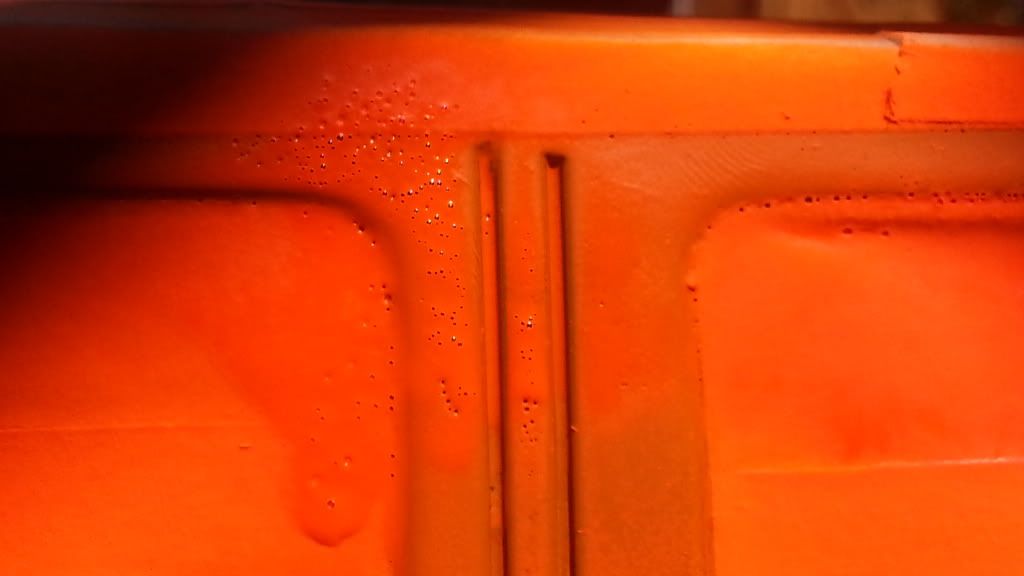 As I told a friend I nearly threw the body across my garage but didn't. I think I'm just going to sand the entire body down to plastic, and start over with all the same brand/age primer and paint. Too frustrating to apply more orange if this is the result...more sanding and reapplying, at this rate ill have 20 coats before its "nice" |
|
| |
|
03-12-2013, 06:58 PM
| #6 |
| Suck it up!   Join Date: Mar 2008 Location: Arkansas
Posts: 11,652
|
Your paint is too thick in that last pic.
|
|
| |
|
03-12-2013, 07:05 PM
| #7 |
| Rock Crawler Join Date: Mar 2011 Location: hampton
Posts: 984
|
way to much paint, and judging by the finger print, something wasn't dry when the paint went on. you probably got something oily on it as well if all you used to clean it was water, oil from your hands can cause fish eye. could also be a paint solvent base issue, some paints dont mix together well and can cause previous paints to melt and bubble or wrinkle. i dont know about lacquer and enamel,see it happen alot with different spray paints, was it painted when you got it? i wouldn't put anymore paint on it, as think as it is, it'll be days before you can sand it. it'll just gum up your paper Last edited by stanmondz; 03-12-2013 at 07:15 PM. |
|
| |
|
03-12-2013, 07:12 PM
| #8 |
| RCC Addict Join Date: Apr 2011 Location: San Diego
Posts: 1,630
|
Pics were taken after frustration kicked in. Paint was dry prior to painting. Fingerprint was from grabbing it. Thanks, ill let it sit a day or two before attempting anything. Like I said, will start over and be more patient with it. First time ive tried bright paint on a hard body, all others have been dark colors and caused me no problems. Then again paint is all about procedure and setup. So clearly I'm doing something wrong. Thanks for the feedback |
|
| |
|
03-12-2013, 07:29 PM
| #9 |
| Rock Crawler Join Date: Mar 2011 Location: hampton
Posts: 984
|
once you get it all cut back down, do your light/bright colors first, they will look better over the white primer, and will cover the primer easier with less coats, then mask it off and paint the dark colors. dont use regular masking tape, i like the green automotive painters tape, leaves a clean line and comes off easy |
|
| |
|
03-12-2013, 07:45 PM
| #10 |
| RCC Addict Join Date: Apr 2011 Location: San Diego
Posts: 1,630
|
Yeah all the painting was me. I feel part of it was the mixture of paints and impatience. All one brand this next time and light to dark. Thanks =) |
|
| |
|
03-12-2013, 07:58 PM
| #11 |
| Rock Crawler Join Date: Mar 2011 Location: hampton
Posts: 984
|
do it the other way on inside of lexan, dark to light
|
|
| |
|
03-12-2013, 08:01 PM
| #12 |
| RCC Addict Join Date: Apr 2011 Location: San Diego
Posts: 1,630
|
Wait, it's a hard body....so light to dark right? White primer, orange then black? |
|
| |
|
03-12-2013, 08:03 PM
| #13 |
| Rock Crawler Join Date: Mar 2013 Location: Waukesha
Posts: 635
|
When you wash it use a little dish soap. I've done this on many lexan bodies. I've also used hand cleaner degreaser like gojo before I paint. Then I always wipe down with alcohol or I've got some Dupont degreaser I use.
|
|
| |
|
03-12-2013, 08:06 PM
| #14 | |
| RCC Addict Join Date: Apr 2011 Location: San Diego
Posts: 1,630
| Quote:
| |
|
| |
|
03-12-2013, 08:09 PM
| #15 |
| Rock Crawler Join Date: Mar 2013 Location: Waukesha
Posts: 635
|
Sorry the lexan is the only thing I use the dish soap for. Everything else I've used to paint hard items I should have cleared that up. You want to degrease it any way you can.
|
|
| |
|
03-12-2013, 08:15 PM
| #16 | |
| Rock Crawler Join Date: Mar 2011 Location: hampton
Posts: 984
| Quote:
your orange will stay bright over the white base, mask off the orange with a good tape, cheap masking tape may not stick good and allow the black to bleed into the orange, or it can stick to good and peel off your orange i just thought id throw the lexan out there for future paint jobs. the light/bright colors will darken if sprayed over a dark base. | |
|
| |
|
03-12-2013, 08:18 PM
| #17 | |
| Rock Crawler Join Date: Mar 2011 Location: hampton
Posts: 984
| Quote:
| |
|
| |
|
03-12-2013, 09:32 PM
| #18 |
| Quarry Creeper Join Date: Jan 2013 Location: Vancouver, B.C.
Posts: 321
|
I run a heater near where I paint before, during and after. You want to get rid of any humidity you can. Do more coats of thin paint instead of wanting to be done in a coat or two. It will dry much better too and its easier to not have any run off in the paint as well as a more even coverage. If its nice out, when the paint is dry, let it bake in the sun for a while, it really help harden the surface of it. I painted a lot of stuff following these rules and most of the above stated and rarely had any issues. Dont give up. |
|
| |
|
03-13-2013, 02:16 PM
| #19 |
| RCC Addict Join Date: Apr 2011 Location: San Diego
Posts: 1,630
|
Argh, hate how good the black came out and how crappy the orange cam out. Got new paint but am.torn about staying alllllll over. Think it's possible to just get rid of orange and salvage the black? Or too much work and may as well start fresh? 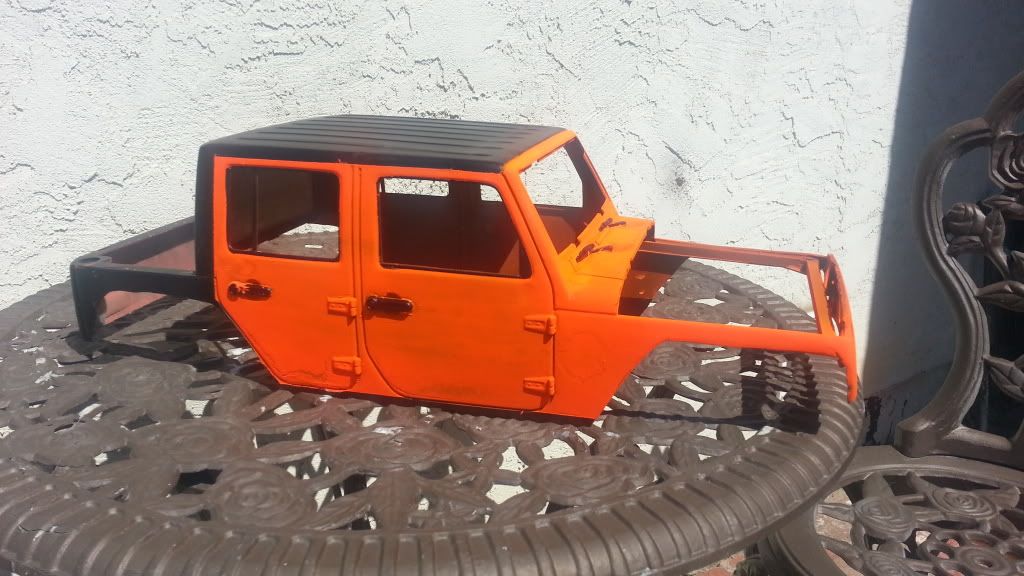 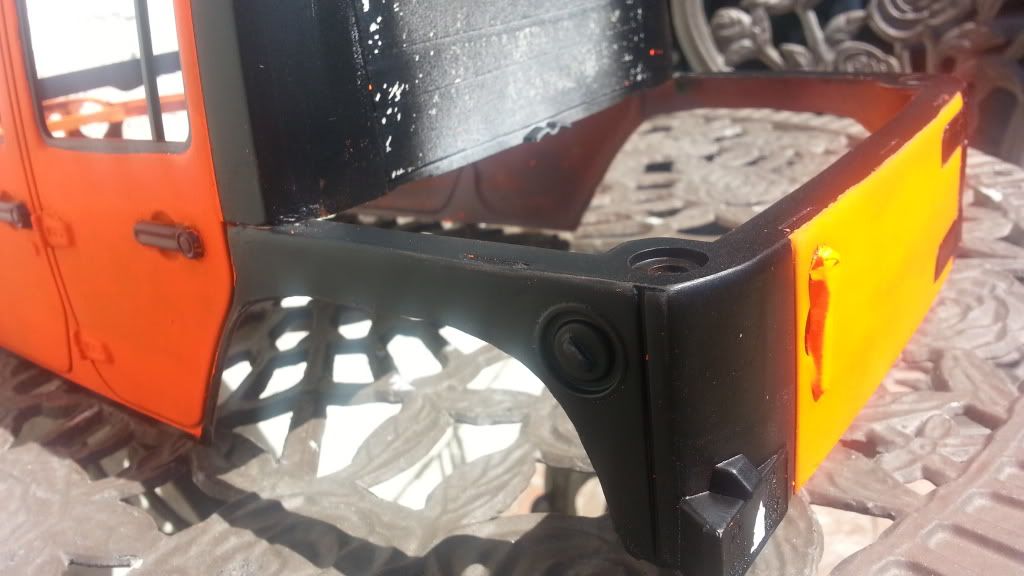 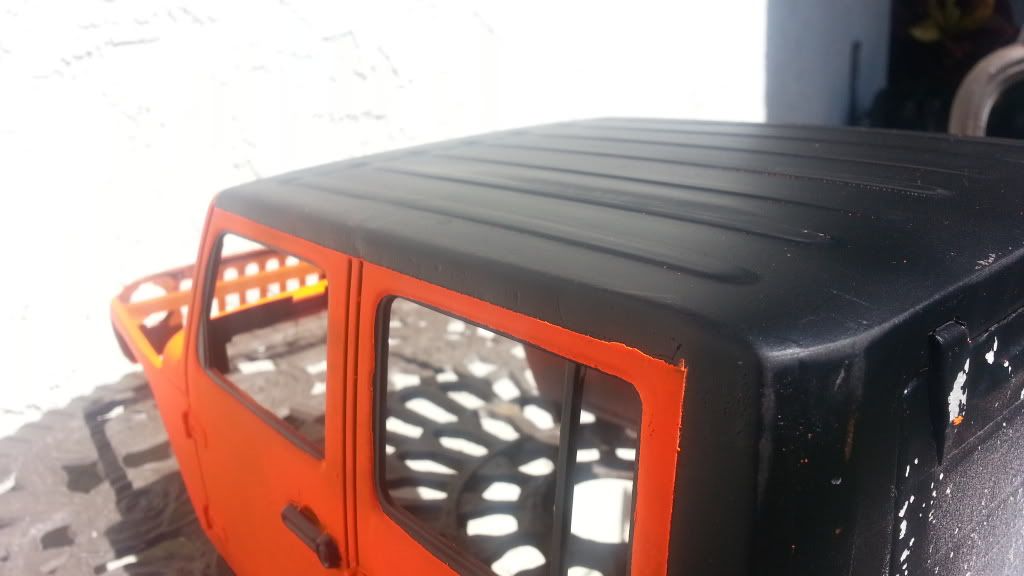 |
|
| |
|
03-13-2013, 02:56 PM
| #20 | |
| Rock Crawler  Join Date: Oct 2012 Location: Garden Grove
Posts: 546
|
X2 Quote:
Use lighter coats, (several), basically misting the surface to build up the layers. The more layers the darker/deeper/richer your color. | |
|
| |
|
 How to eliminate/prevent air bubbles - Similar Threads
 | ||||
| Thread | Thread Starter | Forum | Replies | Last Post |
| Ricky, Julian, and Bubbles say High | GySgt Hartman | Chit Chat | 8 | 10-18-2010 11:24 AM |
| |


 Linear Mode


