| |
 05-24-2010, 08:55 PM
| #1 |
| I wanna be Dave Join Date: Nov 2008 Location: Where freedom is earned.
Posts: 2,011
|
Same TAG chassis, NEW TAG flavor. OK, so I just cut up the skid section, raised and double bent the lowers and drilled one higher upper link hole. I'll let the pictures show the low down, but this was fun reworking the TAG. I did re-postion some of the electronics and get my Rocker Dig put in, but still need to pick up some more bullit connectors for the dig wires to the motors. Ground clearence looks Killer, a shake down run will tell the story if it'll be stabil and handle well enough. It is a bit more extreme than most high clearence chassis setups I've seen but I did move the link postions up the same amounts. Here's a before and after. Last edited by Krakker; 05-31-2010 at 06:58 PM. |

|  |
| Sponsored Links | |
| | |
|
05-24-2010, 09:19 PM
| #2 |
| RCC Addict Join Date: Jun 2008 Location: Nunya Idaho...
Posts: 1,559
|
Looks good bro. Ive been running something simular and love it.
|
|
| |
|
05-25-2010, 10:43 AM
| #3 |
| I wanna be Dave Join Date: Oct 2008 Location: I miss Rowdy
Posts: 2,238
|
Hmmmm...... Wonder if the Tag Team drivers will think of something like that??? Far as I know, this chassis placed 3rd at Midwest this year. It works really well. We call it the Tag HC chassis. And this is version 1.0 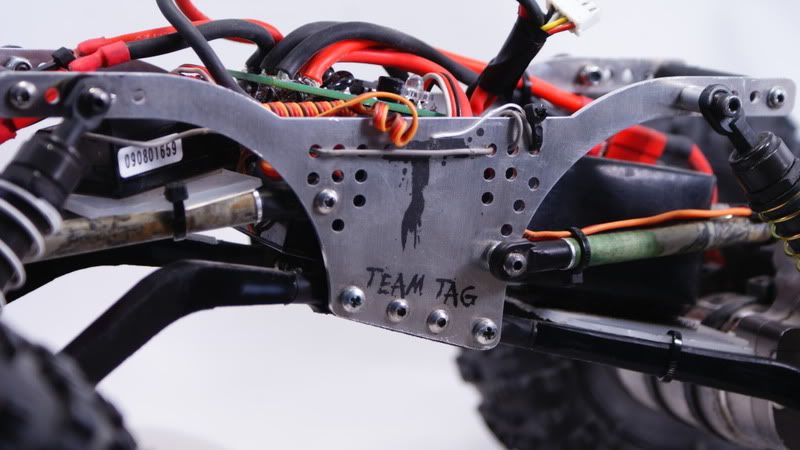 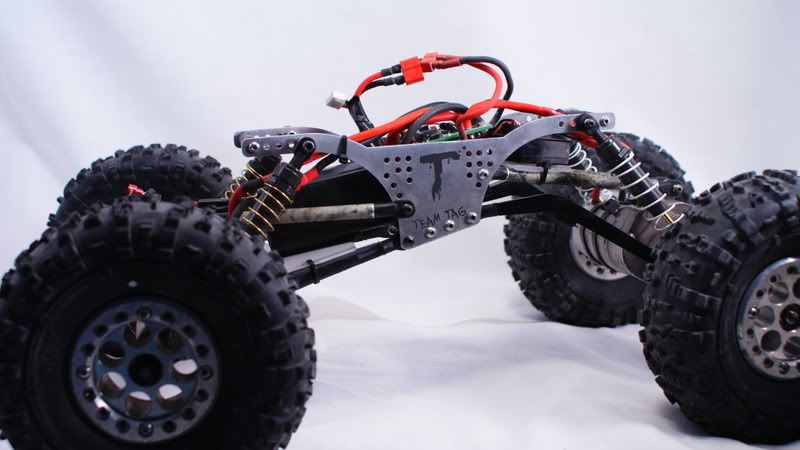 Last edited by jcboof; 05-25-2010 at 10:59 AM. |
|
| |
|
05-25-2010, 11:05 AM
| #4 |
| I wanna be Dave Join Date: Nov 2008 Location: Where freedom is earned.
Posts: 2,011
| I didn't see this version on the web site from the giveaway. That looks exactly like my hacked version, so I'm assuming that ya'll thought the same thing. I have not seen any of these yet, so I feel like a total goober thinking I came upwith something cool. I'm thinking a carbon fiber version would be cool. What links are you using, and do you have a build thread I could check out?? Last edited by Krakker; 05-25-2010 at 11:09 AM. |
|
| |
|
05-25-2010, 11:14 AM
| #5 |
| I wanna be Dave Join Date: Oct 2008 Location: I miss Rowdy
Posts: 2,238
|
More info to come later............ I don't have a build thread as it is a prototype, but keep checking the build threads here soon and you'll likely find something. |
|
| |
|
05-25-2010, 05:00 PM
| #6 |
| I wanna be Dave Join Date: Nov 2008 Location: Where freedom is earned.
Posts: 2,011
|
Holy Crap this thing crawls Awesome now. I'm breakin over rocks and boulders like they weren't even there. The only thing holding me up now is the Body, or if the Axle snags a pointed corner. (I might try making a lexan skid to follow the curve of the rear links.) If you gotta a dremel and a drill, picking up one of these to mod while they're on sale would be a good investment. |
|
| |
|
05-25-2010, 05:08 PM
| #7 |
| I wanna be Dave Join Date: Nov 2008 Location: Where freedom is earned.
Posts: 2,011
|
I'm not to sure about this Rocker DIg thing yet. It seems to roll too much even on flat grassy ground. Or like it needs to roll a bit before complete lock up. We'll check it out at the crawl spot tomorrw and see how it does. I have the EPA's set to 120% each way. Super easy to hook up tho. |
|
| |
|
05-26-2010, 09:13 PM
| #8 |
| I wanna be Dave Join Date: Nov 2008 Location: Where freedom is earned.
Posts: 2,011
|
SICK lines this chassis is pulling now. todays testing was insane on the break-overs and climbs. If I could grab the ledge with a front tire, I could go 90* up and over. I love this chassis.  Here's some pics of todays climbing adventures. As far as the Rocker Dig testing went; let's just say I might have well be driving an Axial with NO dig and a stripped rear pinion. Pics were taken driving oe handed and using my thumb for steering. (Wierd thing is, there's a guy in our group that drives that way ALL the time.) Last edited by Krakker; 05-27-2010 at 01:37 PM. |
|
| |
|
05-27-2010, 12:48 PM
| #9 |
| Old guy   Join Date: Jan 2007 Location: Northwest Arkie-saw and we got ROCKS!
Posts: 7,548
|
It looks like its working for you, good job. |
|
| |
|
05-31-2010, 07:10 PM
| #10 |
| I wanna be Dave Join Date: Nov 2008 Location: Where freedom is earned.
Posts: 2,011
|
Got board and decided to totally rebuild starting with the chassis and electronics setup. I started by milling a new skid that sits lower than the chassis sides and has a channel milled through the center to help hold on side hill obstacles. I turned some white delrin chassis supports for the center and some rectangular ones for each end. Next was some vinyl material agian for the battery tray and a skid section that protects the electronics when a sharp rock is poking up through the rear links. I'm making sure all the electronics are fit to the chassis before assembly. I'm making a temporary plate to hold the "old school" servo dig setup till I get the Rocker Dig figured out. |
|
| |
|
05-31-2010, 07:53 PM
| #11 |
| I wanna be Dave Join Date: Oct 2008 Location: I miss Rowdy
Posts: 2,238
|
How you gonna fasten the front upper links to the axles??? that battery tray skid is too wide. I had to stand my battery on edge on my tag, even with the front uppers outboarded on the chassis. Looking good otherwise. I like the electronics tray! |
|
| |
|
05-31-2010, 09:36 PM
| #12 | |
| I wanna be Dave Join Date: Nov 2008 Location: Where freedom is earned.
Posts: 2,011
| Quote:
| |
|
| |
|
05-31-2010, 11:41 PM
| #13 |
| I wanna be Dave  Join Date: Dec 2005 Location: Gold Bar
Posts: 2,832
|
SO how much did you whack off the chassis and from the looks you kept the link seperation the same? I have been contiplating a v5 on my chassis and doing something simular. |
|
| |
|
06-01-2010, 07:36 AM
| #14 | |
| I wanna be Dave Join Date: Nov 2008 Location: Where freedom is earned.
Posts: 2,011
| Quote:
I did have to make a new skid, the stock one was just a bit off. (It was usable but the screws went into the skid at an angle in the rear) Last edited by Krakker; 06-01-2010 at 07:44 AM. | |
|
| |
|
06-01-2010, 03:20 PM
| #15 |
| SORRCA Committee Member  Join Date: Dec 2008 Location: Parkston, SD
Posts: 4,523
|
Nice Rory! Makes me want to build a comp rig again. |
|
| |
|
06-01-2010, 03:31 PM
| #16 |
| I wanna be Dave Join Date: Nov 2008 Location: Where freedom is earned.
Posts: 2,011
|
Update today with pics. (Everyone loves Pics!)I tried to show details of what's making mine work like the shock piston as a spacer for the out boarded upper links (they were needed to give space so the rod end wouldn't contact the chassis) as well as the shock spring distance to the lower double bent R2j Kustoms links. I thought I had enough room for it to be easy, but getting the rear upper link screws through the inside of the chassis was a bit of work. I moved the rear shock forward one hole to lower the rear a bit and at full articulation, there's a papers clearence between them. Link triangulation looks really good from the bottom, and the full skid protection from front to back will keep the electronics and battery safe. You can also see that there's plenty of room for the front links to move with the battery skid in place. I went ahead and installed the trusty servo dig setup since the Rocker Dig is going back. I can simply remove the upper tray and disconnect the power and motor wires to remove the hole setup. I'll make another plate mount for the Rocker dig so that it can be replaced easily if it works like crap again. Last edited by Krakker; 06-01-2010 at 03:50 PM. |
|
| |
|
06-11-2010, 09:21 PM
| #17 |
| I wanna be Dave Join Date: Nov 2008 Location: Where freedom is earned.
Posts: 2,011
|
Well I finally redid the steering setup to get the front link up and out of the way. Cocking the rod ends like slowride1 had said was a good idea to get the link to stay stablil. I did notice I had to set the servo arm off to one side a bit or would want to rotate back the other direction. (as if it had over traveled.) Probably wouldn't do it with the power on but I decided to play it safe rather than have it wacked out by a rock and get stuck in the wrong direction. Got a comp coming up Sunday, so hopefully we'll get a chance to see how the rig performs in a pinch. |
|
| |
|
06-14-2010, 05:40 PM
| #18 |
| I wanna be Dave Join Date: Nov 2008 Location: Where freedom is earned.
Posts: 2,011
|
NSCA, comp #6. Did pretty good for my 2nd comp in almost a year. I managed to pull off a 3rd place after sitting in first till the end of the 3rd course when driver fatigue took over. (I'm still hobbling around in a boot for the foot) 1st place guy drove his a$$ off on the 3rd course to take the lead. (props to ya Jim.) All of the first three runs had stupid driver errors where I just drove up and into the gate marker I did loose steering to the right in the finals, both rod ends on the tie rod got loosen'd up and I had to repair with some red Loctite. I'm hoping that will cure it after it sets. I did hammer the crap out of these axles and they are still like new. (can't believe these are version 3/4 shafts still. We watched a Berg driver grenade both shafts, TOTALLY shred a front Rover, and still managed to fling his rig through one of the toughest gates with out hitting anything. Last edited by Krakker; 06-14-2010 at 05:43 PM. |
|
| |
|
06-15-2010, 07:54 AM
| #19 |
| Rock Crawler Join Date: Feb 2008 Location: Nebraska
Posts: 819
|
Thanks for the props Rory. I was really impressed with your driving after being out of it for so long. I like the way that your chassis was working too. |
|
| |
|
06-19-2010, 08:19 PM
| #20 |
| I wanna be Dave Join Date: Nov 2008 Location: Where freedom is earned.
Posts: 2,011
|
Dial'n in some minor tweeks and went out for some gate practice today. I beat the tar outta this rig today and pushed it to the limit. The chassis and link set up makes climbing and decending break overs almost TOO easy. Weight is really dialed in for now, but I plan to lighten things up little by little and add support rings to the front wheels. Here's some pics of todays training.
|
|
| |
 |
| |


 Linear Mode


