| |
 11-16-2012, 08:45 PM
| #1 |
| Pebble Pounder Join Date: Oct 2012 Location: Reno
Posts: 170
|
Picked up this bone stock rs10 off Craig's for 100$ . My first thoughts were maybe I should buy a rc cralwer since my real Toyota crawler is a few thousand short of finished. Good cheap way of cralwing with less work right. Haha I was quickly hooked and started tearing it down. Day 1 all stock monster truck style 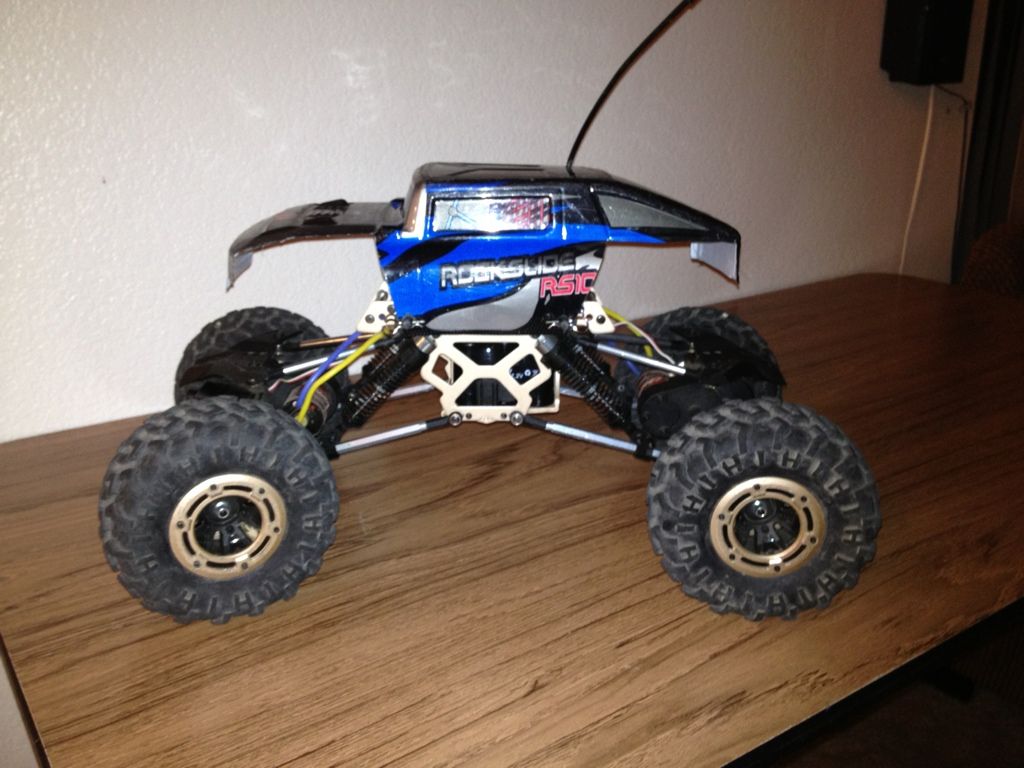 Cut up and lowered body , played with links and suspension 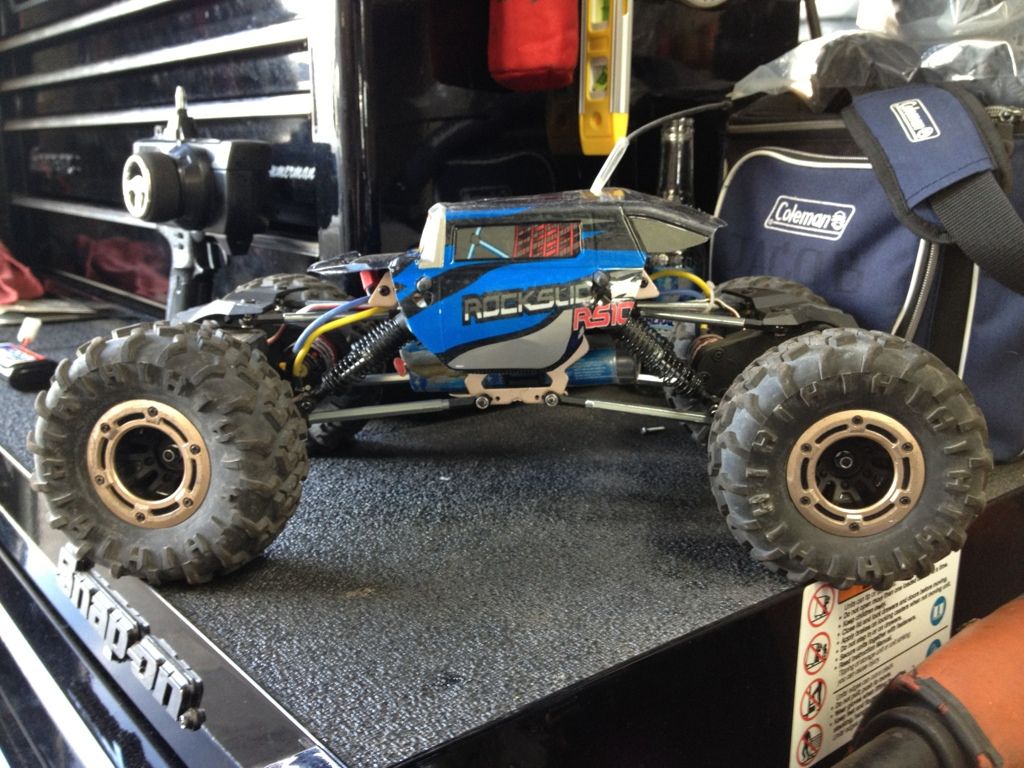 Took it out foams and went for a lil crawl 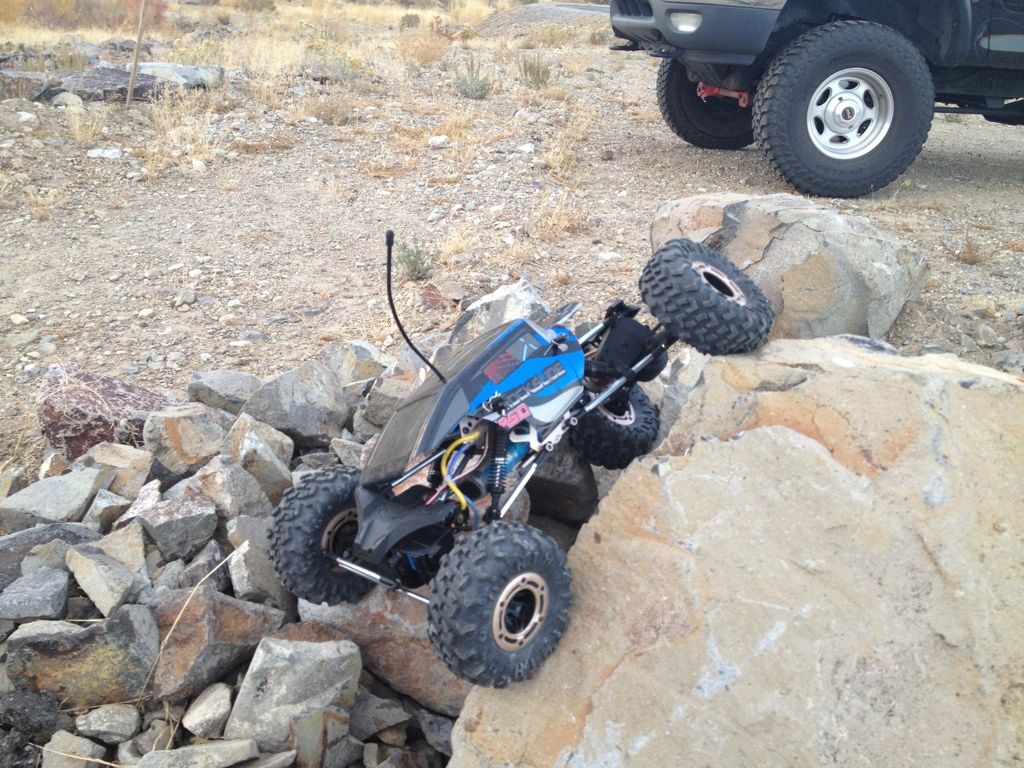 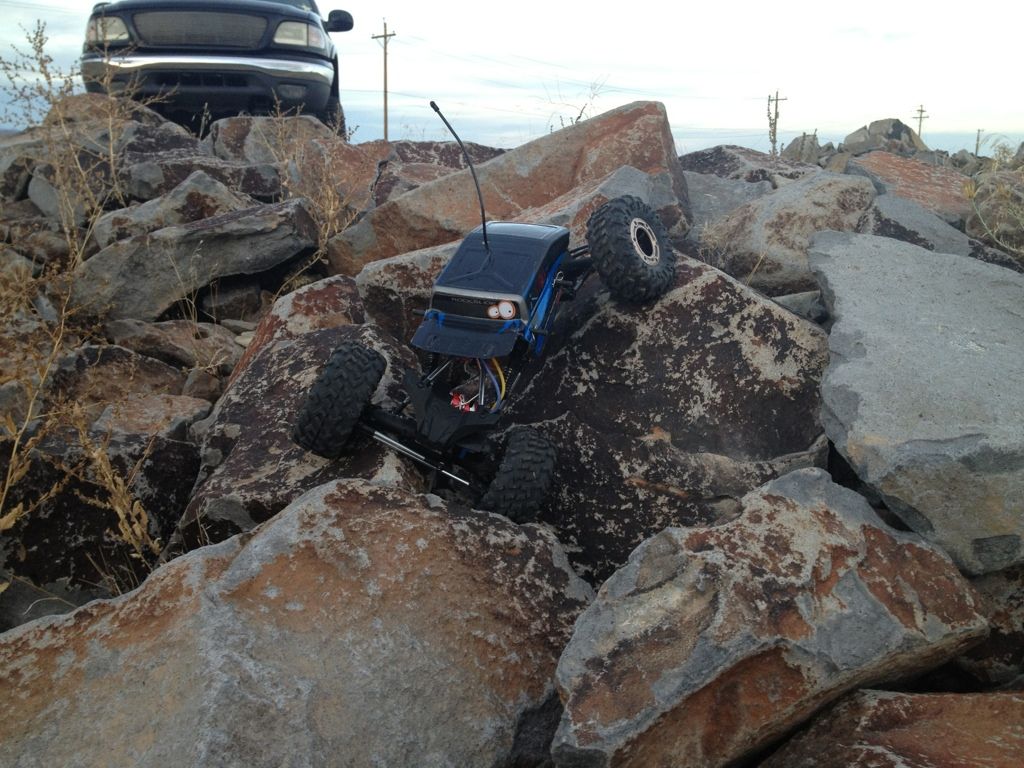  It worked ok but seen some room for improvement for sure. First came tires . White dot rovers . Night and day over stock , but new foams are in order, seems the rover foams are way to soft. May try memory foams. 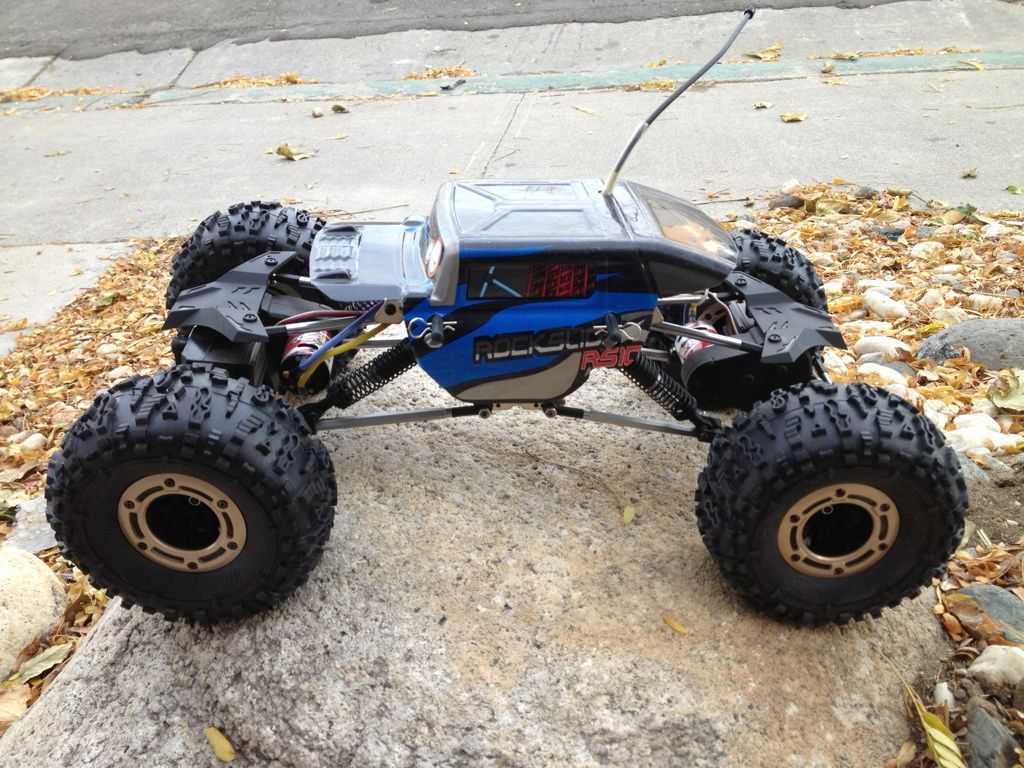 Stripped servo in the front so I locked out rear and Swapped that servo in front , that stripped too so I swapped in a new toward pro 208oz metal gear servo and ckrc aluminum horn. Also made some 4 link mounts out of clear cutting board for Wing removal. 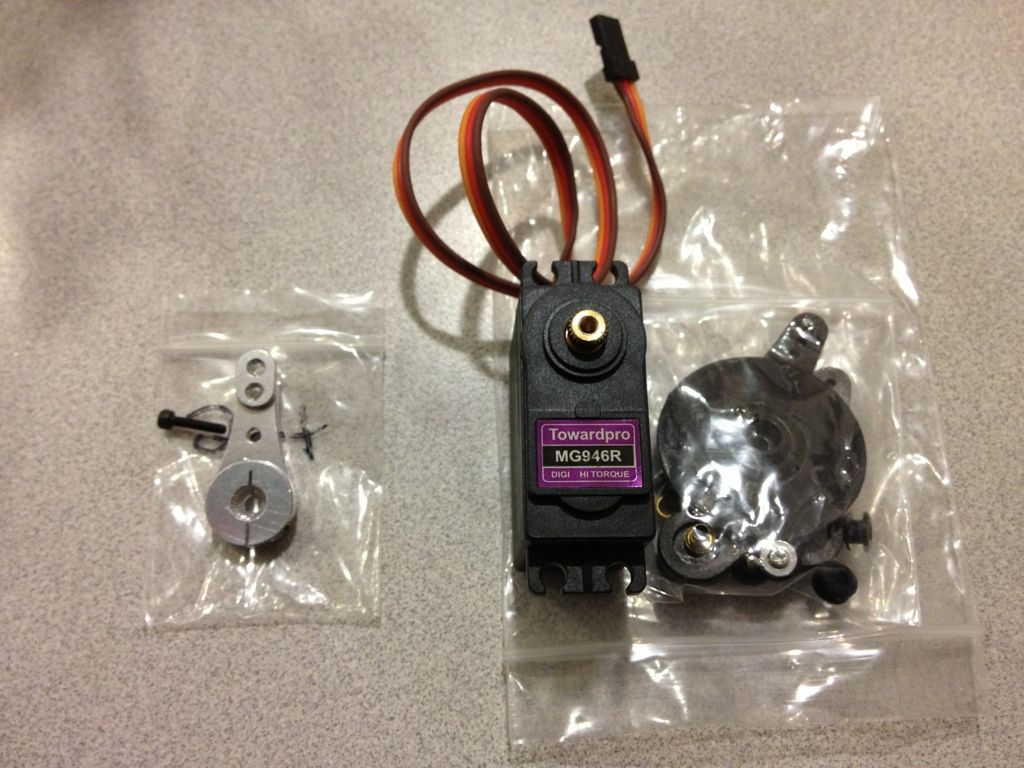 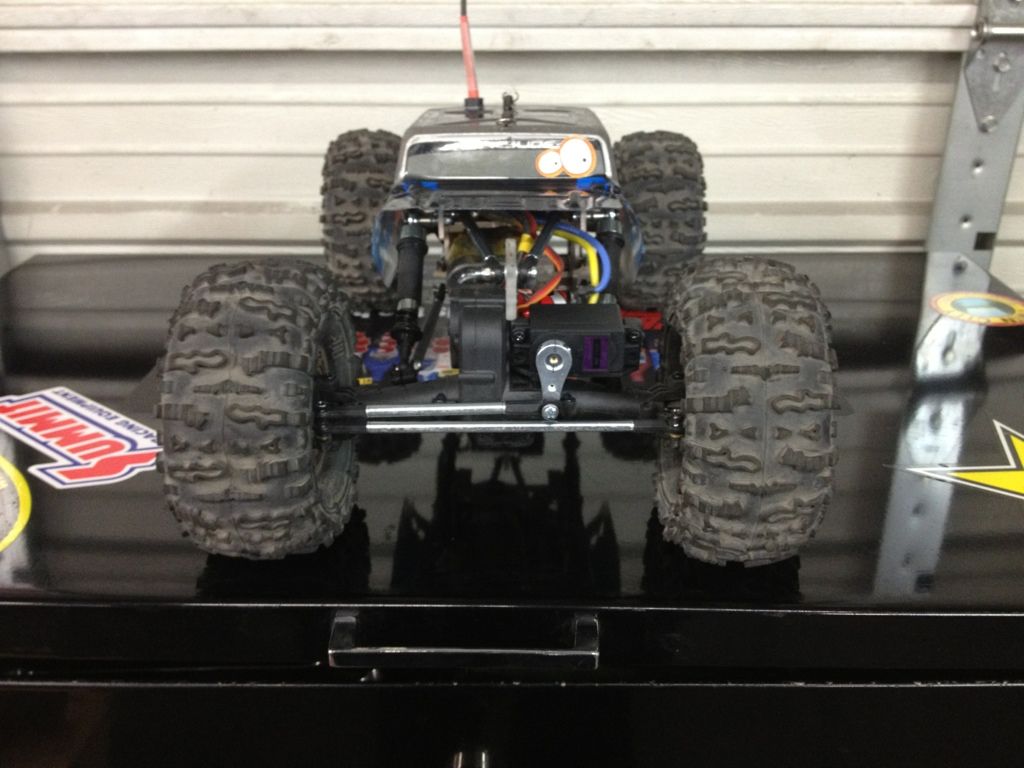 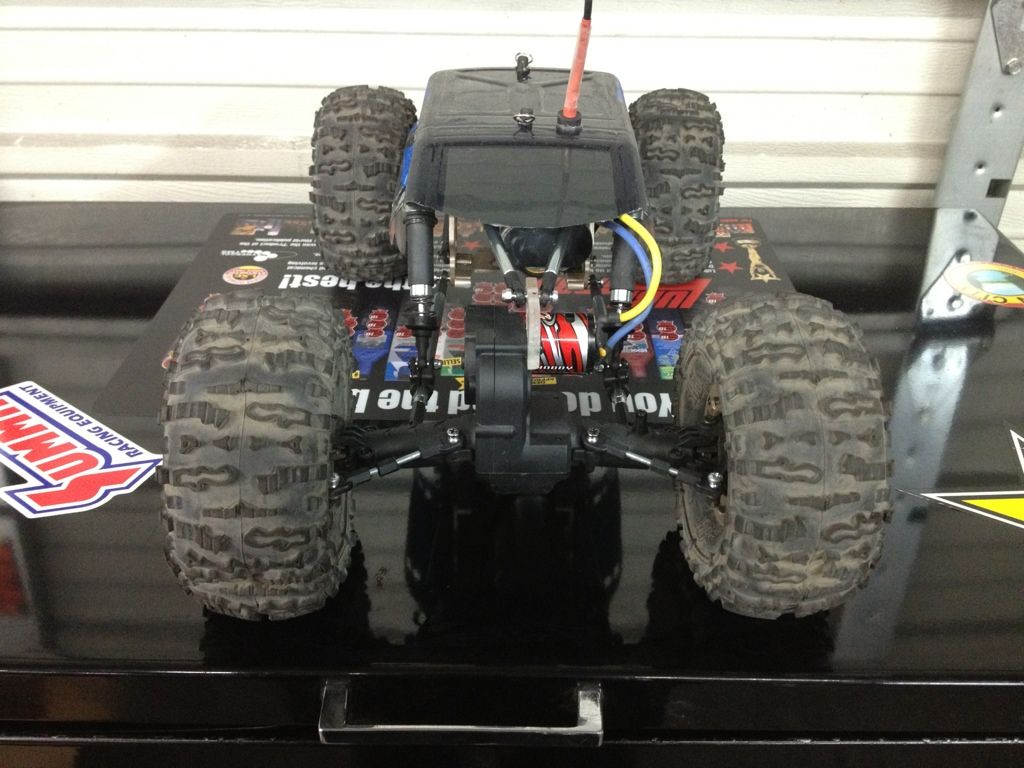 Last edited by G's ^; 11-16-2012 at 09:17 PM. |

|  |
| Sponsored Links | |
| | |
|
11-16-2012, 09:07 PM
| #2 |
| Pebble Pounder Join Date: Oct 2012 Location: Reno
Posts: 170
|
Figured I would make my own links rather than buy so... Picked up 2 bags of traxxus 3mm ends 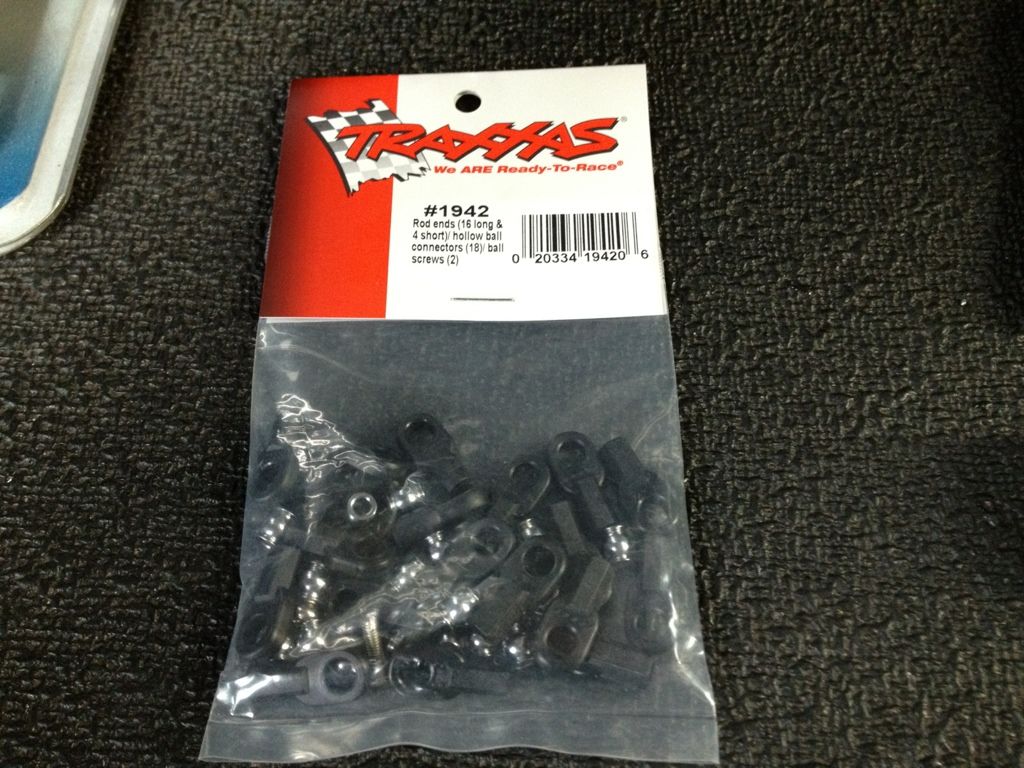 And a stick of 1/4" aluminum solid rod and got to buisness. 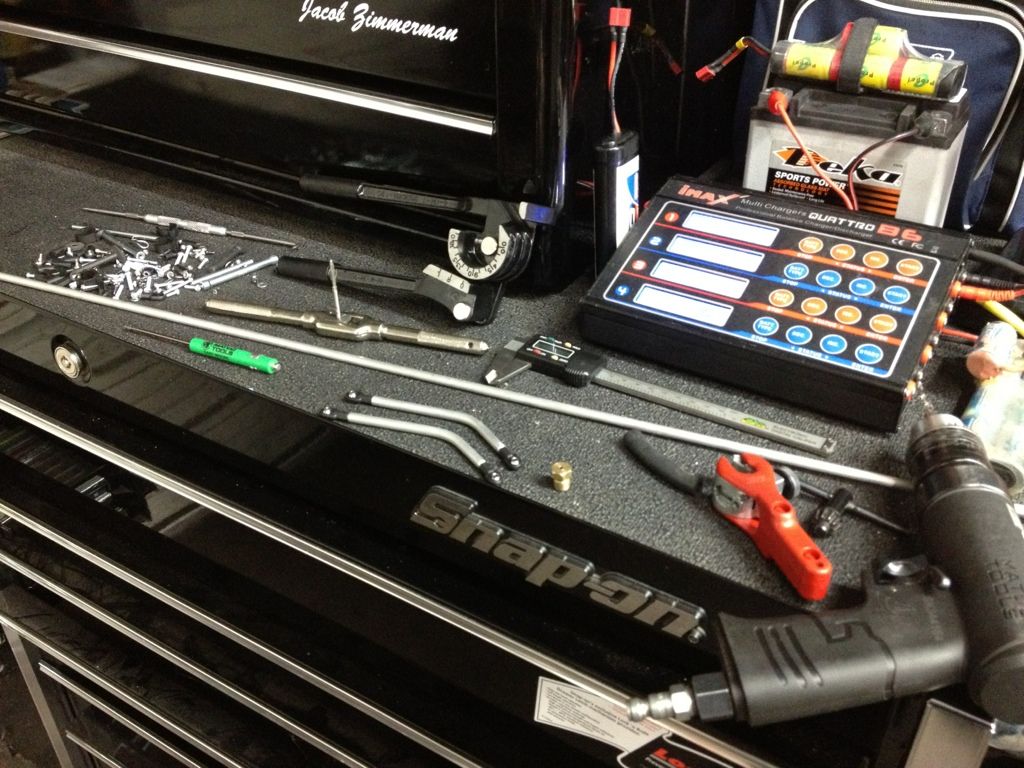 Body still not low enough and tired of side body posts hanging up on stuff I relocated my posts to the top of electronics tray. 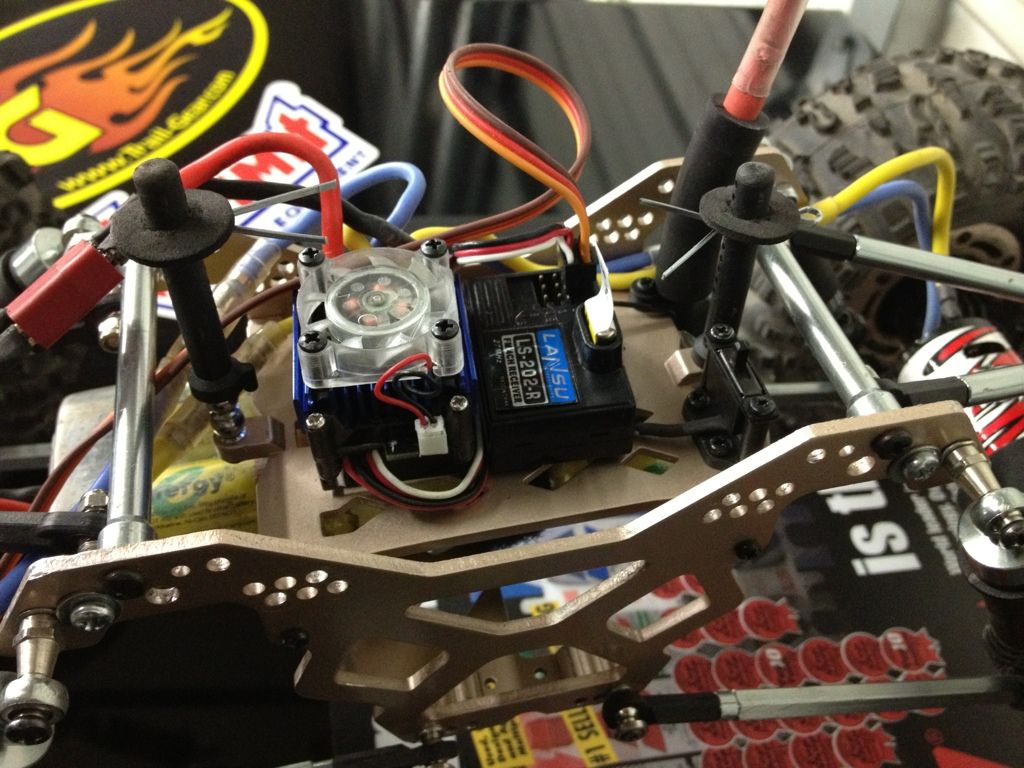 Got my links in and dropped the body down more ,mounted shocks to axles. This created a lot of issues. Links and shocks were too close to the motor. The whole set up was really tight. It didn't want to crawl anything ! 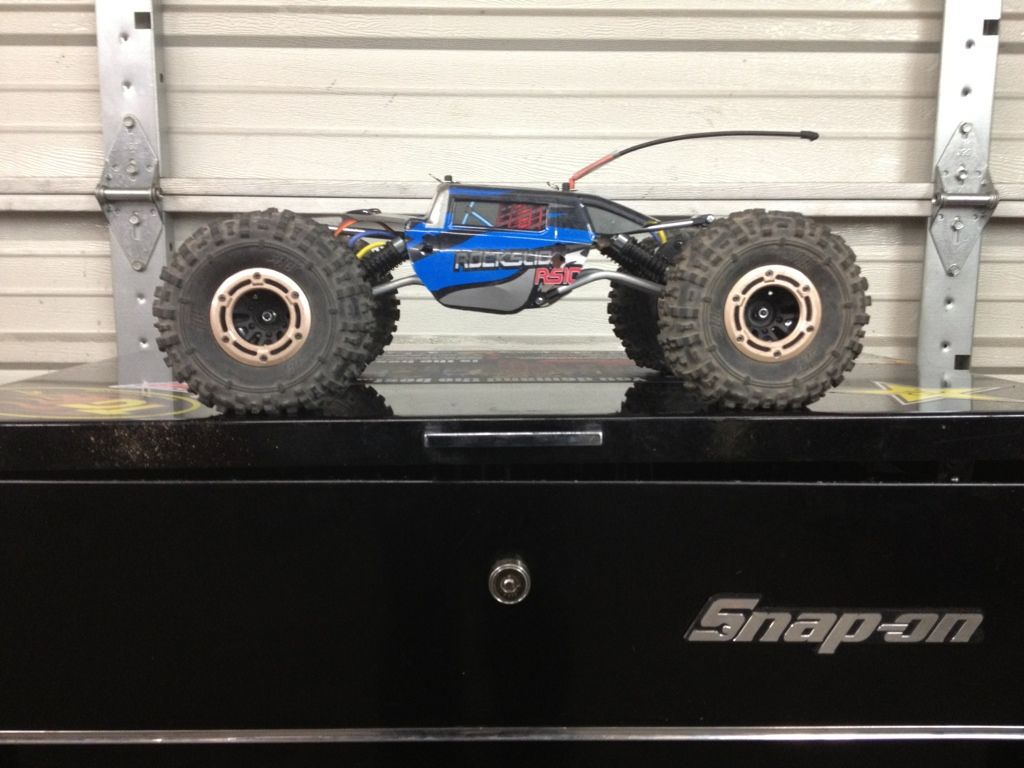 So... Cut bottom of chassis out , and made a skid plate. 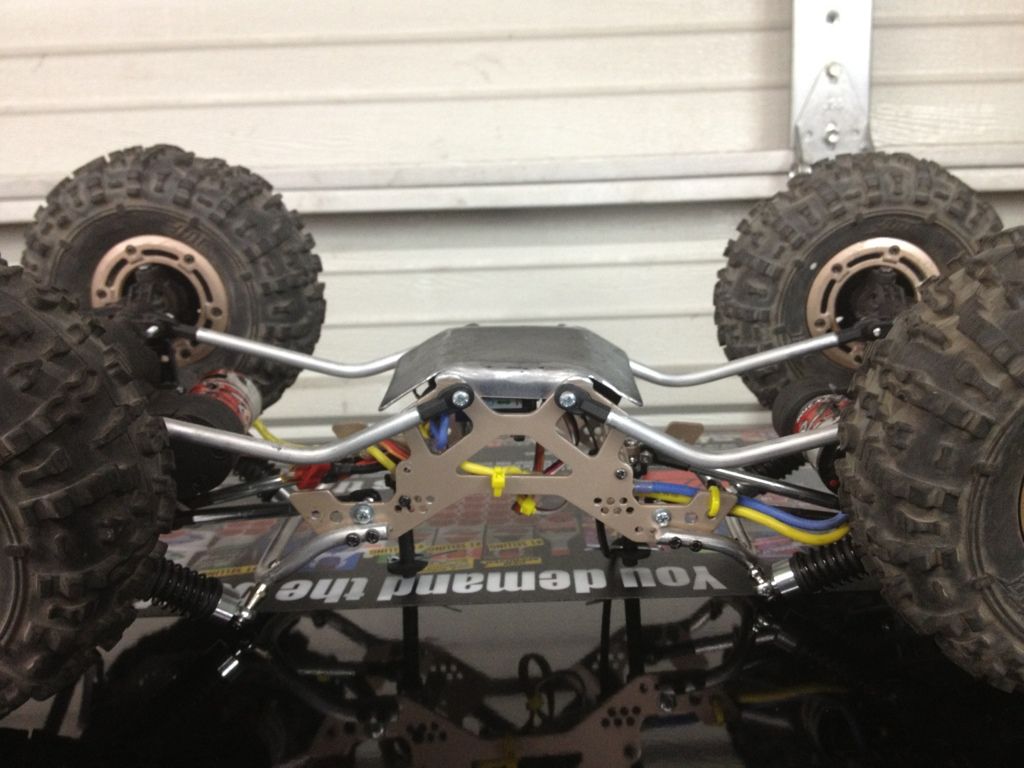 Then I made some shock tabs that mounts on top of axle housing and broke out the aluminum rod and bent up some shock loops for the chassis for new shock locations. Took out the center section of the electronics tray and just left the ends where my body posts are mounted . Dropped all the electronics down on the skid with some double sided sticky tape for now. And a new antenna tube ;) 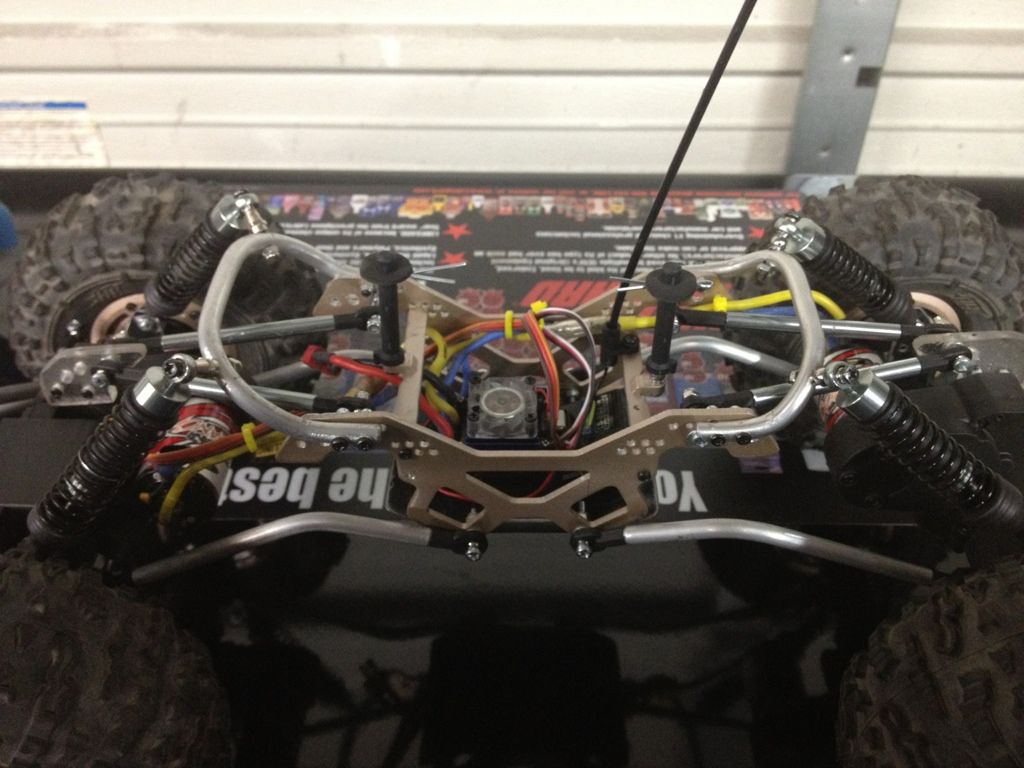 Then played around some more and did a lil hi steer setup. Also cut 4 coils off the springs to give it a 60/40 droop setup. Shrink wrapped the bottoms of the springs where the cup is so tires won't kick them off. 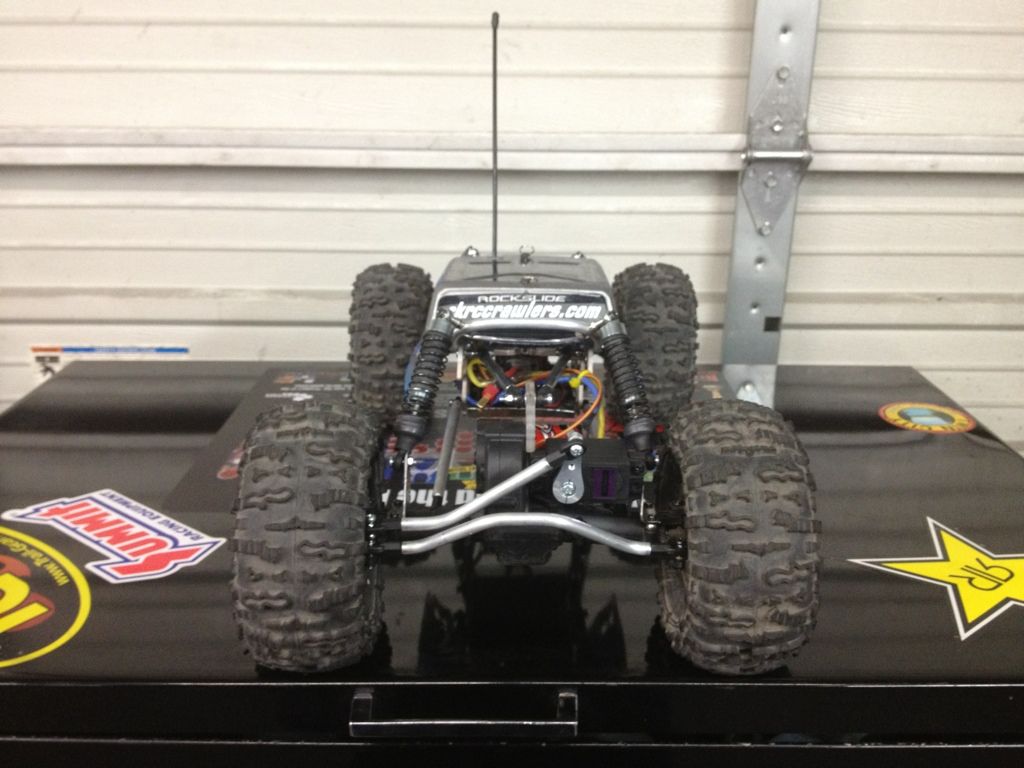 Made new rear lock outs , you can see my new shock mounts give me tons of clearance from motor / tires and links. Front tires barely rub the springs when at full turn. The shrink wrap is there just incase. 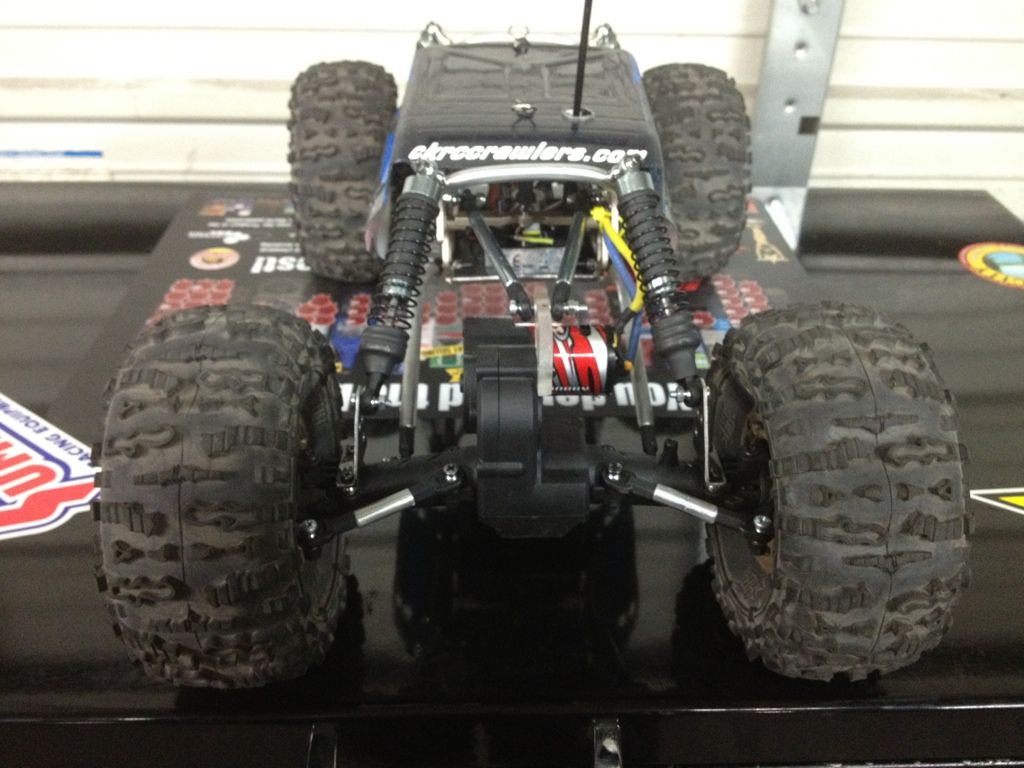 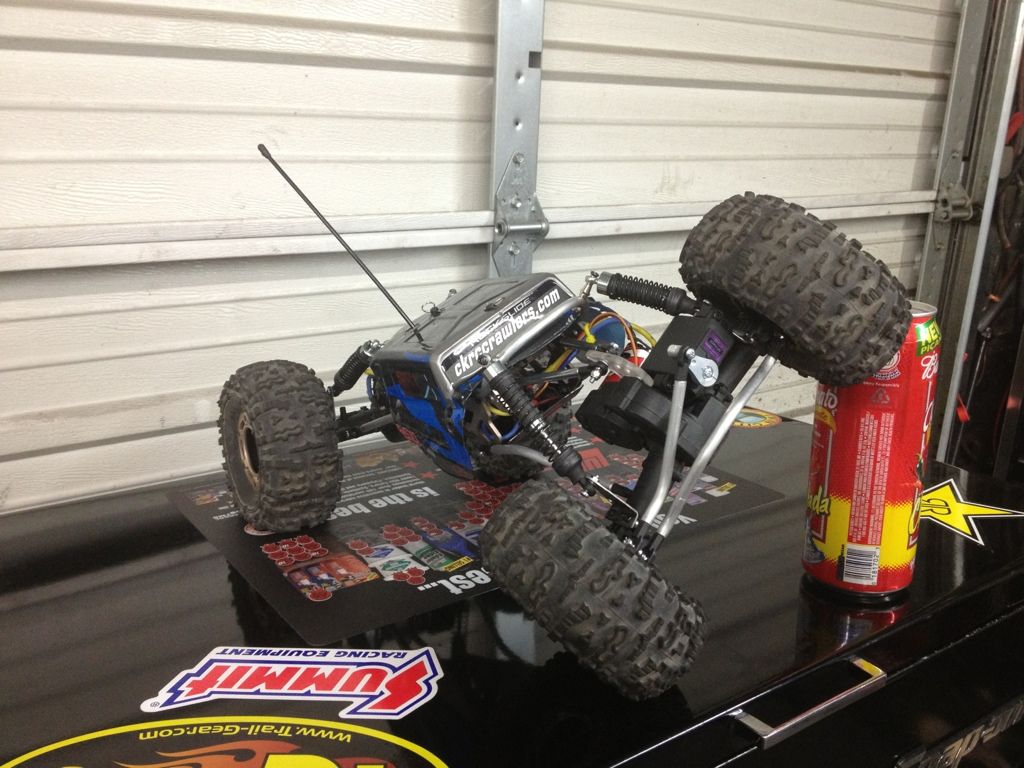 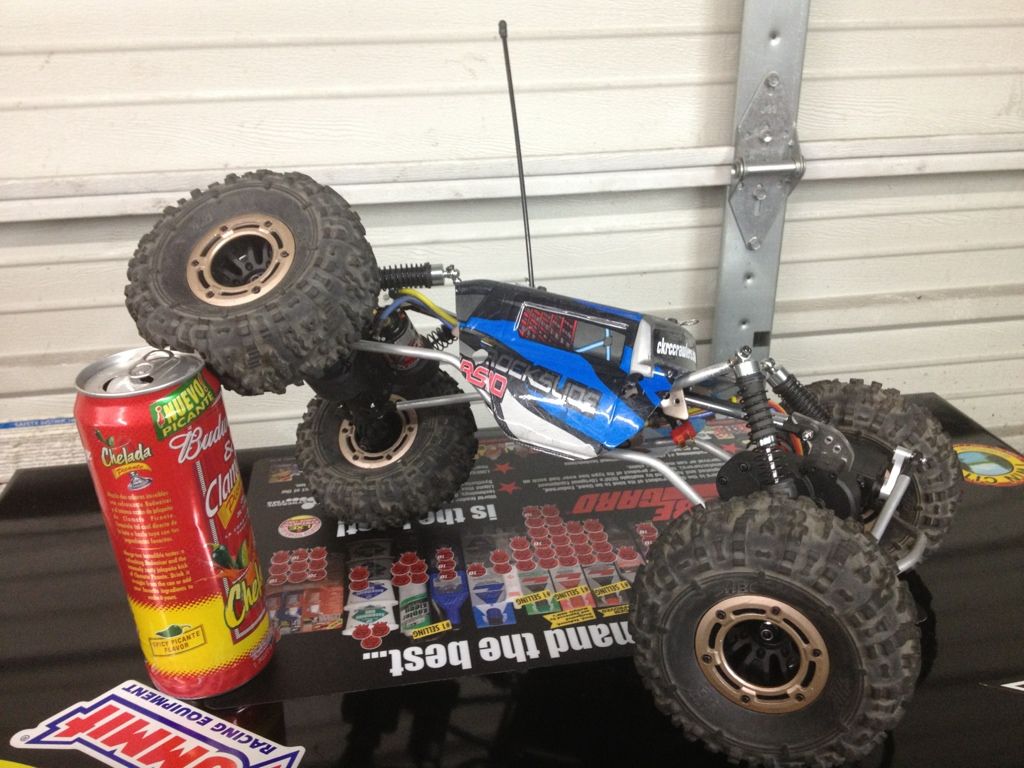 Sits about 2 3/4" to the bottom of skid as it sits now, and what's left of the body lol. 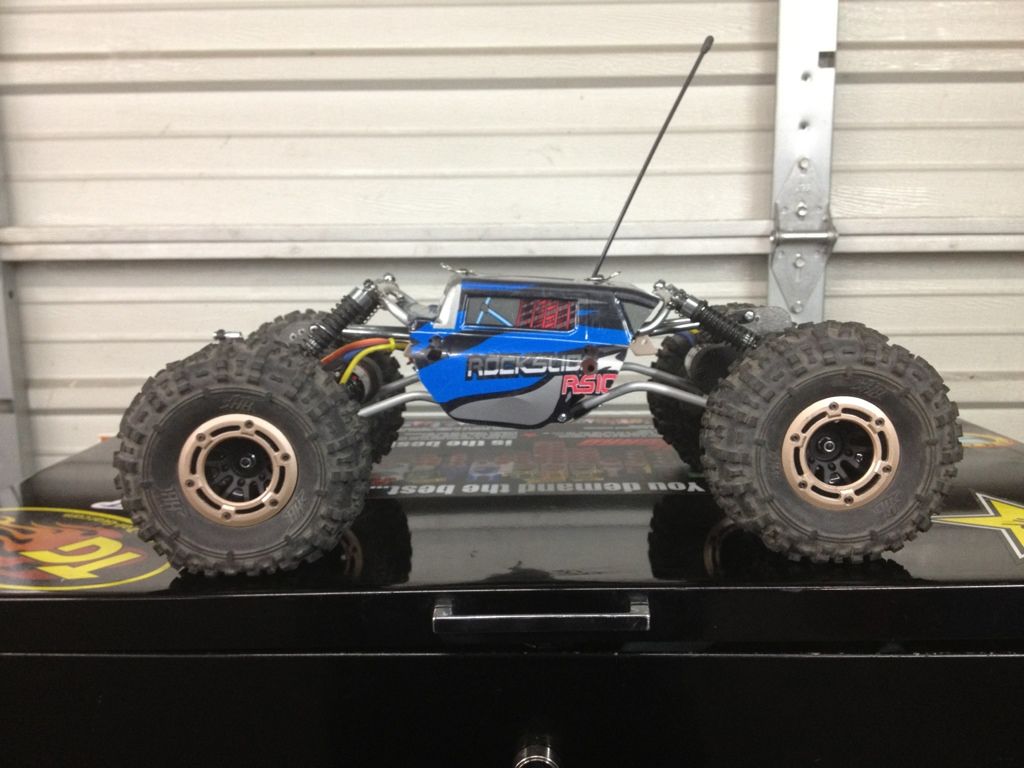 Last edited by G's ^; 11-16-2012 at 10:02 PM. |
|
| |
|
11-16-2012, 09:38 PM
| #3 |
| Pebble Pounder Join Date: Oct 2012 Location: Reno
Posts: 170
|
Since I live in Reno and work only blocks away from ckrc i cant stay out of there. Picked up some metal gears and some vanquish synthetic grease for the gears. 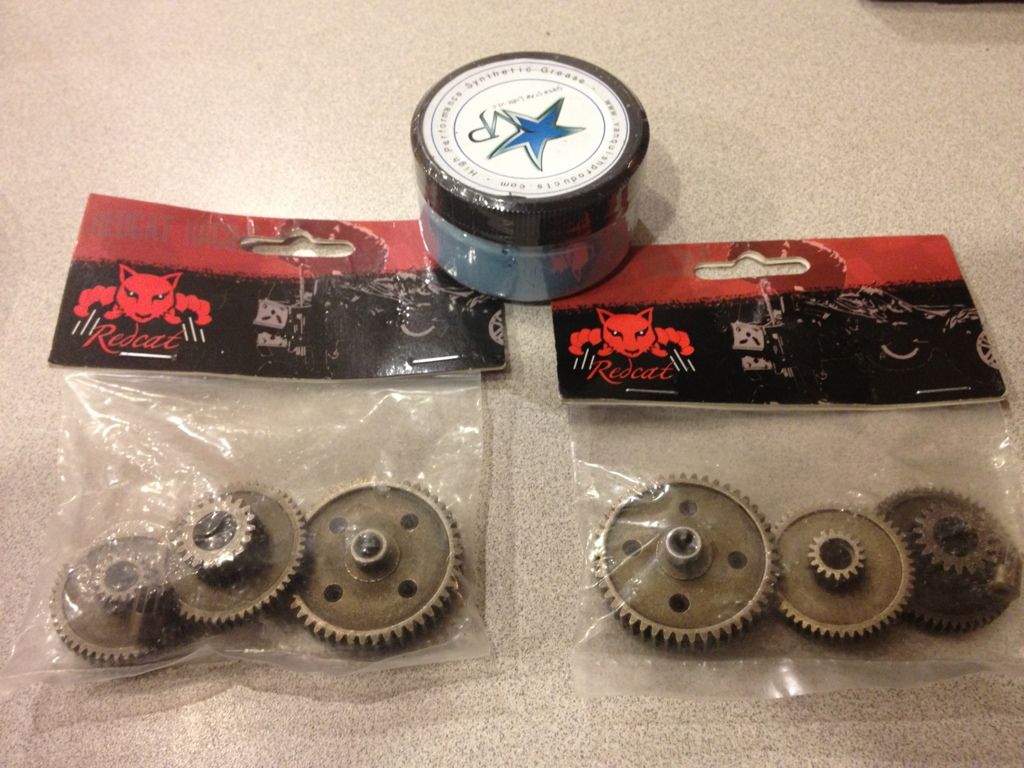 Although I won't be installing them till I can find some aluminum spur plates and hardened pins. Seems like finding a unicorn at the moment. Also got got some lipo goodnes coming in the mail soon ! Can't wait to see how it runs with some juice. It has really bad clod stall at the moment ! It may jut be from the old junk nicd/nimh battery's I'm running ? May try the 8t pinion in the rear also? Feed back / tips or thoughts appreciated ... thanks for looking. Last edited by G's ^; 11-16-2012 at 09:41 PM. |
|
| |
|
11-17-2012, 09:11 AM
| #4 |
| Pebble Pounder  Join Date: Nov 2011 Location: Rhode Island
Posts: 183
|
Hey - those upper shock mounts are like nothing ever seen. Very creative. They might get hung up on the ground with the rig upside down, no? See if you can rock and flip the truck back over. Other than that, looks great. Lucky guy so close to CKRC.  |
|
| |
|
11-17-2012, 12:03 PM
| #5 | |
| Pebble Pounder Join Date: Oct 2012 Location: Reno
Posts: 170
| Quote:
| |
|
| |
|
11-17-2012, 01:28 PM
| #6 |
| Pebble Pounder Join Date: Mar 2011 Location: columbus
Posts: 103
|
Hey man the links are pretty sweet are they fairly easy to make?
|
|
| |
|
11-17-2012, 02:46 PM
| #7 | |
| Pebble Pounder Join Date: Nov 2011 Location: Rhode Island
Posts: 183
| Quote:
| |
|
| |
|
11-17-2012, 02:54 PM
| #8 |
| Newbie Join Date: Apr 2012 Location: van wert county
Posts: 35
|
Really like the way the shocks are mounted on this, what did you use for spacers on the bottom mount were it attatches to the axle?
|
|
| |
|
11-17-2012, 05:42 PM
| #9 | |||
| Pebble Pounder Join Date: Oct 2012 Location: Reno
Posts: 170
| Quote:
Quote:
Quote:
Last edited by G's ^; 11-17-2012 at 06:02 PM. | |||
|
| |
|
11-17-2012, 07:25 PM
| #10 |
| Pebble Pounder Join Date: Mar 2011 Location: columbus
Posts: 103
|
Nice that's a pretty good idea I am going out to get me some now lol. Now why did you drill the middle wouldn't you just thread the end to screw the ends on there?
|
|
| |
|
11-17-2012, 09:07 PM
| #11 |
| Pebble Pounder Join Date: Oct 2012 Location: Reno
Posts: 170
|
[QUOTE=SeTh_Rs10;4019686]Nice that's a pretty good idea I am going out to get me some now lol. Now why did you drill the middle wouldn't you just thread the end to screw the ends on there?[/ Well the aluminum solid core rod is 1/4" , the link ends use a 3mm screw size. So you drill a hole in the end of the rod , centered as possible , then run a 3mm screw into that hole to make threads. Then cut the head off the screw leaving enough thread hanging out of the rod to screw the traxxus link end to. Heres the cap I made out of a brass pipe plug. The inside diameter of it fit over the 1/4" rod nicely. So I drilled a hole in the top of the plug using the same size bit which was 7/64. That way all I had to do is slide that plug over each end and start my hole and it was pretty center. I used it as a guide on everything I made so the hole eventually got a lil bigger , but still much more centered then doing it free hand. Top of plug 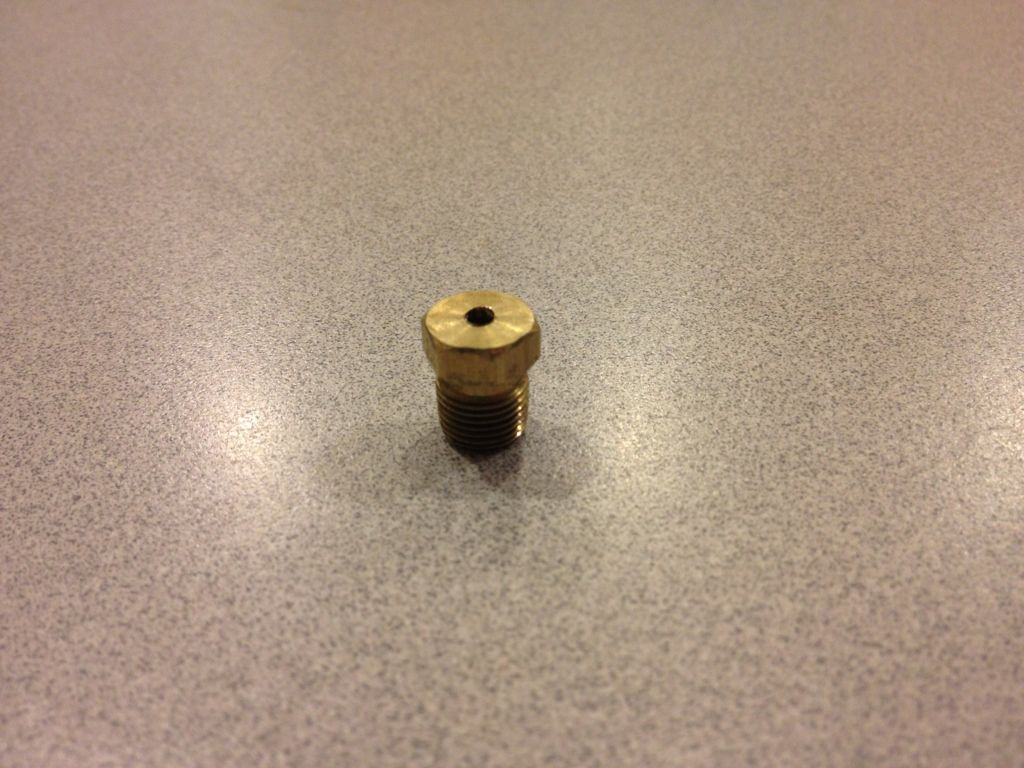 inside of plug that slides over rod 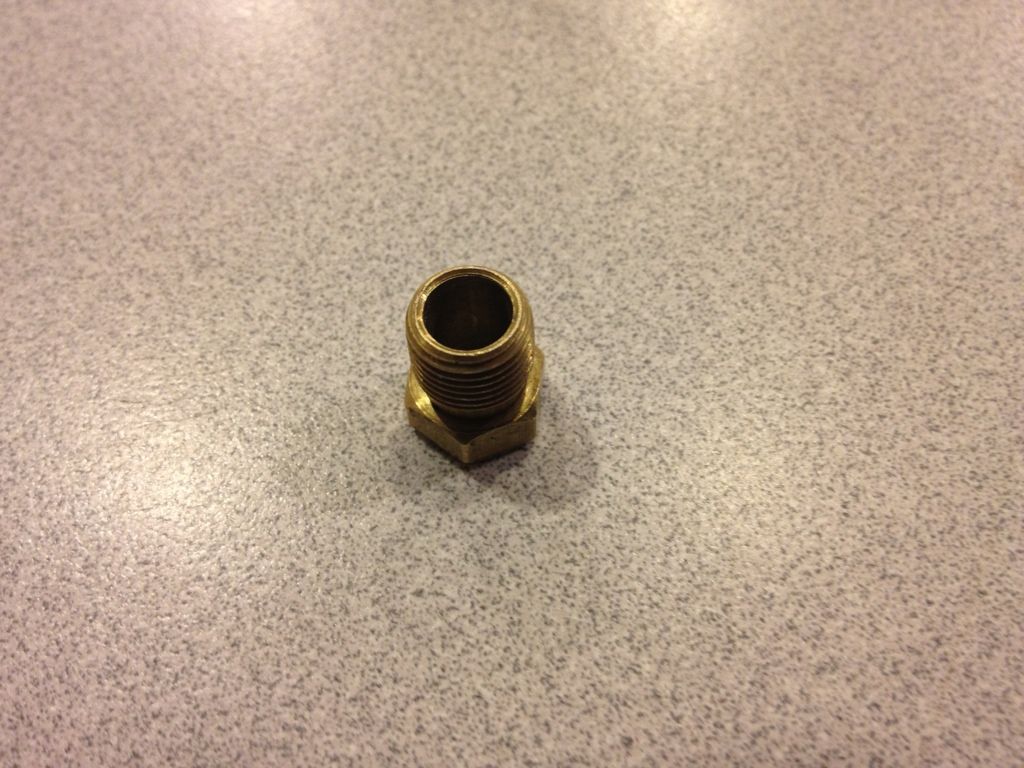 Pic of it slid over rod to start the hole straight , and the tune bender i used 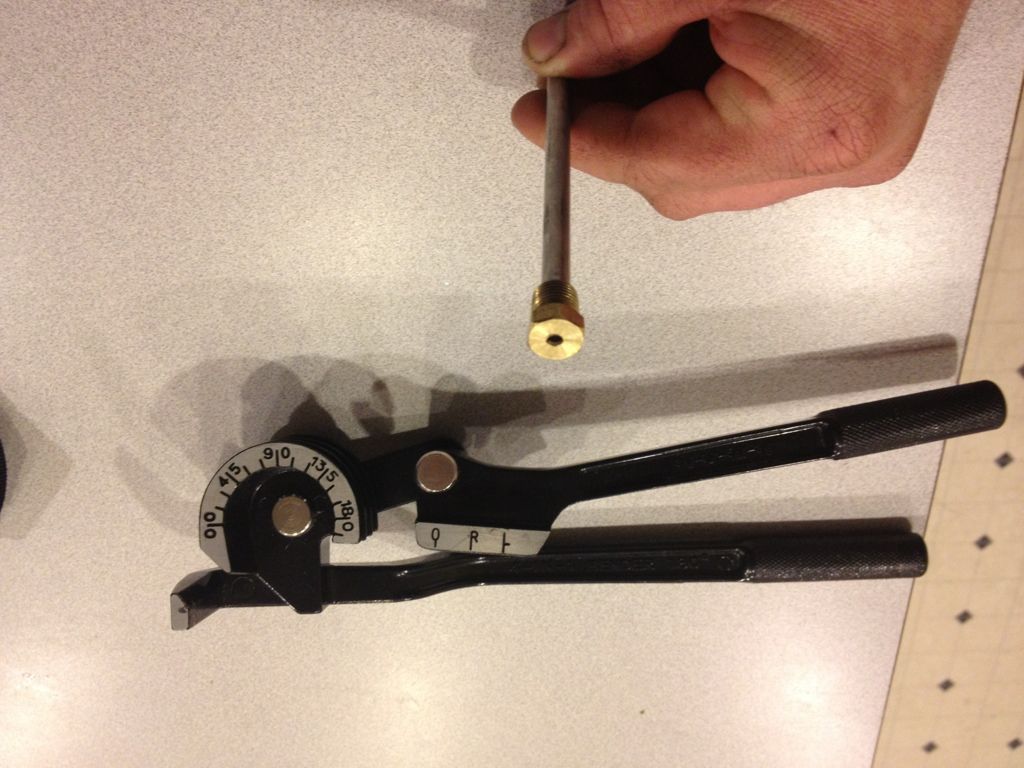 Pic of me running a 3mm screw in the drilled out end . I leave more thread hanging out then in the pic before cutting head off , just an example. 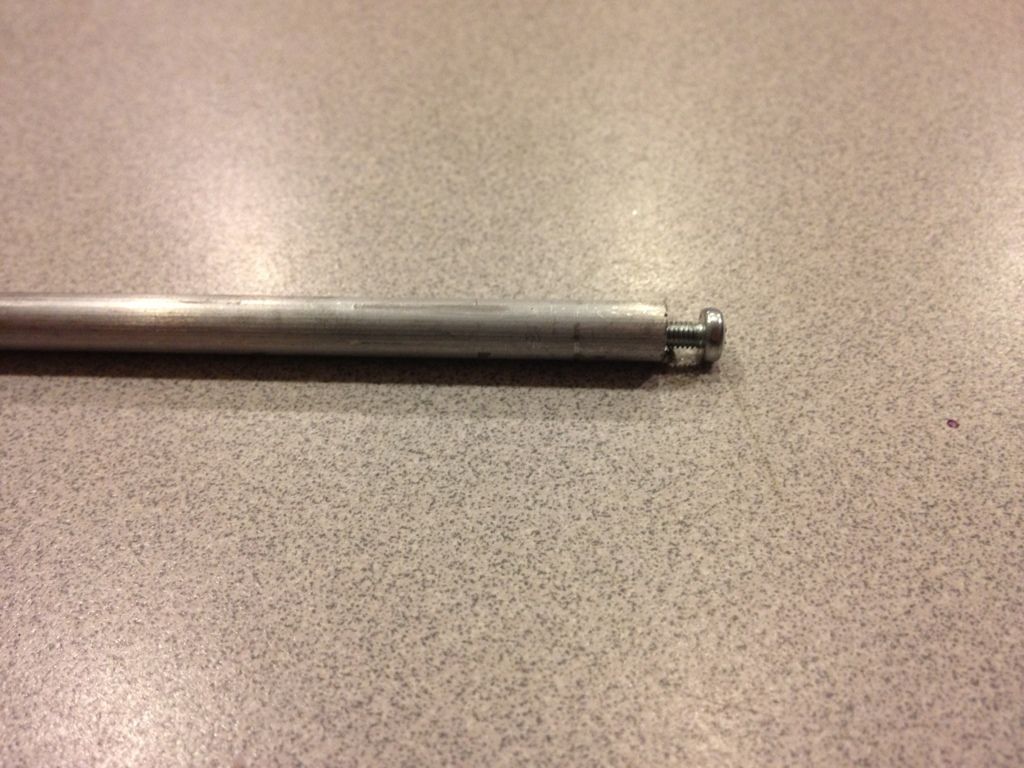 I got a 3ft stick of 1/4" aluminum and a bag of misc size 3mm screws/nuts and washers for like 7$ Last edited by G's ^; 11-17-2012 at 09:11 PM. |
|
| |
|
11-18-2012, 04:19 AM
| #12 |
| Pebble Pounder Join Date: Mar 2011 Location: columbus
Posts: 103
|
Nice that's sweet I have been trying to figure something out like I figures I would have to use a tap and die set excellent idea thanks man !!!
|
|
| |
|
11-18-2012, 11:12 AM
| #13 | |
| Pebble Pounder Join Date: Oct 2012 Location: Reno
Posts: 170
| Quote:
| |
|
| |
|
11-18-2012, 02:31 PM
| #14 |
| Newbie Join Date: Apr 2012 Location: van wert county
Posts: 35
|
How do you like the servo your using? was looking at hi tech but the price on the tower pro's is so cheap i was thinking about trying one of those first.
|
|
| |
|
11-18-2012, 07:42 PM
| #15 | |
| Pebble Pounder Join Date: Oct 2012 Location: Reno
Posts: 170
| Quote:
| |
|
| |
|
11-18-2012, 07:50 PM
| #16 |
| Pebble Pounder Join Date: Oct 2012 Location: Reno
Posts: 170
|
Was online last night after a few brews... And placed a order for this peice I've been reading so much good stuff about .  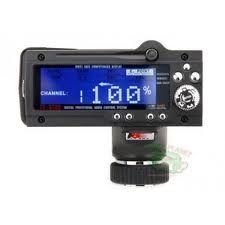 Can't wait to mod it out. Last edited by G's ^; 11-18-2012 at 07:53 PM. |
|
| |
|
11-18-2012, 10:24 PM
| #17 |
| RCC Addict Join Date: Dec 2011 Location: Australia Queensland!
Posts: 1,086
|
Are you going to hack it or did you get a prehacked one?
|
|
| |
|
11-18-2012, 11:23 PM
| #18 | |
| Pebble Pounder Join Date: Oct 2012 Location: Reno
Posts: 170
| Quote:
| |
|
| |
|
11-19-2012, 08:25 PM
| #19 |
| Pebble Pounder Join Date: Oct 2012 Location: Reno
Posts: 170
|
Got these in the mail today ! 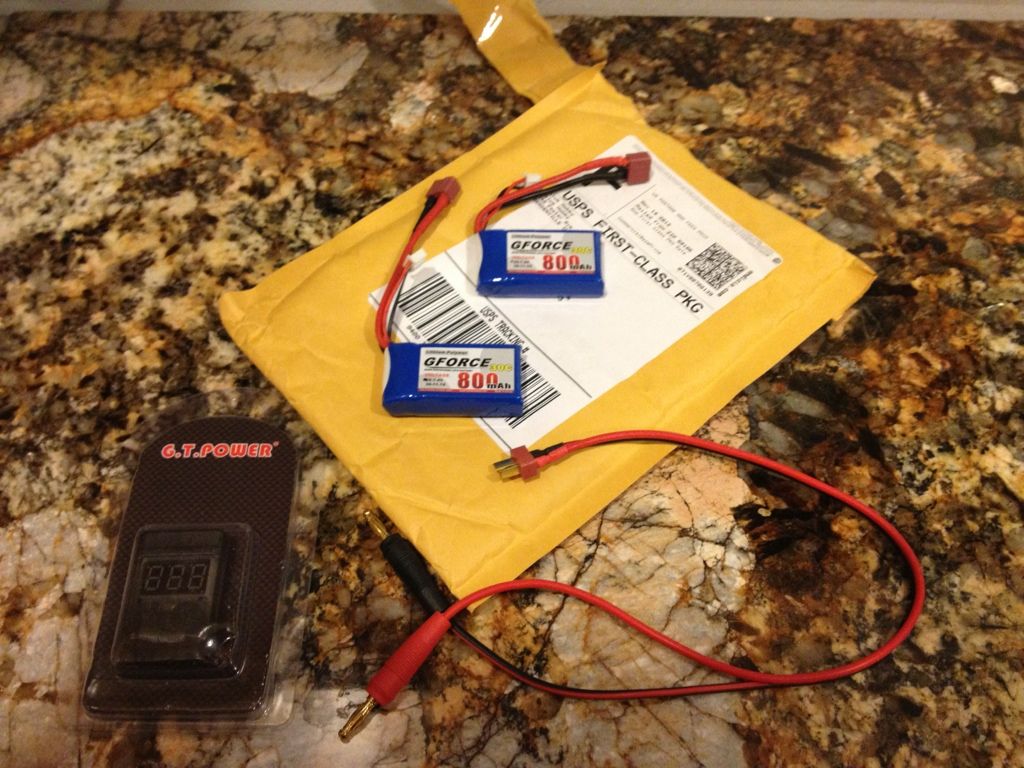 I'm was excited as I'm sure most of you are when parts come in ! Ofcourse I had to try it ASAP ! So I made a temporary plastic tray to mount on top of upper links , drilled some holes and cut some slots for the Velcro strap. Battery and volt alarm fit nicely. 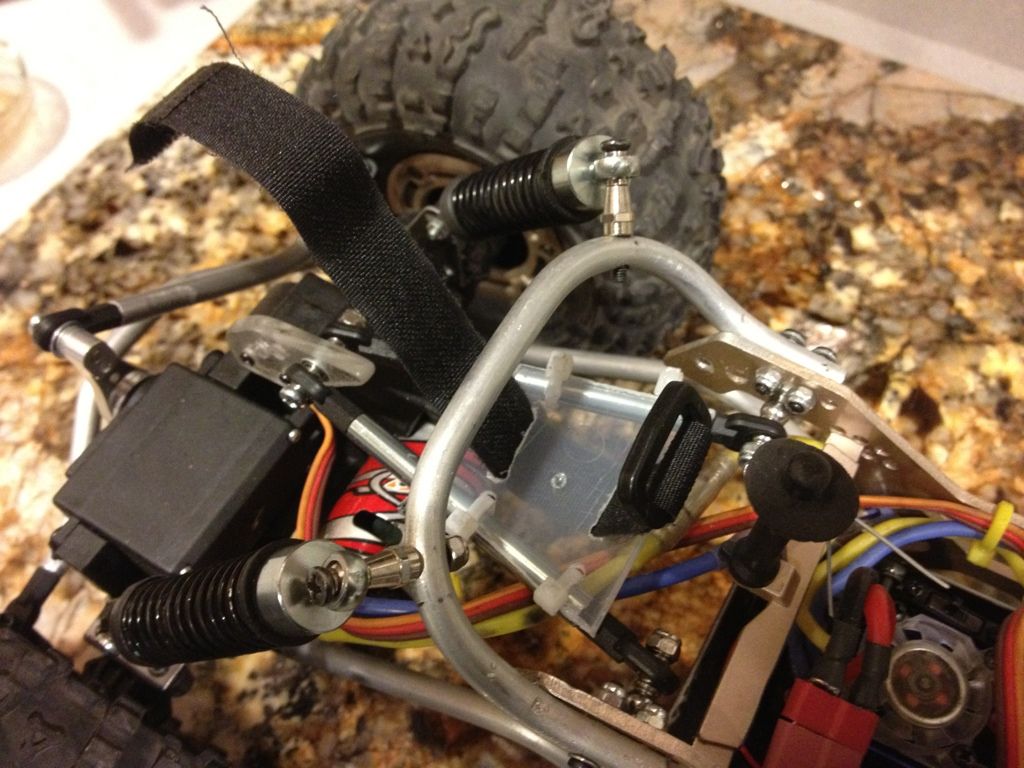 All strapped down 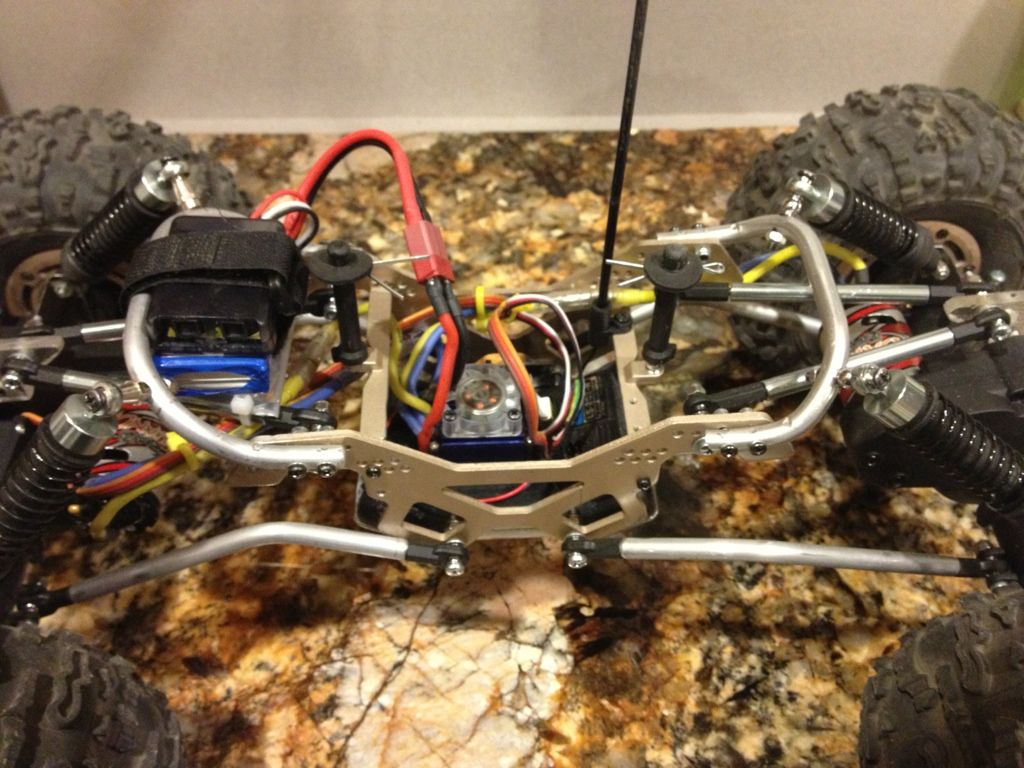 Then put a drop light in my sideyard to play on my lil test pile 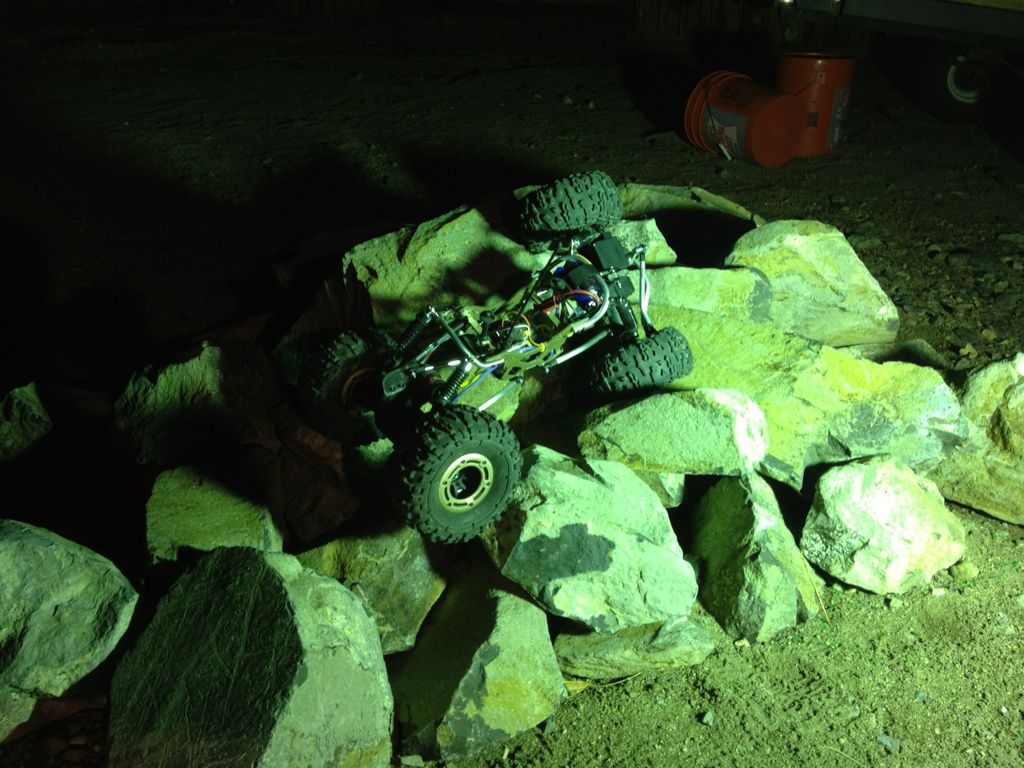 I brain farted and forgot to order a lipo safe charging bag ;( Wastnt sure if these lipos would be charged out of the box , so I plugged in the voltage alarm and it read 3.7v per cell. So I ran it . Didn't last more than 10min ;( Gonna put it on them on the charger tomorrow amd get them up to 4.2v and see just how long they run till hitting the set limit on alarm. Which I guess I'll set at around 3.3-3.4v. Last edited by G's ^; 11-20-2012 at 12:40 AM. |
|
| |
|
11-20-2012, 05:18 AM
| #20 |
| RCC Addict Join Date: Jun 2011 Location: Lindsborg
Posts: 1,708
|
I run mine at 3.2
|
|
| |
 |
 My kitty build - Similar Threads
 | ||||
| Thread | Thread Starter | Forum | Replies | Last Post |
| My kitty | crash | Chit Chat | 2 | 06-07-2012 04:44 PM |
| Kitty | ggooler | 1.9 Scale Rigs | 41 | 10-31-2009 11:04 PM |
| My New Kitty | 01XJ | Chit Chat | 6 | 08-26-2006 01:08 AM |
| Kitty Crawler! | Ur Next | Chit Chat | 7 | 07-08-2005 09:35 AM |
| |


 Linear Mode


