| |
 11-29-2008, 02:54 PM
| #1 |
| Rock Crawler Join Date: Jun 2006 Location: Wisconsin
Posts: 570
|
Hi guys, hope you don't mind me sharing some photos of a project I have been working on. It's a Hustler, which seems to be a very popular crawler chassis around these parts, so I am sure you've all seen them before. Never the less, I always enjoy building and documenting my projects. This definitely isn't my first crawler, but it is my first super. It will also be my first brushless, and my first droop suspensioned crawler. I don't have photos of every step, but I am sure most are firmilar with Clodbusters, so they wouldn't exacty be anything new. First, some axles. I didn't really plan on full metal axle cases, but it ended up that way. JP steering knuckles kind of started the whole deal. Then I got the Integy axle tubes, which are actually pretty nice. I followed that up with the Integy gear case halves. Figured I might as well. I could have gone full JPS axles too, but Integy parts are cheaper and scratching them on the rocks wouldn't bother me as much.  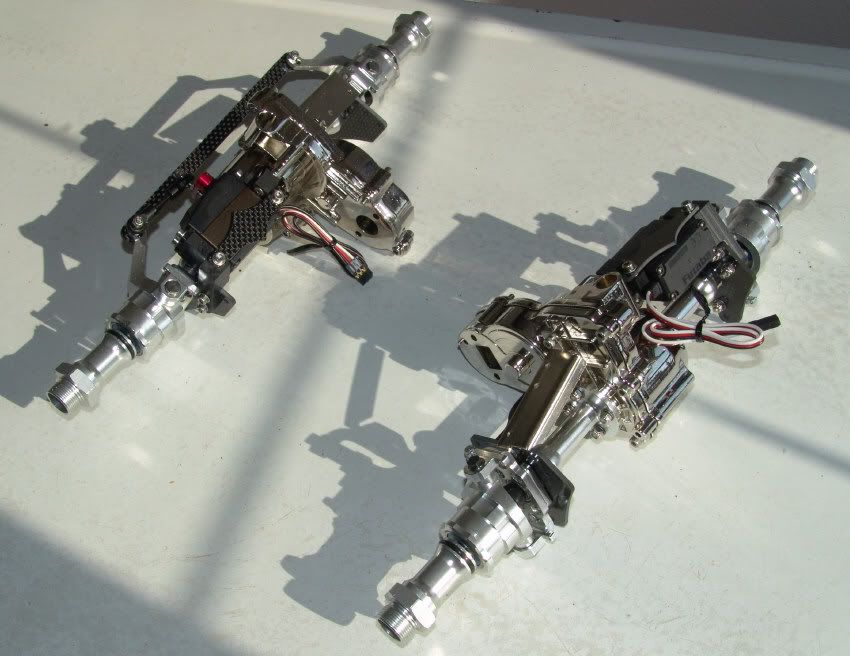 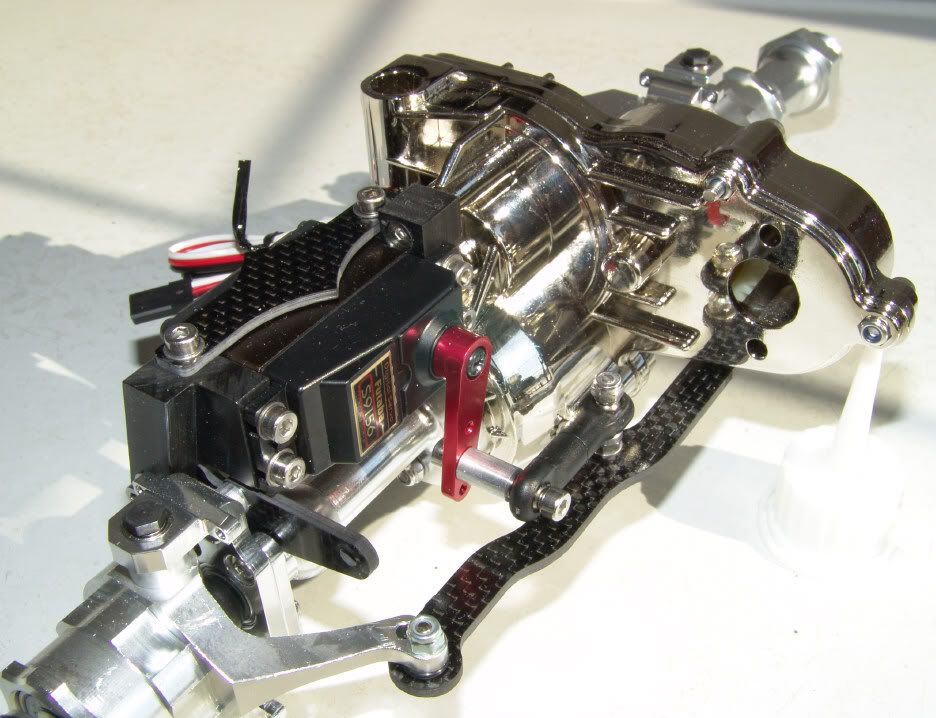 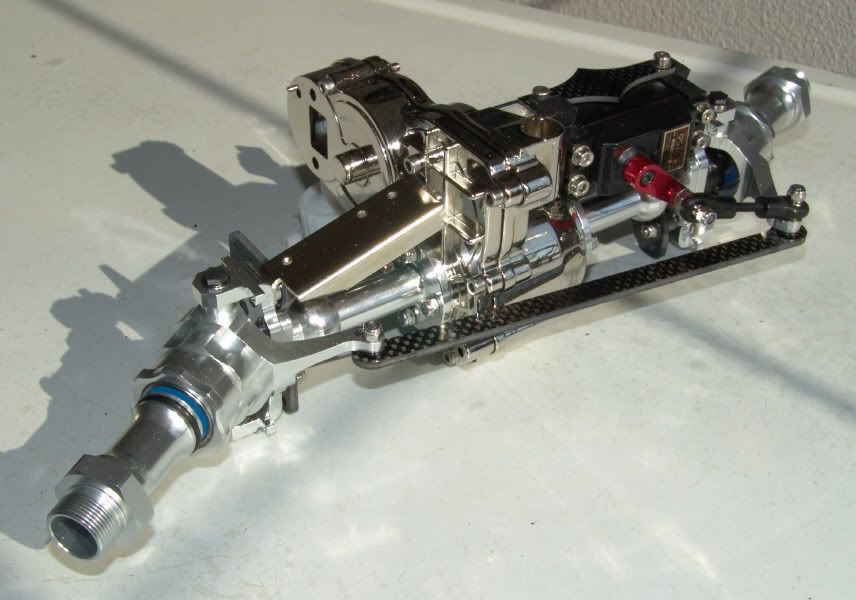 I stuffed the alxes with the good parts. TTR CVDs, a spool to replace the differential, and Acer ceramic bearings. I settled on a suitable behind the axle servo steering set-up and mounted up some Futaba S9156 servos. Good for 340 oz. of torque. I would have gone HiTec, but I've recently switched over to the Futaba camp, since I started flying helicopters. 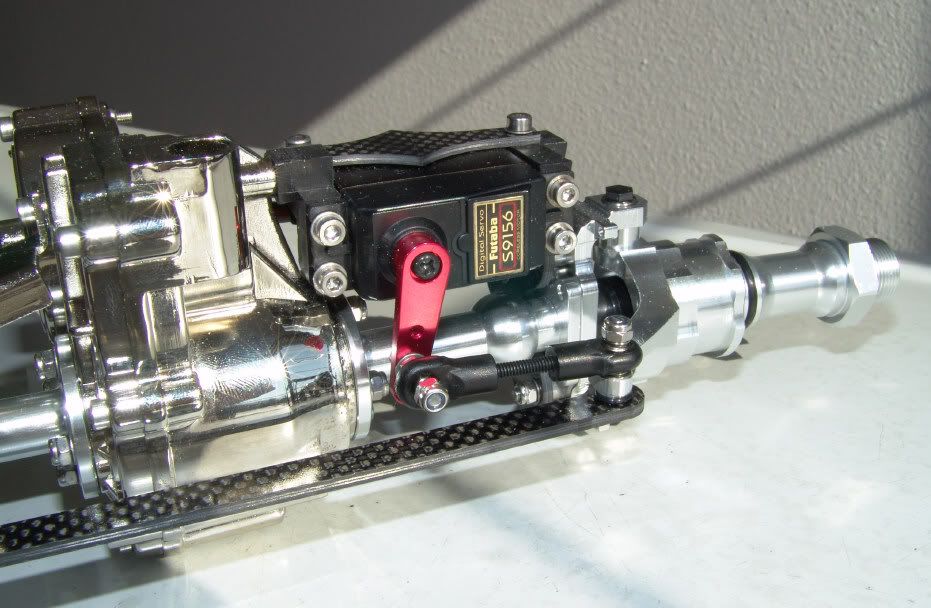 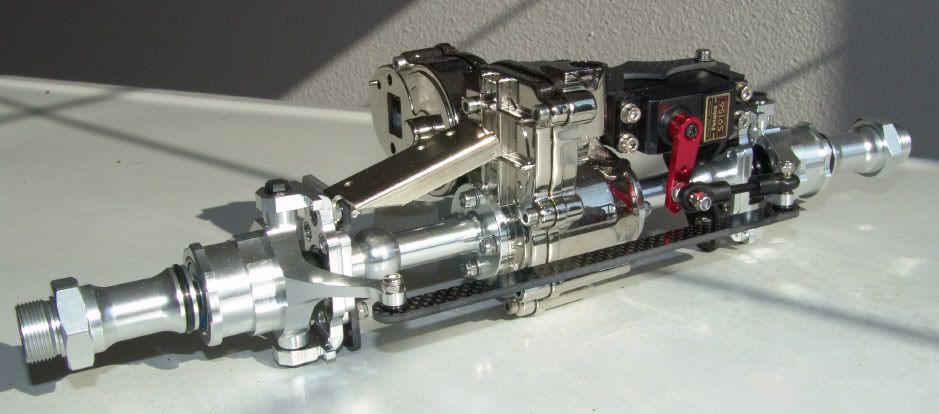 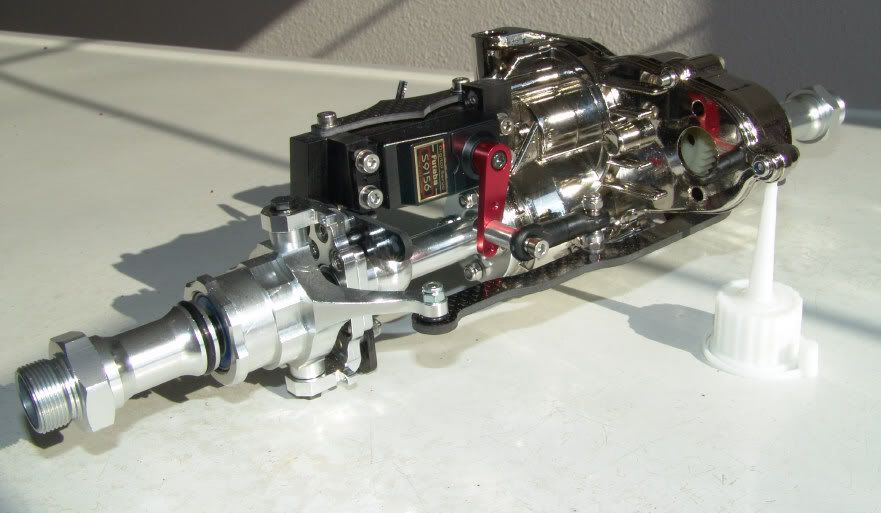 I then picked up some Integy wheel wideners for their 23mm hexes. To fit them, I had to chuck them up in a lathe and bore the hole to 8mm for the TTR CVD stub shafts. They mount up just fine otherwise. They'll help me fit then Pro-Line XL beadlocks that I'll be running later. Next, I focused on the power. I wanted to run a dual brushless system, but I took a path off the beaten trail. After doing much research on brushless motors and reading the specs, I settled on a pair of Great Planes Rimfire out-runners, which are readily available. They should be over-kill for my needs. The motors have an 850 Kv rating, and can run on 7.4 to 14.4 volts. Roughly around the middle to upper 45 amp range, at full load, of which I will probably never reach, and depending on the voltage, up to 710 watts. That's nearing 1 hp, per motor. 745 watts = 1 hp. 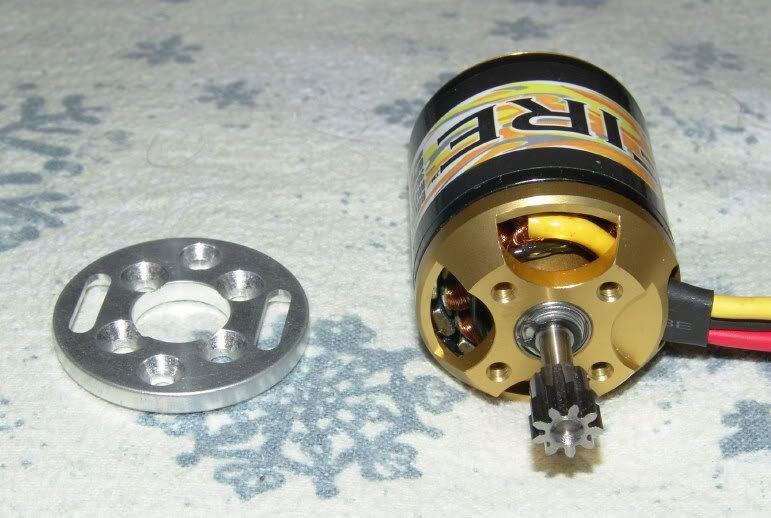 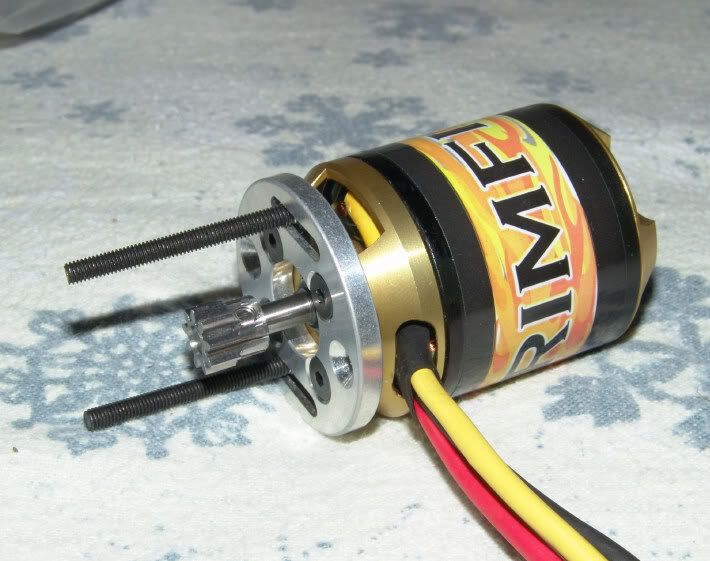 Fitting these motors was not overly complicated. I simply bought some TTR adjustable motor mounts, and had them modified to match the bolt pattern on the brushless motors. This way I have all the flexibility to run any gear combination I could with a standard 540/550 can motor. Since the motor shafts' are 4mm in diameter, I was faced with the decision of turning the shafts down to fit standard pinions, or bore the pinions out myself. I choose to bore the pinions on a lathe at work. It was nice and easy. For now, I will start with some Robinson Racing 9 tooth pinions, and go from there. The pinions are on the small side for boring out the hole. It's questionable how well the set screws will hold, but I will see. The threads couldn't be quite as deep with the enlarged bores. I plan to run 8 NiMh cells, so 9.6 volts - batteries strapped to the JP steering knuckles. Roughly 8160 RPM, no load.  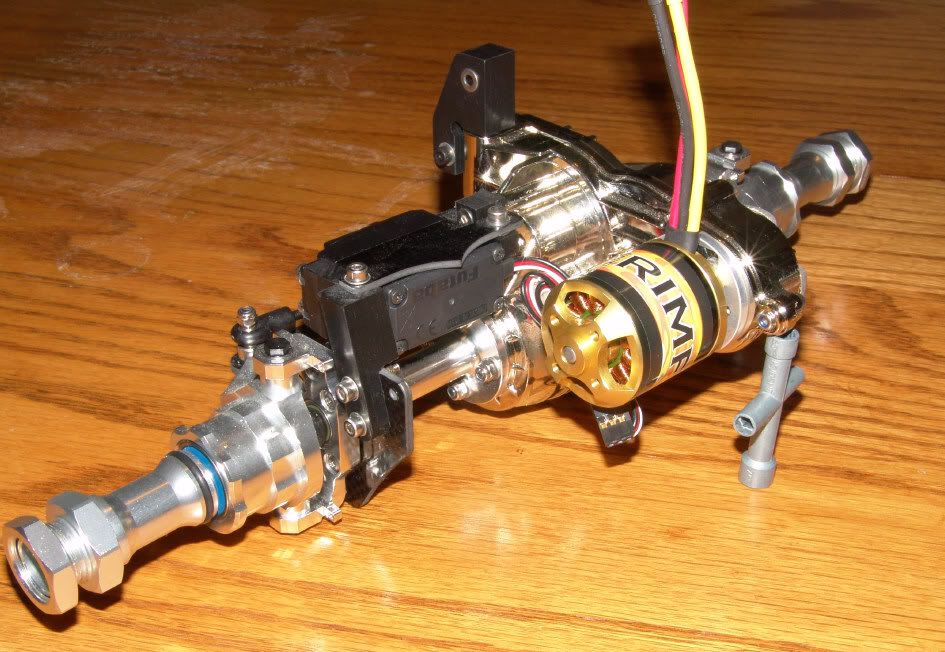 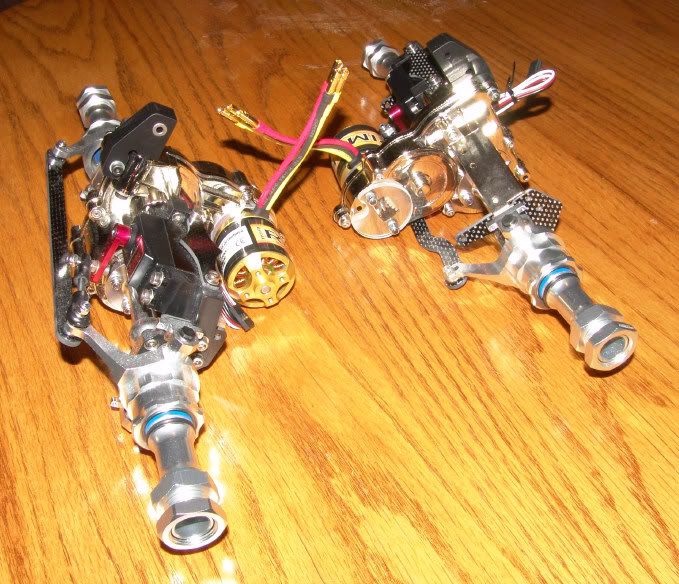 Finally, the axles are ready to be bolted to the chassis. I had some shocks, from OFNA, ready for installtion, but they ended up being a leaky mess. I couldn't get them to seal up. I'll probably be trying another set of shocks I have laying around, or else ordering new ones. Possibily a rebuild kit. 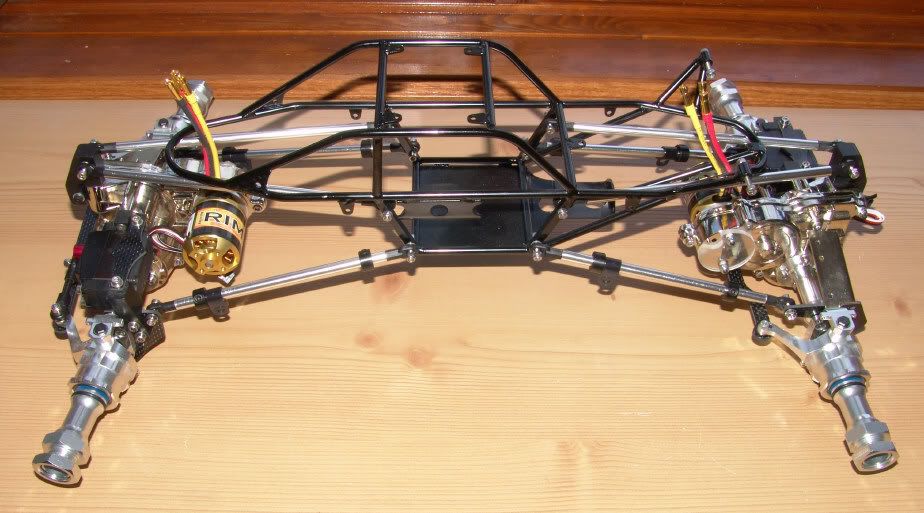 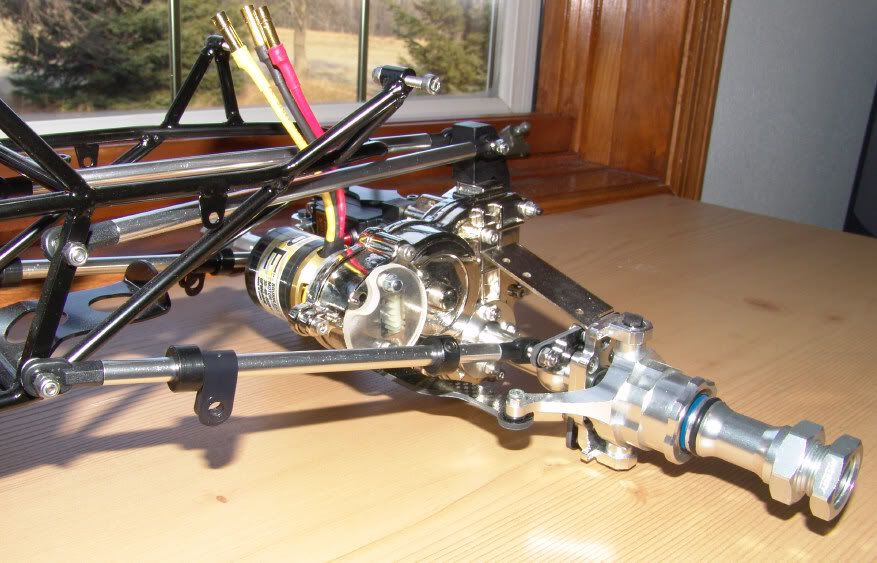 |

|  |
| Sponsored Links | |
| | |
|
11-29-2008, 03:18 PM
| #2 |
| Pebble Pounder Join Date: May 2008 Location: Vancouver, Canada
Posts: 152
|
Looks like thats going to be a very nice rig. Good job! |
|
| |
|
11-29-2008, 03:20 PM
| #3 |
| MODERHATER   Join Date: Nov 2005 Location: Colorado
Posts: 10,939
|
I have 4 recommendations. Lose the Integy center sections, they are too heavy and will hut your performance. Those motors are going to destroy the plastic gears the first time you put any pressure on them. Those wheel adapters are going to make you hella wide, you might want to look into narrower adapters. The carbon fiber lower link mounts are probably going to break, just mount to the axle tube. Where did you get that BTA kit? It looks nice as does your build. |
|
| |
|
11-29-2008, 05:22 PM
| #4 |
| Pebble Pounder Join Date: Mar 2007 Location: cleveland
Posts: 107
|
Those adapters look like it will make the clod as wide as it is long |
|
| |
|
11-29-2008, 08:14 PM
| #5 | |
| Quarry Creeper Join Date: Sep 2008 Location: sterling VA
Posts: 276
| Quote:
| |
|
| |
|
11-29-2008, 09:57 PM
| #6 |
| I wanna be Dave Join Date: Oct 2006 Location: Centered
Posts: 2,082
|
Nice looking build! As a very happy Hustler owner for the past 2.5 years, I'll throw in my 2 beans as well: Shocks: Traxxas Big Bore with 1000w oil and 3-5mm external limiters to prevent the droop springs from inverting the bladders. Those are some heavy gearboxes so 100w just won't do it for you I don't think. Wheel Wideners: Lose them, period. You're track width will be more than sufficient without them. The Hustler is a very stable crawler and you'll be missing out on a lot of fun with a rig that wide. I'm dead nuts at 14" and I can hit lines that I couldn't with my original build at 14.75" Motors: You already own them so try it, but as 666 said, you will obliterate your plastic guts quickly. 55's are still the balls for this rig in my opinion. Keep us posted with pics and updates |
|
| |
|
11-30-2008, 06:44 PM
| #7 |
| Rock Crawler Join Date: Jun 2006 Location: Wisconsin
Posts: 570
|
Hi guys. Thanks for the comments. On the motors, I just had to try them out. I mentioned right away that they might be overkill, but to be honest, that was kind of what I was going for. No shortage of power. If I break something, I'll fix it, and learn to use throttle control. I actually wanted to run these as an experiment for another model. I figure it'll be interesting to see how much torque they pump out. On the wideners, they look wide, and they are, but the Pro-Line beadlocks have so much off-set, I need to run some sort of widener or else the tires will hit the lower 4 links long before I get full steering lock. They hit, in fact, even with the wideners. 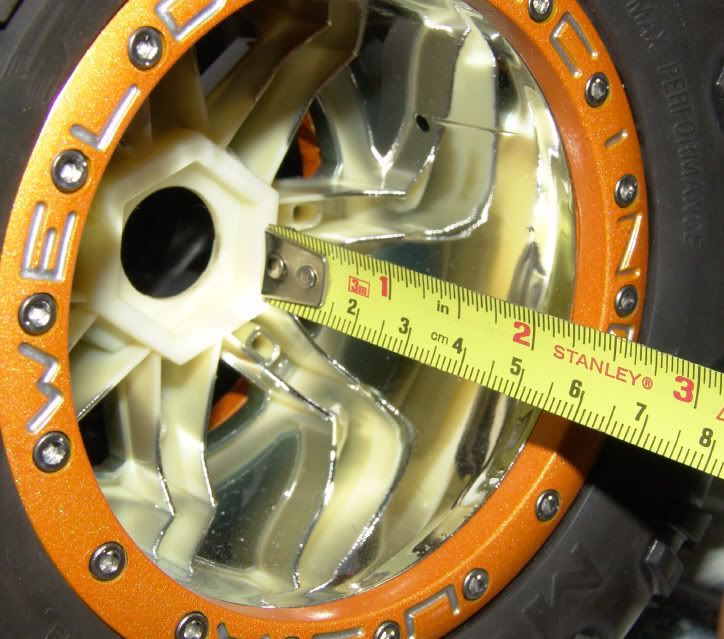  The other thing is I wanted to try and build some battery packs on the steering knuckles, since that is what they are designed for. The typical sub-C cell would probably not fit, without some type of widener, unless someone can offer some experience and knowledge of a set-up that would work. 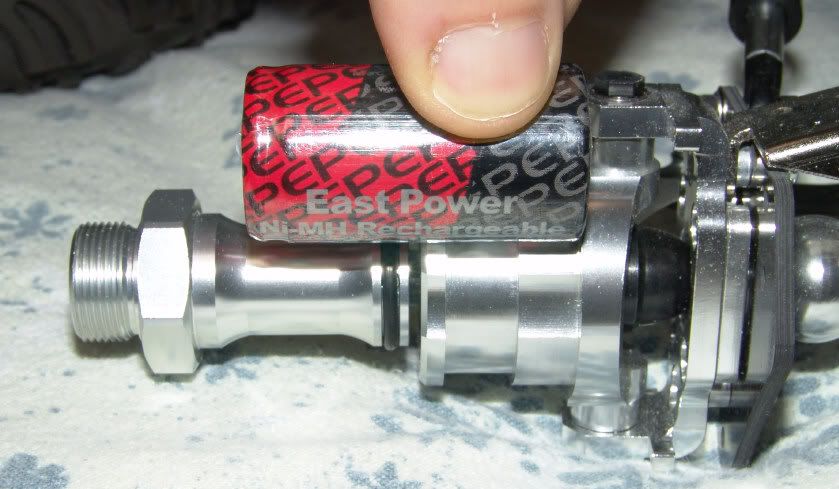 Even though the wideners look pretty wide, they aren't bad when the rims are bolted on. I think it's mis-leading, until you see the rims on the truck. Track width ends up being about 14.75". I don't really want to give up any more steering angle, by running narrower wideners, and to be honest, I don't intend to run the truck in any comps. At least not for a while. As far as I know, there aren't any comps in my neck of the woods, and I enjoy crawling on my own or with friends for fun. Getting through gates isn't much of a concern to me at this point. 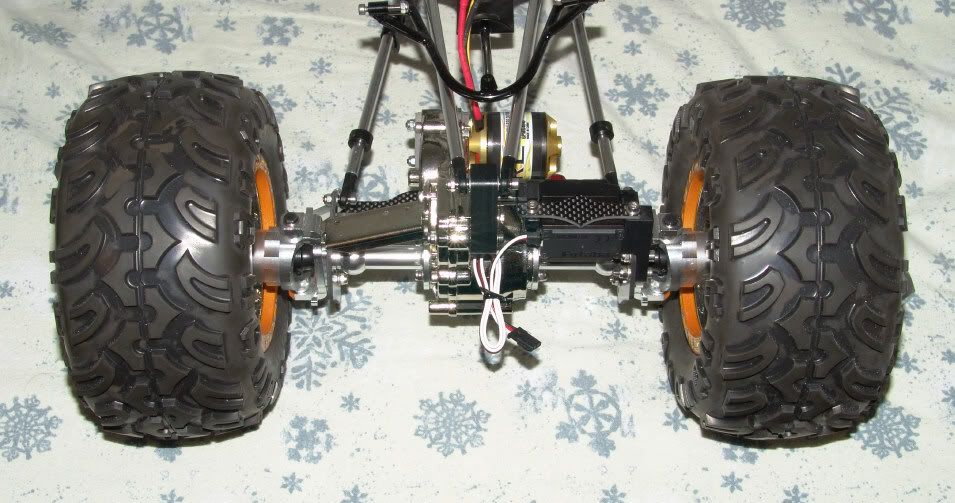 Let me throw in a couple photos of the steering. 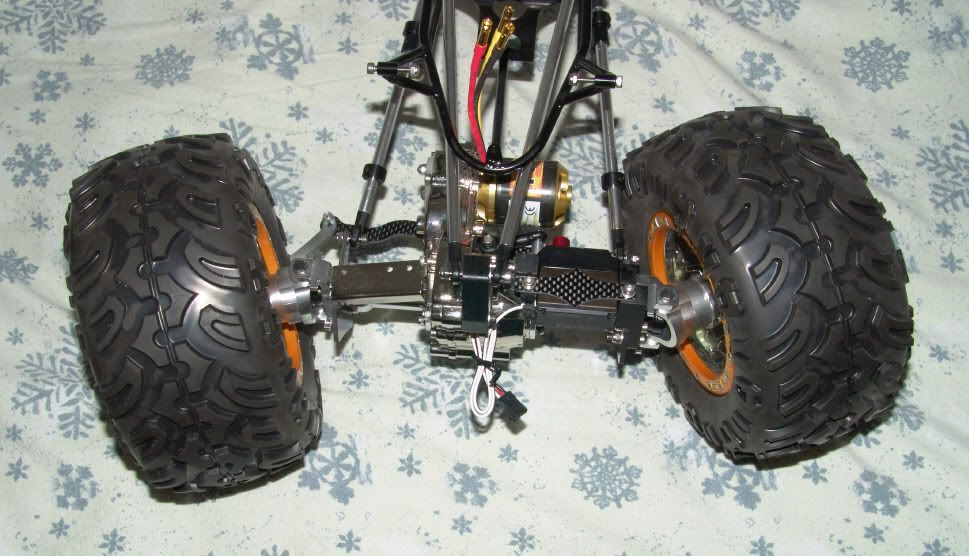 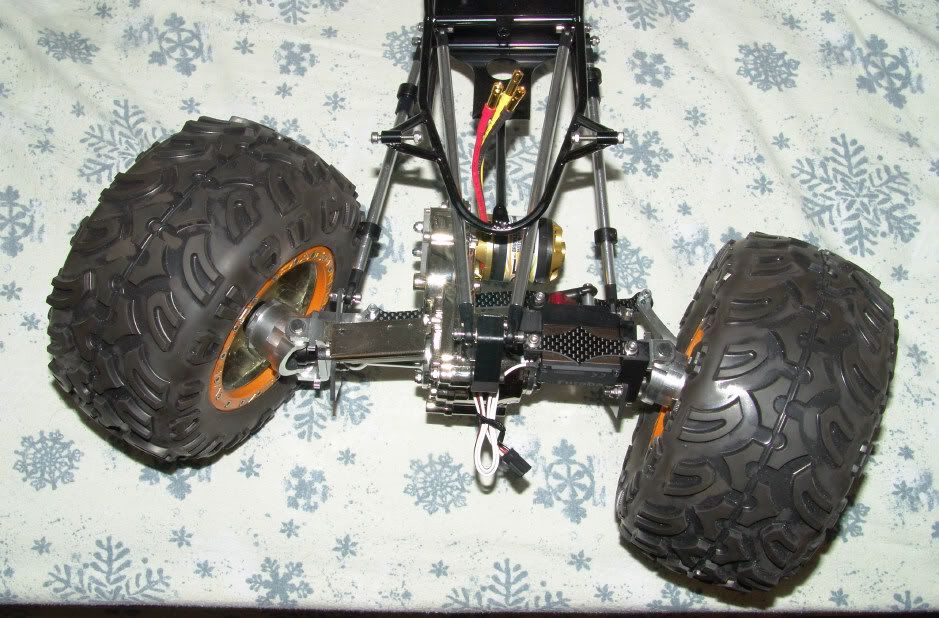 |
|
| |
|
11-30-2008, 06:52 PM
| #8 |
| Rock Crawler Join Date: Jun 2006 Location: Wisconsin
Posts: 570
|
Oh, and I was going to mention, I appreciate the reply on the shock set-up. I may get some Traxxas big bores, if I can't make somethin else work. Like I said, this is my first droop suspension and I am happy for the insight. I was able to try my leaky shocks out. 100 weight oil was what I did use, and that seemed awfully stiff. I could pick the chassis up and literally watch the axles slowly sink down. It took about 5 seconds for them to settle, even with the internal springs. Way slow. I think I will end up going lighter then 100 weight.
|
|
| |
|
12-01-2008, 12:45 PM
| #9 |
| RCC Addict Join Date: Sep 2005 Location: Tempe, AZ
Posts: 1,262
|
At least run a plastic case in the rear...I started out with your set up on my Hustler and quickly switched the rear case to plastic and it helped alot. I have been out of it for a while but who makes your bta? I went even heavier in the shocks once you get wheels/tires and wheel weights you will want thick fluid in the shocks.....also think about limiting travel with straps.
|
|
| |
|
12-02-2008, 06:58 AM
| #10 | |
| I wanna be Dave  Join Date: Oct 2006 Location: Martinsburg WV
Posts: 2,781
| Quote:
I'm using a set from RC4WD and they are not much better. 1 1/2" wider total. I cut them down a little bit but they can't be modified too much. Like an 1/8" each. I'm switching axles (from Raptors to Bergs, the Raptors are geared way too high and have no turning radius. Shelf queen axles is all they're good for) so I'm hoping the Bergs are a little narrower. Your Pro-Line wheels seem to have quite a bit more backspace than the Axials I have. I may go with 2.2 wheels after all anyway, the 40 series tires/wheels are so much bigger than I thought, and there's no real choices for them other than Moab XL's or making your own hybrid tire. Traxxas Big Bores are a good shock choice for these. Any 4" shock that you can fit springs inside will work. I have Sportwerks Mayhem rear shocks (Losi Mini-T front springs fit perfect inside) they are a bit on the long side for the Hustler. I'm not a huge articulation fan, so I may limit the travel once I drive it. Whichever shock you choose, remember it has to hard-mount on the link end (the cap of the shock, mount them upside-down so the weight is lower) so no ball ends on the bottom, just the top. Otherwise you'll get lots of side-to-side play in the suspension. Nice Hustler... Last edited by Big Mike; 12-02-2008 at 07:08 AM. | |
|
| |
|
12-02-2008, 10:06 AM
| #11 |
| Rock Crawler Join Date: Jun 2006 Location: Wisconsin
Posts: 570
|
Thanks for the comments and advice, guys. A few small updates today. I have a Hustler roller now. The only things holding me up now are the bullet connectors I will be needing to wire my speed controllers, battery pack(s), which I will either be building myself, or picking up something to fit on top of the axle, rather then on the knuckles. I am undecided yet. Anyway, I ended up using some Integy piggy back shocks I already has on-hand. They were laying around for a couple years, so I said 'why not give them a try'. I hear mixed thoughts on these things, but I figure now I will really know if they are good for anything other then looks. Believe it or not, so far I am happy with them. They were easy to fill and bleed the air out of. They don't leak, like my OFNA shocks did, so I am pleased. They do look good too. Time will tell, but for now, they seem to do the job. 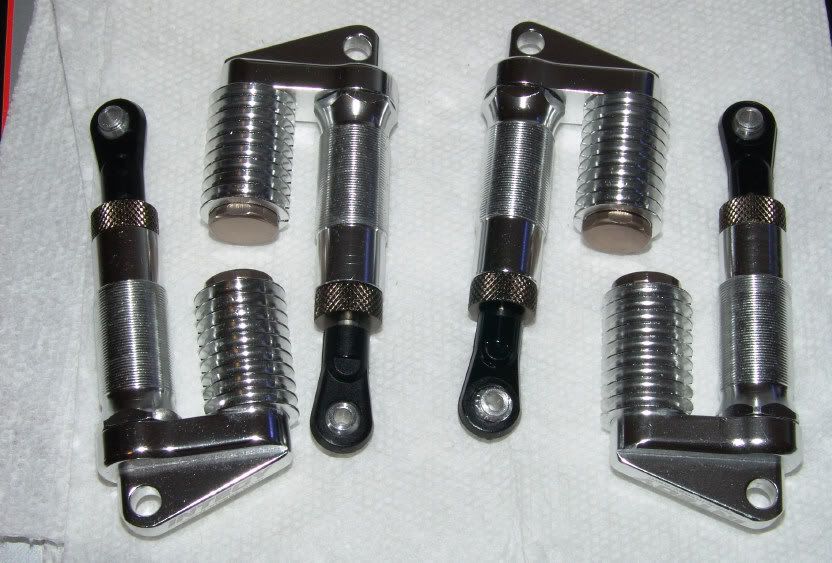 They ended up being a little on the short side. I would liked to fit them to the chassis without any bump stops, but as they are pictured above, the chassis tubes were laying on top the upper 4 links, and extending the shocks slightly. This worked out okay though. The shock shaft was hitting the cap, internally, when fully compressed anyway, so some kind of bump stop was going to be required no matter how I sliced it. I may still order up some Traxxas big bores. Those are practically the standard for Hustlers, and I know they are good shocks. Oh, for thos asking, the BTA set-up is from PRP. Hard to get a hold of, but nice. The company is small and when their stock runs dry, which is also small, it takes a while to get some more. I would probably have gone with a Hand Brothers steering kit, otherwise. That one seems cool. Here are some photos from today. 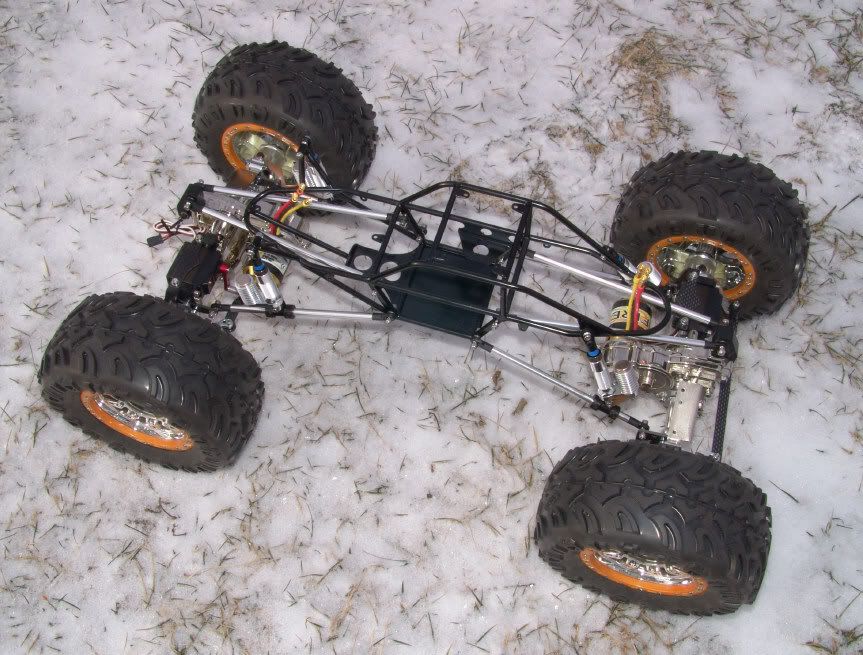 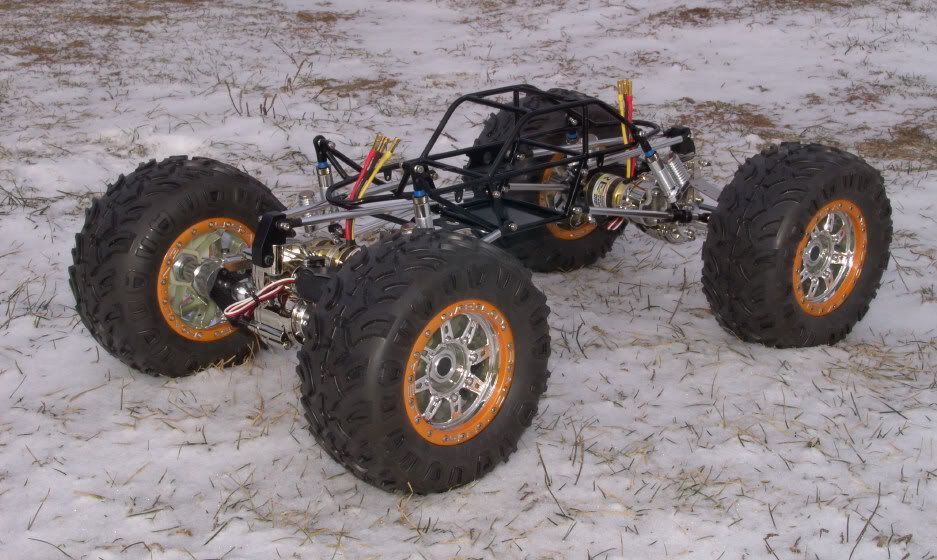 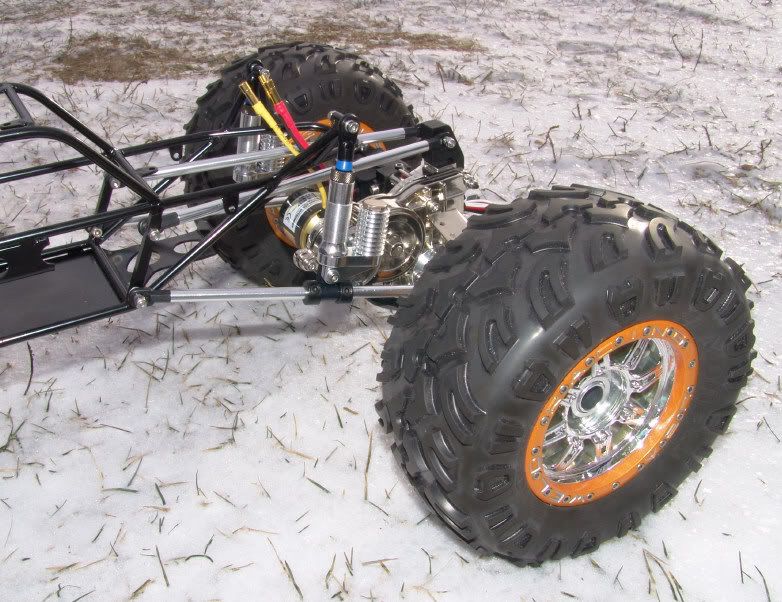 You'll notice the blue rubber bump stops on the shocks, in the above and below pictures. These are Traxxas parts, from the Revo. I had some laying around and they worked awesome! 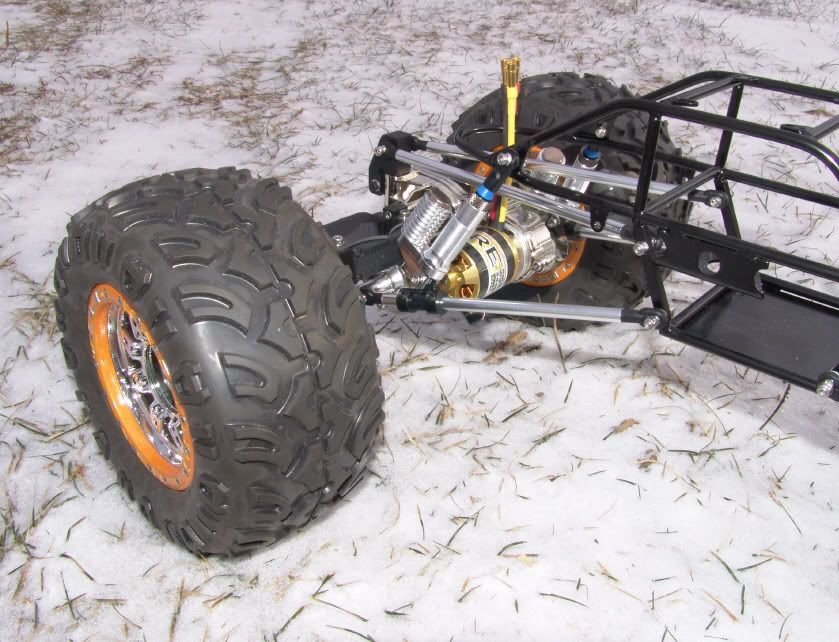 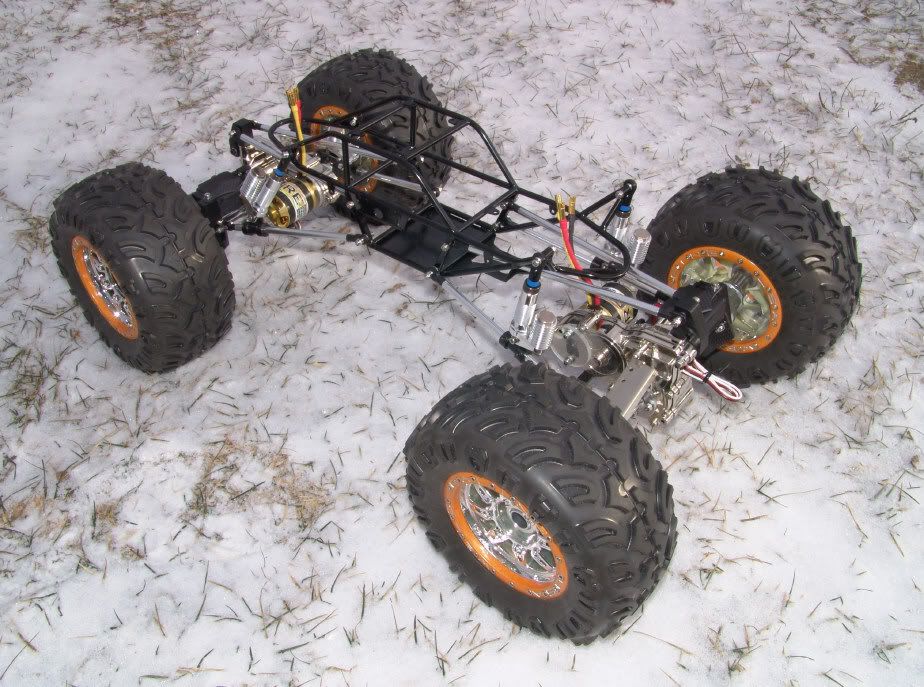 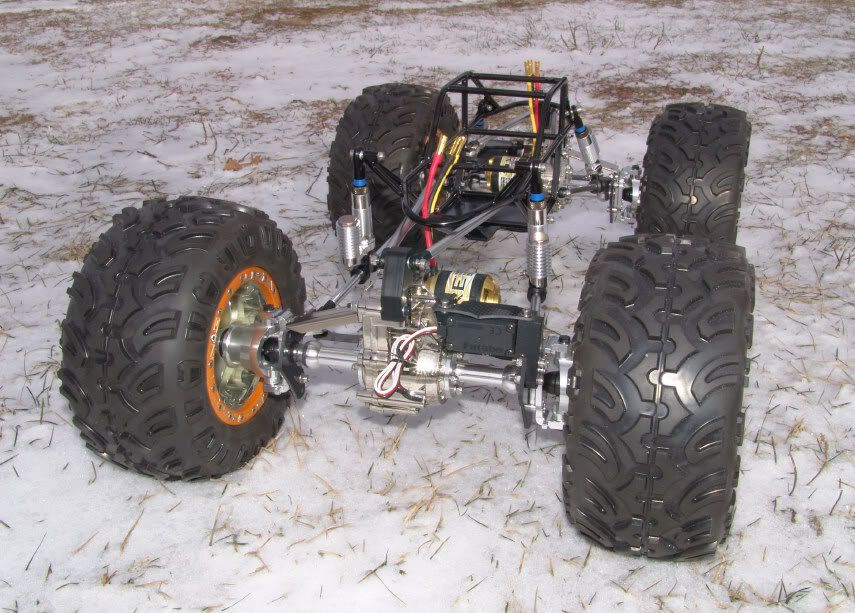 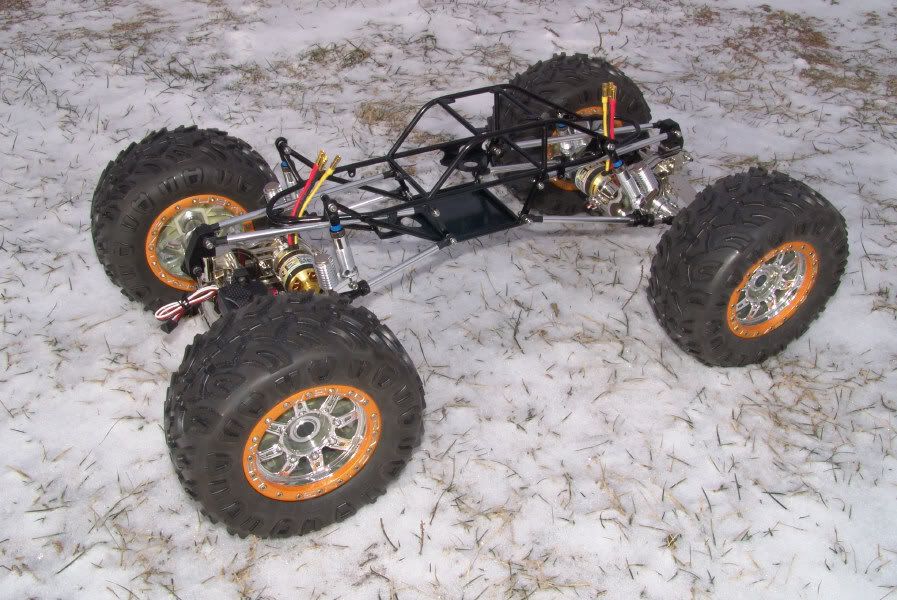 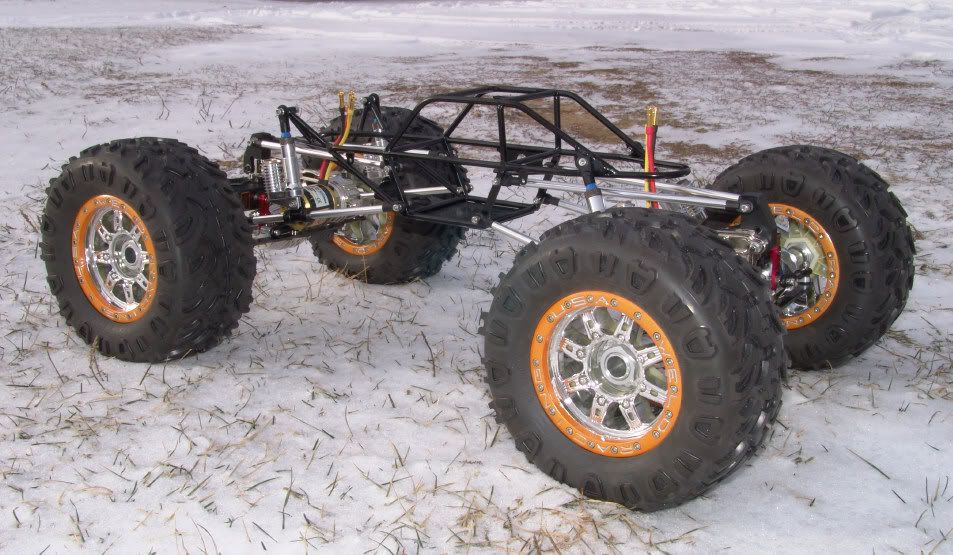 Also, I noticed these brushless motors have really stong magnets and with the extra poles, they are hard to spin by hand. Not really hard, but they do put up some resistance. Once they were on the gearboxes, I had to try something..... 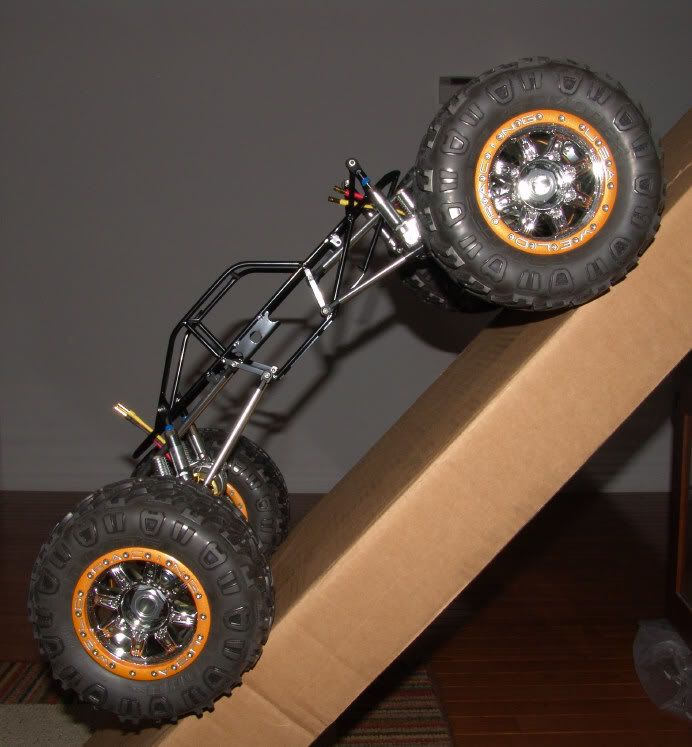 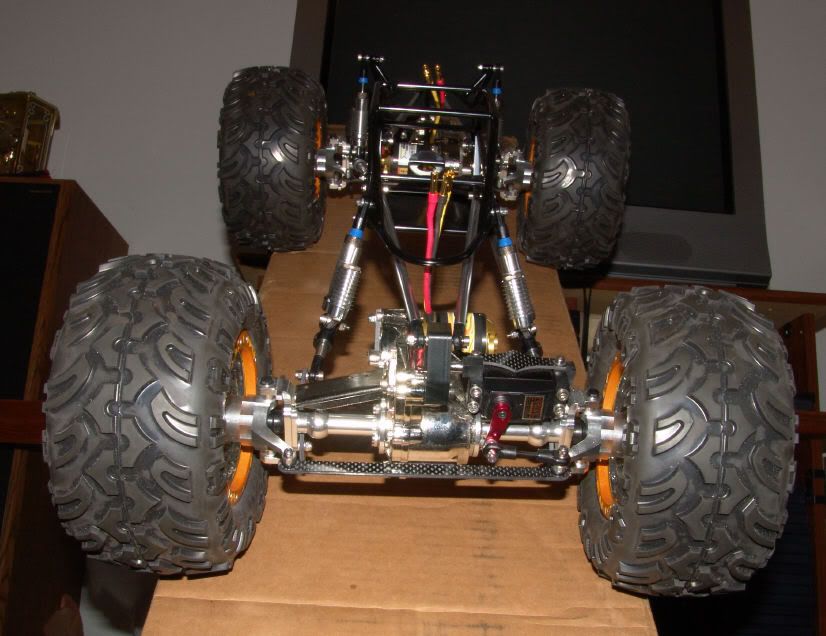 They had no problem holding the truck at about a 45 degree slope. I can't imagine how well the drag brake setting will work on the speed controller with these bad boys! Last edited by Espeefan; 12-02-2008 at 10:16 AM. |
|
| |
|
12-02-2008, 10:44 AM
| #12 |
| I wanna be Dave  Join Date: May 2006 Location: HONDURAS...ROCK HEAVEN
Posts: 5,076
|
It's coming along nicely , as for the shocks i also had a set and used them for an unfinished clod, i also went droop with internal springs |
|
| |
|
12-08-2008, 12:16 PM
| #13 |
| Rock Crawler Join Date: Jun 2006 Location: Wisconsin
Posts: 570
|
Hello guys. Another small update. I worked today on getting my speed controllers ready to go, which basically ment I did some soldering. Deans plugs for battery packs and bullet connectors to match my motors. 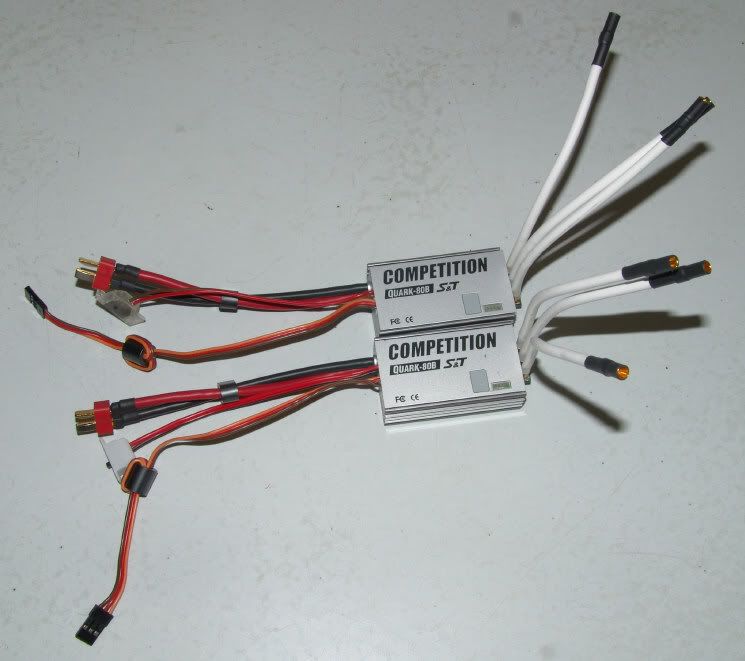 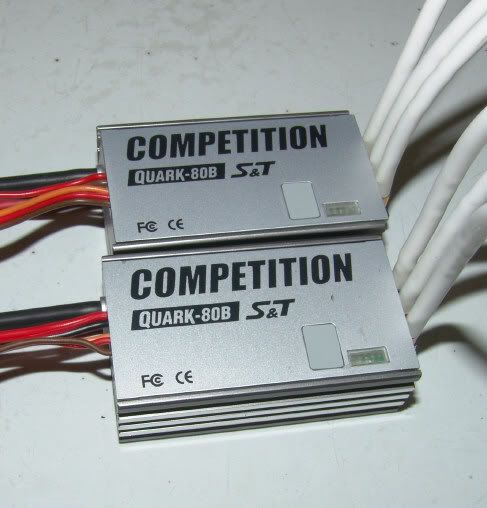 I went with some Sky Technology Quark Competition 80B speed controllers. They are fully programmable, though not with a PC and USB cable. 80 amp capacity, continous, 120 surge for 5 seconds at WOT. They also have a 5 amp BEC, so I shouldn't need any external regulators, at least not on my planned cell count. I'm hoping these will be good speed controllers. They do have a drag brake function and enough capacity to take a really high cell count. Up to 18 cells, NiMh, or 6 LiPo cells. I'm not going to come close to that, however. I'm also working on building my battery packs for the knuckles. They are getting there. I may do some soldering on them, once I get home from work. I also need to come up with a parallel harness to plug the speed controllers into as well. Thanks for looking. |
|
| |
|
12-08-2008, 02:26 PM
| #14 |
| I wanna be Dave Join Date: Sep 2006 Location: Stuck on a Rig in the middle of nowhere Utah.
Posts: 2,024
|
Nice build! I was noticing the pictures of your turning radius. If you don't want the tires to rub the linkage, you could narrow the wheels. This will move the inside of the rim away from your linkage. I had to do it on both of my supers. Keep us posted on your progress |
|
| |
|
12-09-2008, 09:14 AM
| #15 |
| Rock Crawler Join Date: Jun 2006 Location: Wisconsin
Posts: 570
|
70ducan, thanks buddy. I guess I could narrow the wheels, but I think I'll just live with the steering angle for now. It's pretty good and there isn't a whole lot of turn-in left before it's at full lock. Just a little more. I've never narrowed any wheels before, but I might have to look into it. Not sure how easily these beadlocks would be to narrow. Cut a section out of the center, and re-glue? When I got home from work last night, I decided to solder up my battery packs and harnesses for wiring the crawler up. I got into zone and just kept working on it. I was up till 3am this morning! It took about 3-4 hours to do all the work, but now it's done, so I can take a little break now. Here are some pictures..... 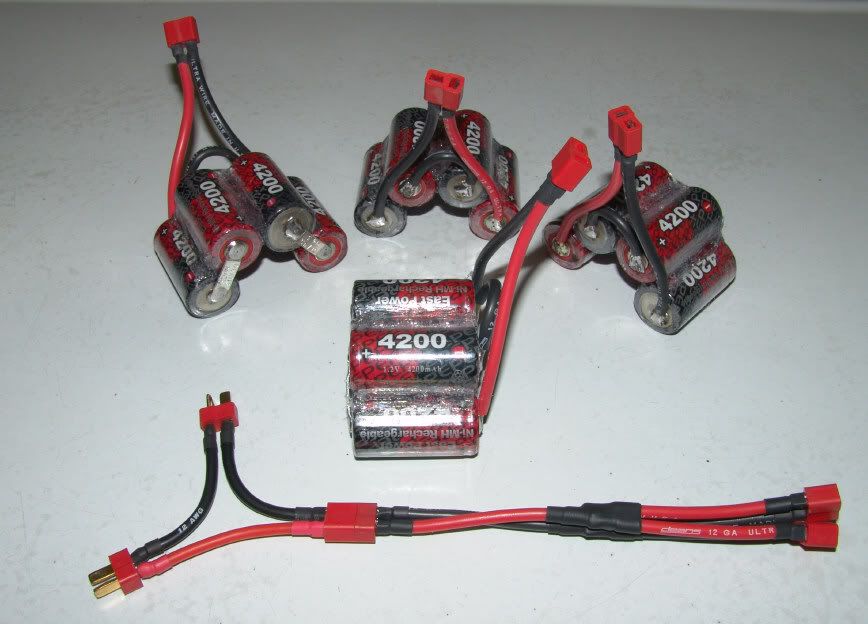 Four knuckle packs, 4 cells each. They will be wired in series, on the front knuckles. I made four packs so I could swap them out and keep running. Should be easily changed out in the field, so long as I bring some zip ties with! I was thinking maybe I could try some velcro too. 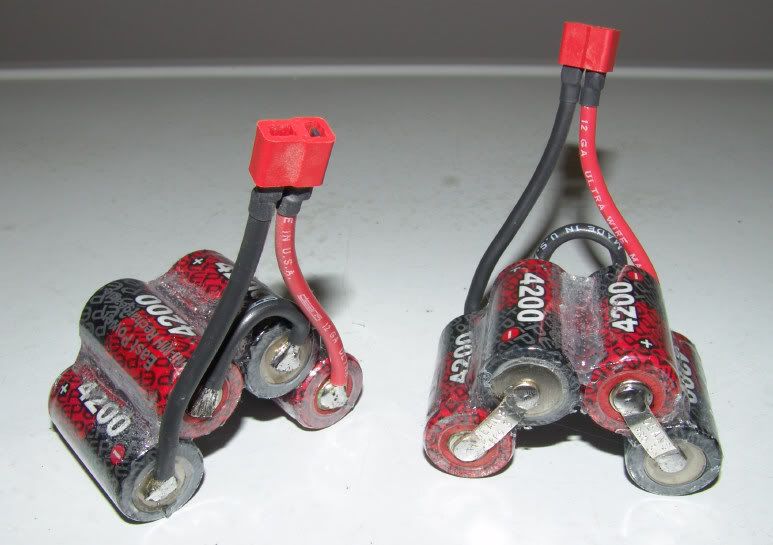 An awful lot of work! I'm going to buy a hotter soldering iron. There was one joint that gave me some trouble. My 40 watt iron was barely able to make the joint. I have a 60 watt iron, but it's cheap, the tip was junk, and it was working worse then my 40 watt iron. The packs still turned out good, so I am happy! 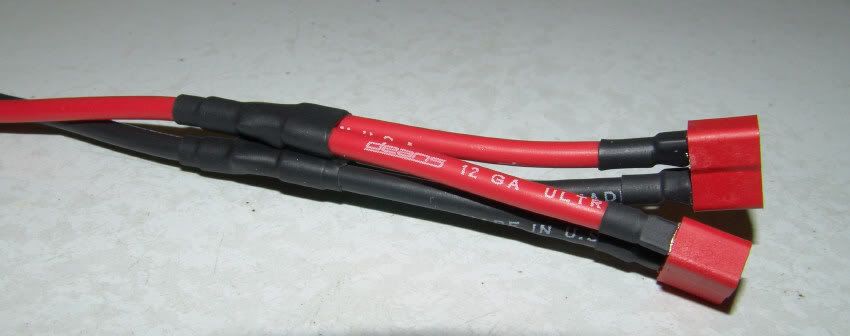 This end will be going to my dual speed controllers. The parallel connections turned out awesome. I highly recommend a 'third hand' soldering aid/holder for this kind of stuff! 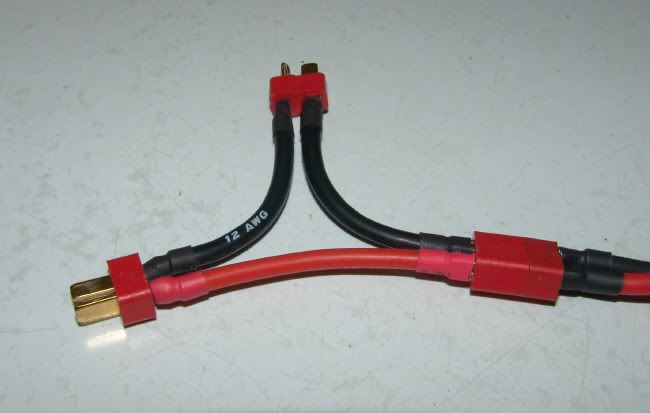 And, of course, the series harness, for tieing the two 4 cell packs on the knuckles, together. With this set-up, I should be able to have some flexibility in the way I decide to run the ESCs. That's the big reason I used all the Deans plugs. Everything turned out great! I'm exicted to charge the packs (see if they are good) and then figure out what kind of radio set-up I'll be using for this crawler. The hard part (I think) is over. |
|
| |
|
12-09-2008, 09:43 AM
| #16 |
| Quarry Creeper Join Date: Nov 2007 Location: southender
Posts: 239
|
that is nice and clean.... |
|
| |
|
12-09-2008, 10:51 AM
| #17 |
| Rock Crawler Join Date: Jun 2006 Location: Wisconsin
Posts: 570
|
Thanks roninwarrior555. I take a lot of pride in my work. |
|
| |
|
12-09-2008, 10:52 AM
| #18 |
| Pebble Pounder  Join Date: Jan 2005 Location: Kirkville
Posts: 182
| I hate to say How much you got into that Crawler but it has Turned out Great,Keep up the Great Job on it and is a Very nice Rig.Jim |
|
| |
|
12-09-2008, 11:43 AM
| #19 |
| Rock Crawler Join Date: Jun 2006 Location: Wisconsin
Posts: 570
|
Thanks Jim. I am not really sure how much is invested at this point either. I had been accumulating parts for this build, for the better part a year so I don't know, and didn't keep track. Easily over thousand, I'm guessing.
|
|
| |
|
12-09-2008, 11:56 AM
| #20 |
| Pebble Pounder Join Date: Jan 2005 Location: Kirkville
Posts: 182
| Well I know that a lot because I have about $500.00 in mine,I still have buy alot of Alum Part for it but eather way it is going to be a very nice crawler when it all done,Thankyou for putting up (pic) on your Build it helps me with some stuff on mine.Jim |
|
| |
 |
| |


 Linear Mode


