| |
| |||||||
 |
| | LinkBack | Thread Tools | Display Modes |
 08-16-2009, 11:15 AM
| #1 |
| Pebble Pounder Join Date: Jul 2009 Location: Windsor, UK
Posts: 141
|
well, first crawler build, if you discount my Losi MRC that we play with indoors. Fairly happy with how this came out, but if I want to do a scaler project next I'm really going to have a steep learning curve. (all links click through to the originals on my flickr page) 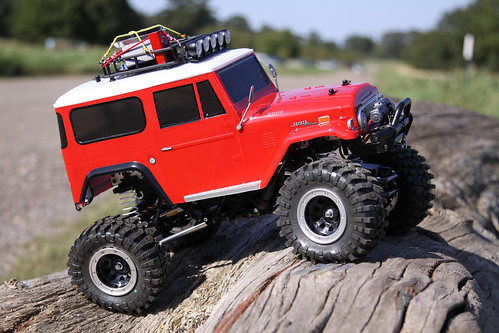 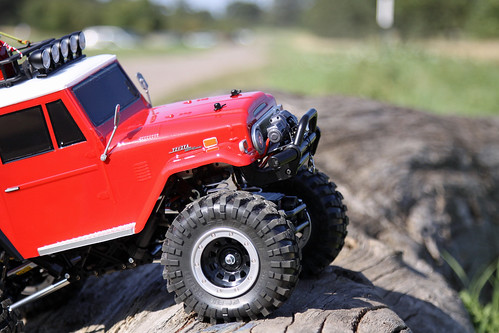 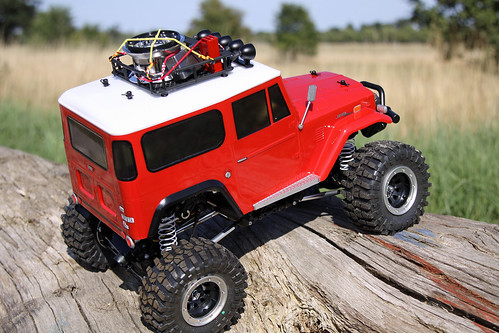 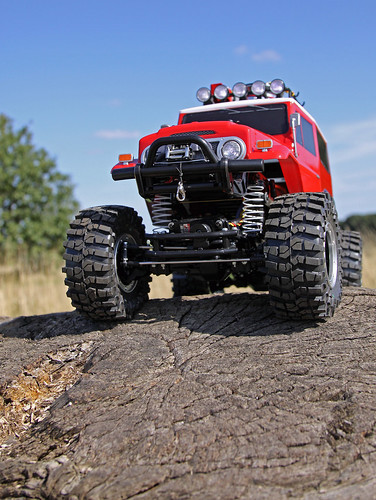 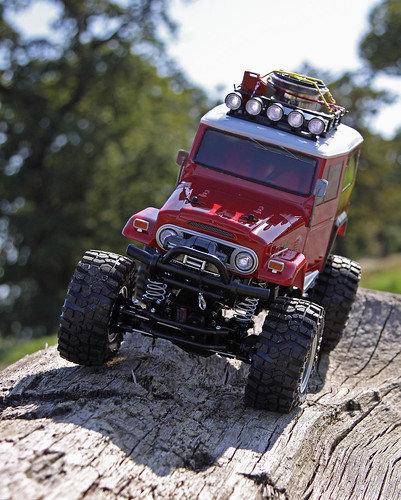 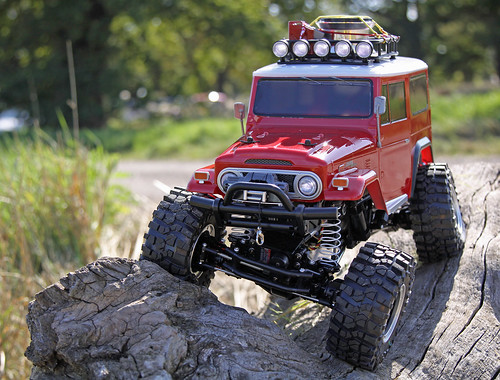  For the specs: - stock Tamiya motor - Novak Rooster Crawler ESC - Castle BEC - 2x Hitec 645MG servos (4ws) - spektrum sr300 3ch receiver - TLU-01 light kit + 6 additional white lights for the light bar - proline light bar, roofrack and a couple of accessories - 3racing winch with manual control for now. - Proline Flatiron tyres with memory foam (on standard Tamiya wheels). some weight in the fronts, none in the rear. Not run it in anger, and I'm a bit wary - its quite a fast little so and so, compared to my mini rock crawler, which you can drive at an absolute crawl if needed - and its very wobbly too. I suppose I'll calm down after its first few topples. Doesn't seem to be that much slow speed control - Can't see where I can set curves etc on my spektrum DX3 - can I do that on the novak? Doesn't seem programmable for anything other than lipo mode. |

|  |
| Sponsored Links | |
| | |
|
08-16-2009, 12:02 PM
| #2 |
| Newbie Join Date: Jan 2009 Location: chattanooga
Posts: 12
|
Congratulations your land cruiser looks awesome, I painted mine the same color scheme, I got mine to flex and not be so tippy by following what mods that others had done to theirs the first mod was to take out the front sway bar link and then zip tied the cantlever links together to take the slop out of them. I also went to a lipo battery which reduced my weight up top.
|
|
| |
|
08-16-2009, 12:15 PM
| #3 |
| Pebble Pounder Join Date: Jul 2009 Location: Windsor, UK
Posts: 141
|
I'm running lipo already! But it is a big one from my firestorm. Maybe a smaller one would be better. I thought the cantilever mod was only after a while of running - is the slop there from the get-go? Worth looking into that too. |
|
| |
|
08-16-2009, 12:33 PM
| #4 |
| Newbie Join Date: Jan 2009 Location: chattanooga
Posts: 12
|
My lipo is really small it is from CKRC, A 1300mah 2s it only weighs a few ounces. As for the slop mine was used and sloppy when I got so I don't know about a new one. I haven't added weight to my wheels like you, so I think I am going to add weight to my wheels this next week and I think that will help my bounce also. All though I am happy so far with it's performance. It is a blast to drive in all kinds of terrain. Do you have any pics of your winch mount or mounting bracket ? That is going to be my next mod and I really like the way yours looks up front with the stock bumper. Last edited by crawling-yota; 08-16-2009 at 12:36 PM. |
|
| |
|
08-16-2009, 02:29 PM
| #5 |
| Pebble Pounder Join Date: Jul 2009 Location: Windsor, UK
Posts: 141
|
I'll try and get some but it might take a few days It was really simple, but a bit of a pain. I used some 1.5mm aluminium sheet cut with a hacksaw to the same width as the 3racing mount. I bent it up in my workbench 90 degrees so it was like an L-shape. The short part of the L was the same size as the height of the front black cross brace, and the long part was long enough to just take it from the cross brace to the front bumper. I mounted it to the front cross brace by removing the towing eye - at least I guess thats what it was, leaving four screw holes to use. I had some spare long 3mm bolts from the CR01 kit so used those to bolt the aluminium to the front brace. Note that the holes in the front cross brace seem to be self-tapping holes, so it was a PITA to get the screws in there. In hindsight I'd have drilled them out a tiny bit, but I made it in the end. I then drilled holes for the 3racing screws to go through. 2.5mm drill bit seemed ok for those, although you might go for a 3mm to give you some leeway in positioning There were some problems with this approach, and I'll redo it when I have some free time. 1) the aluminium was too thin - so the hacksaw bent the metal a bit too easily. Not sure what force it'll withstand. So I'll probably do it in 2mm next time. 2) if you bend the aluminium into a simple 'L', with the horizontal part being in line with the bottom of the chassis, you can't put the body on! I ended up trimming off the bottom of the body under the headlights, but if I'd been more patient, I'd have taken the aluminium down about 1cm (1/2") below the chassis to give some clearance for the body. Problem then will be that the winch will be a bit too low, so you'll need to bring it back up. Either by bending your aluminium more, or just sticking a small box-section of aluminium on it. This is what I have: | |______ This is what you ideally need: (ignore the dots, just for spacing) |....... __ |____| |
|
| |
|
08-16-2009, 05:04 PM
| #6 |
| Newbie Join Date: Jan 2009 Location: chattanooga
Posts: 12
|
Thanks that is great I will probably start on mine in the next week or so. I 'll let you know what it turns out like. Thanks again
|
|
| |
|
| |


 Linear Mode


