| |
 05-05-2016, 08:30 PM
| #1 |
| Pebble Pounder Join Date: Nov 2015 Location: Northern NJ
Posts: 133
|
Order a new tool today. This: Kaka Industrial 8 inches Manual Mini Shear/brake Combination Machine  Ordered from amazon. I debated getting the larger 12 inch combo unit, but space and weight seemed to be limiting me. I haven't ever felt the need for rolling metal yet, but if I do, I'll consider an upgrade. This unit is large enough for most of my plans, while still remaining small enough for my limited space. The money I saved going a little smaller is better spent, IMO, on other toys. Despite the name, I do not see a difference between this unit and Micromark's unit, or Bailleigh's, or any of the others. The others were a bit more expensive and the KaKa unit had free shipping to boot. So about $80 cheaper than the next priced unit. Last edited by Chumley54; 05-09-2016 at 01:22 PM. |

|  |
| Sponsored Links | |
| | |
|
05-09-2016, 02:25 PM
| #2 |
| Pebble Pounder Join Date: Nov 2015 Location: Northern NJ
Posts: 133
|
My KaKa Industrial 8 inch Shear/Brake arrived today. Thought I'd give a box opening and initial review. First the unboxing: The box felt sturdy and had good plastic straps.  The unit was packed in styrofoam pretty well:  On removal of the top of the styrofoam, I found some of the smaller parts in different places, and the handle loose within the styrofoam. Nothing was damaged, though, so no foul, no harm:  I unpacked the unit, it had paper anti-rust over the center part, a plastic bag over the whole item. Everything has a coating to protect it. It is much like Cosmoline.   I pout the handle in to check movement, and I found the handle was in a position that did not allow you to operate it without removing the handle and replacing 180 Deg. around. Maximum travel clockwise:  Maximum travel CCW: (Well, not maximum cause the handle hits the table.  So after cleaning most of the cosmoline off, I opened the side plate to inspect the mechanism:  Nice to see grease. I knocked out the pivot pin and pushed out the bushing around the handler mount and rotated the mount so that when mounted, the handle could remain mounted and still get full travel for shearing and bending. This was the only flaw in the unit. The pins knocked out with a drift pin and the gear I pushed out using a large screwdriver, prying on the inside. The pushing pushed out with the gear. I used a deep socket to put the pushing back in. Took all of 10 minutes. So now the important part... I tried the shear on some aluminum flashing I use on my roof. There are 2 shapes on the anvil.:  The bends were made with both:  Pretty crisp with a narrow radius. I cut the sheet metal with snips, left a jagged edge, and you can see the edges of the bent pieces are straight and crisp. Perfect. I even tried double bends, and the pic shows the bench mounting bolts that come with the unit: 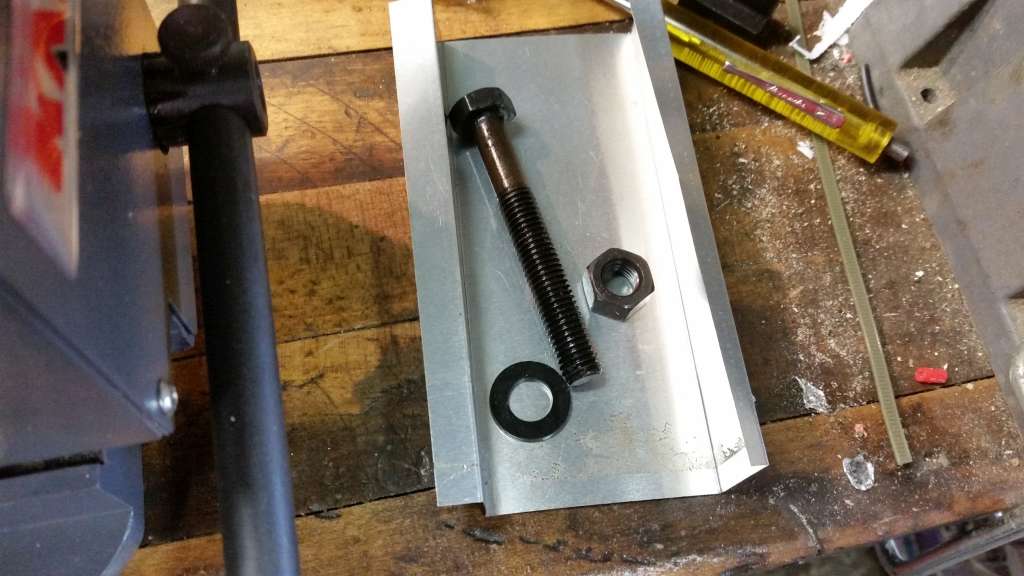 Also, the Unit cam with the 8 inch section for bending, as well as smaller "fingers to bend boxes and pans:  Right now, I give the unit an A-. Having the operating lever mis-positioned is a minor flaw, but fixable. Had the lever been right, a solid A. Will update as I work with it... |
|
| |
|
05-10-2016, 08:21 AM
| #3 |
| I wanna be Dave Join Date: Aug 2006 Location: under a rock and a hard place
Posts: 5,443
|
Have you tried it with 16 or 18 gauge steel ? Curious as to if it will bend it since the directions only mention brass and aluminum.
|
|
| |
|
05-10-2016, 09:35 AM
| #4 |
| Pebble Pounder Join Date: Nov 2015 Location: Northern NJ
Posts: 133
|
I don't have any 18g to test, but the instructions claim this:  1 mm steel is about 19 ga, 20 ga is a little less, so I suspect 20ga is the max reasonable size. I suppose if you are careful on the force used, it may bend/cut 18, but unless I stumble on some to test, I will only get within parameters. This pretty much is the same spec for the 12 inch models out there. I need to find a sheet metal vendor near me, see if they would part with scrap for low $$ or free...I found one about 6 miles away on google, so when I am in the area, I may stop in and see if they are friendly about it. I bristle at some of the prices online for small pieces. |
|
| |
|
05-10-2016, 09:55 AM
| #5 |
| Quarry Creeper Join Date: Mar 2010 Location: SF East Bay
Posts: 451
|
Cool find. I'm in to see how all the other attachments for building boxes and pans actually work. Can you bend some more sheet using those attachments and post up pics? |
|
| |
|
05-10-2016, 11:05 AM
| #6 | |
| Pebble Pounder Join Date: Nov 2015 Location: Northern NJ
Posts: 133
| Quote:
I am willing to bet it is like every other machine I have ever used. Measure twice, cut once...go slow and carefully... I tend to hurry sometimes, and I have never learned how to cut something "longer"... So I will practice and also, I want to create a skip plate for my CC01. So I will be doing a paper template first, then recreate in metal. I have found it will bend and cut lexan neatly, as well as paper and cardboard. Just be patient...Life has been busy for me lately, so hobbies are in the back seat right now... | |
|
| |
|
05-10-2016, 12:50 PM
| #7 |
| Newbie  Join Date: Dec 2015 Location: Columbus
Posts: 43
|
I'm going to have to look into one of these. I have a couple sheet metal projects I would like to do and this would be perfect.
|
|
| |
|
05-10-2016, 02:04 PM
| #8 |
| Pebble Pounder Join Date: Nov 2015 Location: Northern NJ
Posts: 133
|
I was originally going for the 12 IN unit at about $100 more. I decide that 8 inch was big enough...It is light enough to move around, doesn't occupy the whole bench top. KaKa sells their products on Amazon and on E=bay....Free shipping on either place. E-bay was slightly cheaper. I have been communicating to a guy named Stefan at KaKa industrial. He is a co-founder. He took my feedback pretty seriously (about the handle alignment) and the packaging. At this point, if they have a product that I need, I am inclined to chose them. The price was right and the product was just like the other products of similar nature.
|
|
| |
|
05-11-2016, 04:35 AM
| #9 |
| Quarry Creeper Join Date: Dec 2013 Location: NoVa
Posts: 241
|
On the Handle location / position, Most breaks would have the handle hanging off the end of a bench or stand. This might make sense of the position it came in. larger breaks have more than 180 degrees of handle swing from full open to close.
|
|
| |
|
05-11-2016, 12:44 PM
| #10 |
| Pebble Pounder Join Date: Nov 2015 Location: Northern NJ
Posts: 133
|
I can do it all in one swing....It still was not in a good position. Unlike the combo unit with a sliding handle, this one has to be loosened and moved manually. I have it at the edge of my bench, as to bend fully it needs to go a little further, but in the original position, but functions required handle removal, whereas now I do not need to removed it at all If it was mounted on a stand, open on both sides, it was less of an issue, but the starting point was still odd. I am willing to bet the position is random during assembly. I suspect if I bought another, the position may be different. At any rate, it was fixable, and I did tell the company about it and they seemed to be listening. That's always a good sign. So far, I am happy. |
|
| |
|
05-11-2016, 09:19 PM
| #11 |
| Pebble Pounder Join Date: Nov 2015 Location: Northern NJ
Posts: 133
|
So I had some time around lunch to fiddle around. I did not measure carefully nor take my time...so of course, the results are less than perfect. However, I did learn some lessons and gained some experience. So I drew a pattern on paper :  Taped the pattern to a scrap piece of aluminum flashing. (Ink side visible on the other side)  Used a sharp punch to scribe the pattern on the aluminum:  It ripped up the pattern but left a clear mark on the aluminum. I used a guide to get straight lines.  Trimmed the metal off with the shear around the perimeter then used a tin snips to cut the corners out:  You can see the tin snips are not great for straight cuts. Using the 8 inch bending blade, I bent the 2 long edges. Wasn;t as careful here as I should be.  Then I checked the width of the box and selected the 2 blades that closely matched the width of the box to bend the short ends.  Then removed the long blade and installed the 2 shorter blades: 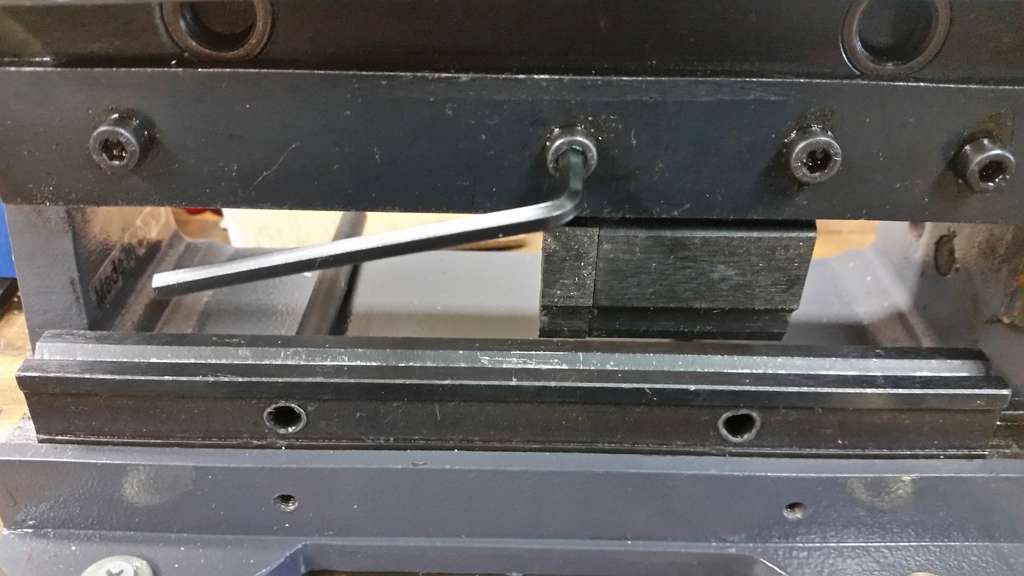 Then bent the 2 short ends:  Voila' An aluminum box is born:  So what did I learn? 1. Tin Snips are terrible cutting straight lines. 2. Scribing a straight line needs more patience. 3. Leave the long side full length. You can use the excess to bend around the corner and fasten the sides together with the tab that is formed. 4. After scribing a STRAIGHT line that is parallel, line the scribe and shear up carefully, cut on the scribed line. (Note to self: Better light helps old eyes see the line clearly) 5. Careful when placing the metal under the bending blade. (See item 4 note to self). 6. Width of box should be an exact multiple of the bending blade for best results 7. Practice is good, reveals flaws without wasting expensive metal of thicker gauges. The unit worked as expected. Being in a hurry and lack of experience caused small measuring , cutting and bending errors. The corners especially are sloppy on my first test bend. I would say 95% is my lack of precision, and about 5% due to things like the blades not meeting exactly centered. I found the guide in the back supports the base (Prism Block) a little firmer and may help with the blade slight misalignment. Not unhappy with the results. I priced 20 gauge aluminum sheets, and I don't want to waste any. I also am going to try to find scrap in someone's waste stream (with permission). I found a metal shop not too far from me, and will stop by one day and see if they would part with some scrap, either free, or at least cheaper than the metal supply house near me, or Hone Depot and the other big box store. Hope this helps some others with this tool. Any advice is welcome too. Always best, if possible to learn from other's mistakes (otherwise called experience). Also, the bits of goo on the machine are remnants of the cosmoline it was packed in. Old eyes need strong light sources... |
|
| |
|
05-14-2016, 08:51 AM
| #12 |
| Pebble Pounder Join Date: Feb 2015 Location: Bay area
Posts: 129
|
A few tips coming from someone who used to do this for a living. 1) Tin snips work really really well for cutting straight lines, if you know what you're doing. Be sure to choose the right snips (the side of the blade that sits below the metal is the side that will curl off, the side of the blade sitting on top of the metal will retain its flat edge). Choosing when to use your left/right snips is VERY important. Also, if you're trying to make precise cuts, first cut off all but 1/4". Your finish cut should be no more than 1/4" to 1/2" of material, which will allow the scrap to curl out of the way and keep the actual work piece true. Also, the "straight cut" snips (usually a yellow handle) are only designed to make only very small cuts, about 1/2 the length of the blade. Also, don't buy cheap tin snips. They are one of those tools where you really *need* to get a slightly more expensive pair, and once you do, you'll never look back. $30 apiece should get something good enough. 2) Draw your cut/bend lines on the work piece itself whenever possible to minimize that small difference between tracing. When doing bends in different directions, make sure your lines are on the right side of the work piece. Sounds silly, but it's important! A scribe (I prefer a double scribe) *really* helps with drawing straight, parallel lines, and cost less than $10. 3) Just like when cutting with a blade, you have a kind of "kerf" with a brake. Be very careful not as to whether your line is behind, in front of, or split by the brake blade (what's the real word I wonder?). You will "lose" a tiny bit of material from one side of the line. When making a very small box it's not a big deal, but when you start stacking these tolerances up, it can make a very big difference, especially when you're bending two pieces you want to fit together etc. Keep practicing, looks like you're on your way! |
|
| |
|
05-14-2016, 07:14 PM
| #13 |
| Pebble Pounder Join Date: Nov 2015 Location: Northern NJ
Posts: 133
|
Thanks, I appreciate the advice. Some things are obvious, some less so. I understand the geometrics of the bending, just don't have recent experience actually doing it (at least in the last 35 years). When I was a truck mechanic in a previous life, I worked next to a welding shop and used their industrial brake and shear for make pump hangers for oil delivery trucks. This was in the 1970's. I knew about the little bit extra length needed for the bend. Knowing it and actually doing it though, like all things, is always slightly different. The snips I knew about too. I used straight snips. I attribute some of my difficulty to age and less sharp vision. But I was not taking the extra time to do it well as I just wanted to get a feel and didn't mind wasting the flashing. I found out something else, that I missed initially. The set came with a t-block that I could not grasp the purpose for. I asked KaKa (I still can't grasp how or why they picked that name) what it's purpose. It is a height gage to make sure the bending blade is parallel to the bending prism/base. I knew the blade should be parallel, and any block of material can verify it, but it is nice to have the tool. I continue to be pleased with it. |
|
| |
|
05-14-2016, 08:47 PM
| #14 |
| Rock Crawler Join Date: May 2013 Location: Dallas
Posts: 680
|
Welcome to the world of sheetmetal. That's a fantastic start. You're a little limited here but when you have a wider selection of "fingers" for your brake they can make things easier with boxes and pans. If you use one that's slightly narrower than the fold it won't interfere with your other bends. Be careful with this though because if it's too narrow you'll have a wider radius on the edges of the bends. The kerf/take-up/lost material that MiteyF mentions is very predictable however it does change with material thickness and selection. 16ga aluminum will have a different bend radius than 16ga steel. When you're planning out your sheet fold a piece of scrap and measure the radius of the bend. This will tell you how much to offset your lines to get the bends exactly where you want. I'll dive more into this if you'd like but I don't want to trash up your thread. |
|
| |
|
05-26-2016, 04:59 PM
| #15 |
| Pebble Pounder Join Date: Nov 2015 Location: Northern NJ
Posts: 133
|
You won;t be trashing it up....I think a thread about a metal brake and comments and tips about bending metal increase the value of thread. I have started using it. Been making partial bends and the results are to my liking. My next project will be making a skid plate for my CC-01. I have all the aluminum I need for now....Tower Hobbies had a no shipping day and made the metal cost competitive. So a bought 6 sheets of 22 gauge. They are 4 x 10 inch, a good size for what I need to do. |
|
| |
 |
 New Mini 8" Brake/Shear - Similar Threads
 | ||||
| Thread | Thread Starter | Forum | Replies | Last Post |
| BR mini drag brake setting?????? | Tgreer | Electronics | 12 | 12-04-2015 10:12 PM |
| Metal shear actuator | JohnRobHolmes | Tools, and Procedures | 17 | 06-30-2011 01:33 PM |
| School me on the drag brake or what does Axial use for "roll control" | LowLock | Axial AX-10 Scorpion | 9 | 04-27-2011 11:37 PM |
| Non Newtonian Shear Thickening Fluid | Talico | General Crawlers | 9 | 04-13-2011 07:56 AM |
| |


 Linear Mode


