| |
| |||||||
 |
| | LinkBack | Thread Tools | Display Modes |
 02-07-2009, 08:40 PM
| #1 |
| Rock Stacker Join Date: Feb 2009 Location: Oregonian liven in Utah
Posts: 51
|
Id like to see what others are coming up with! Maybe it's because I'm still a bit uneducated about RC crawlers but a real fabricator would never lay the shocks down on a real rock buggy. The further a shock is layed down the less it functions corectly, so why do it to an RC crawler? Any who.......... I will eventually get my shocks to a position that is a bit more staright up and down but here is what I have so far. Of course you can see the new mounting location of the shock. I also used an Axial 60mm post to extend the upper links.     Last edited by smashmetal; 02-08-2009 at 08:37 AM. |

|  |
| Sponsored Links | |
| | |
|
02-07-2009, 09:14 PM
| #2 |
| Rock Stacker Join Date: Jan 2009 Location: Eagle, Idaho
Posts: 53
|
This is my creeper, im running it droop. The shocks are hot bodies long travel shocks. (cheap but good) I run 40wt shock oil I also run them outside of the Shock mount ears so they sit a little wider. I also run my upper links outside of the ears, Changing my anti squeat. (notice my hacked up drivelines) :( still havent gotten a reply from venome ): 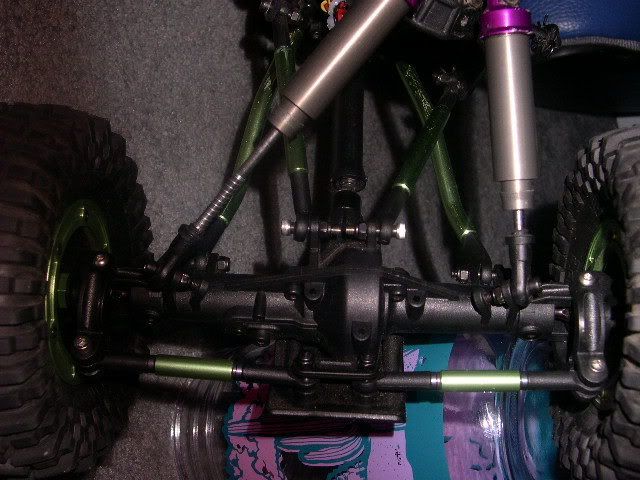 Notice the spring on the left rear shock, this was tooken out of a pen, and it cuts the torque twist down cause im running droop.  If you look at my hubs you can see that i changed my screw to button tops, this will keep you from hanging them up on rocks. 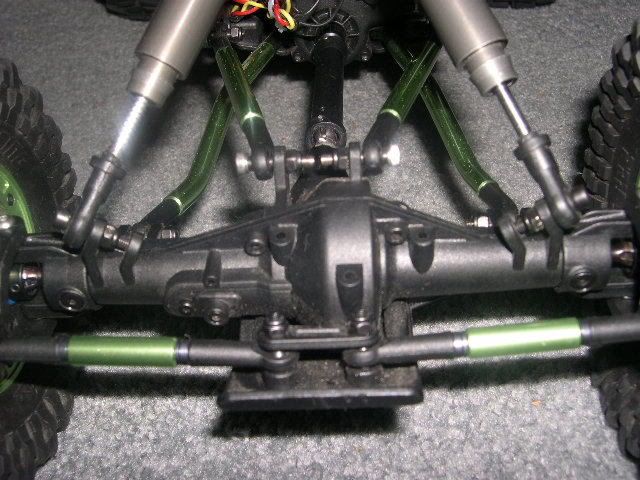 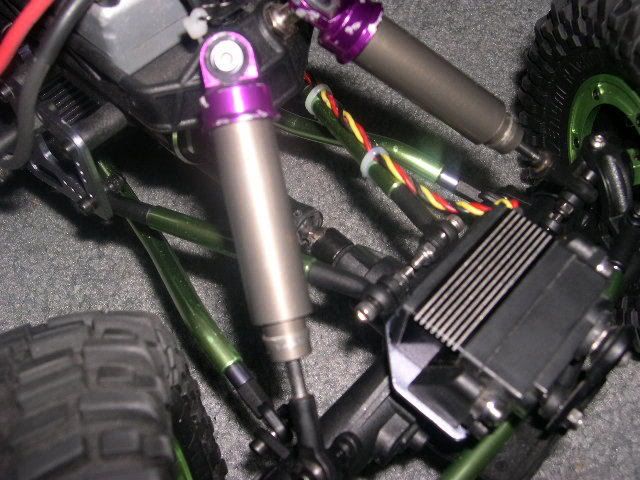 I cut the little spring from the kit (that go inside the shock) in half and put them inside my shock so that i am not sitting tooo low  |
|
| |
|
02-07-2009, 09:35 PM
| #3 |
| Quarry Creeper Join Date: Dec 2008 Location: Gardnerville
Posts: 272
|
Hey Smashmetal, I have thought about mounting my shocks there also. I did mount mine upside down to keep the weight down. I just got my BEC today. I still have not been able to run mine yet. I need to get some wheel time with this thing. I have changed the shock springs a couple of times. I have taken the shocks off twice and have 2 stripped mounts on the battery tray. This is a real bummer. 1/4Elliptic has a nice mod for shock mounts. I just have not ordered them yet. |
|
| |
|
02-07-2009, 11:22 PM
| #4 | |
| Rock Stacker Join Date: Feb 2009 Location: Oregonian liven in Utah
Posts: 51
| Quote:
| |
|
| |
|
02-07-2009, 11:32 PM
| #5 | |
| Quarry Creeper Join Date: Dec 2008 Location: Gardnerville
Posts: 272
| Quote:
| |
|
| |
|
02-08-2009, 08:36 AM
| #6 | |
| Rock Stacker Join Date: Feb 2009 Location: Oregonian liven in Utah
Posts: 51
| Quote:
yours are upside down so you shouldent have a problem here. I just set the ajustment down far enought to clear during suspension cycling. Also added a washer under the spacer.  kinda close to the upper links too.   Last edited by smashmetal; 02-08-2009 at 08:40 AM. Reason: werds | |
|
| |
|
02-08-2009, 05:17 PM
| #7 | |
| Rock Stacker Join Date: Jan 2009 Location: Eagle, Idaho
Posts: 53
| Quote:
| |
|
| |
|
02-09-2009, 08:57 PM
| #8 |
| Rock Stacker Join Date: Jan 2009 Location: Prescott Valley, AZ
Posts: 61
|
I was really hoping to see more posts on this subject. I know there are some really intelligent people out there with some good ideas that I wouldn't come with on my own. Please help a brotha out. |
|
| |
|
02-10-2009, 03:16 PM
| #9 | |
| Rock Stacker Join Date: Feb 2009 Location: Oregonian liven in Utah
Posts: 51
| Quote:
| |
|
| |
|
02-10-2009, 06:14 PM
| #10 |
| Newbie Join Date: Jan 2009 Location: Rio Rancho
Posts: 45
|
This is a new kit, give it some time and this will be a sticky. |
|
| |
|
02-11-2009, 10:41 AM
| #11 |
| Pebble Pounder Join Date: Dec 2007 Location: Northwest
Posts: 181
|
The suspension geometry of the Creeper has been optimized for shock position and drive line angle, twist, steering and all the clearance for shocks tires and linkages at the max deflection. Changing anything, any one of the factors will change the way it works and reduce travel and cause parts to hit each other. The way it works stock, smooth, bind free will change a lot depending on what you mod. You can do a lot with just tuning the shocks before you relocate them. There isnt anything wrong with laying down the shocks. The position they are in places them out of the way and gives them great leverage on the axle and chassis and bind free for all the articulation you want. Thats why the mounts are angled as well so the pivot ball and socket does not bind up at the extremes. Its very easy to take away twist with limiters as needed. Chris |
|
| |
|
02-11-2009, 04:45 PM
| #12 |
| Rock Stacker Join Date: Feb 2009 Location: Oregonian liven in Utah
Posts: 51
|
Ive got something in the works!  |
|
| |
|
02-12-2009, 09:49 PM
| #13 |
| Rock Stacker Join Date: Feb 2009 Location: Oregonian liven in Utah
Posts: 51
|
Not sure if im onto something yet or not but there is plenty of ajustment now! Like a bit longer wheel base to accomidate a bigger tire to get that tranny to clear a bit better.  I was suprised that the original chassie plate is made from such weak material. I know it does not need to to hold alot of force but it's really soft. Soft like 2024-0 or H53 aluminium, usually a peice this thick of a harder aluminium would be nearly imposiable to bend by hand.  Last edited by smashmetal; 02-12-2009 at 09:51 PM. |
|
| |
|
02-14-2009, 06:42 PM
| #14 |
| Rock Stacker Join Date: Feb 2009 Location: Oregonian liven in Utah
Posts: 51
|
have been gettiing a chance to move things around. I have discovered that if I wanted to keep the shocks in more of a vertical position. They would need to be a longer travel shock to benifit from upright position. So need less to say the more ya lay them down the better these will work for ya. Had a problem with on of the lower links.  Ended up getting some Traxxus end links to replace the lowers. Local hobbie shop dosent have any selection of Venom parts yet, and I don't like waiting. They work just as well althought there straight. Had to add a 6mm spacer to kinda even things up.  Also put the shocks back up to there original lower mounting spots. still playing with the uppers but they seam to work allright for now.     |
|
| |
|
02-14-2009, 06:42 PM
| #15 |
| Rock Stacker Join Date: Feb 2009 Location: Oregonian liven in Utah
Posts: 51
|   |
|
| |
|
02-17-2009, 12:00 PM
| #16 |
| Rock Stacker Join Date: Jan 2009 Location: Eagle, Idaho
Posts: 53
|
This needs to be a sticky |
|
| |
|
02-22-2009, 05:23 PM
| #17 |
| Rock Stacker Join Date: Feb 2009 Location: Oregonian liven in Utah
Posts: 51
|
Well I had planned on dinking with it again today but ended up breaking my tap. O-well i got pic's anyway. My new frame has proven to be a real nice asset during the occasional roll over. Although my body is pretty much destroyed it's holding up much better to my 8 year old now. Had to trim the front of the body out just a bit though. I know not pretty, but im not spending a bunch of time on something thats allready hammered.   Also got some new sneakers for it   |
|
| |
|
02-22-2009, 06:37 PM
| #18 |
| Rock Stacker Join Date: Dec 2008 Location: Marion, iowa where no fun happens,ok, maybe once in a long while!!
Posts: 74
|
why did you make a new chassis |
|
| |
|
02-22-2009, 06:43 PM
| #19 |
| Rock Stacker Join Date: Feb 2009 Location: Oregonian liven in Utah
Posts: 51
|
Cause I can, I have an insatiable urge to just build stuff and I just wanted to see what diffrent shock locations would do.
|
|
| |
|
02-22-2009, 08:12 PM
| #20 |
| Quarry Creeper Join Date: Dec 2008 Location: Gardnerville
Posts: 272
|
I like the idea of being able to mount the shocks to the custom chassi instead of the battery tray. Also you have different mounting positions, but I bet you could save a lot of weight by doing some triming. Go get funky with it. Now I wanna build my own chassi. |
|
| |
|
| |


 Linear Mode


