• Welcome to RCCrawler Forums.

    It looks like you're enjoying RCCrawler's Forums but haven't created an account yet. Why not take a minute to register for your own free account now? As a member you get free access to all of our forums and posts plus the ability to post your own messages, communicate directly with other members, and much more. Register now!

    Already a member? Login at the top of this page to stop seeing this message.

GT3B Hack Question and Answer Thread

Got some batteries for my Tx this evening...about 15 min later I was done with the Hack N Flash ,and ready to start the setup.
Kick Ass product

Will try mapping all the buttons tomorrow when I get a few servos hooked to the RX.

Thanks

This reminds me, i need to finish up the key mapping guide.
 
Thats exactly what I came here looking for.
I can only get 3 chanels to work a servo. I need to set up a 3 pos for my winch BEFORE this weekend.
Does this radio normally come with a book , mine didn't........guess it wouldnt tell you how to get 6 chanels outa it anyway.
 
Thats exactly what I came here looking for.
I can only get 3 chanels to work a servo. I need to set up a 3 pos for my winch BEFORE this weekend.
Does this radio normally come with a book , mine didn't........guess it wouldnt tell you how to get 6 chanels outa it anyway.

Did you flash the 6ch firmware...if so

Long click Rev
Scroll to 3 or d (1,2 is for the trims by the screen)
enter
scroll to chx (3,4,5,6)
enter,
etc

heres the manual, go to the ch mapping section

http://www.overkillrc.com/MANUAL-0.3.2.txt
 
Almost done with it, i'll have my key mapping guide up tomorrow, but its basically just a re written one of whats already available, i just use bold, bulleted lists, and explain it just a touch better

But it spaces it all out, and the stuff that needs to catch the eye, it does...and it doesn't look so scary :ror:

I could have completely re written it, but then it be alot harder and time consuming to update with the firmware
 
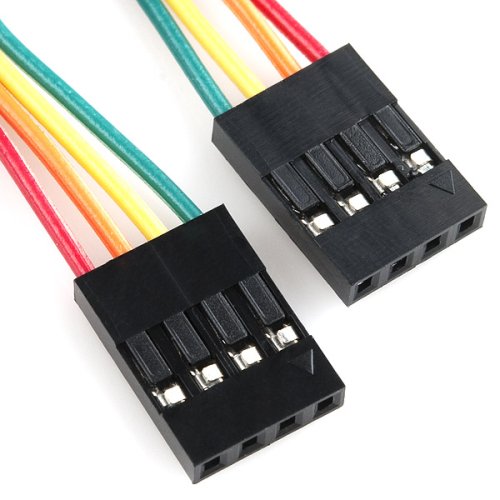
Alright, so i'm looking into a different 4 pin extension that i'm not making...because as it sits now i've been wanting to raise the price due to the time and money that goes into making 4 pin extensions. So i have found one that should work great (i have afew coming in to test, but the way it's setup, i can't give instructions based on the arrow on the plug...because they don't flip them like i do :evil:

But i'm looking into getting some made to my specs...so we'll see how this goes in the future.

Could always grab a bright colored paint marker and dab a little dot on the "button side" might be cheaper than having custom cables made yet still easier than making them yourself.

Thanks for the manual update. checking it out now!
 
Could always grab a bright colored paint marker and dab a little dot on the "button side" might be cheaper than having custom cables made yet still easier than making them yourself.

Thanks for the manual update. checking it out now!

I just planned on using the wire color...it will be a ribbon cable, not twisted, so if you was to flip the plug so the same color wire was on the arrow (triangle) it put a twist in the cable
 
Here is the cable i'm considering...and its about 50 cents cheaper than all the parts to make my own:roll:

If bought bulk, otherwise kinda pricy
 

Attachments

  • 10369-02.jpg
    10369-02.jpg
    102.1 KB · Views: 464
This is the cord I used to use my older airtronics radio as a joystick for simulators.

http://cgi.ebay.com/USB-RC-Simulato...Control_Parts_Accessories&hash=item2c5df706b1

Did your GT3B not come with a USB adapter in the box? Both the ones I bought from hobbypartz did.

Nope..... bought mine in china over a year ago. Way before Eurgle and Hobby king started re branding them. Funny thing is you go to pick one up and you get it without the box, just the styrofoam. Got the lame CD, Rx and Tx. Its china what do you expect??? Hell they got knock off apple stores every 3 blocks. Wasnt really concerned about the charging plug or the DSC then. Thanks for the link tho "thumbsup" but is it the JR mini 3.5 or the GWS mini 3.5??? Anyone got a good pic of the plug that goes to the Tx??
 
Last edited:
Here is the cable i'm considering...and its about 50 cents cheaper than all the parts to make my own:roll:

If bought bulk, otherwise kinda pricy


Just a thought Austin.... why not change gears on it and just go with that plug on one side and nothing on the other. Requiring the ends to be tinned and burned into the board. Then the cable would be ran down through the handle and into the battery compartment?

I know that doing this would be a little bit more difficult to solder, so change that up to push wires in through the bottom and soldering on the top? This was just a thought since Ive heard of a couple people ending up with poor solders and not aligning pins correctly through hole and thinking the issue is with the program and not the actual connection to the radio.

Also I used a drop of thick CA to hold down the 90 deg pins. Seemed to work really well.... really fast and dosent move when heated up. "thumbsup"

Just tryin to think of ways to help you better yourself on all of this. Thanks again for all the help and support !!!
 
Nope..... bought mine in china over a year ago. Way before Eurgle and Hobby king started re branding them. Funny thing is you go to pick one up and you get it without the box, just the styrofoam. Got the lame CD, Rx and Tx. Its china what do you expect??? Hell they got knock off apple stores every 3 blocks. Wasnt really concerned about the charging plug or the DSC then. Thanks for the link tho "thumbsup" but is it the JR mini 3.5 or the GWS mini 3.5??? Anyone got a good pic of the plug that goes to the Tx??

Here you go this should work

http://www.nitrorcx.com/fs-gt2-computer-cable.html
 
Just a thought Austin.... why not change gears on it and just go with that plug on one side and nothing on the other. Requiring the ends to be tinned and burned into the board. Then the cable would be ran down through the handle and into the battery compartment?

I know that doing this would be a little bit more difficult to solder, so change that up to push wires in through the bottom and soldering on the top? This was just a thought since Ive heard of a couple people ending up with poor solders and not aligning pins correctly through hole and thinking the issue is with the program and not the actual connection to the radio.

Also I used a drop of thick CA to hold down the 90 deg pins. Seemed to work really well.... really fast and dosent move when heated up. "thumbsup"

Just tryin to think of ways to help you better yourself on all of this. Thanks again for all the help and support !!!

I like my current setup now...routing a cable down through the handle and out the battery box is a huge pita compared to what you have to do now.

And the problem wasn't with soldering...he just wan't putting the plug on the right pins :roll:

Ah CA glue could work too...but i'm not sure if it is the smartest idea, if you ever have to remove it, and it may have something in it that eats away at the circuit board.
 
.....Ah CA glue could work too...but i'm not sure if it is the smartest idea, if you ever have to remove it, and it may have something in it that eats away at the circuit board.

Heat will eventually harden and crumble CA glue.
 
Back
Top