| |
| |||||||
 |
| | LinkBack | Thread Tools | Display Modes |
 09-02-2014, 08:15 PM
| #21 |
| I wanna be Dave Join Date: May 2006 Location: FOUR 8 OH
Posts: 4,913
|
Yay! I love Chris's builds. Very detailed and informative. Always something new to see.  Looking forward to more of this. |

|  |
| Sponsored Links | |
| | |
|
09-02-2014, 10:19 PM
| #22 | |
| Rock Crawler Join Date: Aug 2012 Location: Los Angeles, CA
Posts: 864
| Quote:
I was taking a second look at the aforementioned front bumper. It reminds me of the bumper on my Wrangler-on-Fire. They're not exactly the same, but similar. | |
|
| |
|
09-03-2014, 07:37 AM
| #23 |
| Newbie Join Date: Jul 2014 Location: Central Kalifornia
Posts: 30
|
I like the way you did the sliders, very clean!
|
|
| |
|
09-03-2014, 01:05 PM
| #24 | |||||
| PapaGriz Yo   Join Date: Apr 2004 Location: In the garage building the wife a crawler
Posts: 13,137
| Quote:
Quote:
Quote:
Quote:
Quote:
| |||||
|
| |
|
09-03-2014, 01:23 PM
| #25 |
| PapaGriz Yo Join Date: Apr 2004 Location: In the garage building the wife a crawler
Posts: 13,137
|
While the Jeep was looking good, between the slight wb stretch up front and the tire size there was going to be interference with the grill at full lock turn and articulation. My original plan was to do a narrow XR10 mod to the front axle but when I put the wide AXR10 axle under the Wraith I thought it looked good so I decided to go full width. I decided to try out the RC Bros Burly Tubes for this install. I really liked the idea of having splines on the tubes so I thought I give these a shot.  Install was super easy. Not that the mods for Beef Tubes are hard; but the Burly Tubes were plug and play.   I like to sand down the sharp edges on the housing. I feel it gives a bit more realism.  The other nice feature from RC Bros are these super sano spacers that look nice and clean. After taking all the pics I realized that the spacers were installed backwards but I didn't want to redo all the pics. They are installed correctly now.  I used a drill bit to make sure all the holes were lined up.  Then a quick tap.  The plastic Axial Chubs are a really tight fit, you can see how the tubes shaved off some material. After I cleaned out the shavings the Chubs were able to fully seat.  The Vanquish Chubs go on smooth as buttah and have no slop.  As with either tube option, drilling the holes for the knuckle screws is the worst part. I never can seem to get them in exactly the right spot, but then again I never change the clocking once I get them installed so it's not that big of a deal if they are off a bit. As you can see, my holes are a bit off but a bit of clearancing took care of that.  I stuffed a piece of paper towel in the tube so chips wouldn't get on the ring gear and I wouldn't have to remove the tubes to clean the chips out.  I couldn't be happier with the RC Bros Burly tubes. I love how you leave the plastic in the housing so that the tubes are held in firmly and the screws only keep the tube from rotating. I love the splined ends and they are very well machined. I also like how the Chub screw only has to hold the Chub in place on the tube and not stop rotation. The axle and Chub screws on Guido's Beef Tubes are always coming loose. I have high hopes that the Burly Tubes will not have that problem. I will let you all know soon enough. I plan to spend the money on Burly Tubes again for sure. Great product guys. Before the Burly Tubes with Vanquish .350 hubs and OMF beadlocks:  The width with Vanquish .350 hubs and OMF wheels turned out to be a bit too much. I ordered some .225 hubs to see if that fixes it:  The width in the rear with the Vanquish .725 hubs and OMF beadlocks was perfect.  |
|
| |
|
09-03-2014, 01:43 PM
| #26 |
| PapaGriz Yo Join Date: Apr 2004 Location: In the garage building the wife a crawler
Posts: 13,137
|
Holy Lightbars!!!!!  Only two are actually mine. One for Dutch, one for Short Change; the other two are for a friend and his son. We needed lights for an upcoming night Scale Adventure and MORE was the only choice! Too much light is just right. |
|
| |
|
09-03-2014, 04:32 PM
| #27 |
| Pebble Pounder Join Date: May 2013 Location: Workshop
Posts: 121
|
I can't wait to see these used in anger at Crawl-a-Palooza 2014. |
|
| |
|
09-04-2014, 06:35 PM
| #28 | |
| PapaGriz Yo Join Date: Apr 2004 Location: In the garage building the wife a crawler
Posts: 13,137
| Quote:
I was checking out the Vanquish Products site and stumbled across these new wheels. I searched RCC and couldn't find any info, did I find these before they were announced? Cuz usually I am late to the party.  RC Accessories - 1.9 Beadlock Wheels - 1.9 Vanquish 8 Hole Shooter Wheels - Vanquish Products I am in love!!!! Exactly the wheel I wanted Vanquish to make. I know what will be going on Dutch now!!! A beautiful dished wheel with holes, and it uses the OMF beadlock rings. Saweeet!!! Awesome job guys! | |
|
| |
|
09-04-2014, 06:48 PM
| #29 |
| RCC Addict Join Date: Aug 2005 Location: Pocatello
Posts: 1,032
|
Those are sweet for sure.
|
|
| |
|
09-04-2014, 09:51 PM
| #30 |
| Rock Crawler Join Date: Aug 2012 Location: Los Angeles, CA
Posts: 864
|
This are nice wheels. Definitely my style.
|
|
| |
|
09-08-2014, 09:34 AM
| #31 | ||
| PapaGriz Yo Join Date: Apr 2004 Location: In the garage building the wife a crawler
Posts: 13,137
| Quote:
Quote:
I need to get caught up on updates this week. Two weekends ago I finished up the firewall, floorboards, and winch mounting. Here you can see the floorboards and firewall.  Firewall and battery mount.  Inner fenders will also help brace the firewall.  Here is the winch mounting plate. It is secured to the crossmember and also captured by the CMS. I put a longer horn on the servo and the screw threads from attaching the draglink were catching on the bottom of the frame. By spacing the servo down with the 0.060" steel plate that issue was fixed.  Winch servo mounting. The servo sits on the 0.125" aluminum plate to give clearance for the drum. I was going to just cut a relief hole for the drum but then realized that the spacer would give me a place to thread one of the crossmember screws into, so it worked out good this way.  Guide tube was made from 0.188" aluminum tube.  The 3Racing winch is simply for decoration. I have burned up 2 motors in this winch alone so I don't trust them to last. The servo winch will give me more reliability, more speed, and more power. I don't want to lose my winch in the middle of a 200 gate course.  | ||
|
| |
|
09-08-2014, 10:07 AM
| #32 |
| PapaGriz Yo Join Date: Apr 2004 Location: In the garage building the wife a crawler
Posts: 13,137
|
Then the chassis was blown apart for paint. I had a set of Locked Up 1.9 wheels so I painted them as well. The paint I am using is from Eastwood. It is a spray paint with a hardener in it so the finish should be just as tough as any automotive paint. I first tried this paint on my RM250 frame this year and I am extremely happy with the durability.   Word of advice, if you use this paint don't treat it like a regular spray paint. The chemicals in this stuff are much worse so you must use a real respirator and good ventilation. It's also $25.00 per can and only good for 48 hours after you activate the hardener so plan ahead. I feel that the benefits of a true 2 part paint in the convenience of a spray can are worth it though. 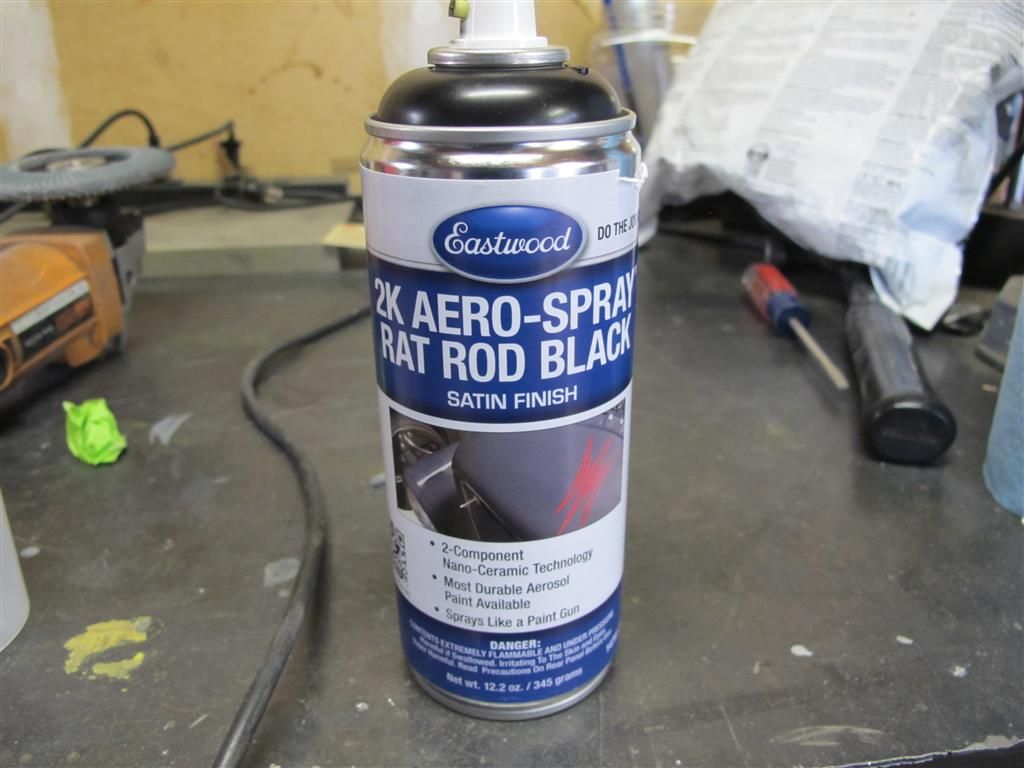 Here is my bike going back together after painting the frame. I have been riding several times this year and the paint is holding up amazingly well to the abuse. 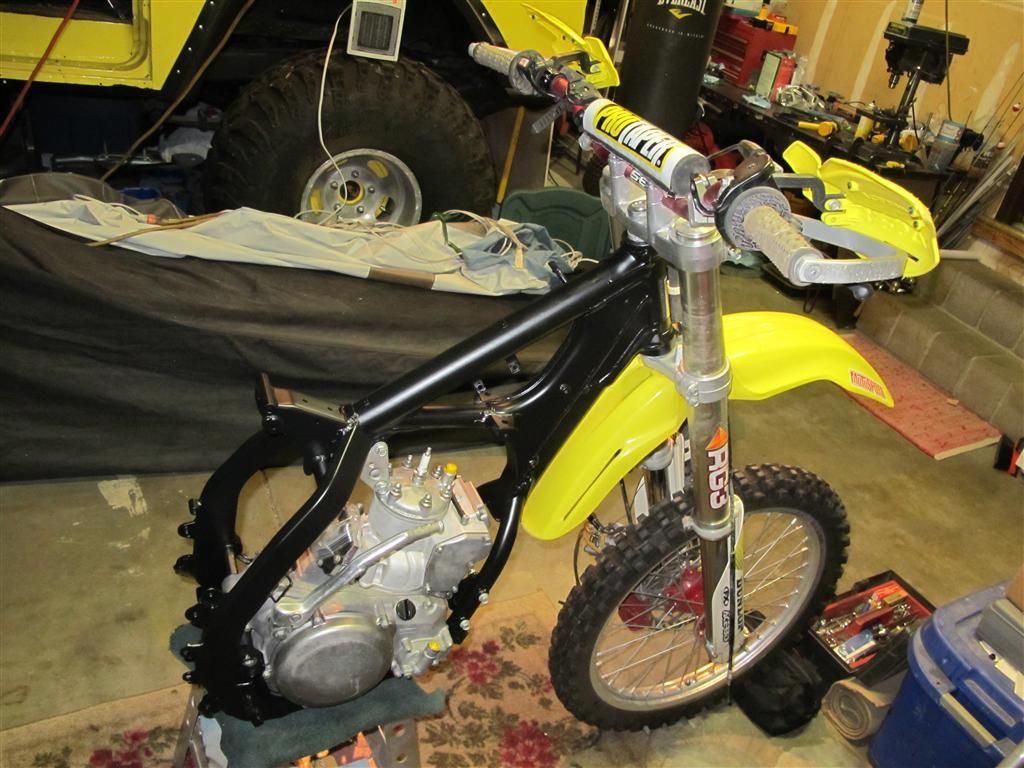 |
|
| |
|
09-09-2014, 10:17 AM
| #33 |
| PapaGriz Yo Join Date: Apr 2004 Location: In the garage building the wife a crawler
Posts: 13,137
|
After a couple days of cure time for the paint I was ready to assemble the chassis again. Luckily I had some help show up Thursday to get this together.  They worked quick and had it back to a roller in no time.  I needed to build a track bar and a new drag link because of the XR10 axle. I built the new track bar out of 0.188" stainless steel tube while the guys built the drag link. To save time I just wanted the drag link made from 0.188" aluminum tube because all you have to do is cut to length and run a 6-32 tap into the end. However, since the K&S aluminum tube isn't the strongest stuff I had them make a spare; just in case. While I love their enthusiasm; I really need to get them some power tools.  Finished pieces next to the ones I used for mockup.  "Let's get these installed"  Perfect! The 0.188" tube looks more scale than the 6mm Axial tube. Even though the drag link is longer than the track bar, there is no noticeable bump steer. The tie rod is a spare I had built for Guido so I just used it to save some time.  Last edited by Grizzly4x4; 09-09-2014 at 01:40 PM. |
|
| |
|
09-09-2014, 10:34 AM
| #34 |
| PapaGriz Yo Join Date: Apr 2004 Location: In the garage building the wife a crawler
Posts: 13,137
|
More parts came in on Friday. I sourced DSPro for the cool ammo cans and some gas can holders. Not pictured is the "down and dirty" winch hook. I wanted to buy the Nato cans also but since I need four I held off for now. I'll pick them up next month. I will make my own rack to mount the gas cans to the tire carrier. DSPro makes some great quality stuff. Top notch vendor that Ryan!  My RPP order came in as well. Stickers, sleeping bags, the Gear Head Rubicon roof rack, scale bolts and Vanquish hubs for the Locked Up wheels that go on Short Change, some Gear Head tow rope hooks, RPM blower, and some gas cans. The Hot Racing cans were a lot cheaper than the DSPro cans so I bought them for now. I will give them to my son once I get the Nato cans from DSPro.  |
|
| |
|
09-10-2014, 10:59 AM
| #35 |
| PapaGriz Yo Join Date: Apr 2004 Location: In the garage building the wife a crawler
Posts: 13,137
|
I was going to buy a new Hitec 7955 servo for the winch but since I bought another set of wheels I decided to use a servo I had laying around in the parts bin. I found this Hitec 5997TG servo and figured that it would make for a decent winch. Compared to the 5645 in the bin this was a good option. Here are some specs for comparison. All specs are @ 6.0V because that's what the HeyOk controller is rated for and that's what I run my electronics off of anyway. I prefer to use the lower voltage because I feel it keeps the servos more reliable; and reliability is important to me for TTC and G6 type events. HS-7955TG - 250 in-oz and .14 sec/60 degree. HSC-5997TG - 333 in-oz and .15 sec/60 degree HS-5645MG - 168 in-oz and .18 sec/60 degree A HeyOk controller should eliminate the usual creep and make this a good solid winch.  For this install I had to trim off some plastic where the trim pot was in order for the controller to fit.  Perfect fit now.  Wires soldered.  All buttoned up. The price of the HeyOk controller is well worth the time saved soldering on resistors to replace the pot and messing around with trim. It's really a simple install. It took longer to get the control board desoldered from the motor than to install the HeyOk controller.  Found a bobbin to use for a drum. Some aluminum mounts and these way cool RCBros clamps will make the mounting bombproof. Some black Permatex RTV around the wires and this sucker is waterproof.  Last edited by Grizzly4x4; 09-11-2014 at 09:53 AM. |
|
| |
|
09-10-2014, 04:39 PM
| #36 |
| PapaGriz Yo Join Date: Apr 2004 Location: In the garage building the wife a crawler
Posts: 13,137
|
A couple packages showed up Monday from Holmes Hobbies and Vanquish.  The new Vanquish 8 Hole Shooters are simply badass. I absolutely love these wheels!!! I don't have time to waterproof the MMP and "offspec" Trailmaster BL motor before this weekend so I will just install the Trailmaster BL and MMP borrowed from Guido for now. "Let's get that motor installed"    The Freqeskinz wrap has been coming along nicely. I have been working on it slowly to try and get it as perfect as I can. There are still some small air bubbles and bumps from dirt that somehow got under the wrap, but it's really turning out just as nice as any of my paint jobs with about the same amount of work. Plus there is no way I could have replicated this graphic in paint. Nice product for sure!!! My only wish would be that the black and grey were flat instead of glossy.  |
|
| |
|
09-10-2014, 05:07 PM
| #37 | |
| Rock Crawler Join Date: Aug 2012 Location: Los Angeles, CA
Posts: 864
| Quote:
| |
|
| |
|
09-10-2014, 05:33 PM
| #38 | |
| I wanna be Dave Join Date: Dec 2006 Location: Where the sheep run scared.
Posts: 3,008
| Quote:
The sliders look great Grizz! They act as nice body mounts as well. | |
|
| |
|
09-10-2014, 10:57 PM
| #39 | ||
| PapaGriz Yo Join Date: Apr 2004 Location: In the garage building the wife a crawler
Posts: 13,137
| Quote:
Thanks Trump, I really like the green and black too. I think it pays tribute to 10 years of RCC pretty well. Quote:
Yes, they would make good body mounts. However, I have decided to use the stock mounts since I want to be able to make fast battery changes in this rig. I am trying to not make things too complicated on this one. I got the electronics finished up and took Dutch for a test drive in the garage tonight. Everything works so that is a big relief. Looking forward to the maiden voyage this Sunday at The Crawl Space Scale Adventure. | ||
|
| |
|
09-11-2014, 06:29 AM
| #40 | |
| I wanna be Dave Join Date: Aug 2004 Location: san jose
Posts: 2,061
| Quote:
These rims are so Sweet but once again out of stock.. Great build there GRIZZLY | |

| |
|
| Tags |
| adventure, axial, crawl, crawl space, crawler, dutch, holmes, pit bull, pitbull, rcc, rccrawler, recon g6, rpp, rubicon, scale, scaler, scx, ssd, the crawl space, wrangler |
 Griz's Scale Adventure Trail Rigs/G6 Rides - Similar Threads
 | ||||
| Thread | Thread Starter | Forum | Replies | Last Post |
| scale trail rigs 6-8-10 | spyderwebbcustoms | Scale Videos! | 2 | 06-09-2010 06:22 AM |
| scale trail rides and locations. | LockedinLow | Missouri | 1 | 01-03-2010 01:32 PM |
| My rides and rigs | yoda@4x4 | Florida | 3 | 12-08-2009 12:57 PM |
| Scale Trail Rides | RockMonster | Virginia | 1 | 06-11-2008 11:31 AM |
| |


 Linear Mode


