| |
 12-02-2014, 06:48 AM
| #1 |
| Quarry Creeper Join Date: Jun 2008 Location: Central KY
Posts: 473
|
I've gotten bored lately so I decided to sell off some old stuff and trade around, and one of the new Axial SCX10 Deadbolt's have made an appearance in my shop. There are some killer deals on these little rigs right now. Most LHS will have them for well under $300 RTR, all you need is a good battery and charger. Yes, it was an RTR, but of course I had to change a few things. We all love tinkering, so here's a few pictures of the current setup. I'll be updating over the next few weeks to keep track of progress. Here in Kentucky, crawling definitely isn't what it was a few years ago, but there are still plenty of people out there with scalers that they'd like to show off and possibly even get together soon for a trail ride. Current Mods: -Replace stock radio with DX4C, need those extra channels for a future winch controller and lights (done) -Create rigid steering links out of 8-32 all thread and revo rod ends (done) -Flip the skid plate and tranny around to counter torque twist (done) -Mount the battery tray across the frame up front (done) -Modify sliders to bring them in closer to the body and chassis (done) -Cut off tamiya battery plug and solder on xt60 (done) -Get rid of that big honkin light bar and replace with a Rigid Industries bar (done) -Castle BEC (done) -Racer's Edge 25T (Futaba, Savox, Tactic) Aluminum Servo Horn (done) -Scale Hilift and Fire Extinguisher (done) Future Mods: -Take some styrene and fab up a new front grille, purchase Axial light bucket set for headlights and taillights. -SSD-RC Steel D-Hole Wheels -3Racing Winch (on order) -Savox SA-1230SG Servo -Wire up 8 Leds for light bar, 2 headlights, 2 bumper/driving lights, 2 taillights=14 Leds total, hooked to Turnigy LED controller ran off the receiver Obligatory pose pics...    UPDATE #1 Got to rummaging around my toolbox and found some aluminum links from an old AX10 kit. The front links were the perfect length, the bent rears will need to have about 1/4" chopped off and possibly drilled out and tapped a bit more. Either way, it saves me some money and will give a much more precise feel to driving than the old flimsy links. My experiences with past rigs were sometimes pretty hilarious/frustrating when the stock plastic links would bow up and cause the whole rig to look like it was trying to hump the rocks.  As the topside sits right now. I'm thinking about fabbing up some plates to mount to the rock slider standoffs so I can bring the ESC and receiver further forward and lower down on the chassis.  Front steering links made of 8-32 all thread and traxxas revo rod ends.  UPDATE #2 I finally got a chance to really run my new DB today. I have to admit, it's a climbing machine in (vaguely) stock form. I had briefly considered putting some weights in the wheels or going with knuckle weights, but with the suggested setup of the electronics moved up next to the tranny and the motor combined with the battery sitting low across the frame in front of the tranny and motor, it climbs really well. So much so, that after adding the slightly exta weight of steel wheels (SSD-RC D-Hole Steel Beadlocks coming soon), I think any more weight would inhibit its climbing ability. I'm really happy with this little rig and even managed to hit a line I was never able to quite make with my old 2.2 comp rig. I attribute most of it to the shorter wheelbase and lighter weight, sometimes less is more. UPDATE #3 Fabbed up some plates to mount the esc and receiver on the slider standoffs, which will bring the electronics forward and lower in the chassis. I know there are some aftermarket aluminum plates that are either currently being sold or are in the works, but I like doing my own mods as much as possible, plus it was CHEAP to do it this way using parts I had laying around. This should make a pretty significant difference in both the front to rear weight balance as well as lower the overall center of gravity. The truck is pretty stable to begin with, so this should make it handle exceptionally well. I'm thinking once I get some steel beadlock wheels, it will be damn near perfect as far as handling goes, at least for what I'm going for anyways. I've also got a Castle BEC on the way, the steering servo needs one BAD. Once the BEC comes in, I'll post up a handy diy article for making a Y-harness for plugging it into the servo, esc, and receiver. This will eliminate hacking into the servo wire itself. Also picking up the new lightbar and mounting it up today, which should drastically improve the looks. I'll eventually get around to purchasing the Jeep body, but the stock Deadbolt/Bronco body looks ok for now, I'll just run it till it's trashed. Doing little things like this remind me of how much I love this hobby. The fellowship was good as well, so hopefully some people will get to reading this and we can get a few Kentucky people together for some trail runs or something.    UPDATE #4 Got the new Axial Rigid Industries Light Bar mounted up. I'll eventually get around to putting some led's in it once I find the right set or make my own. I'm wanting to ultimately install 8 led's in the lightbar, two for the headlights (need the axial light bucket kit), two for the bumper, and two red tail lights. The entire light system will be remotely turned on and off via my DX4C and a Turnigy aux light switch. Next up, I'll be either purchasing the Axial light bucket set so I can go ahead and finish up the light system, or some scale accessories like the Hobby Parts set that includes the hilift, rifle, and fire extinguisher.     Last edited by Boogie; 12-09-2014 at 07:13 AM. |

|  |
| Sponsored Links | |
| | |
|
12-02-2014, 10:22 AM
| #2 |
| Rock Crawler Join Date: Nov 2004 Location: Lost in Florida
Posts: 934
|
great thread i will be following this ! nice truck too! |
|
| |
|
12-02-2014, 05:01 PM
| #3 |
| Rock Crawler Join Date: Jun 2013 Location: Knox, IN
Posts: 843
|
Can you please take some under side shots of the mounting of the battery tray? I would like to do this mod to my rig. Here is where I am at right now... 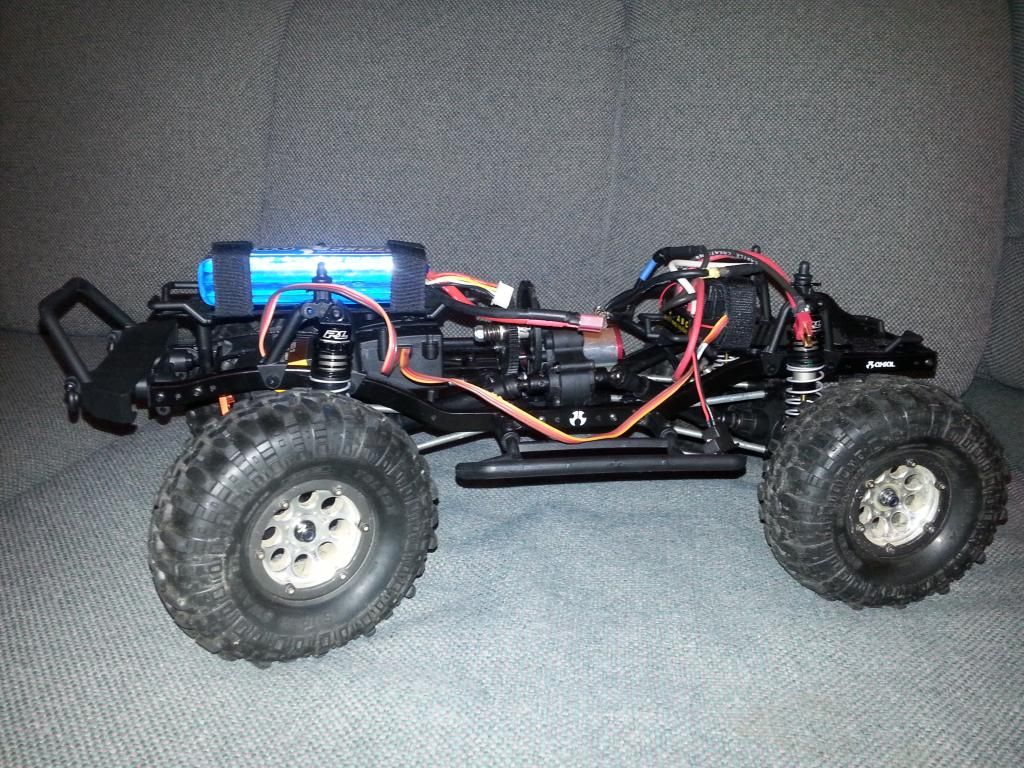 |
|
| |
|
12-03-2014, 08:03 AM
| #4 | |
| Quarry Creeper Join Date: Jun 2008 Location: Central KY
Posts: 473
| Quote:
  | |
|
| |
|
12-03-2014, 01:52 PM
| #5 |
| Quarry Creeper Join Date: Jun 2008 Location: Central KY
Posts: 473
|
Got some more goodies on order, including a winch, scale hilift jack and fire extinguisher, and aluminum servo horn. The aluminum horn will probably be overkill for the stock servo, but I'd rather go ahead and spend the $9 to replace it than very likely bust or strip the stock servo horn out on the trail and screw up a whole day of crawling. More pics once the items all come in and get mounted up. The led light system will be powered straight from the battery and controlled via a Turnigy led controller hooked to the Rx. The winch and servo will both be powered via the Castle BEC (set at 6v) using a Y harness. Since I'm running 3S lipos, I don't want to burn out the controller on the winch, although I see myself very rarely using it. It will likely be more for looks than anything, although it will still be hooked up and functional for use when I want to mess around with it. The little Traxxas waterproof receiver box will likely become VERY crowded here soon, but I'm determined to keep the rig from becoming a crows nest of wires and components strewn everywhere. That being said, I still have the stock axial receiver box I can remount and use if necessary. |
|
| |
|
12-03-2014, 06:06 PM
| #6 |
| Pebble Pounder Join Date: Mar 2012 Location: Port Angeles
Posts: 167
|
I really like how you used the offset rod ends on the front of the battery plate. Now I can get rid of the zip tie that's holding the front of mine down. Also the smallish project boxes from radio shack work great for hiding electronics.
|
|
| |
|
12-04-2014, 01:09 PM
| #7 | |
| Quarry Creeper Join Date: Jun 2008 Location: Central KY
Posts: 473
| Quote:
I got the idea for the battery plate mount from another thread, I want to give credit where it's due. Super simple and cheap/free idea, yet it makes a world of difference in how the rig handles. | |
|
| |
|
12-09-2014, 06:55 AM
| #8 |
| Quarry Creeper Join Date: Jun 2008 Location: Central KY
Posts: 473
|
Got a few new goodies in yesterday, including the Hobby Gear Scale Accessory pack containing a 1/10 scale rifle, hilift jack, and fire extinguisher. Also got a Castle 10A bec, Racer's Edge aluminum servo horn, and Axial light bucket set. Still waiting on my 3Racing winch, it's apparently on a slow boat from Japan. I mounted the servo horn up, nothing much to see there. I've used the Racers Edge horns before and they always held up well for me. $8 shipped from most sellers ain't bad! The only bad thing is now the whole linkage from the knuckles to the servo is solid, so it's only a matter of time before I kill the stock servo. I'll run it till it dies, then pick up a Savox SA-1230SG. I'm holding off a bit on mounting the headlights until I decide if I'm even going to fool with running a grill or just wait till I get a G6 Jeep body. I forgot to program the bec to 6V, so I took it to work with me (all I have are Macs at home) to program. Tonight I'll get it all hooked up with my handy wire harness I made up last night out of a couple servo extensions. I used this picture to figure it out. Anyone with a couple free minutes, a soldering iron, two servo extensions, and basic soldering skills can figure it out. Alternately, you can buy one from Holmes for $6, not bad.  I originally wanted to mount the Hilift jack on the hood, but quickly realized that as long as it is, it would likely hang on random sticks or rocks and quickly get broken. That realization being made, I opted to mount it in the back, safely tucked away next to the roll cage.     |
|
| |
|
12-10-2014, 08:02 AM
| #9 |
| Quarry Creeper Join Date: Jun 2008 Location: Central KY
Posts: 473
|
Got the BEC and remote light switch installed last night, also got the light bar wired up with lights. I'd be happier if it was with the standard 8 led's, but the little 6 led strip was all I had at the moment until I can get a custom setup wired up. Here's a quick video    Last edited by Boogie; 12-10-2014 at 08:12 AM. |
|
| |
|
12-18-2014, 01:45 PM
| #10 |
| Quarry Creeper Join Date: Jun 2008 Location: Central KY
Posts: 473
|
Finally got time for a quick hike to Anglin Falls here in Kentucky. It was around 2 miles roundtrip. I went through two 2200mah 3S lipos, which did ok, but it's pretty evident I'm going to have to replace them soon. They only used around 1200 to 1400mah before hitting the soft cutoff on the esc. They are around 2 or 3 years old and used pretty heavily with my quadcopter and planes, so I can't really complain about them. The next couple packs I buy though will be in the 3300 to 3600mah range, just to have a little more capacity. The trail was a good mix of roots, water crossing, and a fairly significant amount of rock crawling. I only had to portage one spot, a 2 foot tall ledge with no other way around. The SCX10 performed flawlessly with one exception, the steering servo. It didn't break down or crap out on me but it did stall a couple times in some tight spots, even with the BEC. It'll do for now, but I'll be ordering a stronger one here sometime soon, probably around the 300oz range. Other than that minor annoyance, no breakdowns! Stay tuned for video from today once I'm done with the post processing and uploading. In the meantime, check out the pics from today.  Lights off...  Lights on...      Little air time...  |
|
| |
|
12-18-2014, 02:02 PM
| #11 |
| RCC Addict Join Date: Nov 2014 Location: Nowhere
Posts: 1,326
|
Cool shots and that looks like a great place. Any issues with rollovers and the plastic lightbar?
|
|
| |
|
12-18-2014, 02:17 PM
| #12 | |
| Quarry Creeper Join Date: Jun 2008 Location: Central KY
Posts: 473
| Quote:
| |
|
| |
|
12-23-2014, 01:10 PM
| #13 |
| Rock Stacker  Join Date: Sep 2006 Location: springfield
Posts: 55
|
Love the pics and the ideas. Living in Big Cave Country i would bet that is an ideal place to crawl. I just got a deadbolt and i like the way you have your battery set up thanks for the ideas!
|
|
| |
|
12-23-2014, 02:36 PM
| #14 |
| Quarry Creeper  Join Date: Nov 2014 Location: Northwest Arkansas
Posts: 217
|
Love it. My Deadbolt will be here tomorrow. You've given me plenty of ideas for mods to work on.  |
|
| |
|
07-08-2016, 07:42 PM
| #15 |
| Newbie Join Date: Jul 2016 Location: USA
Posts: 6
|
That is a awesome spot! Nice stuff.....
|
|
| |
 |
 Boogie's Deadbolt - Similar Threads
 | ||||
| Thread | Thread Starter | Forum | Replies | Last Post |
| My new Deadbolt | 05stroker | Axial AX10 2nd-gen | 17 | 02-17-2014 06:14 PM |
| Deadbolt | Alamo71 | Axial AX10 2nd-gen | 2 | 12-24-2013 01:43 PM |
| Boogie's Secksy10 | Boogie | Axial SCX-10 | 9 | 04-04-2011 08:35 AM |
| Boogie's Bully | Boogie | RC4WD Bully | 14 | 06-30-2009 08:43 AM |
| |


 Linear Mode


