| |
 06-05-2008, 10:27 AM
| #1 |
| Quarry Creeper Join Date: Feb 2008 Location: no more lockers
Posts: 400
|
thought i would share my berg build with everyone , hopefully i can come up with some good ideas for this build and learn a lil something too. i am going for an ultra low cog, simple design and function. ok some observations of the berg kit. first things first i hope berg is watching , the rod ends are terrible , now that's out of the way the rest of the kit has nice part . i wont be using most of it lol clocking the axles was the first goal and last night i completed the rear axle flip flop and clock to move the motor above and behind the rear axle for more clearance . today i will start on the front axle clock and custom battery servo mounts. specs for this build berg axles axiom 45t hand wound x2 CAC tucker wheels flippin bad ass panther tires mamba max electro disco spektrum dx3r chassis and shocks tba after doing the rear axle last night i decided to throw the kit together to see what the stock configuration was like. i notice a good amount of axle steer so not an ideal link geometry from the stock kit . that will be addressed with a new chassis . i also feel the shocks are laid down to far and are not effective with the 30 wt oil the kit recomends . maybe 90-100wt shock oil would help but again new chassis will solve this issue too. you can find more info on the rear axle flip flop here berg/ocm rear axle flip and clock here are some shots of the stock kit and rear axle flip |

|  |
| Sponsored Links | |
| | |
|
06-05-2008, 10:49 AM
| #2 |
| I wanna be Dave  Join Date: Dec 2005 Location: Happiness is a warm AK.
Posts: 12,563
|
Very clean, do you have enough wheel speed w/ that motor? |
|
| |
|
06-05-2008, 11:41 AM
| #3 | |
| RCC Addict Join Date: Oct 2005 Location: $t. Helen$, OR
Posts: 1,082
| Quote:
these things are the Clod of 2.2s  what motor combo are you going to be running? | |
|
| |
|
06-05-2008, 12:23 PM
| #4 |
| Im Brandon  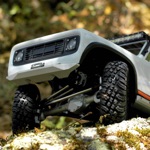 Join Date: Feb 2005 Location: Colfax, CA
Posts: 8,156
|
Nice Alan! Sending a PM your way |
|
| |
|
06-05-2008, 12:36 PM
| #5 | |
| I wanna be Dave Join Date: Dec 2005 Location: Happiness is a warm AK.
Posts: 12,563
| Quote:
| |
|
| |
|
06-05-2008, 02:56 PM
| #6 |
| I wanna be Dave Join Date: Oct 2005 Location: Columbia TN
Posts: 6,154
|
I hope that motor is a joke.....
|
|
| |
|
06-05-2008, 03:37 PM
| #7 | |||||
| Quarry Creeper Join Date: Feb 2008 Location: no more lockers
Posts: 400
| Quote:
Quote:
Quote:
Quote:
Quote:
| |||||
|
| |
|
06-05-2008, 04:42 PM
| #8 |
| I wanna be Dave Join Date: May 2007 Location: Taylors Falls just hanging with the MNRCRC crew.
Posts: 7,843
|
Nice so far I like the clocked rear axle will the front axle get some clocking?
|
|
| |
|
06-05-2008, 04:47 PM
| #9 | |
| Quarry Creeper Join Date: Feb 2008 Location: no more lockers
Posts: 400
| Quote:
| |
|
| |
|
06-05-2008, 04:55 PM
| #10 |
| I wanna be Dave Join Date: May 2007 Location: Taylors Falls just hanging with the MNRCRC crew.
Posts: 7,843
|
Gonna be awesome Bonus |
|
| |
|
06-06-2008, 12:13 AM
| #11 |
| Quarry Creeper Join Date: Feb 2008 Location: no more lockers
Posts: 400
|
front axle clock finished , i followed robb's write up to get me started this is also a really simple mod that should be done to prep the berg for comp . i clocked it slightly further than robb did in his write up so that i could then rotate the motor back down a little to gain some negative castor . the stock rig sits at 0 degrees i tilted it back for better steering and it helps with sidehill bite when trying to steer up hill from sidehilling . another perk to over clocking and then turning back to gain castor is that it moves the tie rod to a higher position . while i was at it i bent the lower links for high clearance also playing around with different bodies i found the hpi bug body fit perfectly over the tiny berg chassis and can sit lower than the grappler or the new c10 . the car can nearly be driven upside down with the bug body so my choice for comp body is simple . next up will be the servo battery axle mount cheers |
|
| |
|
06-08-2008, 01:11 AM
| #12 | |
| Quarry Creeper Join Date: Feb 2008 Location: no more lockers
Posts: 400
| Quote:
came up with this idea for an axle mount platform using the bumper plates , simple super sturdy mount that can be clocked. perfect for a lipo or ? using both bumper mounts is not needed , this mod is burly for what ever you mount . not sure if i am going to use it for anything but i thought i would share the idea anyway . | |
|
| |
|
06-08-2008, 02:05 AM
| #13 |
| RCC Addict Join Date: Nov 2007 Location: BV
Posts: 1,170
|
I used my stock bumper on the rear axle as a battery mount and have since decided to move away from that arrangement because it eats up ground clearance. I really did notice the difference. I think if it would be less bad if the bottom was a smoother transition like the servo mount. Give it a try anyways, it may not bother you.
|
|
| |
|
06-08-2008, 07:24 PM
| #14 |
| Quarry Creeper Join Date: Feb 2008 Location: no more lockers
Posts: 400
|
finished up the rear axle lock out . seeing how everyone has done theirs i tried to keep it simple and tough . i like some of the other ways people have done but i feel this the best way for my build. i did not want to use threaded rod ends for the lock out strut because the possibility of pulling out a thread , been there done that . i like kamikazi's mod but i wanted a little bit of triangulation . i just feel triangulation is always stronger . this way also tucks everything nicely into the wheel . first flip your knuckles so the steering horn faces toward the front , this allows the strut to go inside the wheel because of the offset mounting hole on the axle. the next thing i did was eye up where on the strut the hole needed to be then i drilled one strut . bolt the other strut to the one drilled and then use the first hole as your pilot to make them equal length . in order to align everything for drilling into the knuckles everything was locked parallel and then drilled to keep side to side toe in equal . turned out well should have the servo/battery mount doe tonight so more updates to come. |
|
| |
|
06-08-2008, 07:43 PM
| #15 |
| Rock Crawler Join Date: May 2006 Location: Georgia
Posts: 876
|
Nice job on the rear lockout. |
|
| |
|
06-08-2008, 09:54 PM
| #16 |
| Tire&Foam Extraordinaire   Join Date: Jun 2007 Location: C.I. Compound, Tyler, Texas
Posts: 5,601
|
Wow, nice build. |
|
| |
|
06-09-2008, 08:58 AM
| #17 | ||
| Quarry Creeper Join Date: Feb 2008 Location: no more lockers
Posts: 400
| Quote:
Quote:
now if the rest of the parts im waiting on show up i'll be golden | ||
|
| |
|
06-09-2008, 09:08 AM
| #18 |
| I wanna be Dave Join Date: May 2005 Location: CITY of CHAMPIONS!!
Posts: 2,086
|
on your lockout, did you flip the knuckles? i am guessing thats how you lined the lockout up parallel to the top of the knuckle. was there any prob doing this? are the knuckles reversible with no difficulties? thanks
|
|
| |
|
06-09-2008, 10:09 AM
| #19 | |
| Quarry Creeper Join Date: Feb 2008 Location: no more lockers
Posts: 400
| Quote:
the knuckles can be flipped no problems | |
|
| |
|
06-09-2008, 12:57 PM
| #20 |
| Pebble Pounder Join Date: Apr 2007 Location: at the bench of the up 'n coming '79 ford crew cab
Posts: 171
|
Bonus this will be a great comp truck. i really am stoked to see your finished product. nice builds always come out of your shop man! lookin killer!
|
|
| |
 |
| |


 Linear Mode


