| |
 08-01-2007, 08:00 PM
| #21 | |
| Pebble Pounder Join Date: Apr 2006 Location: Grand Rapids
Posts: 172
| Quote:
| |

|  |
| Sponsored Links | |
| | |
|
08-01-2007, 08:55 PM
| #22 |
| Rock Stacker Join Date: Mar 2006 Location: plainfield
Posts: 74
|
i think its the chevy SSR body by hot body's
|
|
| |
|
08-01-2007, 09:00 PM
| #23 |
| Rock Crawler Join Date: Dec 2005 Location: Tulsa, Oklahoma
Posts: 857
|
Its definitely not the SSR
|
|
| |
|
08-06-2007, 06:30 PM
| #24 | ||
| Pebble Pounder Join Date: Jul 2007 Location: Phoenix
Posts: 110
| Quote:
Quote:
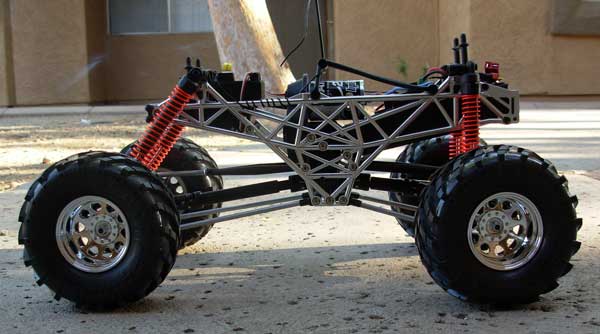
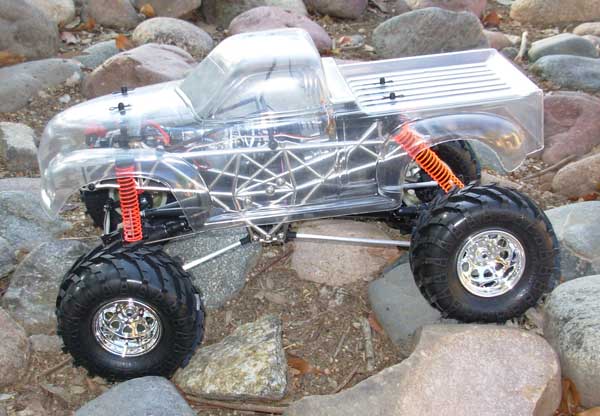
I thought it might be fun to go with one of those SSR bodies, but decided to stick with something that would have came with a straight axle under it. Updates? Sorry it took me so long. I've had the body painted for days now, but I was having issues cutting my tire foams. I tried to do the star cut on my foams, but got halfway through the first one, and realized I was wrecking it. Me and tire foams just do not get along. So I tacked it back together, and made mental note to get some softer foams I wont have to cut next time. I just did my usual cut I always did on my stadium truck tires to give them more sidewall bite, but in this case I think it just help them fit over the narrowed wheels better, since they suck in the tires sidewall. 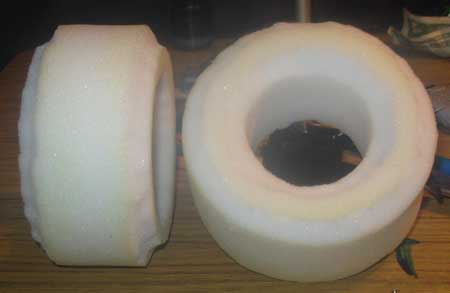 SG hooked me up with this TowerPro MG945. 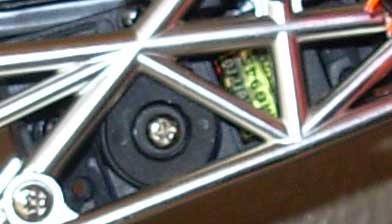 Its a little noisy, but its plenty torquey enough that when I tested it, it took about 10 minutes to yank the self tapping screw out of the steering bell crank. I just drilled it out and did the ol' 4-4o screw and locknut thing. It should be fine now.  I took shaun's advice and just dremeled out the motor plate to let me use the 15 tooth pinion. he never mentioned having to take out the top of the tranny, but I got it. Just had to shave a little bit off. I like the extra power. It snaps when it takes off now. 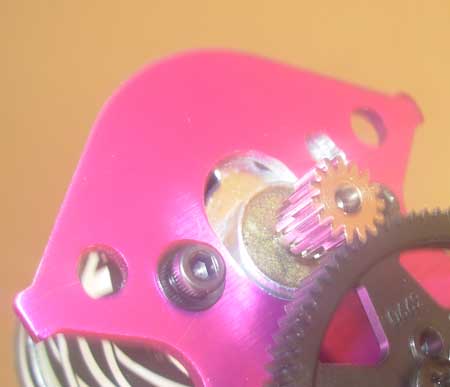 ... and now the part I've been waiting for. Introducing: 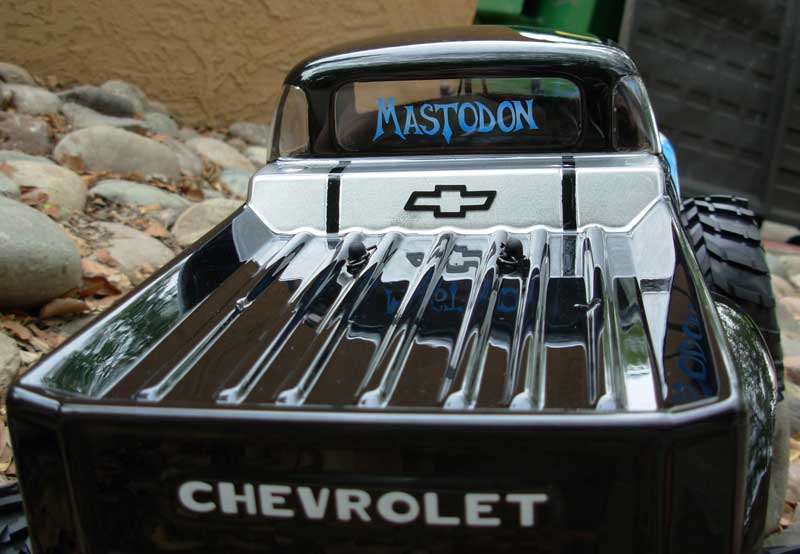 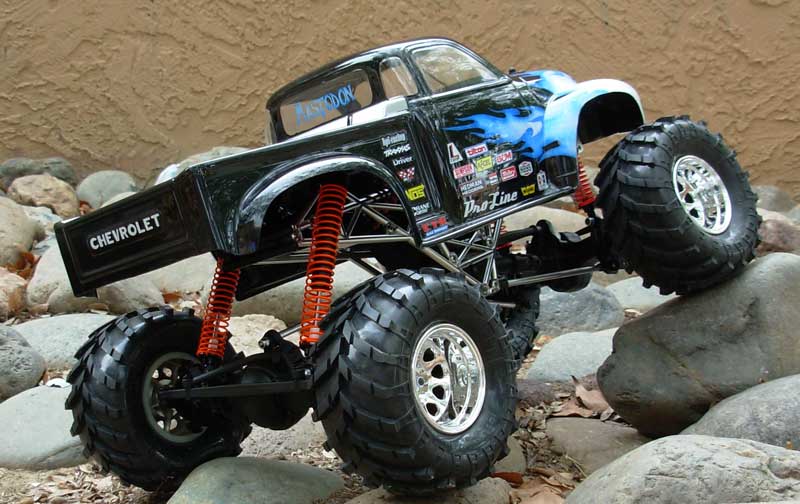 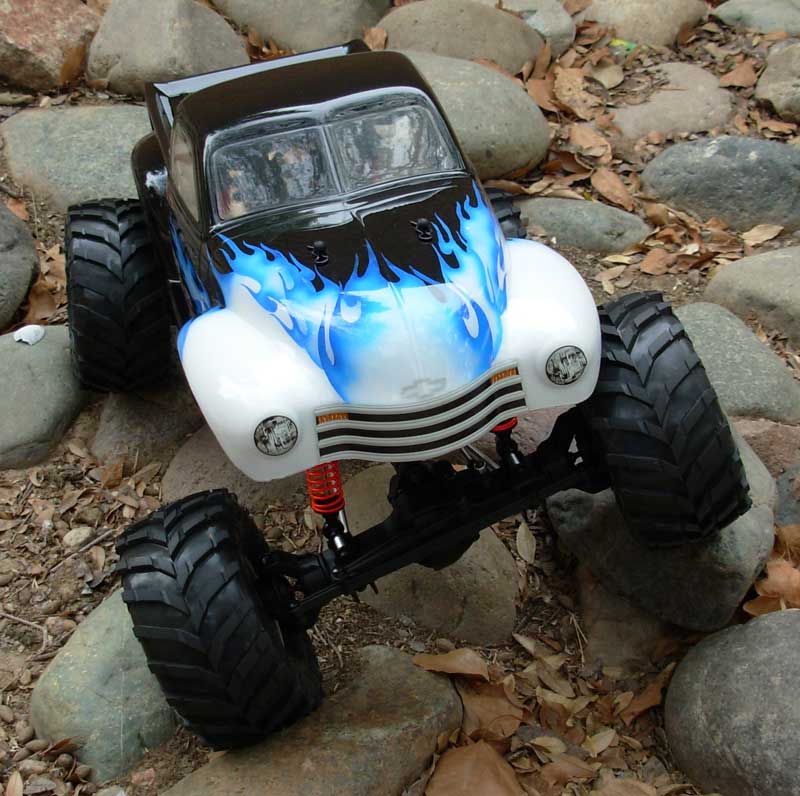 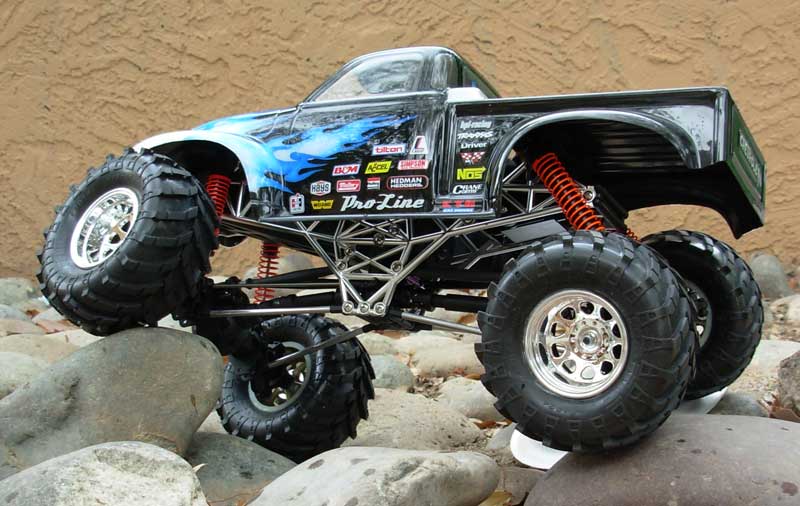 I had intended to do hot rod flames, but at the last minute decided to challenge myself and do something based off the decals that came with the body, and I don't know, I guess it came out pretty good, but I wish I just stuck with the hot rod flames. I'm gonna play with it for a few days, and maybe try to get some video this weekend. | ||
|
| |
|
08-06-2007, 09:03 PM
| #25 |
| Rock Crawler Join Date: Dec 2005 Location: houston
Posts: 650
|
Looks GREAT!!! The body turned out killer too. This should be an awesome first crawler to get you really hooked into the crawler world. Shows how well the WK can be modded into a crawler using stock parts with a little fabwork.Once again, great job. How ya liking it so far?
|
|
| |
|
08-07-2007, 07:06 AM
| #26 | |
| Pebble Pounder Join Date: Jul 2007 Location: Phoenix
Posts: 110
| Quote:
 | |
|
| |
|
08-07-2007, 07:12 AM
| #27 |
| Rock Crawler Join Date: Dec 2005 Location: Tulsa, Oklahoma
Posts: 857
|
Looking great.
|
|
| |
|
08-07-2007, 06:29 PM
| #28 |
| Quarry Creeper Join Date: Jul 2007 Location: Kansas city
Posts: 223
|
That paint job looks real good!
|
|
| |
|
08-07-2007, 10:24 PM
| #29 |
| Pebble Pounder Join Date: Jul 2007 Location: Phoenix
Posts: 110
|
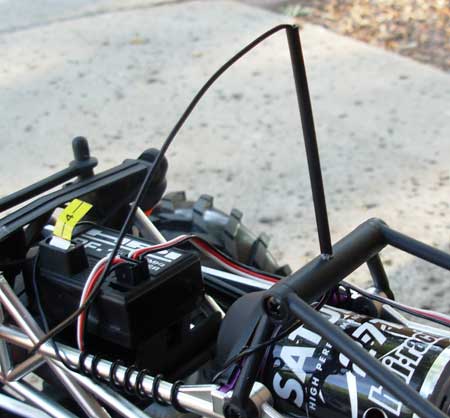
Welp, just when you think you got it all together, you find another issue to deal with. A friend pointed out it yanked that screw out of the bellcrank because it had too much throw, and that people with WKs have smoked their digtal servos like that. He suggested using my Iwaver radio with EPA, but I just used the steering D/R to cut out that extra throw. Seems good now. Didn't care much for that HPI Tx anyways. When I was adjusting it, and watching the bellcrank real close, I noticed how much the bellcrank mount actually flexes. Probably soaking up all the extra power from the servo. I'm gonna see if I can figure out how to brace that up, tomorrow. |
|
| |
|
08-07-2007, 11:32 PM
| #30 |
| Newbie Join Date: Jun 2007 Location: Surrey, B.C
Posts: 18
|
Looks great..although as far as i understand this hobby..they're never really finished? i know im still working on mine as i play with it |
|
| |
|
08-08-2007, 10:00 AM
| #31 |
| I wanna be Dave Join Date: Jul 2006 Location: Moscow Mills MO
Posts: 2,204
|
I think there is a cnc one floating around on the bay.
|
|
| |
|
08-09-2007, 09:32 AM
| #32 |
| Rock Crawler Join Date: Jul 2007 Location: Beechview/Pittsburgh
Posts: 536
|
Hey Crazy Dave, I may not be the prettiest but you may want to switch to an OTA servo mount.. I had the same kind of setup When I first stretched my WK.. Also Kreepys Links for the shock and lower link mounts are killer!! I didnt notice anyone else saying anything about the M2K's that you are running, but if you swap them around and run them backwards it'll give you alot more bite on the rocks... At least it does here in western PA.. Also the Axial Lizards are great on straight up rock, without alot of edges... Not knowing the terrain that you are running on I dont know if they would be a benifit to you. On the foam inserts, I cut mine in half so that I got double the amount of inserts then cut a cog wheel pattern into the ones in my M2ks and just used half of the stock foam in my Lizards.. The body looks awsome!! |
|
| |
|
08-09-2007, 11:26 AM
| #33 |
| Quarry Creeper Join Date: Jul 2007 Location: Holland,OH
Posts: 255
|
I'm new to this also, I'm thinking I'm gonna get me one of these. I love the paint job!! Looks AWSOME!!! |
|
| |
|
08-10-2007, 08:48 AM
| #34 |
| Newbie Join Date: Jul 2007 Location: Hillsboro
Posts: 46
|
That thing i really alsome dude great work!
|
|
| |
|
08-10-2007, 09:23 AM
| #35 |
| Rock Crawler Join Date: Jul 2007 Location: Rectalville
Posts: 889
|
Man, that truck is SHARP! Was stretching the rear more than the front the only way to fit that body on there? Or did you do it that way more for trail ability? I only ask because I REALLY like that body, but I prefer a more "equal" looking stretch. (just a looks thing, that's all.)
|
|
| |
|
08-10-2007, 05:31 PM
| #36 | |||
| Pebble Pounder Join Date: Jul 2007 Location: Phoenix
Posts: 110
|
Hey thanks for the compliments guys, they are appreciated. Quote:
Quote:
I was kinda waiting for someone to say something about the direction of the tires. I'm almost embarrassed to admit I haven't taken it out of the house in over a week (working out kinks), and they get too grabby on the carpet reversed. I'll be reversing them when I hit the rocks. Quote:
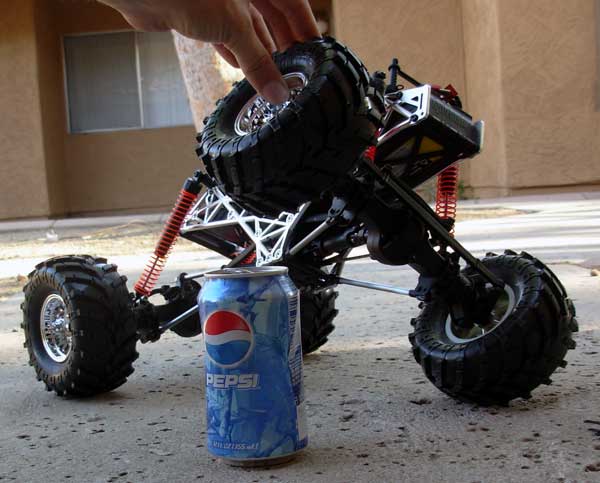
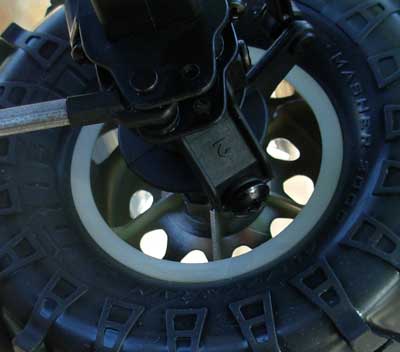
Ok now here's the update. I borrowed a couple ideas from crawler_king. I just flipped the axles over to make them work in reverse. Had to swap the hubs on the ends to keep the angles right, but it was relatively simple to figure out, and I feel a lot better about doing that, than swapping my motor wires, as I had done. A nice little side effect is that I had to shave a tad off the bellcrank mount to match up with the new angle on the side of the pumpkin, with the axle flipped. Which braces it up solid on one side. 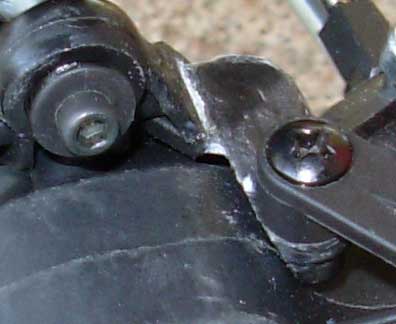 Still had to brace up the other side a bit, 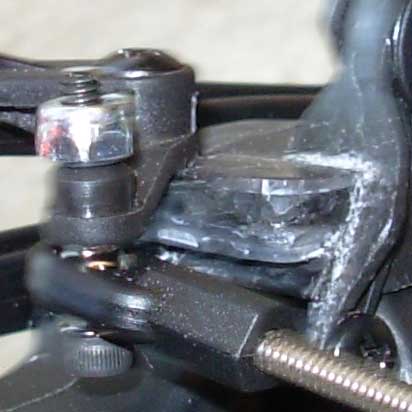 ...but it don't flex now. Took me less than 5 minutes to do this: 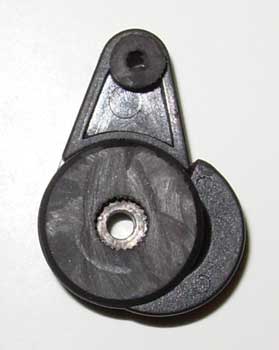 That was an easy fix, I just filled it with glue. Its solid now. I ran down the remainder of the pack without any problems. So hopefully I got it. Another idea I borrowed from crawler_king was his positioning of the rear lock out. 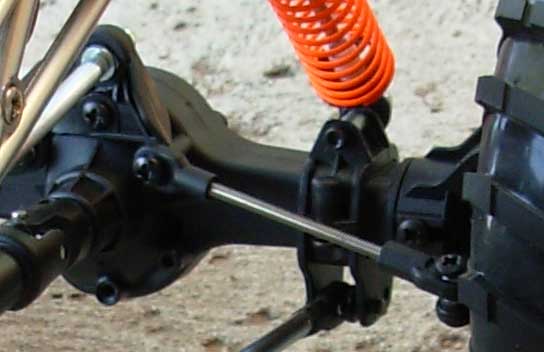 I guess right after I did this, he had a problem with the screw bending. I don't quite remember exactly how he mounted his, but this feels really solid to me. I just used Traxxas ball joints, and I had a couple long screws left over from something. I think from when I took the wheelie bar off. I actually had to shave a couple millimeters off the end to let them screw in all the way. So they're in there pretty good, but my favorite part is how it cleans up the looks of the rear end. 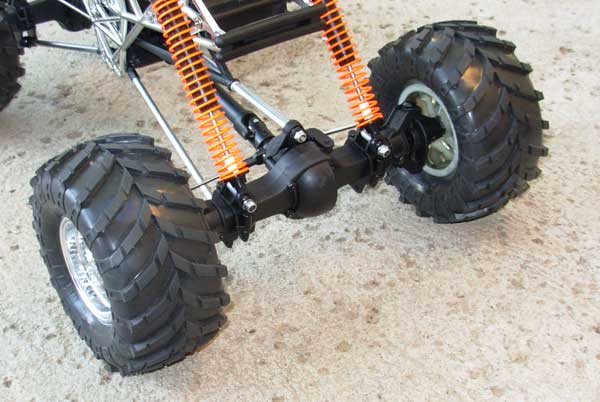 I had read a bunch of stuff where people were using 2/3A cells. So I borrowed the pack from my RC18 to try that out. Packed it in there with some cut up tire foam. 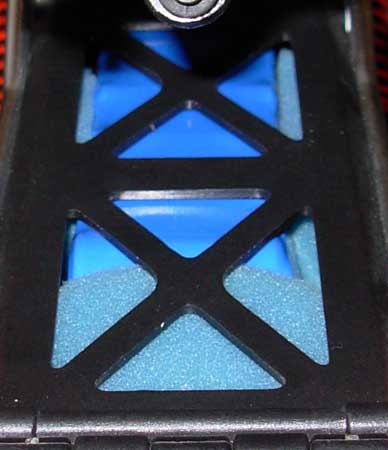 Oh man, that has to have been the one thing that made the most drastic effect on this truck more than anything. I could feel in my hand how much lower the center of gravity is now. It wanted to pull my wrist side to side before, but now it feels totally stable. Though I can't say that made it any easier to keep it on its wheels, because it got crazy quick all of sudden. I was afraid the smaller cells would have less punch, but I could hear off the ground the motor just sounded faster. I knew the stock HPI cells were kinda lame, but, yeah, they're real cheapies. Its a hell of lot more fun now, and it has a lot more power with less throttle input. I think it'll be better if I practice a little throttle control. Its been a long work week, I'm exhausted. I'm going to bed early because I can't wait to give it a good working over in the morning. | |||
|
| |
|
08-11-2007, 06:56 PM
| #37 |
| Pebble Pounder Join Date: Jun 2007 Location: Las Vegas
Posts: 121
|
After reading your thread I did a little searching and found this. I believe this is the piece you are looking for. http://rc4wdstore.com/product_info.p...roducts_id=628 Hope this helps. Trev |
|
| |
|
08-11-2007, 07:28 PM
| #38 | |
| RCC Addict Join Date: Jun 2006 Location: Sin City
Posts: 1,852
| Quote:
| |
|
| |
|
08-13-2007, 05:28 AM
| #39 |
| Rock Crawler Join Date: Jul 2007 Location: Beechview/Pittsburgh
Posts: 536
|
Hey Crazy I had actually hooked up my rear lockouts to the central screw, as opposed to the two lower upper link mounts as you did, I had both lockouts stressing one screw as opposed to each one working one screw. Also I think the screw that I had originally used was like and inch and a 1/4 or so.. I just replaced it with a 3/4 of an inch screw and a shorter spacer, it seems to work fine, I had it out friday with no problems.... Looking good! |
|
| |
|
08-14-2007, 04:45 PM
| #40 | ||
| Pebble Pounder Join Date: Jul 2007 Location: Phoenix
Posts: 110
| Quote:
Only thing is now that my braced up one is holding up, the bellcrank seems to be developing a bit of slop, so I think I'm actually gonna replace that first now. Quote:
Ok, update time... bashed it around all weekend around the apartment complex, and it held up extremely well. Just had a couple minor issues in the beginning, then it was good for the rest of the weekend. After less that 10 minutes, I stripped the teeth out of the input of the servo saver. I just gave it a couple coats of superglue, so I had to jam it on the servo, and it works fine now. The other issue is kind of a non issue. It was getting high centered at first, I made mental note I needed to put a bend in the linkage, but when I brought it in to fix the servo saver issue, I had discovered that one of the linkages had already bent, so I just bent the other to match. I broke out with a ruler and got it all evened out since I took this pic, but you get the idea. 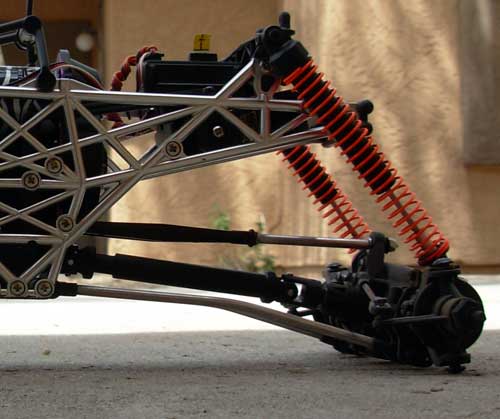 I would have put the bend closer to the axle, but that's where the curb decided to put it, and if the curb wants it bent, the curb gonna bend it where it wants. Ironically I was watching HorsepowerTV or one of those Powerblock shows yesterday, and they were talking about brake line. I guess there's stainless steel hard line that needs a tube bender to be bent, then there's soft line that can be bent by hand. Judging by how easy this was to bend, I think they stuck me with the soft stuff. I just asked for "Stainless steel brake line", I guess I got to be more specific next time. And then finally, the best part, I got video. http://www.youtube.com/watch?v=zodpWt53YPk | ||
|
| |
 |
| |


 Linear Mode


