| |
| |||||||
 |
| | LinkBack | Thread Tools | Display Modes |
 08-25-2007, 07:29 PM
| #1 |
| Let me 3D Print that...  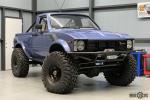 Join Date: Jun 2007 Location: Concord
Posts: 315
|
Seems like I just finished with Phase 1 of the project. But after running the truck for just a short while and thinking of what the capapilities of a tuber style truck could be. (It was pretty capable with the stock chassis) For now I have decided to do a "quick and dirty" buggy style tuber so that I can get out and enjoy the WK parts with a little more potential. The Bronco body is gone for now, but that gives me an opportunity to take some time and make a nice scale tuber using it (for phase 3 So here is where I started... The base/skid plate is a piece cut from a good old Wal-mart cutting board. Nothing fancy...seen many like it before. The links are made from 1/4" aluminum standoffs from McMaster-Carr They come pre-tapped with 4-40 threads. The max length is 2" but you can buy a couple of them in various lenghts and join them in the middle to make any length you want. I have done this on a Clod project (you can see some in the background) and they hold up great.  The transmission I am using is an old B2 Buggy transmission that I had laying around. I got a set of diff lockers from 62PYRO and they fit.  Last edited by RexRacer19; 08-25-2007 at 07:54 PM. |

|  |
| Sponsored Links | |
| | |
|
08-25-2007, 07:38 PM
| #2 |
| Let me 3D Print that... Join Date: Jun 2007 Location: Concord
Posts: 315
|
The frame is 3/16" brake tubing that is typical for the most part. When I started on the frame, I did not have the materials for brazing, so I built the main part of the frame with a MIG welder. I mocked up the rear axle and compared it to the original WK frame. The new tuber will have a higher ground clearance for sure, and a lower CG as well. Nothing new for you vets.  This past week the materials to braze with came and I figured that I should get some practice. All of the 4-40 nuts were brazed to the frame for attaching the body. I also put a battery mount on up front. It ended up being eaisier than I expected...I wish I would have brazed the whole frame. Building a scale tube frame for the Bronco is going to be fun...  |
|
| |
|
08-25-2007, 07:49 PM
| #3 |
| Let me 3D Print that... Join Date: Jun 2007 Location: Concord
Posts: 315
|
The body panels are next. Those were made from some .040" aluminum that I had laying around.   Painting shortly followed... For the frame, Duplicolor red was used...nothing fancy there. I just wanted a solid color that would be easy to touch up once it got some rash on it. For the body panels I used some Pactra True Blue Pearl right over the aluminum. I wanted it to have an anodized look. Also, I sanded the panels in one direction to give them a little more visual interest.     That is it for now. Next is getting the transmission mounted. I am also waiting for some parts to adapt the ouput of the transmission to the driveshafts. Hopefully this thing will be running in the next week or so. |
|
| |
|
08-25-2007, 08:22 PM
| #4 |
| Newbie Join Date: Aug 2007 Location: allentown
Posts: 8
|
my dad works for mcmaster-carr... so i might have to do that since he gets everything for like 50% off... do u noe the specific name/part number? =]
|
|
| |
|
08-25-2007, 08:29 PM
| #5 | |
| Let me 3D Print that... Join Date: Jun 2007 Location: Concord
Posts: 315
| Quote:
| |
|
| |
|
08-25-2007, 10:35 PM
| #6 |
| Pebble Pounder  Join Date: Feb 2007 Location: L-TOWN
Posts: 158
|
i like it it is my school colors lol red and blue
|
|
| |
|
08-26-2007, 08:42 AM
| #7 |
| Pebble Pounder Join Date: Oct 2006 Location: Sault Ste. Marie, MI
Posts: 129
|
Holy Ficus. that thing is clean and simple
|
|
| |
|
08-26-2007, 08:45 AM
| #8 |
| Pebble Pounder Join Date: Oct 2006 Location: Sault Ste. Marie, MI
Posts: 129
|
Wait, where are your lower links mounting to?
|
|
| |
|
08-26-2007, 09:40 AM
| #9 | |
| Let me 3D Print that... Join Date: Jun 2007 Location: Concord
Posts: 315
| Quote:
 | |
|
| |
|
08-26-2007, 11:23 AM
| #10 |
| Pebble Pounder Join Date: Oct 2006 Location: Sault Ste. Marie, MI
Posts: 129
|
Alright, I see. Very nice!
|
|
| |
|
08-27-2007, 03:20 PM
| #11 |
| Pebble Pounder Join Date: Oct 2006 Location: Sault Ste. Marie, MI
Posts: 129
|
Any Updates?
|
|
| |
|
08-27-2007, 08:37 PM
| #12 |
| Let me 3D Print that... Join Date: Jun 2007 Location: Concord
Posts: 315
|
Good progress over the past couple of days... The transmission was mounted to the skid plate. The bottom screws were countersunk to keep from haning up. I also made an aluminum brace to support the transmission better. Two screws from the bottom was just not enough...  Next was getting the WK driveshafts to mate up with the transmission. The diff lockers were 5mm outputs so adapters were bought to get them to 6mm. I had a couple of problems though. First the WK output yokes have the pin style set screw that goes all the way through (which I like). So I drilled thought the adapter to match the WK transmission outputs. Also, the adapters only had a flat on one side and the WK yokes have two flats on the inside...so one flat was ground out of the yokes to make compensate. There may be an easier way to do all this, but I worked with what I had...    |
|
| |
|
08-27-2007, 08:43 PM
| #13 |
| Let me 3D Print that... Join Date: Jun 2007 Location: Concord
Posts: 315
|
Next up is some assembly. The rear suspension was first. Pretty straightforward for the most part. Here are a couple of pics that detail how the suspension is setup. The shocks are some old Losi units that I had laying around...still probably my favorite shocks of all time.   |
|
| |
|
08-27-2007, 08:53 PM
| #14 |
| Let me 3D Print that... Join Date: Jun 2007 Location: Concord
Posts: 315
|
Tonight saw this puppy on it's feet for the first time. I am pretty pleased so far with how it as turned out. This is my first tuber build, and a good learning experience. I may need to go with longer front shocks, but the jury is still out. With any luck it will be ready for testing in the next few days.       |
|
| |
|
08-27-2007, 09:36 PM
| #15 |
| Quarry Creeper Join Date: Feb 2007 Location: Fresno
Posts: 472
|
Wow that looks great! Clean build, nice colors, it's perfect.
|
|
| |
|
08-30-2007, 07:20 PM
| #16 |
| Let me 3D Print that... Join Date: Jun 2007 Location: Concord
Posts: 315
|
Got the thing runing last night and took it for a little test run tonight on some slate slabs that we have here at the house. Can't wait to get on some good rocks. No new pictures, but I took a little video of it in action: http://www.project-seven.goof.com/videos/RBTest.wmv Next projects on the list... - Make some schnazzy Red Bull decals - Some smaller batteries (been eying the Elite 1500s) - Adding some weights to the wheels and playing with the foams - Upgrade ESC (running stock WK one now) I'll put up some more pics when the decals are done. |
|
| |
|
08-30-2007, 07:33 PM
| #17 |
| Pebble Pounder Join Date: Oct 2006 Location: Sault Ste. Marie, MI
Posts: 129
|
Looking Great!
|
|
| |
|
08-30-2007, 09:14 PM
| #18 |
| Pebble Pounder Join Date: Jun 2007 Location: Las Vegas
Posts: 121
|
I had a set of those shocks on my original losi junior 2. Did those have the screw clamp as the upper spring retainer?
|
|
| |
|
08-30-2007, 09:19 PM
| #19 | |
| Let me 3D Print that... Join Date: Jun 2007 Location: Concord
Posts: 315
| Quote:
| |
|
| |
|
08-31-2007, 09:16 AM
| #20 |
| Quarry Creeper Join Date: Feb 2007 Location: Fresno
Posts: 472
|
Nice vid, it looks great!
|
|
| |
|
| |


 Linear Mode


