| |
| |||||||
 |
| | LinkBack | Thread Tools | Display Modes |
 03-03-2011, 07:59 AM
| #21 |
| Quarry Creeper Join Date: Jan 2011 Location: Chelsea, MI
Posts: 239
|
Build is going great man! I'm not really liking the spare placement though. Your driver can't see where he is going! Plus the thing takes up almost the whole hood. I'd move it to the back.
|

|  |
| Sponsored Links | |
| | |
|
03-08-2011, 05:09 PM
| #22 |
| Rock Crawler Join Date: Jun 2007 Location: Working in my dream RC workshop and remodeling my entire home.
Posts: 850
|
I'm finally back from my out of town excursion, so back to work on the Rover. The problem with the front shocks was that the frame was so narrow, I had no room to mount the shocks without them binding up. I was going to just make an entire frame out of brass, but I liked how everything was mounted and by attatching a section of brass rails to the outside of the existing frame, the spacing would be perfect. Plastic frame pre-cutting and the brass sections  Showing my frame "splice". Seems pretty sturdy....  Attatched to the tranny housing and the screws holding the frame pieces together make for a good spot to mount the shocks.  Showing the new mount for the front bumper. Had to fab one up to allow it mount properly.  Making sure it all fits  Also had to throw the body on there to make sure everything would work. Had to slightly grind the ends if the frame pieces. I thought the gap to be just a bit too large...........  |
|
| |
|
03-09-2011, 08:36 AM
| #23 |
| I wanna be Dave Join Date: Jan 2009 Location: By a lake in Thornton
Posts: 2,218
|
You're doin great!!! the brass work is sweet and sturdy. What type of bit are you using to drill it out, and do you tap it? |
|
| |
|
03-09-2011, 10:42 AM
| #24 | |
| Rock Crawler Join Date: Jun 2007 Location: Working in my dream RC workshop and remodeling my entire home.
Posts: 850
| Quote:
| |
|
| |
|
03-09-2011, 11:32 AM
| #25 |
| Rock Crawler Join Date: Jun 2007 Location: Working in my dream RC workshop and remodeling my entire home.
Posts: 850
|
I'm getting near the finish line with my Rover! I got a lot of the details done and wired everything up last night. All that's left is to get a set of driveshafts to connect the axles with the tranny and a few other things. I got the ESC/receiver installed and the wires routed by drilling a hole to hide them....  With that accomplished, I hid the ESC with a piece of painted diamond-plate plastruct and installed a cover behind the seat to hide the rest of the wiring.  I plugged in the battery and made sure everything works. Yay! No problems!  I installed the windows and placed the top on. Everything still fits perfectly.  I got some of the accessories installed; just a few more to go....  |
|
| |
|
03-10-2011, 08:06 AM
| #26 |
| Rock Crawler Join Date: Jun 2007 Location: Working in my dream RC workshop and remodeling my entire home.
Posts: 850
|
I got a little more done on the Rover last night. I am getting the small things done to finalize my micro. I decided to lengthen the drive shafts with a little cabon fiber shaft I had from trimming arrows instead of buying another set. I cut the female part of the shaft in half and sliding them in the carbon section and gluing them in place. It can be tricky; too long and your suspension won't flex, too short and it will fall apart when the suspension does flex. Enough jabber; time for more pics.... The modified shaft....   I also figured out my hood retention system. I glued some metal strips to the hood and recessed some along the edges of the opening. I have some extra stong mini magnets to place in between.   Everything nice and secure; I decided to take it for a (Topless!) spin on my course to make sure everything is working good.    I placed the top on just to see how it looked on the course....   All that's left to do is to secure the top and add the light lenses and afew other minor details. I am considering making a roll cage and making the top removable. Any thoughts on this? Just wonderin'. I think I'm also gonna get some CAC wheels for it and some micro Rock Crushers.... |
|
| |
|
03-10-2011, 03:50 PM
| #27 |
| Quarry Creeper Join Date: Jan 2011 Location: Detroit and Denver
Posts: 344
|
i cant find the cac wheels in stock anywhere..... let me know if you find some plz thx!  |
|
| |
|
03-10-2011, 09:50 PM
| #28 |
| Rock Crawler Join Date: Jun 2007 Location: Working in my dream RC workshop and remodeling my entire home.
Posts: 850
|
Yeah, I have figured out the same thing since my last post. I got a set for my other micro not too long ago from RPP and just assumed they'd have them. Probably for now I'll just get the rock crushers and mount them on the stocker wheels. Not too hard to peel them off. I was going to paint the CAC's black to match it anyways. I know there are other options out there, but they're more coin than I want to spend on a $100 micro. New tires are what it really needs. The wheels are purely bling. I had a little problem running it earlier. Sometimes everything seemed to be turning except the tires. Uh oh! I thought it was a worn out pinion. Tore the WHOLE DAMN truck apart to get to it only to discover it was fine. Must be an internal gear then? HELL NO! All those were fine as well. Upon closer inspection of the newly built drive lines, I made the discovery that model glue doesn't bond to carbon shafts at all! &$!&@$!!!! All that tear down for nothing! I'm now in the process of looking for an appropriate pen to tear apart and modify. Oh yeah and putting my truck back together...... |
|
| |
|
03-11-2011, 06:56 AM
| #29 |
| Quarry Creeper Join Date: Oct 2010 Location: TX Coast
Posts: 196
|
Did you use plain plastic model glue on the 'shafts? I used aluminum tube to extend mine & used Super Glue to bond it together. I've done 3 of them & run the rigs hard afterwards w/o ever having a problem. You'd prolly have better luck using some on it instead of model glue.
|
|
| |
|
03-11-2011, 01:17 PM
| #30 |
| I wanna be Dave Join Date: Jan 2009 Location: By a lake in Thornton
Posts: 2,218
|
I used Aluminum and 60 Second Epoxy.
|
|
| |
|
03-11-2011, 01:45 PM
| #31 | |
| Rock Crawler  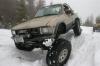 Join Date: Dec 2010 Location: Madison Co.,Ms.
Posts: 711
| Quote:
| |
|
| |
|
03-12-2011, 07:22 PM
| #32 | |
| Rock Crawler Join Date: Jun 2007 Location: Working in my dream RC workshop and remodeling my entire home.
Posts: 850
| Quote:
| |
|
| |
|
03-12-2011, 07:58 PM
| #33 |
| Rock Crawler Join Date: Jun 2007 Location: Working in my dream RC workshop and remodeling my entire home.
Posts: 850
|
OK enough of that. I figured since I was in there, I would go ahead and dismantle the rest of the truck's front end to get at the shock mounts easier. I just can't get the front end ride heigth that I desire. No matter how I try to mount the shocks, the front is just a bit higher than the rear, even at full droop with Micro-T shocks. I know it's like a 1/4 inch, but it would eat at me until I fixed it. SO, last night, I figured something out to fix my front and drop it even lower. My other truck sits high, like a jacked up mud-runner and I wanted this one to be different. I figured I had a bit of room above the frame rail, so I made sort of a shock hoop to raise the shocks up in the chassis and pull the wheels closer to the wheel wells. This is what I'm talking about. Ripped apart!  My "shock hoops" 'er spacers.  Crappy picture of them mounted.  I also got twitchy while watching NCAA basketball today and started contemplating the roll cage idea. I started looking around to see if I could come up with enough supplies to knock one out. I found enough aluminum tubing and used my thumbs as guides and bent the tubing slowly....  I used a dremel bit to round the ends of my pieces, so they would fit nice and tight.   And a drum roll, please.....    I also threw my Rok-Lox & CAC's on there from my other truck to see how they looked. Not bad, but still going with stockers and crushers... All that's left is to mount some magnets so my roof will be removeable. Some rare earth magnets will do the job nicely and are currently holding my hood rock steady.....stay tuned!! |
|
| |
|
03-13-2011, 04:52 PM
| #34 |
| Rock Crawler Join Date: Jun 2007 Location: Working in my dream RC workshop and remodeling my entire home.
Posts: 850
|
Got still more done today. Just finishing up, really. Put a coat of paint on the cage....  I also got the roof section on so I had something to mount the magnets to. They're tucked under the diamond-plate.  The roof hides a piece of steel...  I also painted the rings to match the paint.  And a few course shots......      |
|
| |
|
03-17-2011, 09:06 AM
| #35 |
| Rock Crawler Join Date: Jun 2007 Location: Working in my dream RC workshop and remodeling my entire home.
Posts: 850
|
I finally got my Rock Crushers from RPP. Only a few days to get them to me! UUUUuuuuggggg....I hate re-building bead-lock (style) wheels. Not hard, just tedious.  New and sticky  Mounted and looking good. I opted to leave out the foams, empty a shotgun shell and divide up the pellets. I put twice as much in each front wheel as the rears.  I also added a few scale goodies  I found a new use for my old body. Seems to have had an accident!  Had to snap a few more course pics with the new skins    These tires are pretty nice. I'm finding I can climb a few spots I couldn't ascend before. They look pretty cool, too! |
|
| |
|
03-25-2011, 06:39 PM
| #36 |
| Rock Crawler Join Date: Jun 2007 Location: Working in my dream RC workshop and remodeling my entire home.
Posts: 850
|
My old problem resurfaced again. Something is slipping in the center of the truck. I tore apart the front and rear axles and everything was 100 percent perfect. I put in an order for all the center tranny gears, because maybe my pinion isn't quite as tight as I thought. I got my stuff the other day and my fears were correct; the new pinion is way harder to get on the shaft than the old one. I also went ahead and replaced all the center gears while I had it apart. I've had this truck since they came out and I'm sure they're all a bit chewy. Gears. Tiny, little gears....  Ripped to pieces!  I also added some premium lube to keep everything moving freely.  I got a chance to drive it a bit and everything feels great. Like it did when it was new. Not too tight but nice and solid. I am LOVING the Rock Crushers!! |
|
| |
|
| |


 Linear Mode


