| |
| |||||||
 |
| | LinkBack | Thread Tools | Display Modes |
 07-09-2010, 09:03 PM
| #1 |
| Rock Crawler Join Date: Jul 2009 Location: waterville
Posts: 525
|
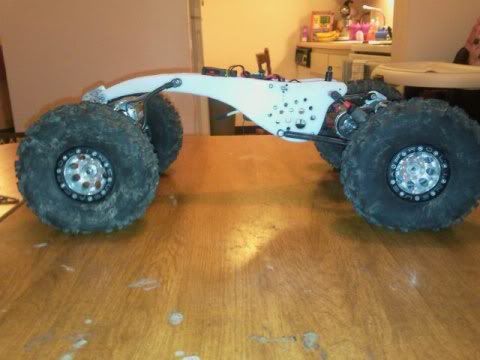
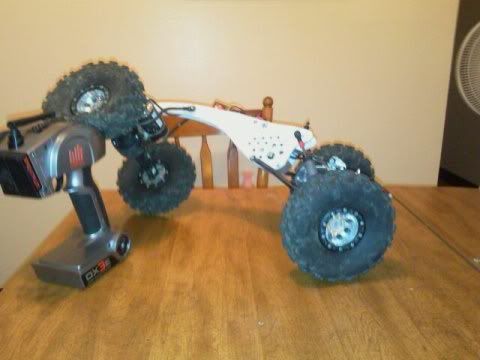
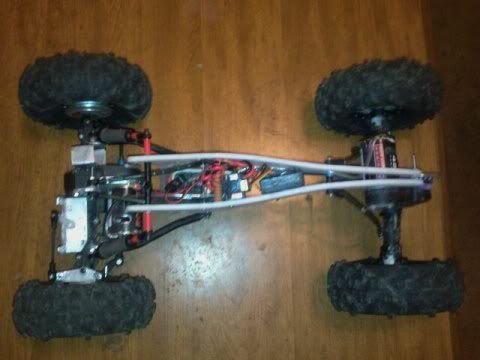
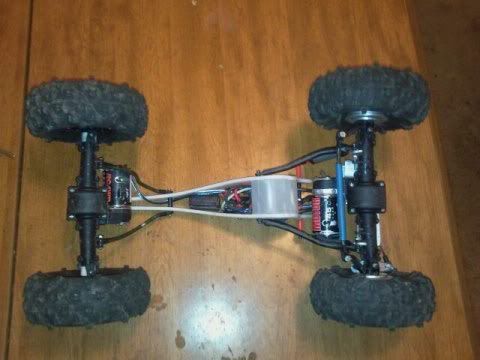
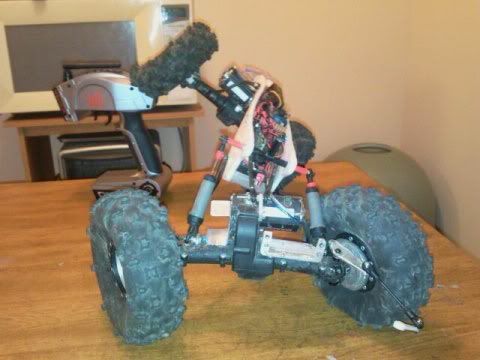
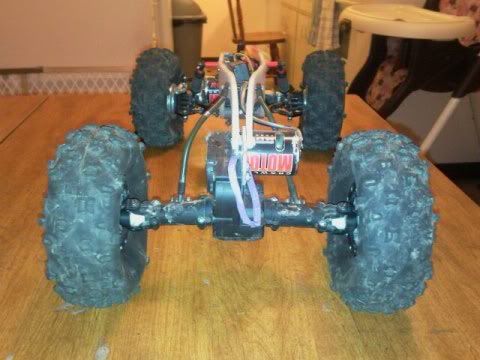
well after the thread about the g-air system, i decided to try it out. i have seen it before, but was never tempted til now. i used my 8 shooters that i was running all along. sealed up the vent holes in them. used one of the beadlock bolts for the breather. found a video on you tube on getting air into your tires with any special pumps or what not. just put em in the freezer. let them sit pull them out replace the last bolt and let them warm up and you have a pressurized tire! i did the fronts for 10 minutes and the rears for 7. i did not have high hopes for them, but i was surprised how well they worked. the leopards were hooking up hard. alot more traction. the last time i ran them i was feeling i needed more from them, so i went back to my rovers. after running the leopards then back to the rovers i just prefered the leopards mostly because of the soft sticky compound. anyways i wwent down to my favorite spot. i have pics and a couple vids. so with that being said on with it. 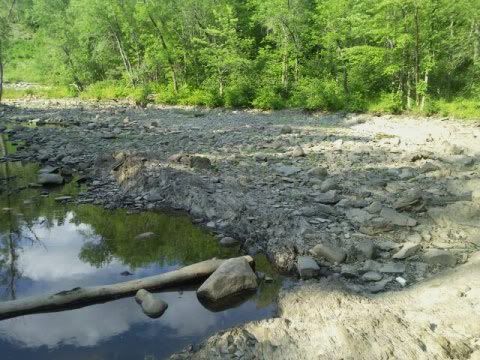 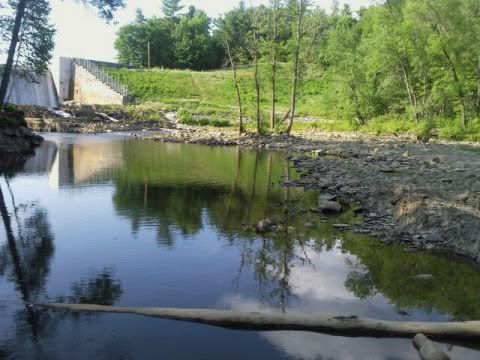 big large open area. pics dont show it for what it really is. theres lots of large challenging climbs and giant bolders. the best spot is right by the dam if your brave enough to get that close to the water. 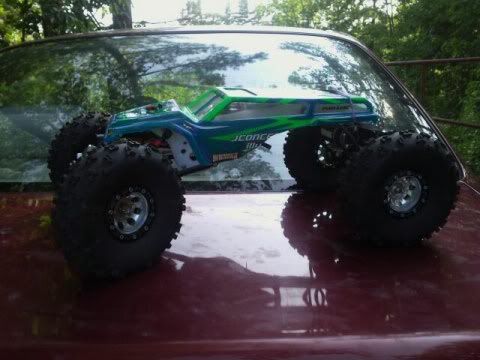 air filled leopards ready for the testing. its amazing how large and narrow they grew with some air. they are still very soft. same amount of slack as with foams. also you can see the now chassis setup i am running. its almost a copy of the mantis chassis. if dna didnt shut down i would buy this chassis in a heart beat. it flat out works. still needs a few minor tweaks though. made from cutting board with a bent nylon skid. front droop setup only. the rear acts more like a torsion setup. i can tune the flex with a turn of a bolt in the rear. it can climb vertical ledges with ease. the articulation is not limited at all. same amount as with shocks all the way around. 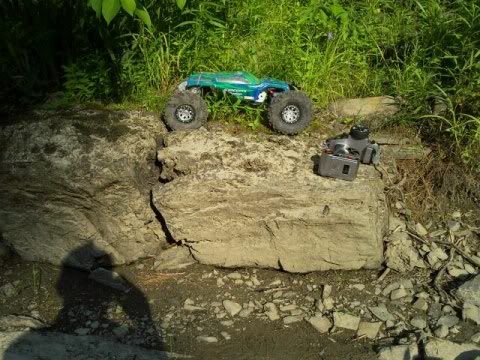 stopped for a break. the sidewinder was getting toasty. it gets slightly warm usually after an hour and half run, but it was 100 plus outside when i did this. http://s780.photobucket.com/albums/y...7-08170424.mp4 short little video at the beginning of testing. http://s780.photobucket.com/albums/y...7-08174739.mp4 the second one toward the end of my run. when you see the front locking up it was due to the pin in the dog bone pushing out. so it forces its way out of the wheel stub forcing my servo to go where it doesn't want. in the end it locked up for good and fried the servo 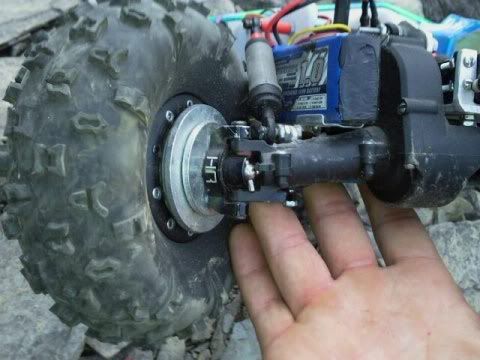 the pins getting pushed out from digs. i had it with those ones. i picked some better bigger hardened steel dogbones up today. they are going to require modifications though. gonna shorten them. sleeve them, then weld em up. in the end i am very pleased how well the chassis works as well as the aired tires. there is one very steep climb that needs wheel speed to get over the first couple dips. it did bounce as it was digging for traction, but it wasn't any worse them with foams in this spot. other then that i had no issues at all with the setup. traction was great. sidehilling was just as good. maybe differ with other tires due to the fact that the leopards have a thick sidewall and thins out where the lugs start. im going to continue to run this setup on different terrains so i can better tell how they function. |

|  |
| Sponsored Links | |
| | |
|
07-10-2010, 11:07 AM
| #2 |
| Pebble Pounder Join Date: May 2010 Location: Central Coast
Posts: 111
|
I saw that same video about the freezer. Pretty cool idea. Hows the flexibility on rocks?
|
|
| |
|
07-10-2010, 02:49 PM
| #3 |
| Rock Stacker Join Date: Jul 2010 Location: Santa Cruz
Posts: 60
|
Any pics with the lid off? i wanna scope the chassis set up. looks good
|
|
| |
|
07-10-2010, 06:01 PM
| #4 | ||
| Rock Crawler Join Date: Jul 2009 Location: waterville
Posts: 525
| Quote:
Quote:
| ||
|
| |
|
07-10-2010, 06:39 PM
| #5 |
| Rock Crawler Join Date: Jul 2009 Location: waterville
Posts: 525
|       |
|
| |
|
07-11-2010, 12:43 PM
| #6 |
| Rock Stacker Join Date: Jul 2010 Location: Santa Cruz
Posts: 60
|
thanks. looks awesome. It must kill on vertical climbs.
|
|
| |
|
07-11-2010, 05:55 PM
| #7 |
| Rock Crawler Join Date: Jul 2009 Location: waterville
Posts: 525
|
no problem! it does do vertical climbs very well. this is the chassis i plan to stick with. best one to date that i have made. in the process of changing the front links a bit, so it can preform even better on vertical climbs. having that much clearance in the rear really helps for climbing off vertical ledges to. it will just hang from the rear and use the dig to pull it down and out of it.
|
|
| |
|
07-11-2010, 06:55 PM
| #8 |
| RCC Addict Join Date: Jul 2009 Location: Blacksburg, VA
Posts: 1,882
|
That looks pretty interesting...definitely a way to step outside the box on a chassis. I'm curious though...what are those metal washers on the inside of the front wheels? Just spacers to widen the stance perhaps?
|
|
| |
|
07-17-2010, 11:02 AM
| #9 | |
| Rock Crawler Join Date: Jul 2009 Location: waterville
Posts: 525
| Quote:
 no one asks, im not tellin! no one asks, im not tellin! | |
|
| |
|
07-17-2010, 11:09 AM
| #10 |
| RCC Addict Join Date: Jul 2009 Location: Blacksburg, VA
Posts: 1,882
|
You know, that's actually not a bad idea...it certainly makes it easier to change up the weight without disassembling the beadlocks. How's that chassis doing?
|
|
| |
|
07-19-2010, 07:51 PM
| #11 | |
| Rock Crawler Join Date: Jul 2009 Location: waterville
Posts: 525
| Quote:
my wheel spacers allow more room for them. its coming together. made some changes to it where needed be. still waiting on a new servo. i ordered two, but they should be here very soon. 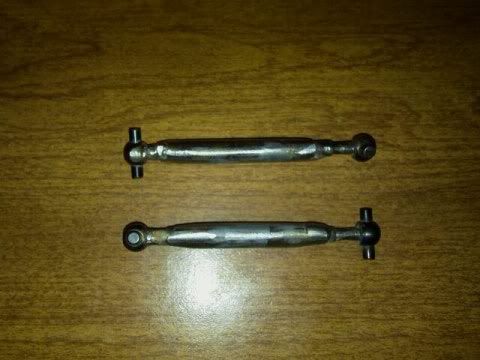 the new dog bones. modified. they have larger pins and they are hardened steel. should last longer then the stockers. sleeved an welded.i had to shorten them. they are a little ruff looking, but they wont be seen. i will have to open up the stubs a little.  i shortened the front to bring the tires closer to the belly. then lengthened the rear. raised the rear a little bit. minor changes to the chassis. thats a rover under the belly with room to spare. 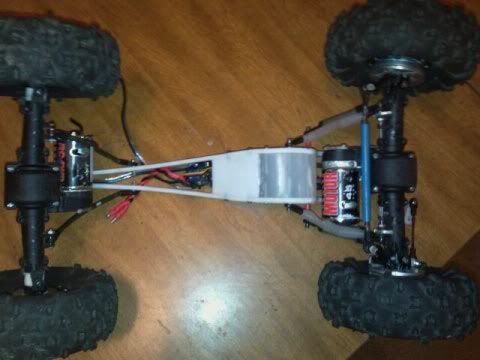 lengthened the skid.blended it into the front skid. 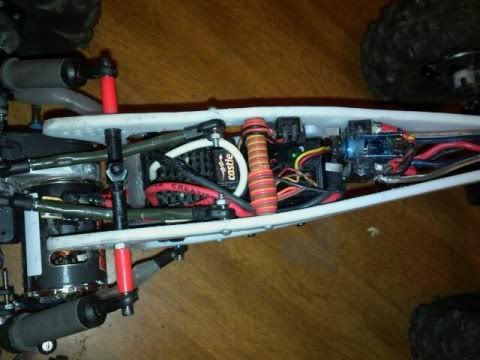 a very tight fit for te esc, receiver, bec, and the dig. also a gearing change. should be better then before. while testing i ran a few runs with the body off so i could see what needed to be tweaked. so after my new servos arrive i will go out and test again. | |
|
| |
|
07-20-2010, 11:05 AM
| #12 |
| Quarry Creeper Join Date: Apr 2010 Location: Natchez
Posts: 410
|
That chassis is nice bro . I think I will try to make something like it . I will probably waist a bunch of material though . Any chance you would be willing to make one for me ? If so please pm me with a price and a time line .All I need are the side plates . If youre not interested in making one , will you please share the rough dimensions ?
|
|
| |
|
07-21-2010, 03:18 PM
| #13 | |
| Rock Crawler Join Date: Jul 2009 Location: waterville
Posts: 525
| Quote:
| |
|
| |
|
07-22-2010, 07:30 PM
| #14 |
| Rock Crawler Join Date: Jul 2009 Location: waterville
Posts: 525
|
alright got a chance to go out and test again after some changes.changed to a 10t in the front.thanks zno .if you need bored pinions and dont have the stuff to do it, he's the man to talk to. specially the 8t pinions. left the 8t in the rear. the 10t made a world of difference.it didnt start out to well, i had a feeling something was going to go wrong as i was driving to the dam. it started raining right when i got there. waited for a while and the rain passed. the testing was run short again due to a stripped servo horn. okay so after i pass the gate and about 50 feet later this is what i find. anyways i have a short 30 second video of one of the climbs. i finally made my own photo bucket account. i know the mrs. will be happy. hopefully these videos can be seen that i have been posting. this was a pretty good climb. the ticking you hear is the front. its no were near as bad as it sounds. its amazing how well the mic works on my phone.http://s780.photobucket.com/albums/y...7-22170707.mp4  side view shot of this climb from the video. pretty tall ledge. 14 or 15'' give or take. plus you can see how the ledges angle is. required a bit of wheels speed to get the back tires up and over due to the angle. 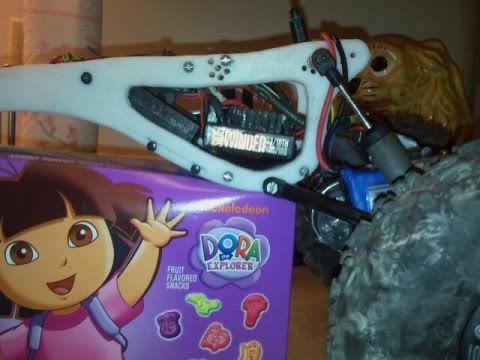 please excuse the dora fruit snacks. i was going to go with a nice servo, but i had good luck with the towerpros.figured they are cheap enough if they die early i wont be out much.my others lasted a couple years.crawling 3 or 4 times a week at the most. my original choice was the 996. had the 995's before. after nosing around the site i found the 946r's. that's what i went with. they work so much better then the 995's. more power. no centering issues. didn't even break a sweat.
|
|
| |
|
07-23-2010, 11:41 PM
| #15 |
| Rock Stacker Join Date: Jun 2010 Location: Calgary
Posts: 80
| That is the tits! Cutting board eh? Awsome! |
|
| |
|
07-24-2010, 02:24 AM
| #16 |
| Pebble Pounder Join Date: Jun 2009 Location: Selah
Posts: 175
|
sweet rig how do you like your rc4wd motors, i just put mine on yesterday and i thought they were pretty good with 10t pinions |
|
| |
|
07-25-2010, 10:42 AM
| #17 |
| Pebble Pounder Join Date: Mar 2010 Location: high planes desert
Posts: 140
|
Once again top-notch wrk how are your gears hold"n up any issues yet
|
|
| |
|
07-25-2010, 11:56 AM
| #18 |
| Pebble Pounder Join Date: Apr 2010 Location: surrey bc
Posts: 111
|
SO killer!!!! nice job that rig is saweeeeeeet!
|
|
| |
|
07-26-2010, 08:22 PM
| #19 | ||||
| Rock Crawler Join Date: Jul 2009 Location: waterville
Posts: 525
| Quote:
Quote:
Quote:
Quote:
| ||||
|
| |
|
07-28-2010, 03:05 AM
| #20 | |
| Quarry Creeper Join Date: Nov 2009 Location: gilbert az
Posts: 199
| Quote:
Jake | |
|
| |
|
| |


 Linear Mode


