| |
 01-13-2011, 08:33 PM
| #41 |
| Rock Crawler Join Date: Apr 2006 Location: Thorp WA, more sheep than men...
Posts: 543
|
I dig it!  |

|  |
| Sponsored Links | |
| | |
|
01-16-2011, 11:19 PM
| #42 |
| I wanna be Dave  Join Date: Sep 2007 Location: San Tan Valley
Posts: 4,267
|
I had the fabrication day from hell, literally!! I'll try to give you guys the short version but there really isn't one. First 10:00am: I decided to mount up my tranny and motor this morning after I got the shock mounts on and realized I forgot to check one very important thing before I brazed up my motor mount ...Where the hell the shock mount goes! Grrrr! It turned out the motor was flush with the outside of the chassis which is a problem considering the shock mount is supposed to sit on top of the chassis. Well I thought about changing over to a gear reduction but with no funds I knew I had to make this work and I really didn't want to slow this thing down in the first place so off came the shock mount and out came the tubing. I ended up making a shock mount that would follow the contour of the motor and brazed it onto the chassis. I even made it adjustable by brazing 3 nuts to it which matches up to the Axial shock mount perfectly. Next 12:00pm: I come to realize that when I brazed up my motor mount I squeezed the chassis to tight and it ended up 1/8" too narrow so out came the torch again. FAWWWK! Well it turned into quite the ordeal because when I was trying to break it loose to move into the correct location I got the chassis too hot and bent it all out of shape when I was trying to move the motor mount. At this same time my freaking shock mount fell off that I had just brazed. At this point I had to walk away for about an hour, get some food me and chill for a bit. Well I got that all taken care of after quite some time and a lot of cuss words but that wasn't the end of it. 5:30 pm I realized with my new set-up my four link wasn't going to work out so I hit the board and decided to make a 3 link like the one Chino has on his Fj, no big deal right? WRONG!! I was cutting away at the heat treated aluminum I was going to use for the mount when my dremil took a shit, 6:30pm. By this time I was so frustrated and pissed off that it went flying. So here we are 11:07, my heart has finally slowed down, blood pressure has dropped and I was able to save this freaking project and finish my 3 link. I did mention that I have never brazed more then two pieces of tube together before this moment didn't I? Yeah I can laugh about it now but man was it a long a$$ day! On to the pics,       |
|
| |
|
01-16-2011, 11:33 PM
| #43 |
| I wanna be Dave Join Date: Jul 2006 Location: The beautiful Pacific Northwest
Posts: 6,923
|
Some days are just like that....I tend to just walk away and do something else for a few hours, or the whole day. Everything looks good, BUT...any reason that the panhard bar is bent so much? I'd straighten it enough that it just touches the axle at full compression. It won't effect the performance at all...just looks a little twitchy to me |
|
| |
|
01-17-2011, 07:01 AM
| #44 | |
| I wanna be Dave Join Date: Sep 2007 Location: San Tan Valley
Posts: 4,267
| Quote:
| |
|
| |
|
01-17-2011, 09:59 AM
| #45 |
| I wanna be Dave Join Date: Sep 2007 Location: San Tan Valley
Posts: 4,267
|
Well today is another day and a much better one. First thing I straightened out the pan hard bar quite a bit and got everything re aligned, then it was on to the front bumper. I guess I'm getting the hang of this brazing thing because the front bumper went together pretty easy.    |
|
| |
|
01-17-2011, 10:43 AM
| #46 |
| Rock Crawler Join Date: Feb 2007 Location: Peoria, Arizona
Posts: 919
|
Looking good man! sorry about the shock mount, but I think it looks better than the plastic part anyways. The bumpers look stellar!
|
|
| |
|
01-17-2011, 11:29 AM
| #47 |
| I wanna be Dave Join Date: May 2006 Location: FOUR 8 OH
Posts: 4,913
|
REally like the look of the front bumper Brian... just don't add a stinger. lol |
|
| |
|
01-17-2011, 02:54 PM
| #48 | ||
| I wanna be Dave Join Date: Sep 2007 Location: San Tan Valley
Posts: 4,267
| Quote:
Quote:
Thanks James! | ||
|
| |
|
01-17-2011, 04:08 PM
| #49 |
| Jeep whore 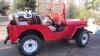 Join Date: Aug 2008 Location: Florida
Posts: 1,042
|
great job so far! |
|
| |
|
01-17-2011, 08:19 PM
| #50 |
| Rock Crawler Join Date: Sep 2009 Location: Bushnell FL
Posts: 648
|
That was one hell of a day |
|
| |
|
01-18-2011, 08:01 AM
| #51 |
| I wanna be Dave Join Date: Dec 2006 Location: Where the sheep run scared.
Posts: 3,008
|
I am digging this entire rig! The panhard is sick and the front bumper is wow! Give us more!!!!!! |
|
| |
|
01-18-2011, 08:40 AM
| #52 |
| Pebble Pounder Join Date: Aug 2008 Location: Living in Paradise
Posts: 193
|
This thing is looking tough, Should be a good competitor for ya! |
|
| |
|
01-19-2011, 11:01 AM
| #53 | ||
| I wanna be Dave Join Date: Sep 2007 Location: San Tan Valley
Posts: 4,267
| Quote:
Quote:
| ||
|
| |
|
01-19-2011, 11:20 AM
| #54 |
| I wanna be Dave Join Date: Sep 2007 Location: San Tan Valley
Posts: 4,267
|
So I started the body work this morning. I'm not an expert with styrene, mainly because I don't have the patients for it ...or for much of anything for that matter So as I mentioned before there was a lot of trimming required to get the chassis to sit tight to the floor and a lot more trimming to get the tranny and spur to fit against the fire wall and dash. I still need to use the filler but it is getting there.    I also had to do some trimming and add a filler where the drive shaft would clear coming from the T case  When I trimmed the wheel wells the rear seat was sticking into the wheel well so I trimmed about 1/2" from it and then made a new wheel well and filler panel for the seat.   |
|
| |
|
01-19-2011, 06:20 PM
| #55 |
| I wanna be Dave Join Date: Sep 2007 Location: San Tan Valley
Posts: 4,267
|
Well I got the interior painted today and since the paint was dry I decided to go ahead and detail it out a bit.    Gotta have some reading material handy in case the little lady needs to powder her nose or the pooch needs to go for a walk  I made the air tank last night just in case I've got to air down on the trail  |
|
| |
|
01-19-2011, 10:45 PM
| #56 |
| I wanna be Dave Join Date: Sep 2007 Location: San Tan Valley
Posts: 4,267
|
Okay, so the next time you see an update from me it will be when the chassis has been painted and the rig is together for good. I fabbed up the servo mount this evening and brazed it up so once that was done it was time to put it all back together for the 4th time and make sure everything still fits. As you can see from the pic I have very little room left after I made my fender wells. I usually run a 2200 3c but I'm pretty sure it wont fit so I may have to get a couple 850 3c's instead. The hood will be attached using some earth magnets.   Here's a couple shots of the inner fenders from the outside.   Now on to the rest of the pics.     Gotta get the flex shots in there.   Here's a shot of my straightened pan hard bar for War Pig.  Lastly a pic of the underside and one with the drivers door open.  In the above pic you can see the Maxx shafts that I made using Jason's method by cutting the ears off an Axial yoke and drilling out the Maxx yoke. I tried using the 29/64 drill bit as mentioned in the how to but found it to be too big a hole for my liking so I used my dremil for the last 3 and was able to get a nice tight fit.  -Brian Last edited by bmuzz1; 01-19-2011 at 10:53 PM. |
|
| |
|
01-19-2011, 11:19 PM
| #57 |
| I wanna be Dave Join Date: Jul 2006 Location: The beautiful Pacific Northwest
Posts: 6,923
|
Looks great! Thanks for the pic of the panhard, I appreciate it .
|
|
| |
|
01-19-2011, 11:57 PM
| #58 |
| Rock Crawler Join Date: Sep 2009 Location: Bushnell FL
Posts: 648
|
Dang man this thing looks sik |
|
| |
|
01-20-2011, 09:56 AM
| #59 |
| I joined the Band! Join Date: May 2009 Location: lake county ,florida
Posts: 1,237
|
really coming out great I like ehat you are doing with this one what is te color going to be
|
|
| |
|
01-20-2011, 10:13 AM
| #60 | |||
| I wanna be Dave Join Date: Sep 2007 Location: San Tan Valley
Posts: 4,267
| Quote:
Quote:
Quote:
I really hadn't thought about painting it, but if I were anyone got any color suggestions? | |||
|
| |
 |
 LinkBacks (?)
LinkBack to this Thread: http://www.rccrawler.com/forum/1-9-scale-rigs/291812-bmuzz1s-2011-class-2-range-rover-build.html | ||||
| Posted By | For | Type | Date | |
| Scale RC - Page 182 - R/C Tech Forums | This thread | Refback | 10-05-2011 03:53 AM | |
| Зарубежные проекты 1.9 - Страница 3 | This thread | Refback | 10-05-2011 03:29 AM | |
| |


 Linear Mode


