| |
| |||||||
 |
| | LinkBack | Thread Tools | Display Modes |
 12-30-2014, 02:33 PM
| #1 |
| RCC Addict Join Date: Oct 2011 Location: Brighton UK
Posts: 1,363
|
I started this in the 1.9 section but actually with this being an SCX10 think it will sit better here. So below is a quick recap of how far I've got with my Deadbolt. Didn't want to spend mega bucks on a rig with nice parts already fitted, and then end up upgrading them anyway, so after what was actually a brief look around the SCX10 Deadbolt was a no brainer. There isn't really another rtr rig that comes in at this price, it'll perform out of the box and is ripe for upgrades. So after contacting rcbitz.com two days later I had my rig sat on the desk.   |

|  |
| Sponsored Links | |
| | |
|
12-30-2014, 02:37 PM
| #2 |
| RCC Addict Join Date: Oct 2011 Location: Brighton UK
Posts: 1,363
|
I actually really like the Bronco look of these shells so not currently in a hurry to change that. I pulled the trigger on some bits to get me started on the upgrades road. First up was Scale locking hubs. These are Spicer style with an internal M4 locknut embedded into them so they won't spin loose. The central part of the Spicer (yellow in my case) is made from plastic so has way more detail than other metal ones. They come supplied with the locking tool required to fit them too. YELLOW LOCKING HUBS  Closely followed by 1.9 Steel D hole wheels. D HOLE SILVER 1.9 Improvements over existing "steel" wheels are, front ring, zinc yellow scale hardware, shallow hex hub, and they will fit all brands of tyre including pro-line (which you will see below).   You'll see here the front ring bolting through the steel rim to a second ring forming the deep over-all ring for the bead to grip onto. You only need to work with the central 6 bolts to build these, the outer ring ones can be left in place....bonus!  |
|
| |
|
12-30-2014, 02:39 PM
| #3 |
| RCC Addict Join Date: Oct 2011 Location: Brighton UK
Posts: 1,363
|
I had some Pro-line 1.9 tyres to try so went for it.   They went on really easily. I felt though the pro-lines where too small for the Deadbolt. I really like the stock Maxxis tyre so will be transferring them over to these beadlocks very soon. BUT I did offer them up onto my TF2  |
|
| |
|
12-30-2014, 02:40 PM
| #4 |
| RCC Addict Join Date: Oct 2011 Location: Brighton UK
Posts: 1,363
|
Maxxis Trepadors went on nicely.   |
|
| |
|
12-30-2014, 02:41 PM
| #5 |
| RCC Addict Join Date: Oct 2011 Location: Brighton UK
Posts: 1,363
|
I liked them in Silver, luvin them in Black, a few coats of etch primer, gloss black enamel and bosh they are transformed   |
|
| |
|
12-30-2014, 02:42 PM
| #6 |
| RCC Addict Join Date: Oct 2011 Location: Brighton UK
Posts: 1,363
|
I've had this 1;1 DRL in a draw for ages wanting to use it but couldn't ever get the right fitment. Well the Deadbolts brackets are almost mm perfect for width. So drilled a couple of tiny holes each end, tapped the DRL and bosh its a direct fit. Being 1;1 they run at 12v so on 3S these are bonkers bright. I bought these a while back so haven't got a direct link to them but here is where I found them when I searched. drl | eBay   |
|
| |
|
12-30-2014, 02:44 PM
| #7 |
| RCC Addict Join Date: Oct 2011 Location: Brighton UK
Posts: 1,363
|
Me and the boys went along to join in with the LSTR today, I had the TF2 and the boys got the Deadbolt. Its first ever run, and good opportunity to see how the new wheels performed. Its on stock electrics and running on 3S so has quite bit of grunt. They'd had it for about 10 mins when I heard the Daaaaaaaad its stopped working. Turns out the idler gear in the transmission had completely stripped. Luckily Martin of RCBitz was there today too so he had a replacement set to hand. Anyway back on track the new SSD wheels performed great and as expected the tyre stayed on perfectly. The stock Maxis tyre wasn't that amazing on the roots and dirt though.........but I've a firm favorite in the post to go on the rims next. A couple of pics      |
|
| |
|
12-30-2014, 02:59 PM
| #8 |
| RCC Addict Join Date: Oct 2011 Location: Brighton UK
Posts: 1,363
|
Typically 1 day after a scale comp the parts I've been waiting from over the pond arrived. 1st on was the pro-line power stokes.  Followed by some Pit Bull Growlers...............stunning tyre.   There is another part to fit too, but thats to the Deadbolt shell, so I will return with pics of that. |
|
| |
|
01-01-2015, 02:38 AM
| #9 |
| RCC Addict Join Date: Oct 2011 Location: Brighton UK
Posts: 1,363
|
Next up is a cosmetic job on the shell, fitting a Delrin grill with light buckets. So far I've cut out the holes for the lights. Now just deciding whether to bond the grill on or use Tiny screws. 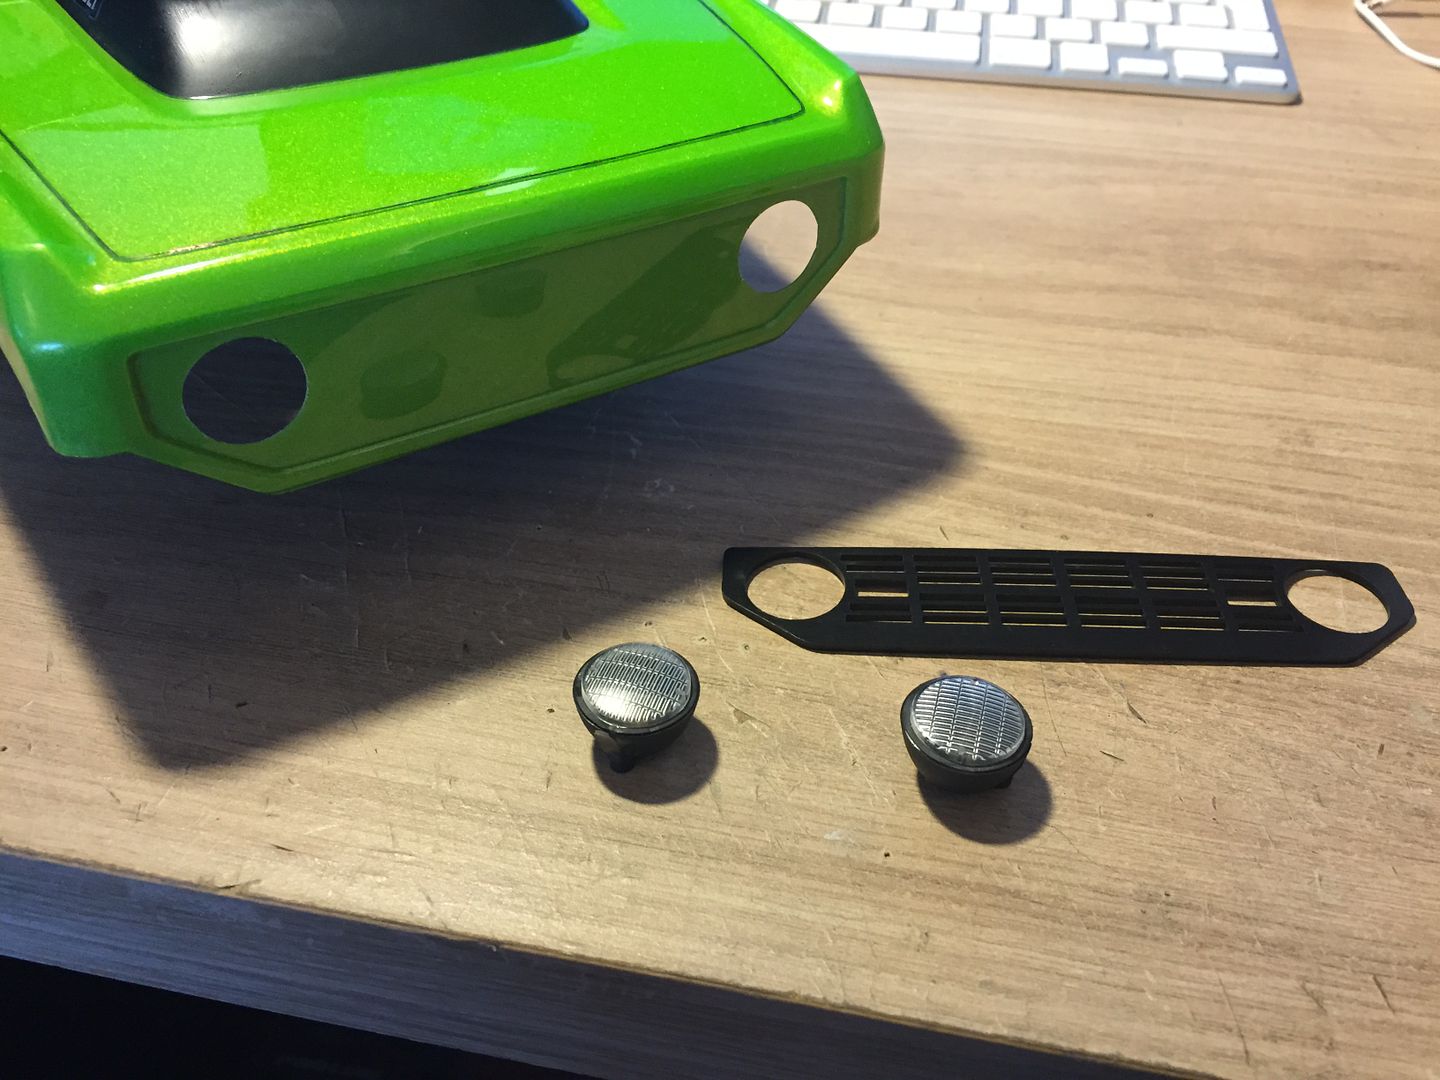 |
|
| |
|
01-01-2015, 08:37 AM
| #10 |
| Rock Crawler Join Date: Mar 2012 Location: UK, Hampshire
Posts: 720
|
Nice looking deadbolt, I really need to make it out to one of those LSTR events soon. As for the grille, i'm gonna suggest tiny screws just for assemble/disassemble purposes
|
|
| |
|
01-02-2015, 02:18 AM
| #11 |
| Rock Crawler Join Date: May 2012 Location: Upland
Posts: 901
|
How bright is the light bar? What's the watt draw?
|
|
| |
|
01-02-2015, 03:47 PM
| #12 |
| RCC Addict Join Date: Oct 2011 Location: Brighton UK
Posts: 1,363
|
Probo I went with your choice and fitted screws, its quite discreet this grill but guess the best bit is the light buckets are now functional.  z50 not sure on the draw but I ran them all day long on 2S with just a 450mah lipo strapped in to power them last weekend. On 2S they basically just light themselves up but looks cool during the day   On 3S which is more what they where designed to run being designed for a real car they are insanely bright......turn night to day.  |
|
| |
|
01-02-2015, 09:50 PM
| #13 |
| Newbie  Join Date: Mar 2014 Location: Bloomington
Posts: 40
|
i just order some of those lights they are amazing for how much they are. Thanks
|
|
| |
|
01-03-2015, 09:45 PM
| #14 |
| Newbie Join Date: Dec 2014 Location: Turlock, California
Posts: 23
|
Truck looks awesome! Have you considered moving your battery tray over the front suspension. Axial has a how-to on their site. I recently made the switch on my newly purchased deadbolt and love the new driving experience of more weight up front. I went ahead and cut the spacers that attach to the receiver box in half to bring the battery down a little further, just a tip if interested.
|
|
| |
|
01-04-2015, 03:25 AM
| #15 |
| RCC Addict Join Date: Oct 2011 Location: Brighton UK
Posts: 1,363
|
Cheers bud. Yeh I used to do that mod but don't bother anymore. I may move it to run laterally just in front of the transmission but not in any great hurry. I felt that yes it's less likely to wheely, and is better at climbing, but then it does endoes when braking and the rear lifts on descents. Mid position and low is my goal. |
|
| |
|
01-04-2015, 08:27 PM
| #16 |
| Newbie Join Date: Dec 2014 Location: Turlock, California
Posts: 23
|
Yes, I can see your point, might consider that myself once I get bored of the current set up. On another note, I added a four link up top front with the included hardware from Axial. Is this a wise switch? |
|
| |
|
01-05-2015, 07:36 AM
| #17 |
| Quarry Creeper Join Date: Jun 2008 Location: Central KY
Posts: 473
|
What is the best way you've found to cut out the holes for your headlight buckets? I have a set sitting on my workbench but haven't gotten around to cutting holes yet and I want them to be perfectly round if at all possible.
|
|
| |
|
01-05-2015, 08:17 AM
| #18 |
| RCC Addict Join Date: Oct 2011 Location: Brighton UK
Posts: 1,363
|
GMCSIERRA, Yes I would say absolutely its the best thing to do. It firstly stops the play and eventual collapse of the front fitting on that ball joint, gives you great twist and means you can fit a chassis mount servo with panard very easily too. I'll be doing this 4 link mod next, but with metal links. BOOGIE, On this occasion I had the grill to hide any mistake I made so my only concern was not going too over size. I laid masking tape over the entire grill area, drew round my two light buckets, then cut out the circles with those little curved lexan scissors. Any slight wandering I had done I tidied up with a sanding fitment on my dremmel. I would state though cut undersize and then open up gradually if you don't have a grill etc to mask any mistakes. I then used my hot glue gun to fix the buckets in. Not sure if you get Fastrax parts where you are but there light buckets come with a lip so if you cut the hole the correct size they simply clip into the hole you've cut which in turn irons any mistakes you've made.  |
|
| |
|
01-05-2015, 08:20 AM
| #19 | |
| RCC Addict Join Date: Apr 2009 Location: LA
Posts: 1,662
| Quote:
| |
|
| |
|
01-05-2015, 08:23 AM
| #20 | |
| RCC Addict Join Date: Oct 2011 Location: Brighton UK
Posts: 1,363
| Quote:
| |
|
| |
|
 SCX10 Deadbolt SSD-RC Build - Similar Threads
 | ||||
| Thread | Thread Starter | Forum | Replies | Last Post |
| SCX10 Trail Honcho or SCX10 Deadbolt? | ZzSniperzZ | Newbie General | 27 | 11-22-2018 06:52 PM |
| My SCX10 Deadbolt Build Threas | YounWha | Axial SCX-10 | 5 | 04-08-2017 09:19 PM |
| Harley's $50 SCX10 Deadbolt Budget Build | Harley | Axial SCX-10 | 615 | 06-03-2016 07:43 PM |
| Scx10 Deadbolt. | jonesyba420 | Scale Videos! | 2 | 01-13-2015 08:07 AM |
| SSD-RC SCX10 Deadbolt build | northernerbill | 1.9 Scale Rigs | 14 | 12-30-2014 02:46 PM |
| |


 Linear Mode


