| |
| |||||||
 |
| | LinkBack | Thread Tools | Display Modes |
 10-02-2011, 07:39 PM
| #61 |
| Quarry Creeper Join Date: Mar 2006 Location: ft. collins
Posts: 419
|
Bit of an update and a video. The body prototype seems to be holding up well. Some good hard crashes and everything is looking solid still. The rear fenders still limit the articulation slightly which I will address with the next fender design. Full bump works though. Some changes after the last time out to the front suspension. Wanted to stand the shocks up a bit to reduce the leverage on the springs. Also did some bracing to stiffen the front end. The top brace and plates are kind of a first draft to see how I like the geometry change. Lessened articulation slightly but I like the stance and wanted the springs up front to feel a bit stiffer without giving up the sag and ride height. The crossbars stiffen up the suspension area without loosing too much of the overall flexibility. Now the front and rear shocks are very close and have the preload collar just snug eneough to keep the springs from ratteling. Oil is 35 weight. The current setup has ride height belly level at 2 and 5/8". Full droops at 3 and 1/2". And it bumps at 1 and 3/4". So with internal springs and external springs I am sitting right at 50% at ride height with 7/8" travel up and down. This seems to be a stable setup for the local terrain. Seems to float on the rough fast sections, works well for crawling, and doesn't bottom too hard or bounce too much on the off balanced landings. Also dropped the battery down lower by about 3/4". I had to remove the adjustment portal cap from the diff cover and cover it with a sticker. Again the mount for the battery is a first draft to work out some details and I should be able to drop the battery to cab floor level (another 1/2" or so). Should be a noticeable improvement in lowering the CG. |

|  |
| Sponsored Links | |
| | |
|
10-04-2011, 01:43 PM
| #62 |
| Quarry Creeper Join Date: Sep 2011 Location: hemet
Posts: 296
|
I like the front shock hoop extension/bracing. Looks like a good way to tailor the ride height and allow the use of different length shocks. Didn't require you to cut up the frame either. Simply bolt-on. I have thought about longer shocks with new mounts, but not sure what to get. I actually have the stock shocks working ok with new springs and after sanding the nibs off of the pistons. My problem is at least two leak at any given time. I put them all together the same way, but still have a 50 percent leak rate.
|
|
| |
|
10-25-2011, 02:56 PM
| #63 |
| Quarry Creeper Join Date: Mar 2006 Location: ft. collins
Posts: 419
|
It has been awhile but I just tore the rig mostly down to put in the Robinson Racing transmission internals. Got em in and there was some binding so I pulled all the bearings out and cleaned n lubed aeverything and reassembled and it was smooth. Got the new Axial front universals and they seem to be great. I like that you do not have to remove the link mounts to install the new axles. As noted elsewhere, the new Axial front axles seem to have a bit more slop but it can be fixed with creative shimming. Reworked the electronics and ended up leaving the controls in the rear but in a smaller box and I tucked the ESC away lower to help the COG. Removed the useless old battery tray and mounted the new box to the frame rails. Also got the battery lower in the chasis. It almost sits on the cab floor. This is over 1/2" lower than any other i can remember seeing. To get the space I trimmed the gear cover back and covering the larger hole with clear tape to make sure no debris gets in. Just barely fits and I am thinking about sorting out a new battery that is a bit smaller. |
|
| |
|
10-25-2011, 03:03 PM
| #64 |
| Quarry Creeper Join Date: Mar 2006 Location: ft. collins
Posts: 419
|
ALso been working on the underside protection for the rig. The firewalls are not new, but boat sides are a new design that works great. I had been running some prototypes of these before but they flexed more than I liked. These are the same material (1/16" ABS), but the new design is braced much better and seems solid. I will have it on the rocks soon for testing. It is secured to the frome by two "straps" that clip on underneath, and then secured by two body screws. The fit is so good that they stay on with no screws.
|
|
| |
|
10-25-2011, 03:05 PM
| #65 |
| Quarry Creeper Join Date: Mar 2006 Location: ft. collins
Posts: 419
|
Back together for some glam body shots.
|
|
| |
|
10-25-2011, 03:07 PM
| #66 |
| Quarry Creeper  Join Date: Mar 2010 Location: murrieta
Posts: 390
|
Nice work like the side's  |
|
| |
|
10-25-2011, 03:23 PM
| #67 |
| Pebble Pounder Join Date: Oct 2011 Location: Ontario
Posts: 142
|
That body looks wicked on there!
|
|
| |
|
10-25-2011, 03:30 PM
| #68 |
| Quarry Creeper Join Date: Mar 2006 Location: ft. collins
Posts: 419
|
A few more pics of the guts. The ESC is on a mount connected to the cross member behind the seat. It is hanging down as low as it can without the links hitting.
|
|
| |
|
10-25-2011, 03:34 PM
| #69 | ||
| Quarry Creeper Join Date: Mar 2006 Location: ft. collins
Posts: 419
| Quote:
Quote:
| ||
|
| |
|
10-25-2011, 06:09 PM
| #70 |
| RCC Addict Join Date: Feb 2005 Location: Minneapolis
Posts: 1,496
|
Interested in how much your rig weighs. I see you took out the passenger seat, have your rear shocks upside down, holes in the seat and floor pan. I see you are going for a light weight rig.... I like it |
|
| |
|
10-25-2011, 08:34 PM
| #71 | |
| Quarry Creeper Join Date: Mar 2006 Location: ft. collins
Posts: 419
| Quote:
Some of the changes were for stiffening the chasis as well. I also concentrated on lowering the weight in the chasis for a lower COG. I added a bit of weight in the front wheels (total of approx 3oz). So any weight saving mod was pretty much offset by a strenthening mod or by the efforts to lower the COG. End result though is a more stable better performing rig at close to the same weight .
| |
|
| |
|
11-12-2011, 02:26 PM
| #72 |
| Quarry Creeper Join Date: Mar 2006 Location: ft. collins
Posts: 419
|
This rig is pretty much wrapped up. Gonna drive it as she is until parts fail and then upgrade any remaining weak spots. Still needs antisway bar. Been having a great time driving and am happy with the performance. Great KOH type rig. I am starting to get some great courses going at Soldiers Dam. The pics are just a final action set from out on the reservoir at Soldiers Dam. on the Wraith, really great rig. Fun and capable with great scale looks. Now I am going to start on my Wraith kit that I have stashed8 |
|
| |
|
11-22-2011, 09:19 AM
| #73 |
| Quarry Creeper Join Date: Mar 2006 Location: ft. collins
Posts: 419
|
Action shots (shameless pic whoring)
|
|
| |
|
11-22-2011, 09:31 AM
| #74 |
| Newbie Join Date: Nov 2011 Location: Pelham
Posts: 26
|
This thing is awesome!!! I love the route you have taken. I wish I had skills to do what you have done.
|
|
| |
|
01-22-2012, 11:56 PM
| #75 |
| Quarry Creeper Join Date: Apr 2009 Location: Wyoming
Posts: 226
|
Very nice
|
|
| |
|
01-23-2012, 07:49 AM
| #76 |
| RCC Addict 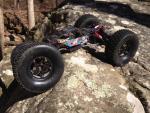 Join Date: Nov 2009 Location: cleveland,Tn
Posts: 1,331
|
i was wondering what exact settings you are set at on your esc? i also am running the novak 17.5t with the mamba max pro and i dont have near the wheel speed that you have in this video. i also am running stock gearing. wraith crawl test - YouTube The video is a test of new settings on the Mamba PRo ESC. My rig is set up primarily for rock racing speed, but I am trying a setup geared for crawling. Still running stock gearing and a 17.5 brushless on 2c. I just toned down the throttle and increased the dragbreak. Overall I am happy with the crawling, and still have decent wheelspeed. I am thinking that I will kepp this rig tuned for rock racing and then will build another Wraith purpose built for Crawling |
|
| |
|
01-23-2012, 01:05 PM
| #77 | |
| Rock Crawler Join Date: Jul 2009 Location: greeley
Posts: 545
| Quote:
I read your desire to get a second Wraith to make one racer speed and one trail rig speed. You oughta go watch Badgers EXO he made a video wich should replace the videos on the Axial site. Well its an awesome vid. | |
|
| |
|
01-23-2012, 04:27 PM
| #78 |
| Pebble Pounder Join Date: Nov 2010 Location: Throttleville
Posts: 195
|
I really like this build. I love how it evolved. Very nice!!
|
|
| |
|
01-27-2012, 02:57 PM
| #79 |
| Quarry Creeper Join Date: Mar 2006 Location: ft. collins
Posts: 419
|
Thanks for the comments. Wanted to post a quick video of some rock race terrain up at Horsetooth. |
|
| |
|
01-27-2012, 03:34 PM
| #80 |
| Quarry Creeper Join Date: Jan 2011 Location: Kingston NH
Posts: 313
|
you did an awsome job on that build lots of good info just got mine to roller statice so im along way from running it beside all the snow outside . hey if you don mind me asking how you made the sides i really like those look like they grew there thanks
|
|
| |
|
| |


 Linear Mode


