| |
 01-31-2013, 11:18 AM
| #1 |
| Quarry Creeper Join Date: Jun 2012 Location: Port Coquitlam, BC
Posts: 222
|
Hey Guys, So I finally got some pics of my build. Just half way through for now. Waiting on my electronics to arrive later on today so it'll be a busy weekend to get everything together. Hopups on this so far are; Delrin plate Upper/lower link mount Skid plates 103mm XD Piggybacks After doing some reading on wheelbase and looking at a few pictures, I fell in love with the R1 done up by tomtom71. The look of the wraith ladder bars just gives it a nice aggressive look. Not only that, but extends the wheelbase nicely while still maintaining the stock upper links. Defiantly had to utilize the upper mount to adjust the mount point to get the axles angled right. Laying the shocks down a bit and removing the stock XD bumps stops also gives it a good amount of flex. I'll be getting another set of XDs to finish off the rear. However I wanted do some mock ups before settleing on the final length. The rear sits pretty high right now so either another set of 103s or down to a 93s... Arriving later today will be; RS Pro ROC 412 2300kv Castle BEC Hitec HS-7954SH Futaba 4pl 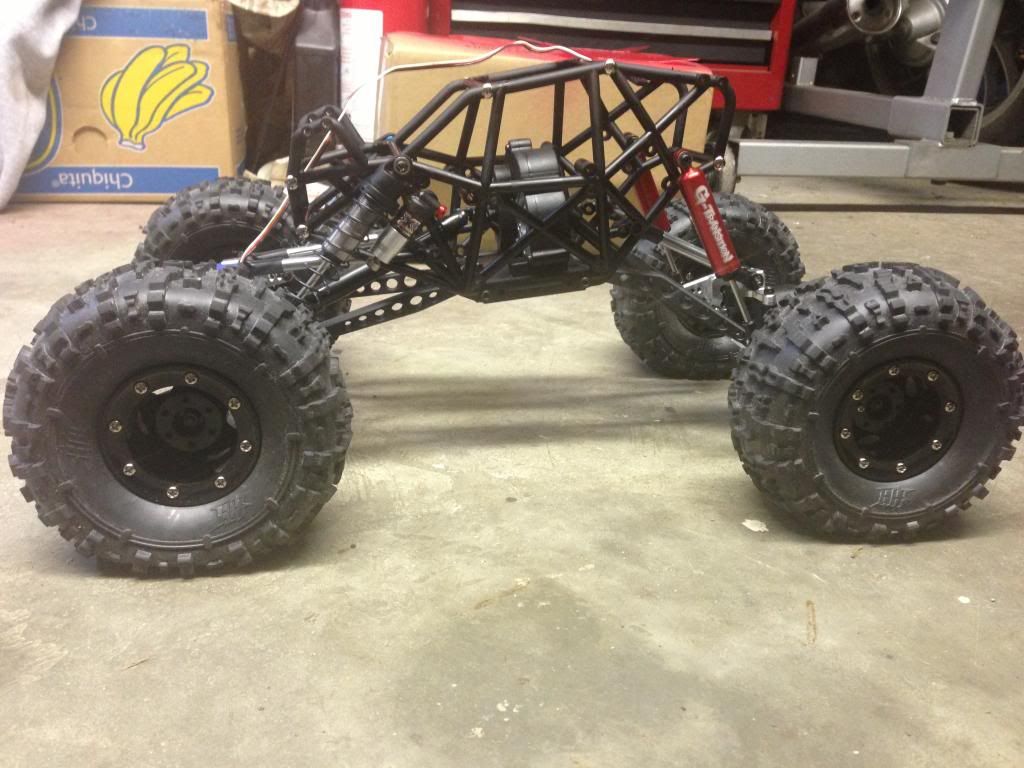 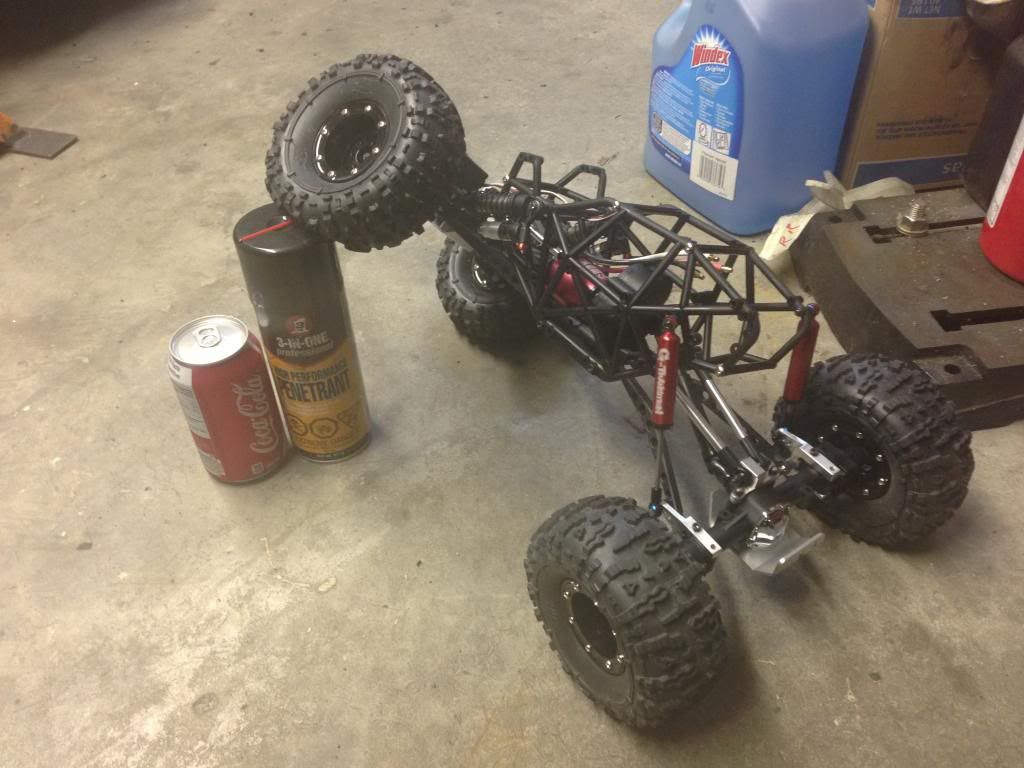 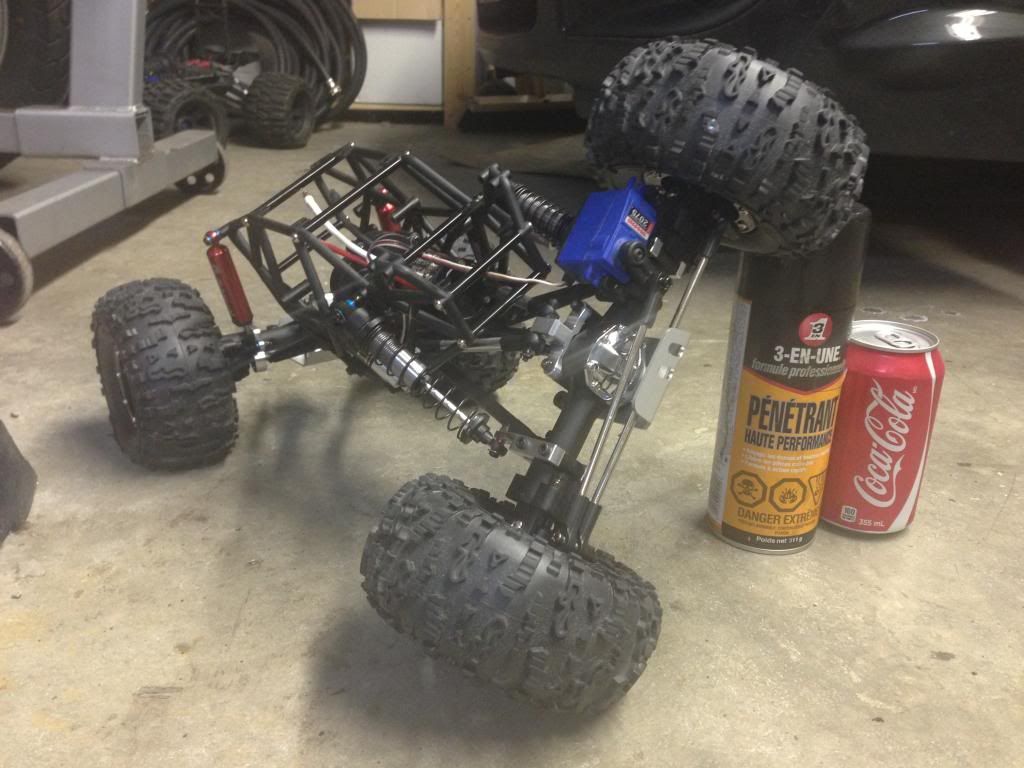 Should be a good weekend coming up!  Last edited by cytogen; 02-08-2013 at 10:31 AM. Reason: fixed picture size |

|  |
| Sponsored Links | |
| | |
|
02-01-2013, 09:09 PM
| #2 |
| Quarry Creeper Join Date: Jun 2012 Location: Port Coquitlam, BC
Posts: 222
|
Update, Got the tekin ROC 412 motor installed. Fits, but it's a very tight. Having the delrin skid plate helps by shifting the trans towards the rear. I had to open up the mounting slot on the aft mounting area on the top side in order to use a straight through screw. This allow the trans to move back an further 1mm. Unfortunately I could only get 3 screws to mount the trans.     Last edited by cytogen; 04-12-2013 at 10:14 AM. Reason: fixed picture size |
|
| |
|
02-01-2013, 09:56 PM
| #3 |
| RCC Addict Join Date: Jun 2007 Location: Indian Village Pontiac
Posts: 1,910
|
Wow, interesting build!! I do feel compelled to tell you(from experience), as good as the plastic wraith links looks with that motor those plastic lower links will become very phlacid. I mean so sloppy flexible your wheel base will change drastically. I would strongly suggest the Aluminum version of those which would also require the rodend kits. |
|
| |
|
02-01-2013, 10:46 PM
| #4 |
| Quarry Creeper Join Date: Jun 2012 Location: Port Coquitlam, BC
Posts: 222
|
I was thinking the same thing. My intentions were to just try it out with the plastic and upgrade to the aluminum bars once I finalized everything. I didn't want to invest too much into without being sure. I'll be looking at the metal rods ends/heim joints for added durability once I do go there. Just got my second set of XDs so they'll be going onto the rear. This will lower the rear end down and help straighten up my driveshaft angles. |
|
| |
|
02-02-2013, 05:56 AM
| #5 |
| Newbie Join Date: Apr 2012 Location: israel
Posts: 23
|
Looks good man, howyou not replacing Driisft? These plastic Driisftim just weak ... They break down in their Cross connection just pops out. |
|
| |
|
02-03-2013, 12:24 AM
| #6 |
| Quarry Creeper Join Date: Jun 2012 Location: Port Coquitlam, BC
Posts: 222
|
The drive shaft were popping off due to the sharp angle in the rear. Since then, I have lowered it and the angle is less severe and the u joint has not popped off yet. But I'm sure over time as it wears in, it'll start popping off. I'll be looking at the carbon steels one, but will probably hold off until next month.
|
|
| |
|
02-03-2013, 01:40 AM
| #7 |
| Quarry Creeper Join Date: Jun 2012 Location: Port Coquitlam, BC
Posts: 222
|
Here is a quick vid of it's first outing... I'll have to admit, i'm very impressed with the low speed resolution with the brushless Tekin setup. Highly recommended! Video! First run with the Gmade R1 with Tekin RS PRO and ROC 412 - YouTube |
|
| |
|
02-04-2013, 02:47 AM
| #8 |
| Quarry Creeper Join Date: Jun 2012 Location: Port Coquitlam, BC
Posts: 222
|
Got a little more progress done today. Installing a BEC to get full potential out of the servo... adding some extra shrink wrap and some silicone to seal up the bec  mounted the bec underside of the radio tray with som 2 sided tape  shorten the BEC output wire  got some servo connectors  hacked up a servo Y cable to only have + and -  Added the signal wire  wired it all up  Works like a charm. Now I'm getting the full 7.4 volts to the servo. I decided to use a Y cable so I can use it for rear steer down the road. I didn't want to hack up the bec output wire or the servo. I wanted to make sure I was able to connect them them later to do any programming if needed. Last edited by cytogen; 04-12-2013 at 10:17 AM. |
|
| |
|
04-12-2013, 10:06 AM
| #9 |
| Quarry Creeper Join Date: Jun 2012 Location: Port Coquitlam, BC
Posts: 222
|
So it's been awhile since my last update; Been running the "356" as is for the last little while, but I've been meaning to shift more weight to the front for better stability during climbs. One of the things I did was getting an axle mounted battery tray. so there no unnecessary weight out back. I've been seeing a lot of people mounting their esc in the hood area of the chassis. I decided to do the same, but used the stock battery tray to do it. It's a perfect fit, but it had to be trimmed to fit around the ROC motor. It's only mounted in the stock radio tray location, but the front part of the tray is squeezed in there so it doens't even move. Now all my electronics are up front, including the bec. With the tray in place, I can still access the esc for adjustments. Next I'll trim the body panel so I can just flip it open like a hood. Wiring is still a bit of a mess, but as I reach completion of the project, I'll sart trimming wires to length. Trial fitment    This is the tray after trimming the excess of to clear the motor. You'll note that the mounting tabs of the tray match up perfectly with the holes in the chassis for securing the tray in the front.  Trial fitted my electroncis    Mounted all my electronics (note that I trimmed the tray further)   All done, unfortunately a slightly blurry pic.  Last edited by cytogen; 12-18-2013 at 09:47 AM. |
|
| |
|
04-12-2013, 01:26 PM
| #10 |
| Rock Stacker Join Date: Jun 2012 Location: France
Posts: 58
|
Clever hack of the battery tray!
|
|
| |
|
06-10-2013, 02:04 AM
| #11 |
| Quarry Creeper Join Date: Jun 2012 Location: Port Coquitlam, BC
Posts: 222
|
I'll have to admit, I'e been very impressed with the performance of the r1. As time goes by, i'm been longing for some DIG action to see if ti wold help improve some of it crawlabiliy. I decided to get the Gmade DIG kit for the R1. Few days later, it arrives and I set forth to install it. As I progress with the install, I start to see a lot of faults with it. It fits very well, both to the transmission housing and chassis. However, after the installation, the actuation of the system was sloppy. The free wheel gear setting was too close to the locked and 4wd settings so the gears would always "click". The rear out drive is only supported my a single bearing so there was a slot of slope to it, which probably contributed to the "clicking". In addition to this, the locking gear will only engage every 180* degrees. I found this to be a problem as it made my servo warm, trying to engage the locking gear. In the end, I threw in the towel and tore it out. I could just not get it to work reliably or predictably. Onward to my Wraith trans install with DIG option. I'll let the pictures do the talking; Took out the skid plate to measure how I was going to mount the Axial trans. I used an SCX10 skid plate to drill up a jig  I then took the jig over to the skid plate and drilled the holes accordingly;  Final product;   I built up the Axial trans as per the instructions and mounted up the motor, servo, linkages;   Now I mounted it al into the chassis;    As you can see, it fits like a charm. I would have liked to move it a bit forward, but the spur assembly gets pretty close to my radio plate. There is an issue where my rear right lower link interferes with my motor end bell, but it's very slight. Another reason I wish I could of moved it forward. So there ya go, a wraith trans does fit in the R1 chassis. Be mindful that if running the stock radio tray in the stock location, the spur gear will interfere. So you go this route, it'll have to be moved else where. I took the opportunity to upgrade my spur gear to 32P. Got me a Spur ger off a traxxas Jato (TRA3956). It's a 54T spur, but it's a bit small. I'm going to try and get a bigger one, either the 56, or 58. Whatever is the biggest and won't interfere with the Junfac axles.  Last edited by cytogen; 06-10-2013 at 02:11 AM. |
|
| |
 |
 My R1 "356" build - Similar Threads
 | ||||
| Thread | Thread Starter | Forum | Replies | Last Post |
| Jkabee's "total noob" TJ build "this should be fun!" | jkabee | Axial SCX-10 | 128 | 03-24-2013 12:10 PM |
| My "Frogger" build "Litoria xanthomera" | DRV KRAWLER | Axial AX-10 Scorpion | 61 | 10-04-2011 09:09 PM |
| Chaotic Crawlers "DEMON" build! aka "Kreacher" | Mac10 | EnRoute Berg | 96 | 09-26-2010 01:49 PM |
| |


 Linear Mode


