| |
 06-07-2006, 06:27 PM
| #1 |
| Newbie Join Date: Jun 2006 Location: tulsa
Posts: 17
|
i have been messin with my 1/6th nylint since xmas, now its time to tear it apart and make it into something practical. i tore the axles, coilovers, battery and electrical. i built a custom buggy chassis for it (not perfect, but not bad) here is where i stand now 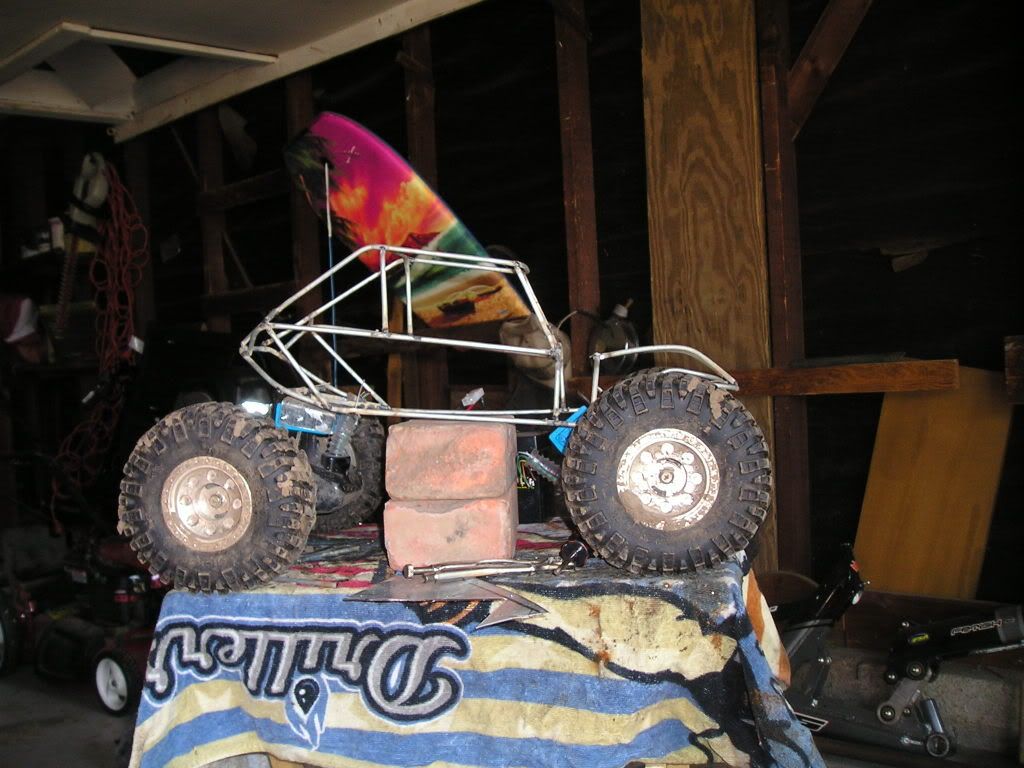 have rear axle mounted using a custom bracket around the nylint center pivot mount. i would like to link it, but have no idea where to get links or how to mount to the axle. IDEAS? anyway you can see the front sits lower due to it not being done, the front end of the buggy is not complete, waiting to see if the front axle will tuck up there fine. also it will be a few inches further forward. once done i plan to mount the electronics on the belly of a thick skid inside the jeep, and same for the battery, prolly a smaller battery. skin the buggy Last edited by nylintbuggy; 06-07-2006 at 06:29 PM. |

|  |
| Sponsored Links | |
| | |
|
06-07-2006, 06:41 PM
| #2 |
| Quarry Creeper Join Date: Jan 2006 Location: Reno
Posts: 448
|
need more pics! |
|
| |
|
06-07-2006, 06:44 PM
| #3 |
| Newbie Join Date: Jun 2006 Location: tulsa
Posts: 17
|
thanks man, my friend found these for me http://www2.towerhobbies.com/cgi-bin...&I=LXDDY3&P=ML might be too long, im thinkin best thing to do is making a truss, but not sure where i would mount it, yall ever us JB weld? would it hold on that plastic? |
|
| |
|
06-07-2006, 06:46 PM
| #4 |
| owner, Holmes Hobbies LLC   Join Date: Nov 2004 Location: Volt up! Gear down!
Posts: 20,290
|
Just buy four packs of http://www2.towerhobbies.com/cgi-bin...?&I=LXHFV7&P=M for your links. Nice and easy.
|
|
| |
|
06-07-2006, 06:49 PM
| #5 |
| RCC Addict Join Date: Oct 2005 Location: $t. Helen$, OR
Posts: 1,082
|
Homemade link, and the top link is from a old car, cut to fit Very strong, solid 1/8 (Only thing different about the pix is I am running a JR650 servo now) Over-the-Knuckle steering    |
|
| |
|
06-07-2006, 06:50 PM
| #6 |
| RCC Addict Join Date: Oct 2005 Location: $t. Helen$, OR
Posts: 1,082
|
Looks like a good start, cant wait to see it finished |
|
| |
|
06-07-2006, 09:30 PM
| #7 |
| Rock Crawler Join Date: Feb 2005 Location: Hardin, KY
Posts: 976
|
dont link it....it offers no advantage over what you already have....but you lose ground clearance....
|
|
| |
|
06-07-2006, 09:32 PM
| #8 |
| Rock Crawler Join Date: Feb 2005 Location: Hardin, KY
Posts: 976
|
another thing, dont use the stock battery, either get a F&F battery or get/build a 10 cell pack
|
|
| |
|
06-07-2006, 10:58 PM
| #9 |
| Quarry Creeper Join Date: Jan 2006 Location: knoxville
Posts: 255
|
yes the 4-link will help if u remove the pin that it rocks back n forth on and hook the links to the axle so that it actually distributes the weight to both the wheels and a little more to the tire thats higher in the air insted of the weight starting in the middle where the pin is which gives more weight to the lower setting tire when its articulated
|
|
| |
|
06-08-2006, 05:21 AM
| #10 | |
| Newbie Join Date: Jun 2006 Location: tulsa
Posts: 17
| Quote:
| |
|
| |
|
06-08-2006, 05:56 AM
| #11 | |
| RCC Addict Join Date: Dec 2005 Location: Beaver Falls
Posts: 1,166
| Quote:
| |
|
| |
|
06-08-2006, 12:13 PM
| #12 |
| Newbie Join Date: Jun 2006 Location: tulsa
Posts: 17
|
yeah i am aware of sliding on the lower links, and im not worried about that. i am curious about shaving the axle and what all that takes, i assume there are some writeups about it here somewhere?
|
|
| |
|
06-08-2006, 04:09 PM
| #13 |
| RCC Addict Join Date: Dec 2005 Location: Beaver Falls
Posts: 1,166
| It's nice having a spare! that should help. Basically you are removing the motor and moving it to the back. You have to cut a good sized hole for the belt to go through too. Cut as much as you can off the front and then seal it up with plastic or metal (keep in mind about opening the axle in the future when you seal up the front hole. You will be better off using two pieces on the hole so you can open it later). |
|
| |
|
06-08-2006, 11:22 PM
| #14 |
| Quarry Creeper Join Date: Jan 2006 Location: knoxville
Posts: 255
|
no dont use 2, use 1 peice and dont put a lip over the bottom of the case and just bolt it on the sides and top of the case and use lock nuts that will be jb welded inside the case where the bolts will go to hold them in.....i can take mine apart in bout 1 min. and yes i know bcuz after 10 dam minutes of playin wit it i found another problem wit the rear axle, so i popped it apart and the plastic drive piece that puts power from the transfer case to the axle that has that + sign/hole in it where the axle slips in, yeah that thing had about 2 more minutes of play time left and it would have been through...... i like to fix problems b4 they get to bad if possible, but it was too late, so now ill steal another part from the back up nylint and throw some more jbweld in there ps. does ne1 know where i can get this part in sum kind of metal |
|
| |
|
06-09-2006, 06:40 AM
| #15 |
| Rock Crawler  Join Date: May 2006 Location: Burrillville, RI
Posts: 778
|
I did a 2 piece with an overlap.....  |
|
| |
|
06-09-2006, 01:44 PM
| #16 | |
| RCC Addict Join Date: Dec 2005 Location: Beaver Falls
Posts: 1,166
| Quote:
| |
|
| |
|
06-10-2006, 10:41 AM
| #17 |
| Newbie Join Date: Jun 2006 Location: tulsa
Posts: 17
|
that looks easy enough, i will plan on doing that. i have not done anything else to it, due to the 100 degree weather, making it way hotter than that in the garage.
|
|
| |
|
06-10-2006, 01:37 PM
| #18 |
| RCC Addict Join Date: Oct 2005 Location: $t. Helen$, OR
Posts: 1,082
|
I dont see why u didnt take more off the axle |
|
| |
|
06-10-2006, 01:44 PM
| #19 |
| Rock Crawler Join Date: May 2006 Location: Burrillville, RI
Posts: 778
|
I wanted to keep those front 2 screws....
|
|
| |
|
06-10-2006, 02:27 PM
| #20 | |
| RCC Addict Join Date: Oct 2005 Location: $t. Helen$, OR
Posts: 1,082
| Quote:
any reason, why not just use more glue and get more clearence? | |
|
| |
 |
| |


 Linear Mode


